【设计模式】Composite
目录
前言
Composite设计模式,将物体组合成一个树结构,让单个对象和组合对象使用起来都一样,组合对象负责将实际的操作分发给每一个组件。
这篇博文分析了安卓的View相关的类,它们可以说是用了Composite设计模式。其中分析View的measure,layout,draw是如何从组合对象分发给单个对象。
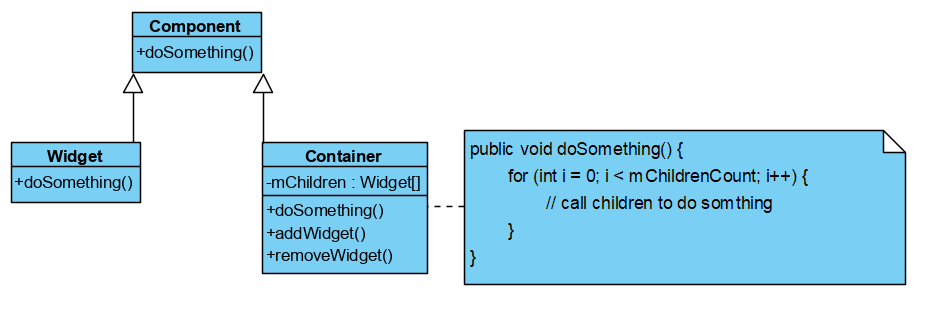
安卓View的实现
Android Framework中View相关的类,就是用Composite设计模式组织起来的。由于这涉及到了很多份源代码,如果一头扎进去看源码,心中想必是一团乱麻(码)。咱们带着问题去看源代码,效率会高一点。下面的问题分成两个类别。关于View流程的问题,每一个几乎都可以写一篇很长的博文,网上的大神们写了许多,这里我就简单的概括它的核心要义,截取看到的源代码。为了对Composite设计模式有一个更好的认识,这里还是要去认识一下View这个类。
关于View的流程的:
- Android中,View扮演着什么样的角色?
- 日常开发中常常见到的setContentView做了什么事情?如何将xml文件变成对象的?
- View的绘制流程?
关于设计模式的:
- View是怎么样使用了Composite设计模式的?它定义了哪些接口?
- 哪些View的子类具有容器性质的?它如何实现的add, remove, getChildren?
- 哪些View的子类是基本的组件?它如何实现View定义的方法?
View
废话不多说,先来一段官方文档。
This class represents the basic building block for user interface components. A View occupies a rectangular area on the screen and is responsible for drawing and event handling. View is the base class for widgets, which are used to create interactive UI components (buttons, text fields, etc.). The ViewGroup subclass is the base class for layouts, which are invisible containers that hold other Views (or other ViewGroups) and define their layout properties.
View是构建UI组件的基本单元,是一个负责绘制(drawing)和事件处理(event handling)的方形区域。View是一些widgets的基类,widgets代表着Composite设计模式中的基本组件。View是ViewGroup的基类,ViewGroup是一个不可见的布局容器,在Composite设计模式中代表着容器。
Beyond setContentView
setContentView做了什么事情?
这里主要参考[1]。
先来看看[1]绘制的层次结构。这里的层级关系是,外面的框框包含里面的框框的引用。比如Activity里面有一个Window对象,PhoneWindow里面有一个DecorView对象。
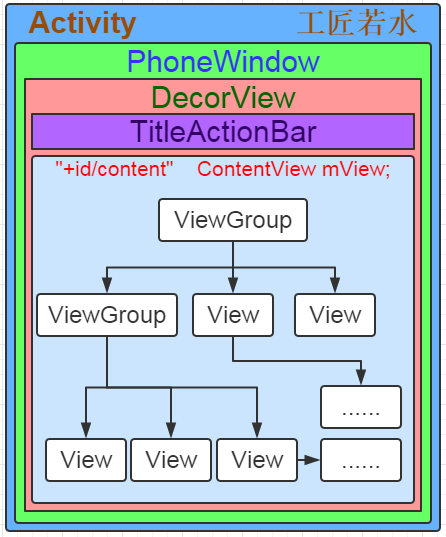
这里给出一个类图,关注其中的数据结构和依赖关系。
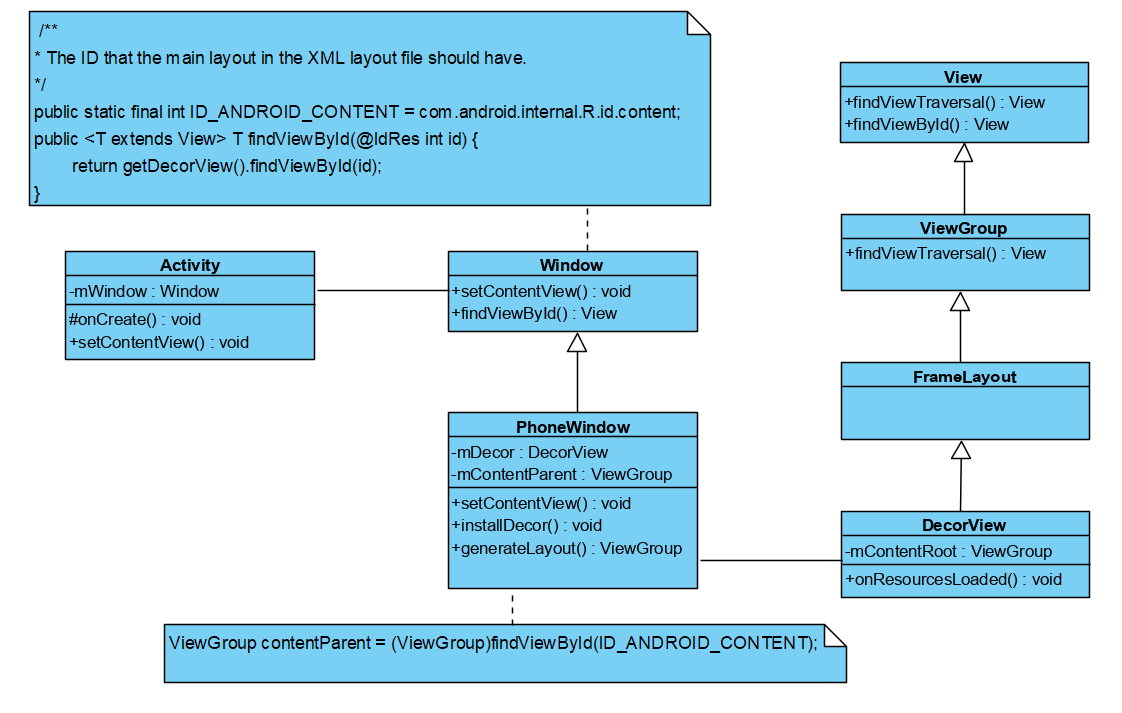
大致流程
这里大概讲一讲流程,具体的细节要进入到下面的源代码去看。
结合类图来看这个分析。首先在Activity中调用setContentView之后,Activity里调用Window的setContentView。实际的工作在PhoneWindow中进行。第一次调用,主要做三件事情。一,初始化mDecor和mContentParent。这个通过调用installDecor来完成。二,通过LayoutInflater将setContentView的参数(layoutResID)指向的这个资源,设置到mContentParent里。三,增加回调函数。
@Override
public void setContentView(int layoutResID) {
    // Note: FEATURE_CONTENT_TRANSITIONS may be set in the process of installing the window
    // decor, when theme attributes and the like are crystalized. Do not check the feature
    // before this happens.
    if (mContentParent == null) {
        installDecor();
    } else if (!hasFeature(FEATURE_CONTENT_TRANSITIONS)) {
        mContentParent.removeAllViews();
    }

    if (hasFeature(FEATURE_CONTENT_TRANSITIONS)) {
        final Scene newScene = Scene.getSceneForLayout(mContentParent, layoutResID,
                getContext());
        transitionTo(newScene);
    } else {
        mLayoutInflater.inflate(layoutResID, mContentParent);
    }
    mContentParent.requestApplyInsets();
    final Callback cb = getCallback();
    if (cb != null && !isDestroyed()) {
        cb.onContentChanged();
    }
    mContentParentExplicitlySet = true;
}
installDecor函数
这里进一步分析一,installDecor函数。installDecor做两件事情:1,初始化mDecor;2,初始化mContentParent。
private void installDecor() {
    mForceDecorInstall = false;
    if (mDecor == null) {
        mDecor = generateDecor(-1);
        mDecor.setDescendantFocusability(ViewGroup.FOCUS_AFTER_DESCENDANTS);
        mDecor.setIsRootNamespace(true);
        if (!mInvalidatePanelMenuPosted && mInvalidatePanelMenuFeatures != 0) {
            mDecor.postOnAnimation(mInvalidatePanelMenuRunnable);
        }
    } else {
        mDecor.setWindow(this);
    }
    if (mContentParent == null) {
        mContentParent = generateLayout(mDecor);
        ...
    }
}
使用generateDecor函数初始化mDecor
generateDecor函数相当于一个工厂方法。获取Context之后,调用DecorView的构造器
protected DecorView generateDecor(int featureId) {
    // System process doesn't have application context and in that case we need to directly use
    // the context we have. Otherwise we want the application context, so we don't cling to the
    // activity.
    Context context;
    if (mUseDecorContext) {
        Context applicationContext = getContext().getApplicationContext();
        if (applicationContext == null) {
            context = getContext();
        } else {
            context = new DecorContext(applicationContext, getContext());
            if (mTheme != -1) {
                context.setTheme(mTheme);
            }
        }
    } else {
        context = getContext();
    }
    return new DecorView(context, featureId, this, getAttributes());
}
使用generateLayout函数初始化mContentParent
初始化各种参数,最后根据调用Window的getLocalFeatures方法获取features。根据features去找到一个R.layout,这个layout就是mDecor的布局了。调用DecorView的onResourcesLoaded函数来设置mDecor的mContentRoot。设置好了mDecor之后,调用Window的findViewById,初始化contentParent。
protected ViewGroup generateLayout(DecorView decor) {
    ...

    int layoutResource;
    int features = getLocalFeatures();
    // System.out.println("Features: 0x" + Integer.toHexString(features));
    if ((features & (1 << FEATURE_SWIPE_TO_DISMISS)) != 0) {
        layoutResource = R.layout.screen_swipe_dismiss;
        setCloseOnSwipeEnabled(true);
    }
    else if...

    ...
    mDecor.startChanging();
    mDecor.onResourcesLoaded(mLayoutInflater, layoutResource);

    ViewGroup contentParent = (ViewGroup)findViewById(ID_ANDROID_CONTENT);
    ...
    mDecor.finishChanging();

    return contentParent;
}
DecorView.java
void onResourcesLoaded(LayoutInflater inflater, int layoutResource) {
    if (mBackdropFrameRenderer != null) {
        loadBackgroundDrawablesIfNeeded();
        mBackdropFrameRenderer.onResourcesLoaded(
                this, mResizingBackgroundDrawable, mCaptionBackgroundDrawable,
                mUserCaptionBackgroundDrawable, getCurrentColor(mStatusColorViewState),
                getCurrentColor(mNavigationColorViewState));
    }

    mDecorCaptionView = createDecorCaptionView(inflater);
    final View root = inflater.inflate(layoutResource, null);
    if (mDecorCaptionView != null) {
        if (mDecorCaptionView.getParent() == null) {
            addView(mDecorCaptionView,
                    new ViewGroup.LayoutParams(MATCH_PARENT, MATCH_PARENT));
        }
        mDecorCaptionView.addView(root,
                new ViewGroup.MarginLayoutParams(MATCH_PARENT, MATCH_PARENT));
    } else {

        // Put it below the color views.
        addView(root, 0, new ViewGroup.LayoutParams(MATCH_PARENT, MATCH_PARENT));
    }
    mContentRoot = (ViewGroup) root;
    initializeElevation();
}
层级结构如何?
[1]中给出了一个图。想要自己看看这个图的方法,单步调试进入了Window.java之后,监视getWindow().getDecorView(),可以看到它的结构。
DecorView内有个ViewGroup成员mContentRoot。DecorView使用了装饰者模式,这里暂且不讲。把握好ViewGroup的结构,mContentRoot就是下面的这个结构,首先它本身是一个LinearLayout,然后它有mChildren数组,其中的一个成员是我们setContentView输入的layout文件加载的地方。需要注意的是ID_ANDROID_CONTENT指向的,mContentRoot的一个children,它是FrameLayout布局,是PhoneWindow的mContentParent。
android.widget.LinearLayout{375bc8 V.E...... ......I. 0,0-0,0}
|----- android.view.ViewStub{55a31c3 G.E...... ......I. 0,0-0,0 #1020192 android:id/action_mode_bar_stub}
|----- android.widget.FrameLayout{262ca40 V.E...... ......I. 0,0-0,0 #1020002 android:id/content}
|------|----- android.support.constraint.ConstraintLayout{46206e9 V.E...... ......I. 0,0-0,0}
如何将xml文件变成对象的?
前面很多地方都看到了LayoutInflater,使用这个类,可以将布局资源文件转为对象,这些对象像一棵树一样被组织起来。这里就不讲具体的代码分析了(看[1]有详细的分析),我们讲讲前面调用到这个类的inflate方法时候的意义。下面截取两行,我们需要搞清楚两个问题:
- inflate方法的第二个参数的意义
- infalte返回值的意义
PhoneWindow.java
mLayoutInflater.inflate(layoutResID, mContentParent);

DecorView.java
final View root = inflater.inflate(layoutResource, null);
下面的内容节选自LayoutInflater.java。分析:这个方法是上面两个调用指向的,意义很明显,如果第一个参数为ViewGroup,那么我们将parse出来的View加入到ViewGroup的孩子中。如果第二个参数为null,那么我们直接返回parse出来的东西。下面有一句注释值得注意:Temp is the root view that was found in the xml。
结合之前的代码,我们可以知道mDecor的mContentRoot,是根据Window的features找到的xml的root view。PhoneWindow的mContentParent,是根据Window的ID_ANDROID_CONTENT找到的View,指向的是mContentRoot的下的main layout。mContentParent是一个FrameLayout,然后将我们开发中的布局文件(如activity_main.xml)加入到这个Framelayout的下面。
public View inflate(XmlPullParser parser, @Nullable ViewGroup root, boolean attachToRoot) {
    synchronized (mConstructorArgs) {
        ...
        try {
            ...
            if (TAG_MERGE.equals(name)) {
                ...
            } else {
                // Temp is the root view that was found in the xml
                final View temp = createViewFromTag(root, name, inflaterContext, attrs);

                ViewGroup.LayoutParams params = null;
                ...
                // We are supposed to attach all the views we found (int temp)
                // to root. Do that now.
                if (root != null && attachToRoot) {
                    root.addView(temp, params);
                }

                // Decide whether to return the root that was passed in or the
                // top view found in xml.
                if (root == null || !attachToRoot) {
                    result = temp;
                }
            }

        }
        ...
        return result;
    }
}
小结
跳转来跳转去的,细节很多。这些细节终将被遗忘,我们能从这里获取到什么知识呢?或者能获取到对开发有帮助的哪些结论呢?
清楚了它的层次结构,知道我们的布局文件最终是在什么地方。大致了解这个流程。
[1]中提到的一些对开发有帮助的结论,具体看[1]。
- 减少布局的嵌套
- 使用ViewStub,预加载。[2]举了一个例子。ViewStub设置好要inflate的xml文件之后,调用inflate或者setVisibity来进行加载。
- 使用merge属性,减少嵌套。
View的绘制流程
先来一段官方文档[4]。
When an Activity receives focus, it will be requested to draw its layout. The Android framework will handle the procedure for drawing, but the Activity must provide the root node of its layout hierarchy.
Drawing begins with the root node of the layout. It is requested to measure and draw the layout tree. Drawing is handled by walking the tree and rendering each View that intersects the invalid region. In turn, each ViewGroup is responsible for requesting each of its children to be drawn (with the draw() method) and each View is responsible for drawing itself. Because the tree is traversed pre-order, this means that parents will be drawn before (i.e., behind) their children, with siblings drawn in the order they appear in the tree.
Drawing the layout is a two pass process: a measure pass and a layout pass.
The measuring pass is implemented in measure(int, int) and is a top-down traversal of the View tree. Each View pushes dimension specifications down the tree during the recursion. At the end of the measure pass, every View has stored its measurements. The second pass happens in layout(int, int, int, int) and is also top-down. During this pass each parent is responsible for positioning all of its children using the sizes computed in the measure pass.
当获取到focus的时候,请求绘制layout。先序遍历这个layout的树结构,调用measure和layout两个过程。在这两个过程之后是draw。(文档的一部分,intersects the invalid,和无效区域判交,有点奇怪?)draw的过程是,每个ViewGroup调用它的孩子的draw方法,每个View本身负责draw。
三个流程
后面主要参考[3]。
[3]中,总结了每个View都要经过的三个主要的阶段:measure, layout, draw。
三个过程的作用:
measure: Measure the view and its content to determine the measured width and the measured height.测量整个View及其内容的宽度和高度。
layout: Assign a size and position to a view and all of its descendants. In this phase, each parent calls layout on all of its children to position them.给View分配大小和位置,如果是一个Parent,那么还要给它的Children放置位置。
draw: Manually render this view (and all of its children) to the given Canvas.渲染View及其children的内容。
三个过程如何触发
[3]中,分析了在setContentView,调用到了这些过程。
这里有一个疑惑,如果是这之后已经调用了measure,那么为什么在setContentView这个函数之后,获取width和height,得到0呢?
后来在[3]下面的评论里,找到了[5],指出了[3]中微小的错误,专门分析了何时绘制View。。
[5]对为什么onCreate没有触发这三个流程,再补充一篇[6]。
[6]给出了结论:
- setContentView() 只是把 View 添加到 DecorView 上
- onResume() 中 ViewRootImpl 和 DecorView 做了关联
- requestLayout() 和 invalidate() 会触发 ViewRootImpl 绘制 View
Measure
具体请参见[3]。
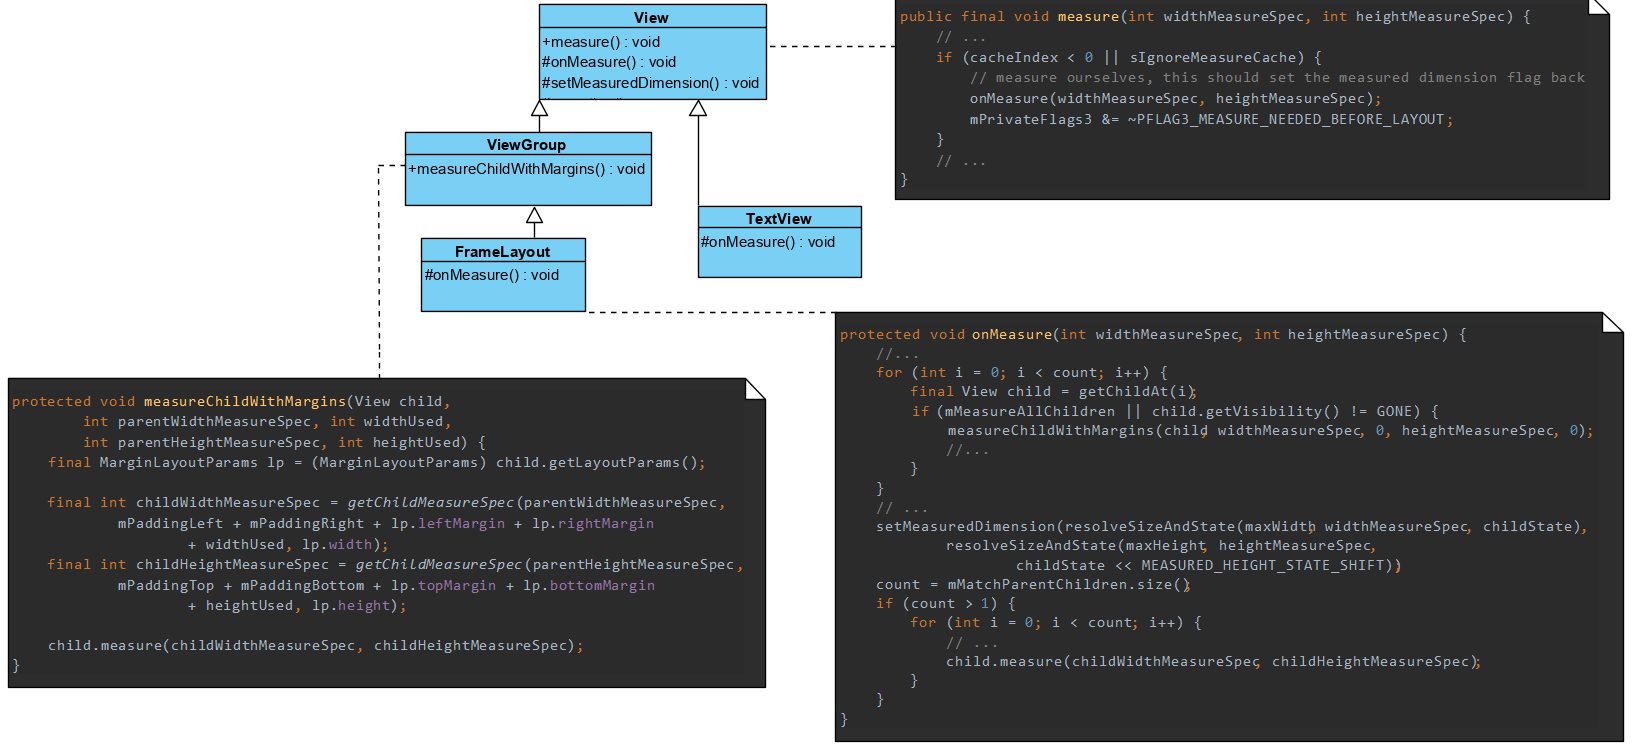
View中的measure方法是final的,子类不能覆盖,这个方法里面有一段调用了onMeasure方法,子类通过覆盖onMeasure来实现自己的测量逻辑。
比如TextView自己实现的逻辑(这里就不给了),比如FrameLayout自己实现的onMeasure。
FrameLayout是一个ViewGroup,它的onMeasure主要的任务是遍历mChildren去measure。如果有match_parent属性的children,重新设定MeasureSpec来measure。
Layout
调用的思路和逻辑基本和measure一样。这里也没什么好说的,直接拿来[3]的结论。
- View.layout方法可被重载,ViewGroup.layout为final的不可重载,ViewGroup.onLayout为abstract的,子类必须重载实现自己的位置逻辑。
- measure操作完成后得到的是对每个View经测量过的measuredWidth和measuredHeight,layout操作完成之后得到的是对每个View进行位置分配后的mLeft、mTop、mRight、mBottom,这些值都是相对于父View来说的。
- 凡是layout_XXX的布局属性基本都针对的是包含子View的ViewGroup的,当对一个没有父容器的View设置相关layout_XXX属性是没有任何意义的
- 使用View的getWidth()和getHeight()方法来获取View测量的宽高,必须保证这两个方法在onLayout流程之后被调用才能返回有效值。
Draw
再次引用[3]的结论:
- 如果该View是一个ViewGroup,则需要递归绘制其所包含的所有子View。
- View默认不会绘制任何内容,真正的绘制都需要自己在子类中实现。
- View的绘制是借助onDraw方法传入的Canvas类来进行的。
- 区分View动画和ViewGroup布局动画,前者指的是View自身的动画,可以通过setAnimation添加,后者是专门针对ViewGroup显示内部子视图时设置的动画,可以在xml布局文件中对ViewGroup设置layoutAnimation属性(譬如对LinearLayout设置子View在显示时出现逐行、随机、下等显示等不同动画效果)。
- 在获取画布剪切区(每个View的draw中传入的Canvas)时会自动处理掉padding,子View获取Canvas不用关注这些逻辑,只用关心如何绘制即可。
- 默认情况下子View的ViewGroup.drawChild绘制顺序和子View被添加的顺序一致,但是你也可以重载ViewGroup.getChildDrawingOrder()方法提供不同顺序。
关于第6点,补充一下,官方文档提到的,draw的顺序是先序遍历。
Composite设计模式
是时候回到我们的设计模式上来了。
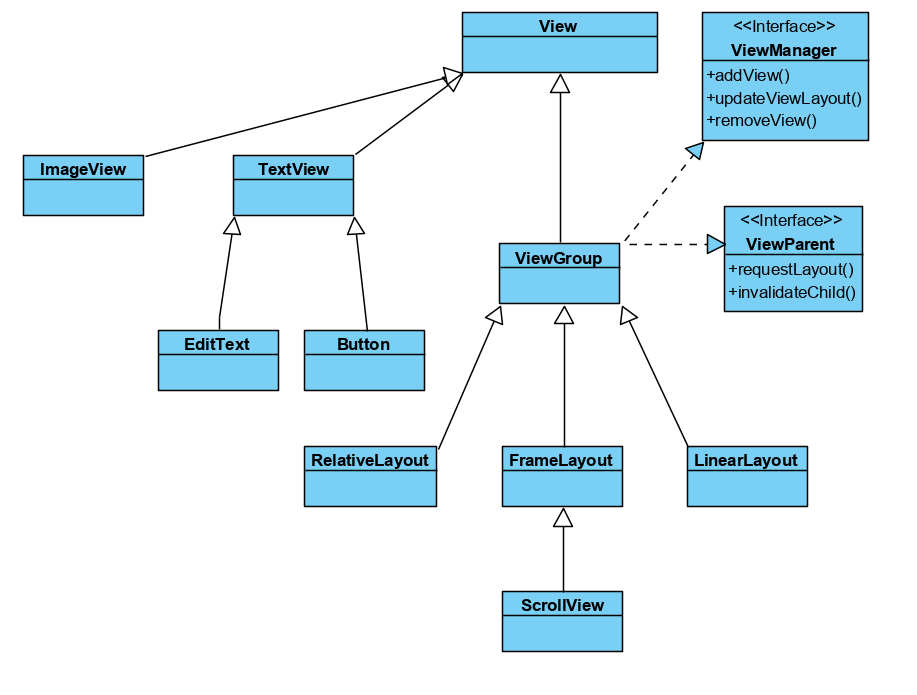
下面分析View的绘制是如何使用Composite设计模式的。首先,对于所有的View子类,它们都有一些公共的方法measure, layout, draw。不管是单个对象还是组合对象,使用这些方法的逻辑是一样的。就好像单个对象和组合对象是一样的。其次,对于组合对象,这里是ViewGroup,定义了接口ViewManager要实现。内部是一些组合对象需要拥有的方法,比如添加View,移除View。然而,既然View定义了measure, layout, draw为final方法,那么单个对象和组合对象不就没有区别了吗?组合对象又要怎么调用孩子去doSomething呢?其实,在View中定义了onMeasure, onLayout, onDraw三个方法,在measure, layout, draw的调用过程中,都会去调用对应的onXXX。这样继承View的单个对象实现自己的逻辑,继承View的组合对象不仅要实现自己的逻辑,还有实现对孩子们的调用。
measure, layout, draw的调用
View内部定义了三个方法,measure, layout, draw。这三个都做到了对扩展开发,对修改封闭。每个View要有自己的measure,layout逻辑,该怎么办呢?
解决办法就是View中的measure和layout去调用一个可以覆盖的方法onMeasure,onLayout。在本质上,onMeasure, onLayout, onDraw这三个方法的作用是扩展View。
ViewGroup中没有具体的onMeasure和onLayout,一个Layout继承ViewGroup,实现自己的onMeasure和onLayout。这样就可以定义出很多不同种类的layout结构,比如RelativeLayout,LinearLayout。相对布局和线性布局,它们都要有自己的layout逻辑,这些都放到onLayout中自己去定义。在定义自己的layout逻辑之外,还要负责调用孩子的measure方法,layout方法。
draw的逻辑有些许不一样。View中定义了draw的逻辑,里面有一些通用的逻辑,下面截取了View中的注释。2~5步,如果需要就跳过。对于第4步,View定义了dispatchDraw的空方法,ViewGroup覆盖它来实现调用孩子的draw方法。
/*
* Draw traversal performs several drawing steps which must be executed
* in the appropriate order:
*
*      1. Draw the background
*      2. If necessary, save the canvas' layers to prepare for fading
*      3. Draw view's content
*      4. Draw children
*      5. If necessary, draw the fading edges and restore layers
*      6. Draw decorations (scrollbars for instance)
*/
总结
Composite设计模式,核心要义在于,不管是单个对象,还是组合对象,使用起来都一样。
这篇博客分析了Android的View类,它的实现就是Composite设计模式。
设计模式,它是前人总结出来的打怪(解决问题)的套路。有些时候一直在使用一些套路,但是没有意识到。于是有人总结出来,下一次遇到同一个问题的时候,相似的情景,用这个套路就可以很好的切入问题。
这篇博客写的又臭又长,难免存在错误,欢迎理性讨论。如果能指正我的错误,那是我最大的荣幸。
参考链接
- https://blog.csdn.net/yanbober/article/details/45970721
- https://droidyue.com/blog/2016/09/11/using-viewstub-in-android-to-improve-layout-performance/
- https://blog.csdn.net/yanbober/article/details/46128379
- https://developer.android.com/guide/topics/ui/how-android-draws
- https://www.jianshu.com/p/c5d200dde486
- https://juejin.im/post/5a61973bf265da3e2d338196
【设计模式】Composite的更多相关文章
- 使用C# (.NET Core) 实现组合设计模式 (Composite Pattern)
本文的概念性内容来自深入浅出设计模式一书. 本文需结合上一篇文章(使用C# (.NET Core) 实现迭代器设计模式)一起看. 上一篇文章我们研究了多个菜单一起使用的问题. 需求变更 就当我们感觉我 ...
- [C++设计模式] composite 组合模式
组合(Composite)模式的其他翻译名称也非常多,比方合成模式.树模式等等.在<设计模式>一书中给出的定义是:将对象以树形结构组织起来,以达成"部分-总体"的层次结 ...
- 设计模式-Composite(结构型模式) 用于 递归构建 树 状 的组合结构,与Decorator的区别是 Composite旨在通过构造子类而添加新操作,而Decorator直接添加新操作。
以下代码来源: 设计模式精解-GoF 23种设计模式解析附C++实现源码 //Component.h #pragma once class Component { public: Component( ...
- 一天一个设计模式——Composite组合模式
一.模式说明 能够使容器与内容物具有一致性,创造出递归结构的模式就是Composite组合模式. 举个例子:计算机中的文件系统中有文件和文件夹的概念,我们知道,文件夹可以包含文件,也可以包含子文件夹, ...
- C++设计模式-Composite组合模式
Composite组合模式作用:将对象组合成树形结构以表示“部分-整体”的层次结构.Composite使得用户对单个对象和组合对象的使用具有一致性. UML图如下: 在Component中声明所有用来 ...
- php组合设计模式(composite pattern)
过十点. <?php /* The composite pattern is about treating the hierarchy of objects as a single object ...
- Java 设计模式实现 不错的引用
这段时间有兴趣重新温习一下设计模式在Java中的实现,碰巧看到一个不错的设计模式总结,这里引用一下作为参考. 创建型模式: JAVA设计模式-Singleton JAVA设计模式-Factory JA ...
- [php]php设计模式 (总结)
转载自[php]php设计模式 (总结) 传统的23种模式(没有区分简单工厂与抽象工厂) http://www.cnblogs.com/bluefrog/archive/2011/01/04/1925 ...
- 探究osg中的程序设计模式【目录】
前序 探究osg中的程序设计模式---开篇 探究osg中的程序设计模式---创造性模式 探究osg中的程序设计模式---创造型模式---Factory(工厂)模式 探究osg中的程序设计模式---创造 ...
- Command模式(命令设计模式)
Command?? 把方法的调用用一个类的实例来承载,要管理工作的历史记录,创建这些方法执行的命令的集合,只需管理这些实例的集合即可,而且还可以随时再次执行过去的命令,或是将多个过去的命令整合为一个新 ...
随机推荐
- 装上这 10 个插件,你就是这条 Gai 最靓的仔!
直奔主题,给大家推荐 10 个好用的插件. 1.「Adblock Plus」 世界排名第一的免费广告拦截程序 相信大家都有这样的体验,进某个论坛.新闻或者购物网站,广告满天飞,关掉之后还时不时弹出 ...
- ucoreOS_lab5 实验报告
所有的实验报告将会在 Github 同步更新,更多内容请移步至Github:https://github.com/AngelKitty/review_the_national_post-graduat ...
- python生产者和消费者模式实现(一)普通方式
import timeimport randomfrom multiprocessing import Queue # 生产者def producer(q, num): for i in range( ...
- [PHP] 存储改造中的逻辑和清理遗留的问题
现象:用户读信时,根据路径的哈希结果,访问四台服务器中一台请求文件,这四台缓存机器已经下线,访问不到再去后端存储访问浪费了时间 前因:每一封信都是一个文件,存储在公司内部的分布式文件系统s3上.因为读 ...
- linux修改权限
修改system目录(包括子目录)的所有者和组 sudo chown -R seven:seven system
- c# 第21节 方法声明和调用
本节内容: 1:为什么要有方法 2:方法的声明及使用 3:方法params 传入接收数组 4:值传递和引用传递 5:输出参数out 1:为什么要有方法 2:方法的声明及使用 声明实例: 3:方法par ...
- python的http包
http包简介 http包提供了 HTTP协议的一些功能,主要模块有: http.client --- 底层的 HTTP 协议的一些功能,可以为 urllib.request 模块所用 http. ...
- Pwn-pwn-100
题目地址http://www.whalectf.xin/files/2779dd8a2562a1d5653c5c6af9791711/binary_100 32位 ,没有防护 上IDA 很简单的栈溢出 ...
- 第十二周Scrum会议
本次照片 总结上周所达成的工作 做到的工作 1. 将前端页面进行了比较美观的美化 2. 实现了后台的代码的整合,同时将flask项目的整体框架搭建完成 3. 进行了数据库的建表等一些工作 遇到的难点 ...
- JAVA字符串截取与求模
public class splitdemo { /** * @param args */ public static void main(String[] args) { // TODO Auto- ...
