使用 Microsoft.Extensions.DependencyInjection 进行依赖注入
没有
的日子,才是好日子~~~~~~~~~~
Using .NET Core 3.0 Dependency Injection and Service Provider with WPF
UPDATE: this article is based on a preview release of .NET Core 3.0. Please refer to Update on using HostBuilder, Dependency Injection and Service Provider with .NET Core 3.0 WPF applications for the latest one.
We all know that .NET Core provides built-in support for Dependency Injection. We typically use it in ASP.NET Core (starting form the ConfigureServices method in the Startup.cs file), but the feature isn’t limited to this framework. So, as .NET Core 3.0 supports also Windows Clients development, we can use it in our WPF and Windows Forms applications.
Let’s see how to do that, for example, in WPF using Visual Studio 2019. Suppose we want to create a service and we also have some application settings; we want to pass both of them to each window of our application via Dependency Injection.
First of all, we must add the required NuGet packages to the project. Right click on the Solution Explorer, select the Manage NuGet Packages command and add the following packages (be sure to select the Include prerelease check):
- Microsoft.Extensions.DependencyInjection
- Microsoft.Extensions.Options.ConfigurationExtensions
- Microsoft.Extensions.Configuration.Json
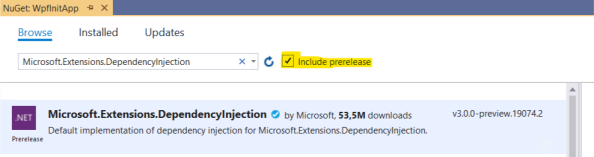
Adding Dependency Injection support to a .NET Core 3.0 WPF application
These packages are necessary to enable Dependency Injection support (the first one) and to store and retrieve application settings in the classic appsettings.json file (the other ones). They will automatically get all the required dependencies.
Then, let’s add a file named appsettings.json to the root folder of the project. Set its Build Action property to Content and Copy to Output Directory to Copy if newer:
|
1
2
3
4
5
6
7
|
{ "AppSettings": { "StringSetting": "Value", "IntegerSetting": 42, "BooleanSetting": true }} |
All the prerequisites are met, so we can start writing our code. Let’s open the App.xaml file and remove the StartupUri property of the Application class. Then, we need to override the OnStartup method in App.xaml.cs:
|
1
2
3
4
5
6
7
8
9
10
11
12
13
14
15
16
17
18
19
20
21
22
23
24
25
26
27
28
29
30
|
public partial class App : Application{ public IServiceProvider ServiceProvider { get; private set; } public IConfiguration Configuration { get; private set; } protected override void OnStartup(StartupEventArgs e) { var builder = new ConfigurationBuilder() .SetBasePath(Directory.GetCurrentDirectory()) .AddJsonFile("appsettings.json", optional: false, reloadOnChange: true); Configuration = builder.Build(); var serviceCollection = new ServiceCollection(); ConfigureServices(serviceCollection); ServiceProvider = serviceCollection.BuildServiceProvider(); var mainWindow = ServiceProvider.GetRequiredService<MainWindow>(); mainWindow.Show(); } private void ConfigureServices(IServiceCollection services) { // ... services.AddTransient(typeof(MainWindow)); }} |
In this method we create the Service Provider and configure the IoC container in a similar way of ASP.NET Core. We only need a bit of initialization. First of all, at line 9-13 we create an IConfiguration object that allows to read settings from the appsettings.json file (line 11). Then, we create an instance of a ServiceCollection class that will hold our services. Finally we call the ConfigureServices method (as we have in ASP.NET Core).
Within the latter (lines 24-29), we register all the services used by the application in the exact same way of ASP. NET Core. We’ll complete this method in a moment, but for now let’s notice that we register also the MainWindow class (line 28). This is important because, in this way, the window itself becomes part of the Dependency Injection chain. It means that, after calling this method, at line 20-21 we can get it from the ServiceProvider and then show it. But, more important, it means that we can pass to the MainWindow constructor all the dependencies it needs, as we do for ASP.NET Core Controllers.
Even if the actual services aren’t yet registered, we can run the application and see that everything works as expected.
Now it’s time to complicate the things a bit. First of all, let’s create an AppSettings.cs file to hold configuration settings. This file will map the settings that we write in appsettings.json:
|
1
2
3
4
5
6
7
8
|
public class AppSettings{ public string StringSetting { get; set; } public int IntegerSetting { get; set; } public bool BooleanSetting { get; set; }} |
Then, create also a sample service with its interface:
|
1
2
3
4
5
6
7
8
9
|
public interface ISampleService{ string GetCurrentDate();}public class SampleService : ISampleService{ public string GetCurrentDate() => DateTime.Now.ToLongDateString();} |
Now we must register these services in the IoC Container, as usual:
|
1
2
3
4
5
6
7
8
9
|
private void ConfigureServices(IServiceCollection services){ services.Configure<AppSettings> (Configuration.GetSection(nameof(AppSettings))); services.AddScoped<ISampleService, SampleService>(); // ...} |
As said before, the MainWindow itself is in the IoC Container. So, when we get it from the Service Provider, it will automatically be injected with all required services, if any. So, we just need to modify its constructor:
|
1
2
3
4
5
6
7
8
9
10
11
12
13
14
15
16
|
public partial class MainWindow : Window{ private readonly ISampleService sampleService; private readonly AppSettings settings; public MainWindow(ISampleService sampleService, IOptions<AppSettings> settings) { InitializeComponent(); this.sampleService = sampleService; this.settings = settings.Value; } // ...} |
Running this code, we’ll obtain a result like the following:
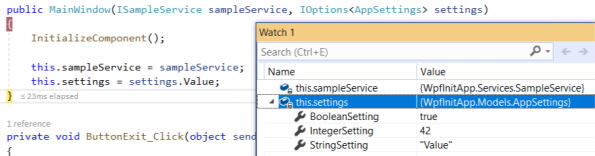
The .NET Core 3.0 WPF application with dependecies injected
原文地址:https://marcominerva.wordpress.com/2019/03/06/using-net-core-3-0-dependency-injection-and-service-provider-with-wpf/
参考:https://docs.microsoft.com/zh-cn/aspnet/core/fundamentals/dependency-injection?view=aspnetcore-3.0
使用 Microsoft.Extensions.DependencyInjection 进行依赖注入的更多相关文章
- Microsoft.Extensions.DependencyInjection中的Transient依赖注入关系,使用不当会造成内存泄漏
Microsoft.Extensions.DependencyInjection中(下面简称DI)的Transient依赖注入关系,表示每次DI获取一个全新的注入对象.但是使用Transient依赖注 ...
- DotNetCore跨平台~一起聊聊Microsoft.Extensions.DependencyInjection
写这篇文章的心情:激动 Microsoft.Extensions.DependencyInjection在github上同样是开源的,它在dotnetcore里被广泛的使用,比起之前的autofac, ...
- 解析 Microsoft.Extensions.DependencyInjection 2.x 版本实现
项目使用了 Microsoft.Extensions.DependencyInjection 2.x 版本,遇到第2次请求时非常高的内存占用情况,于是作了调查,本文对 3.0 版本仍然适用. 先说结论 ...
- 使用诊断工具观察 Microsoft.Extensions.DependencyInjection 2.x 版本的内存占用
目录 准备工作 大量接口与实现类的生成 elasticsearch+kibana+apm asp.net core 应用 请求与快照 Kibana 上的请求记录 请求耗时的分析 请求内存的分析 第2次 ...
- Microsoft.Extensions.DependencyInjection 之三:展开测试
目录 前文回顾 IServiceCallSite CallSiteFactory ServiceProviderEngine CompiledServiceProviderEngine Dynamic ...
- Microsoft.Extensions.DependencyInjection 之三:反射可以一战(附源代码)
目录 前文回顾 IServiceCallSite CallSiteFactory ServiceProviderEngine CompiledServiceProviderEngine Dynamic ...
- Microsoft.Extensions.DependencyInjection 之二:使用诊断工具观察内存占用
目录 准备工作 大量接口与实现类的生成 elasticsearch+kibana+apm asp.net core 应用 请求与快照 Kibana 上的请求记录 请求耗时的分析 请求内存的分析 第2次 ...
- Microsoft.Extensions.DependencyInjection 之一:解析实现
[TOC] 前言 项目使用了 Microsoft.Extensions.DependencyInjection 2.x 版本,遇到第2次请求时非常高的内存占用情况,于是作了调查,本文对 3.0 版本仍 ...
- MvvmLight + Microsoft.Extensions.DependencyInjection + WpfApp(.NetCore3.1)
git clone MvvmLight失败,破网络, 就没有直接修改源码的方式来使用了 Nuget安装MvvmLightLibsStd10 使用GalaSoft.MvvmLight.Command命名 ...
随机推荐
- Samba + DLAN 实现电视机播放电脑文件
用SMB功能——简单二步让电视访问电脑文件http://tieba.baidu.com/p/5330683066 DLNA怎么用?简单三步实现电脑电视DLNA互联!https://news.znds. ...
- NIO与网络编程系统化学习
1.背景 数据在网络中传输,必然回遇到读写问题.... 2.比较NIO与IO 3.案例演示 3.1.缓冲区演示 package com.wfd360.nio; import org.junit.Tes ...
- 浅谈Python设计模式 - 代理模式
声明:本系列文章主要参考<精通Python设计模式>一书,并且参考一些资料,结合自己的一些看法来总结而来. 一.在某些应用中,我们想要在访问某个对象之前执行一个或者多个重要的操作,例如,访 ...
- python的一些包安装
Linux下pip 的安装方法: 使用get-pip.py安装 要安装pip,请安全下载get-pip.py.1: curl https://bootstrap.pypa.io/get-pip.py ...
- 目标检测论文解读5——YOLO v1
背景 之前热门的目标检测方法都是two stage的,即分为region proposal和classification两个阶段,本文是对one stage方法的初次探索. 方法 首先看一下模型的网络 ...
- Hbase 分页设计
hbase 数据获取方式 直接根据 rowkey 查找,速度最快 scan,指定 startrowkey.endrowkey 和 limit获取数据,在 rowkey 设计良好的情况下,效率也不错 全 ...
- python基础知识字符串与元祖
https://blog.csdn.net/hahaha_yan/article/details/78905495 一.字符串的类型 ##表示字符串: 'i like the world' " ...
- [Algorithm] 21. Merge Two Sorted Lists
Merge two sorted linked lists and return it as a new list. The new list should be made by splicing t ...
- [React] Use CSS Transitions to Avoid a Flash of Loading State
Based on research at Facebook, we know that if a user sees a flash of loading state, they perceive t ...
- MySQL中SUM和COUNT的区别
COUNT:是对记录进行汇总,即计数 SUM:是对符合条件的数值列字段进行求和 原表数据如下: 1,当在where子句中使用Price>25时, COUNT函数返回的是符合条件的记录,SUM函数 ...