Selenium 文件下载
点击文件下载时,弹出的那个框,webdriver是定位不到的,只有通过第三方工具或方法来操作
一、通过PyUserInput模拟键盘按键下载
PyUserInput是模拟鼠标和键盘的一个模块,替代了python2 中的SendKeys模块。
需要先安装:
pip install PyUserInput
如果用的是python3 32位版本,直接通过pip安装,可以安装成功;
如果用的是puthon3 64位版本,那就比较悲催了,各种报错。
1、查看本机python版本:

2、安装PyUserInput
如果是32位版本的python,那么就直接pip安装吧,下面的安装教程只针对64位版本的python
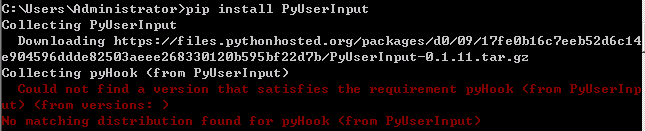
直接报错:No matching distribution found for pyHook (from PyUserInput)
既然直接用pip安装不了,那我们就通过pyHook来安装
pyHook下载地址:https://www.lfd.uci.edu/~gohlke/pythonlibs/
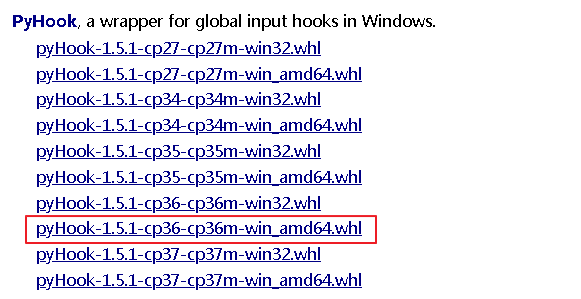
根据python版本来下载,如python3.6就下载cp36;python3.7就下载cp37
下载轮子到本地后,直接用pip安装
pip install C:\Users\Administrator\Desktop\pyHook-1.5.1-cp36-cp36m-win_amd64.whl

继续去刚才那个网址下载pyWin32:
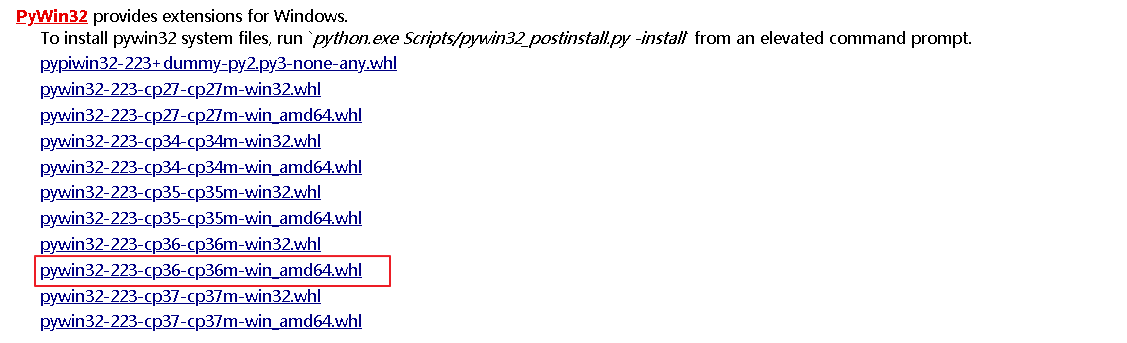
下载完后pip安装
pip install C:\Users\Administrator\Desktop\pywin32-223-cp36-cp36m-win_amd64.whl

现在终于安装PyUserInput了
pip install PyUserInput
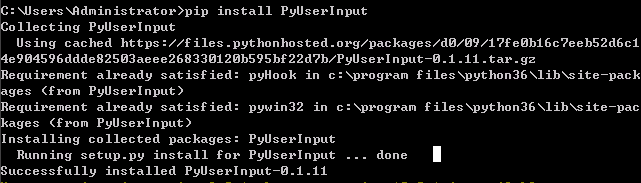
OK,没报错,安装成功。
试一下:

成功导入。
我们以autoit的下载为例
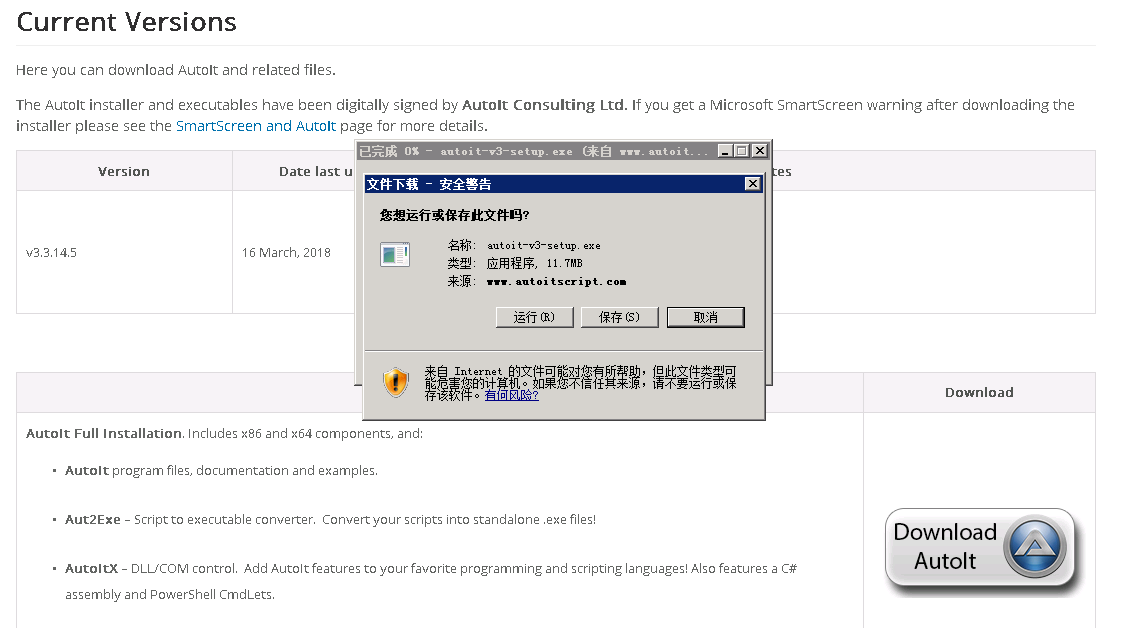
既然没办法直接定位到这个下载框,我们就模拟键盘发送Tab和Enter键来下载
代码:
# coding = utf-8

from selenium import webdriver

from time import sleep

from pykeyboard import PyKeyboard

# 驱动文件路径

driverfile_path = r'D:\coship\Test_Framework\drivers\IEDriverServer.exe'

# 启动浏览器

driver = webdriver.Ie(executable_path=driverfile_path)

driver.get(r'https://www.autoitscript.com/site/autoit/downloads/')

driver.maximize_window()

driver.implicitly_wait(20)

# 拖动滚动条到页面中部

js = "var q=document.body.scrollTop=55555"

driver.execute_script(js)

sleep(2)

driver.find_element_by_css_selector("img[title='Download AutoIt']").click()

# 建立一个键盘对象

sleep(2)

k = PyKeyboard()

# 按两次Tab键,焦点定位到“运行”按钮上

k.press_key(k.tab_key)

sleep(1)

k.press_key(k.tab_key)

# 按下Enter键,开始下载

sleep(1)

k.press_key(k.enter_key)

# 退出

sleep(5)

driver.quit()
二、通过AutoIt下载
我们还可以通过AutoIt工具(不知道这个工具怎么用的请查看 Selenium 文件上传)
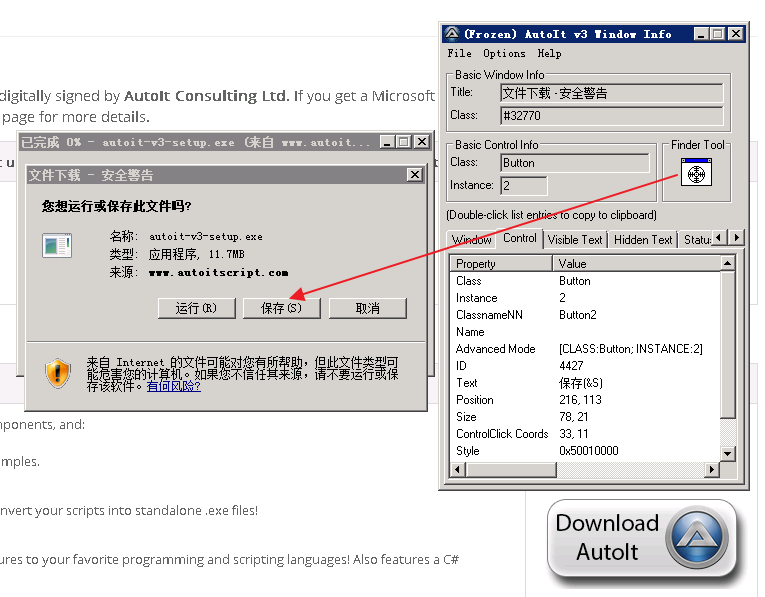
通过AutoIt Windows Info工具获得以下信息:
- 窗口的Title为“文件下载 - 安全警告”,Class为“#32770”“保存”按钮的ClassnameNN为"Button2"
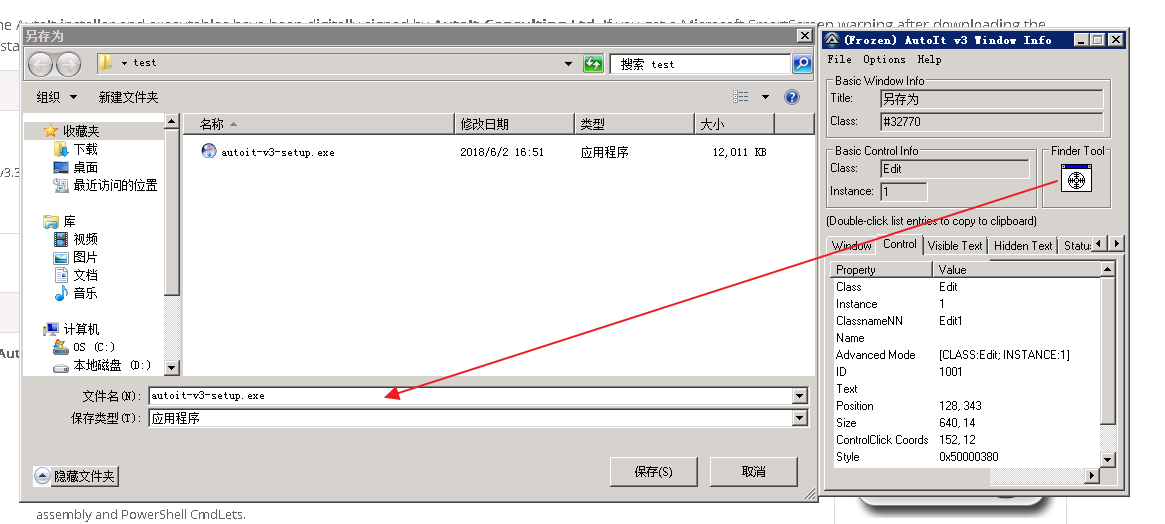
- ”文件名”路径输入框的ClassnameNN为"Edit1"
- 保存窗口的Title为“另存为”,Class为“#32770”
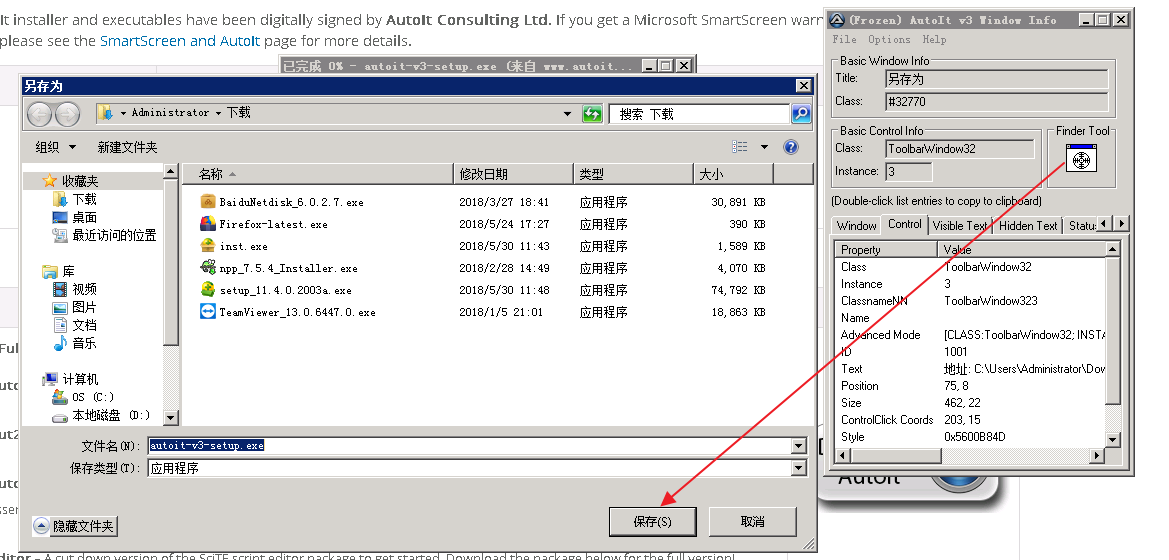
- “保存”按钮的ClassnameNN为"Button1"
根据以上信息编写脚本:
ControlGetFocus("文件下载 - 安全警告")

ControlFocus ( "文件下载 - 安全警告", "", "" )

ControlFocus ( "文件下载 - 安全警告", "保存(&S)", "Button2")

Sleep(2000)

ControlClick ( "文件下载 - 安全警告", "保存(&S)", "Button2","left",1)

WinWaitActive("另存为")

ControlGetFocus("另存为")

ControlFocus ("另存为", "", "" )

;获取下载包的名称

$text=ControlGetText("另存为","","Edit1")

;输入保存路径

ControlSend("另存为","","Edit1","C:\Users\Administrator\Desktop\test\"&$text)

Sleep(2000)

ControlFocus ("另存为", "保存(&S)", "Button1")

ControlClick ("另存为", "保存(&S)", "Button1" )

Sleep(2000)

;当前路径下如果有重名的文件则替换

If WinExists("确认另存为","") Then

  WinWaitActive("确认另存为")

  ControlGetFocus("确认另存为")

  ControlFocus ("确认另存为", "", "" )

  ControlFocus ("确认另存为", "是(&Y)", "Button1")

  ControlClick ("确认另存为", "是(&Y)", "Button1" )

EndIf
生成exe文件,再用python调用
代码:
# coding = utf-8

from selenium import webdriver

from time import sleep

import os

# 驱动文件路径

driverfile_path = r'D:\coship\Test_Framework\drivers\IEDriverServer.exe'

# 启动浏览器

driver = webdriver.Ie(executable_path=driverfile_path)

driver.get(r'https://www.autoitscript.com/site/autoit/downloads/')

driver.maximize_window()

driver.implicitly_wait(20)

# 拖动滚动条到页面中部

js = "var q=document.body.scrollTop=55555"

driver.execute_script(js)

sleep(2)

driver.find_element_by_css_selector("img[title='Download AutoIt']").click()

# 调用downfile.exe

os.system(r"C:\Users\Administrator\Desktop\downfile.exe")

# 退出

sleep(60)

driver.quit()
三、FireFox浏览器下载
通过FireFox浏览器来下载文件时,可以设置其Profile:
browser.download.dir:指定下载路径browser.download.folderList:设置成0表示下载到桌面;设置成1表示下载到默认路径;设置成2表示使用自定义下载路径;browser.download.manager.showWhenStarting:在开始下载时是否显示下载管理器browser.helperApps.neverAsk.saveToDisk:对所给出文件类型不再弹出框进行询问
代码:
# coding = utf-8

from selenium import webdriver

from time import sleep

# 驱动文件路径

driverfile_path = r'D:\coship\Test_Framework\drivers\geckodriver.exe'

# 设置profile

profile = webdriver.FirefoxProfile()

# 设置下载路径

profile.set_preference("browser.download.dir",r"C:\Users\Administrator\Desktop\test")

# 设置成 2 表示使用自定义下载路径;设置成 0 表示下载到桌面;设置成 1 表示下载到默认路径

profile.set_preference("browser.download.folderList",2)

# 是否显示下载管理器

profile.set_preference("browser.download.manager.showWhenStarting",False)

# 设置成不弹框

profile.set_preference("browser.helperApps.neverAsk.saveToDisk","application/octet-stream")

# 启动浏览器

driver = webdriver.Firefox(executable_path=driverfile_path,firefox_profile=profile)

driver.get(r'https://www.autoitscript.com/site/autoit/downloads/')

driver.maximize_window()

driver.implicitly_wait(20)

# 拖动滚动条到显示下载按钮的地方

target = driver.find_element_by_css_selector("img[title='Download AutoIt']")

driver.execute_script("arguments[0].scrollIntoView();", target)

sleep(2)

driver.find_element_by_css_selector("img[title='Download AutoIt']").click()

# 退出

sleep(60)

driver.quit()
Firefox需要针对每种文件类型进行设置,这里需要我们查询对应文件的MIME类型,可以用以下链接进行查询:MIME 参考手册
四、Chrome浏览器下载
通过Chrome浏览器来下载文件时,需设置options:
download.default_directory:设置下载路径profile.default_content_settings.popups:设置为0禁止弹出窗口
代码:
# coding = utf-8

from selenium import webdriver

from time import sleep

# 驱动文件路径

driverfile_path = r'D:\coship\Test_Framework\drivers\chromedriver.exe'

# 设置options

options = webdriver.ChromeOptions()

# 设置下载路径

prefs = {"profile.default_content_settings.popups":0,"download.default_directory":r"C:\Users\Administrator\Desktop\test"}

options.add_experimental_option("prefs",prefs)

# 启动浏览器

driver = webdriver.Chrome(executable_path=driverfile_path,chrome_options=options)

driver.get(r'https://www.autoitscript.com/site/autoit/downloads/')

driver.maximize_window()

driver.implicitly_wait(20)

# 拖动滚动条到显示下载按钮的地方

target = driver.find_element_by_css_selector("img[title='Download AutoIt']")

driver.execute_script("arguments[0].scrollIntoView();", target)

sleep(2)

driver.find_element_by_css_selector("img[title='Download AutoIt']").click()

# 退出

sleep(60)

driver.quit()
Selenium 文件下载的更多相关文章
- Python Selenium 文件下载
Python Selenium 进UI自动化测试时都会遇到文件上传和下载的操作,下面介绍一下文件下载的操作 这里介绍使用FireFox浏览器进行文件下载的操作. 1.设置文件默认下载地址 如下图,fi ...
- selenium WebDriver处理文件下载
下载文件WebDriver 允许我们设置默认的文件下载路径.也就是说文件会自动下载并且存在设置的那个目录中.下面以FireFox 为例执行文件的下载. package com.mypro.jase; ...
- selenium+Python(文件下载)
webdriver允许我们设置默认的文件下载路径,也就是说,文件会自动下载并保存到设置的目录中 下面以Firefox浏览器为例: from selenium import webdriver from ...
- selenium 校验文件下载成功
转自: http://www.seleniumeasy.com/selenium-tutorials/verify-file-after-downloading-using-webdriver-jav ...
- Python+Selenium 自动化实现实例-实现文件下载
#coding=utf-8 from selenium import webdriver #实例化一个火狐配置文件 fp = webdriver.FirefoxProfile() #设置各项参数,参数 ...
- 关于selenium RC的脚本开发
第一.需要录制脚本,找个我也不说了.就是在firefox下下载一个selenium-IDE并且安装. 第二.在工具里找到selenium-IDE点击运行. 第三.默认是红色按钮点击状态的,接下来随便你 ...
- selenium第二课(脚本录制seleniumIDE的使用)
一.Selenium也具有录制功能,可以web中回放,录制的脚本可以转换为java.python.ruby.php等多种脚本语言.seleniumIDE是Firefox的一个插件,依附于Firefox ...
- Python脚本控制的WebDriver 常用操作 <二十七> 文件下载
测试用例场景 webdriver允许我们设置默认的文件下载路径.也就是说文件会自动下载并且存在设置的那个目录中. Python脚本 测试用Python代码: # coding=gbk ''' Crea ...
- Selenium+Python浏览器调用:Firefox
如何查看python selenium的API python -m pydoc -p 4567 说明: python -m pydoc表示打开pydoc模块,pydoc是查看python文档的首选工 ...
随机推荐
- Maven引入oracle驱动包
1.下载驱动包 2.加载到本地maven库中 mvn install:install-file -DgroupId=com.oracle -DartifactId=ojdbc6 -Dversion=1 ...
- Sql Server 常见的几种分页方式
⒈offset fetch next方式[SqlServer2012及以上版本支持][推荐] select * from T_User order by id offset rows /*(页数-1) ...
- C++运算符重载总结(真的很详细了w(゚Д゚)w)
C++运算符重载总结(真的很详细了w(゚Д゚)w) 概述 运算符重载可以使得一些特殊类型参与运算,我是这样理解的. 使用友元形式的运算符重载 //一般形式 class x{ friend 返回类型 o ...
- Laravel5.5 实现session配置
\Illuminate\Session\Middleware\StartSession::class,\Illuminate\View\Middleware\ShareErrorsFromSessio ...
- MySQL的事务和锁
MySQL的事务和锁 阅读目录 什么是事务 事务:是数据库操作的最小工作单元,是作为单个逻辑工作单元执行的一系列操作:这些操作作为一个整体一起向系统提交,要么都执行.要么都不执行:事务是一组不可再 ...
- Mysql主从分离介绍及实现
参考: http://www.cnblogs.com/panxuejun/p/5887118.html https://www.cnblogs.com/alvin_xp/p/4162249.html ...
- Dapper多表查询时子表字段为空
最近在学习使用Dapper时百度了一篇详细使用教程,在做到多表查询的时候,出现如下情况. 使用的SQL如下, SELECT * FROM [Student] AS A INNER JOIN [Juni ...
- 牛客挑战赛32E 树上逆序对
nowcoder 口胡一时爽 先从这个逆序对的性质入手,手玩可以发现对于一对具有祖先关系节点的点,只有权值绝对值大的才能对这一对点是否为逆序对造成影响.具体来讲,如果祖先点权值大,并且取正号,那么其后 ...
- 一份非常完整、详细的MySQL规范
一.数据库命令规范 所有数据库对象名称必须使用小写字母并用下划线分割 所有数据库对象名称禁止使用mysql保留关键字(如果表名中包含关键字查询时,需要将其用单引号括起来) 数据库对象的命名要能做到见名 ...
- LVS DR模型RS端修改配置脚本
#!/bin/bash vip=x.x.x.x in start) > /proc/sys/net/ipv4/conf/all/arp_ignore > /proc/sys/net/ipv ...