SpringBoot(四) -- SpringBoot与Web开发
一.发开前准备
1.创建一个SpringBoot应用,引入我们需要的模块
2.SpringBoot已经默认将这些场景配置好了,只需要在配置文件中指定少量配置,就能运行起来
3.编写业务代码
二.静态资源映射规则
在WebMvcAutoConfiguration中有着如下的配置:
      @Override

         public void addResourceHandlers(ResourceHandlerRegistry registry) {

             if (!this.resourceProperties.isAddMappings()) {

                 logger.debug("Default resource handling disabled");

                 return;

             }

             Integer cachePeriod = this.resourceProperties.getCachePeriod();

             if (!registry.hasMappingForPattern("/webjars/**")) {

                 customizeResourceHandlerRegistration(

                         registry.addResourceHandler("/webjars/**")

                                 .addResourceLocations(

                                         "classpath:/META-INF/resources/webjars/")

                         .setCachePeriod(cachePeriod));

             }

             String staticPathPattern = this.mvcProperties.getStaticPathPattern();

             if (!registry.hasMappingForPattern(staticPathPattern)) {

                 customizeResourceHandlerRegistration(

                         registry.addResourceHandler(staticPathPattern)

                                 .addResourceLocations(

                                         this.resourceProperties.getStaticLocations())

                         .setCachePeriod(cachePeriod));

             }

         }
1.webjars:以jar包的方式引入静态资源,可以将JQuery等前端框架使用maven依赖的形式引入进来
2.webjars中的资源访问都去如下路径: classpath:/META-INF/resources/webjars/
--例如可以在该地址中找到JQuery: localhost:8080/webjars/jquery/3.3.1/jquery.js
         <!--前端框架-->

         <dependency>

             <groupId>org.webjars</groupId>

             <artifactId>jquery</artifactId>

             <version>3.3.1</version>

         </dependency>
--在访问的时候只要写webjars下面资源的地址即可
3.我们可以发现在addResourceHandlers()方法只,还为这些静态资源设置了缓存时间,而我们在ResourceProperties中设置缓存时间:
 @ConfigurationProperties(prefix = "spring.resources", ignoreUnknownFields = false)

 public class ResourceProperties implements ResourceLoaderAware {

 }
4.在spring.resources中我们可以设置静态资源相关的参数,例如缓存时间,回到方法中我们在 registry.addResourceHandler(staticPathPattern) 中设置了资源映射:private String staticPathPattern = "/**";而如果我们不进行配置,则会默认去如下地址中寻找:
"classpath:/META-INF/resources/"
"classpath:/static/"
"classpath:/static/"
"/**":当前项目的根路径.
5.欢迎页的映射
         @Bean

         public WelcomePageHandlerMapping welcomePageHandlerMapping(

                 ResourceProperties resourceProperties) {

             return new WelcomePageHandlerMapping(resourceProperties.getWelcomePage(),

                     this.mvcProperties.getStaticPathPattern());

         }
     private String[] getStaticWelcomePageLocations() {

         String[] result = new String[this.staticLocations.length];

         for (int i = 0; i < result.length; i++) {

             String location = this.staticLocations[i];

             if (!location.endsWith("/")) {

                 location = location + "/";

             }

             result[i] = location + "index.html";

         }

         return result;

     }
--即所有静态目录下的index.html页面
6.设置我们的首页图标
         @ConditionalOnProperty(value = "spring.mvc.favicon.enabled", matchIfMissing = true)

         public static class FaviconConfiguration {

             private final ResourceProperties resourceProperties;

             public FaviconConfiguration(ResourceProperties resourceProperties) {

                 this.resourceProperties = resourceProperties;

             }

             @Bean

             public SimpleUrlHandlerMapping faviconHandlerMapping() {

                 SimpleUrlHandlerMapping mapping = new SimpleUrlHandlerMapping();

                 mapping.setOrder(Ordered.HIGHEST_PRECEDENCE + 1);

                 mapping.setUrlMap(Collections.singletonMap("**/favicon.ico",

                         faviconRequestHandler()));

                 return mapping;

             }

             @Bean

             public ResourceHttpRequestHandler faviconRequestHandler() {

                 ResourceHttpRequestHandler requestHandler = new ResourceHttpRequestHandler();

                 requestHandler

                         .setLocations(this.resourceProperties.getFaviconLocations());

                 return requestHandler;

             }

         }
在静态资源文件夹中寻找favicon.ico
三.引入thymeleaf
在我们传统的网页开发中,通常我们会将静态网站资源修改为.jsp文件,但是我们使用springBoot默认的打包方式是jar包,我们使用的还是嵌入式的tomcat,因此默认是不支持JSP的页面的.如果我们使用纯静态的方式给我们开发会带来很大的麻烦,因此我们可以使用模板引擎例如JSP,Velocity,Freemarker,Thymeleaf;Spring推荐我们使用thymeleaf:
1.引入ThymeLeaf:
         <!--引入Thymeleaf-->

         <dependency>

             <groupId>org.springframework.boot</groupId>

             <artifactId>spring-boot-starter-thymeleaf</artifactId>

         </dependency>
2.其默认使用的2.1.6版本,其功能较少,因此我们可以使用替换较高的版本:
     <properties>

         <java.version>1.8</java.version>

         <!--设置thymeleaf版本-->

         <thymeleaf.version>3.0.2.RELEASE</thymeleaf.version>

         <!--thymeleaf布局功能的支持程序  thymeleaf3 主程序 适配layout2 以上版本-->

         <thymeleag-layout-dialect.version>2.1.1</thymeleag-layout-dialect.version>

     </properties>
四.Thymeleaf使用&语法
 @ConfigurationProperties(prefix = "spring.thymeleaf")

 public class ThymeleafProperties {

     private static final Charset DEFAULT_ENCODING = Charset.forName("UTF-8");

     private static final MimeType DEFAULT_CONTENT_TYPE = MimeType.valueOf("text/html");

     public static final String DEFAULT_PREFIX = "classpath:/templates/";

     public static final String DEFAULT_SUFFIX = ".html";
可以发现我们只需要将html页面放置在类路径的templates下,就可以被顺利解析扩展.
1.访问success页面:
     @RequestMapping("/success")

     public String success(Map<String, Object> map) {

         map.put("hello", "你好");

         return "success";

     }
 <!DOCTYPE html>

 <html lang="en">

     <head>

         <meta charset="UTF-8">

         <title>Title</title>

     </head>

     <body>

         <h1>成功!!!</h1>

     </body>

 </html>
2.在success中引入Thymeleaf模板引擎--导入名称空间:<html lang="en" xmlns:th="http://www.thymeleaf.org">
3.Themeleaf语法:
 <!DOCTYPE html>

 <html lang="en" xmlns:th="http://www.thymeleaf.org">

     <head>

         <meta charset="UTF-8">

         <title>Title</title>

     </head>

     <body>

         <h1>成功!!!</h1>

         <!--获取Hello的值 th:text="${hello}"

         如果模板引擎解析时效,或者hello的值获取失败,那么将显示当前自行填充的默认值-->

         <div th:text="${hello}">这是显示欢迎信息</div>

     </body>

 </html>
(1) th:text:改变当前元素里面的文本内容
th:任意html标签属性: 我们可以用任何属性替换掉原生的值
(2)th:insert th:replace: 片段包含,类似于jsp:include
(3)th:each :遍历
(4)th: if | unless | switch | case:判断
(5)th:object th:with: 设置变量
(6)th: attr | attrprepend | attrappend : 任意属性修改,支持在前方和后方追加内容
(7)th: value | href | src | ...:修改指定属性的默认值
(8)th: text | utext | fragment | remove: 文本转义特殊字符 | 文本不转义特殊字符 | 声明片段 | 移除片段
4.Thymeleaf表达式语法:
(1)${...} :获取变量值,获取对象的属性,调用方法; 使用内置的基本对象:
#ctx: 当前的上下文对象
#vars: 当前上下文的变量
#locale: 获取上下文的区域信息
#request | response | session | servletContext: 应用于web环境
内置工具对象(详情可以参看文档):
#execInfo: information about the template being processed.
#messages: methods for obtaining externalized messages inside variables expressions, in the same way as they would be obtained using #{…} syntax.
#uris: methods for escaping parts of URLs/URIs
#conversions: methods for executing the configured conversion service (if any).
#dates: methods for java.util.Date objects: formatting, component extraction, etc.
#calendars: analogous to #dates, but for java.util.Calendar objects.
#numbers: methods for formatting numeric objects.
#strings: methods for String objects: contains, startsWith, prepending/appending, etc.
#objects: methods for objects in general.
#bools: methods for boolean evaluation.
#arrays: methods for arrays.
#lists: methods for lists.
#sets: methods for sets.
#maps: methods for maps.
#aggregates: methods for creating aggregates on arrays or collections.
#ids: methods for dealing with id attributes that might be repeated (for example, as a result of an iteration).
(2)*{...}: 和${...}在功能上是一样的 th:object 进行使用,在子标签中可以省略object的前缀
(3) #{...}: 获取国际化命名
(4)@{...}:定义URL 可以免去拼串 https:localhost/hello/hi(order=${order},item=${item})
(5)~{...}: 片段引用表达式 (后文将会介绍使用方法)
5.场景应用示例
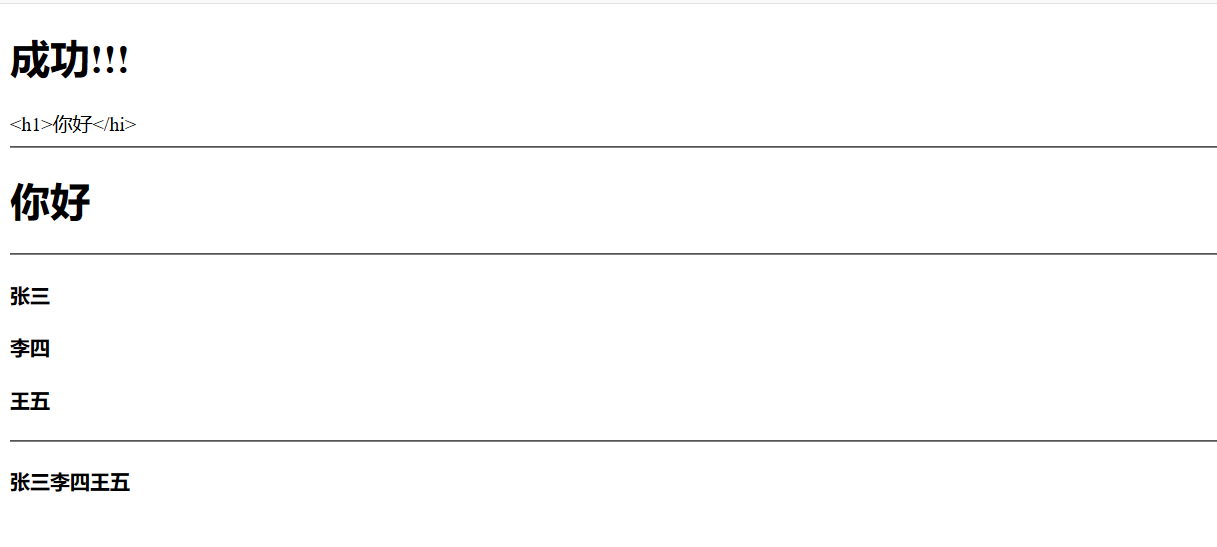
     @RequestMapping("/success")

     public String success(Map<String, Object> map) {

         map.put("hello", "<h1>你好</hi>");

         map.put("users", Arrays.asList("张三","李四","王五"));

         return "success";

     }
 <!DOCTYPE html>

 <html lang="en" xmlns:th="http://www.thymeleaf.org">

     <head>

         <meta charset="UTF-8">

         <title>Title</title>

     </head>

     <body>

         <h1>成功!!!</h1>

         <!--获取Hello的值 th:text="${hello}"

         如果模板引擎解析时效,或者hello的值获取失败,那么将显示当前自行填充的默认值-->

         <div th:text="${hello}">这是显示欢迎信息</div>

         <hr/>

         <div th:utext="${hello}">默认显示的内容</div>

         <hr/>

         <!--遍历获取数组数据

         th:each 所在的标签,每次遍历都是生成一个-->

         <h4 th:each="user:${users}" th:text="${user}"></h4>

         <hr/>

         <h4>

             <!--行内写法[[ text ]]   [( utext )]-->

             <span th:each="user:${users}" >[[ ${user} ]]</span>

         </h4>

     </body>

 </html>

五.SpringMVC的自动配置
SpringBoot自动配置好了SpringMVC,以下是SpringBoot对SpringMVC的自动配置
1.自动配置了视图解析器:根据方法的返回值,得到视图对象,视图对象决定如何渲染界面(转发?重定向?)
ContentNegotiatingViewResolver:组合所有的视图解析器
如何定制:可以自己给容器中添加视图解析器,而后ContentNegotiatingViewResolver将会自动的将其组合进来
2.静态首页访问
3.自动注册了Converter(转化器): 主要完成类型转化
formatter(格式化器):页面带来的数据例如为 2019-12-1 ==> Date类型
 @Bean

         @ConditionalOnProperty(prefix = "spring.mvc", name = "date-format")

         public Formatter<Date> dateFormatter() {

             return new DateFormatter(this.mvcProperties.getDateFormat());

         }
--需要在配置文件中配置日期格式化的规则
4.HttpMessageConverter:SpringMVC中用来转化HTTP请求及响应,User-JSON
HttpMessageConverters:是从容器中确定的;自己给容器中添加HttpMessageConverter,只需自己在容器中注册
5.MessageCodesResolver:定义错误代码的生成规则
6.ConfigurableWebBindingInitializer:我们可以配置自己的来替原有的,用来初始化Web数据绑定器的
7.修改SpringBoot的默认配置:SpringBoot在自动配置很多组件的时候,都有一个模式,先看容器中有没有用户自己配置的(@Bean,@Component)如果有就用用户配置的,如果没有才自动配置;如果有些组件可以有多个(ViewResolver)将用户配置的和自己默认的组合起来;
六.扩展和全面接管SpringMVC
仅仅依赖SpringBoot对SpringMVC的默认配置,是不够使用的,例如我们在SpringMVC的配置文件中可以如下使用:
 <?xml version="1.0" encoding="UTF-8"?>

 <beans xmlns="http://www.springframework.org/schema/beans"

        xmlns:xsi="http://www.w3.org/2001/XMLSchema-instance" xmlns:mvc="http://www.springframework.org/schema/mvc"

        xsi:schemaLocation="http://www.springframework.org/schema/beans http://www.springframework.org/schema/beans/spring-beans.xsd http://www.springframework.org/schema/mvc http://www.springframework.org/schema/mvc/spring-mvc.xsd">

     <!--将Hello请求也映射到success-->

     <mvc:view-controller path="/hello" view-name="success"/>

     <!--配置拦截器-->

     <mvc:interceptors>

         <!--拦截hello请求-->

         <mvc:interceptor>

             <mvc:mapping path="/hello"/>

             <bean></bean>

         </mvc:interceptor>

     </mvc:interceptors>

 </beans>
--如果我们想要保持SpringBoot对SpringMVC的默认配置,仅仅是想额外添加一些功能,我们可以添加一个自定义的Configuration配置类:
1.编写一个配置类(@Configuration),是WebMvcConfigurerAdapter类型,不能标注@EnableWebMvc:
 package com.zhiyun.springboot.web_restfulcrud.config;

 import org.springframework.context.annotation.Configuration;

 import org.springframework.web.servlet.config.annotation.ViewControllerRegistry;

 import org.springframework.web.servlet.config.annotation.WebMvcConfigurerAdapter;

 /**

  * @author : S K Y

  * @version :0.0.1

  * 扩展SpringMVC的功能

  */

 @Configuration

 public class MyMvcConfig extends WebMvcConfigurerAdapter {

     @Override

     public void addViewControllers(ViewControllerRegistry registry) {

         //浏览器发送hello请求也来到success页面

         registry.addViewController("/hello").setViewName("success");

     }

 }
--即保留了所有的自动配置,也能使用我们扩展的自定义配置,查看其原理:
(1)WebMvcAutoConfiguration是SpringMVC的自动配置类;
(2)内部有一个静态类也继承了WebMvcConfigurerAdapter ,在该类上有着注解@Import(EnableWebMvcConfiguration.class)
(3)EnableWebMvcConfiguration类继承了DelegatingWebMvcConfiguration类,在父类中存在如下代码:
     @Autowired(required = false)

     public void setConfigurers(List<WebMvcConfigurer> configurers) {

         if (!CollectionUtils.isEmpty(configurers)) {

             this.configurers.addWebMvcConfigurers(configurers);

         }

     }
(4)表示了从容器中获取所有的WebMvnConfigurer.在进行配置将所有的WebMVC相关的配置都调用了一下,这样一来就可以实现一起配置.所有的容器中所有的WebMvcConfige都会一起起作用,我们的配置类也会被调用.SpringMVC的自动配置和我们的扩展配置都回起作用.
(5)全面接管SpringMVC:SpringBoot对SpringBoot的自动配置将不再生效,我们使用@EnableWebMVC注解来标注我们自己的配置类即可.此时所有SpringMVC的自动配置都失效.
(6)EnableWebMVC注解导入了一个DelegatingWebMvcConfiguration类该是WebMvcConfigurationSupport的子类,而在WebMvcAutoConfiguration类中使用了@ConditionalOnMissingBean(WebMvcConfigurationSupport.class)注解,表示当容器中没有这个组件的时候,这样一来自动配置类才生效.
(7)在SpringBoot中会有许多的XXXConfigurer,帮助我们进行扩展配置.
SpringBoot(四) -- SpringBoot与Web开发的更多相关文章
- SpringBoot(四): SpringBoot web开发 SpringBoot使用jsp
1.在SpringBoot中使用jsp,需要在pom.xml文件中添加依赖 <!--引入Spring Boot内嵌的Tomcat对JSP的解析包--> <dependency> ...
- spring-boot (四) springboot+mybatis多数据源最简解决方案
学习文章来自:http://www.ityouknow.com/spring-boot.html 配置文件 pom包就不贴了比较简单该依赖的就依赖,主要是数据库这边的配置: mybatis.confi ...
- Sublime Text web开发神器
开发工具介绍 开发工具一般分为两种类型:文本编辑器和集成开发环境(IDE) 常用的文本编辑器:Sublime Text.Notepad++.EditPlus等 常用的IDE:WebStorm.Inte ...
- SpringBoot之旅第四篇-web开发
一.引言 有了自动配置,springboot使web开发变得简单,这个在springboot之旅中的第一篇中就有体现,实际的开发中当然不会这么简单,很多时候我们都需要自己去定制一些东西.web开发的东 ...
- SpringBoot起飞系列-Web开发(四)
一.前言 从今天你开始我们就开始进行我们的web开发,之前的一篇用SpringBoot起飞系列-使用idea搭建环境(二)已经说明了我们如何进行开发,当然这是搭建起步,接下来我们就开始进行详细的开发, ...
- SpringBoot(四) Web开发 --- Thymeleaf、JSP
Spring Boot提供了spring-boot-starter-web为Web开发予以支持,spring-boot-starter-web为我们提供了嵌入的Tomcat以及Spring MVC的依 ...
- SpringBoot(二)Web整合开发
Spring Boot (二):Web 综合开发 本篇文章接着上篇内容继续为大家介绍spring boot的其它特性(有些未必是spring boot体系桟的功能,但是是spring特别推荐的一些开源 ...
- Springboot 系列(七)Spring Boot web 开发之异常错误处理机制剖析
前言 相信大家在刚开始体验 Springboot 的时候一定会经常碰到这个页面,也就是访问一个不存在的页面的默认返回页面. 如果是其他客户端请求,如接口测试工具,会默认返回JSON数据. { &quo ...
- SpringBoot Web开发(5) 开发页面国际化+登录拦截
SpringBoot Web开发(5) 开发页面国际化+登录拦截 一.页面国际化 页面国际化目的:根据浏览器语言设置的信息对页面信息进行切换,或者用户点击链接自行对页面语言信息进行切换. **效果演示 ...
随机推荐
- 小程序makePhoneCall拨打电话问题
调用wx.makePhoneCall后肯定会弹出一个询问框,此时无论是点击确认或者取消,页面都会依次触发app.js中的onHide函数和onShow函数,所以需要注意
- php内置函数分析之array_column()
PHP_FUNCTION(array_column) { zval *zcolumn = NULL, *zkey = NULL, *data; HashTable *arr_hash; zval *z ...
- 基于VUE多人聊天项目
项目背景 公司平台要做一个通讯系统,本来是java 来做的后面改前端+PHP来做,所以就用VUE来做这个了. github github地址 新人求star 技术栈 vue-axios vuex we ...
- wepy-数据双向绑定input
初入wepy,发现wepy和vue神似,但还是有不一样的地方,例如v-model数据双向绑定 场景: 一个input搜索框,用户输入内容,点击“叉叉”按钮,输入的内容全部清空,这是一个很常见的场景 j ...
- Python---进阶---logging---logger
一.####用logging的四大组件来实现日志的功能 - 打印出函数执行的时间,日志的等级,日志的消息 - 用装饰器 - 不同的日志,要记录不同等级的日志消息 ------------------- ...
- get和post请求方式的区别,常见状态码的整理
get和post的区别 get和post是什么? HTTP协议中的两种发送请求的方法.get从指定的资源请求数据: post向指定的资源提交要被处理的数据. HTTP是什么? 超文本传输协议(HTTP ...
- 8:Spring Boot Shiro记住密码
1,添加Cookie 2,添加安全管理器中 3,配置记住我, 4 ,在登录页面中加我rememberMe复选框 /** * 1.配置Cookie对象 * 记住我的cookie:rememberMe * ...
- [luogu]P3941 入阵曲[前缀和][压行]
[luogu]P3941 入阵曲 题目描述 小 F 很喜欢数学,但是到了高中以后数学总是考不好. 有一天,他在数学课上发起了呆:他想起了过去的一年.一年前,当他初识算法竞赛的 时候,觉得整个世界都焕然 ...
- Redis 序列化方式StringRedisSerializer、FastJsonRedisSerializer和KryoRedisSerializer
当我们的数据存储到Redis的时候,我们的键(key)和值(value)都是通过Spring提供的Serializer序列化到数据库的.RedisTemplate默认使用的是JdkSerializat ...
- CCPC E Problem Buyer
题目描述 有一些区间,还有一些点. 问最小的k使得选出任意k个区间,每个点都可以匹配上区间,一个区间只能匹配一次. 题解 考虑对于每一个点,我们有\(x\)个区间包含它,那么答案的一个下界是\(n-x ...
