spring boot创建多模块聚合工程
环境:java1.8,idea
聚合工程优势:
1.统一maven操作。可以在一个maven工程管理多个子工程(每个子工程可单独打包,重启,调试。也可通过聚合工程一起管理)。
2.统一管理依赖版本。可以借助父工程(dependencyManagement)来管理依赖包的版本,子工程就直接引用包而不用添加版本信息。
3.统一引入公共依赖,而不需要每个子项目都去重复引入。
4.防止pom.xml过长。
期望达到的效果:
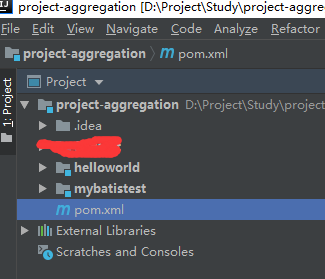
1.新建maven聚合父工程project-aggregation
file-new-project-maven
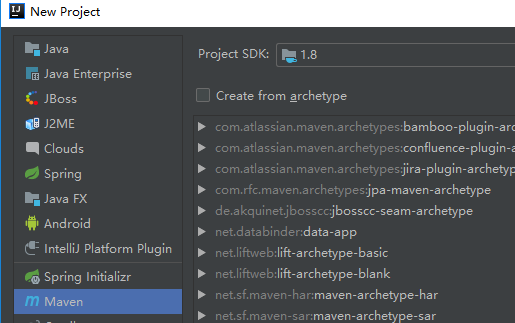


快速创建一个maven工程,删除无关文件,只保留pom.xml

pom.xml文件内容如下
<?xml version="1.0" encoding="UTF-8"?>

<project xmlns="http://maven.apache.org/POM/4.0.0"

         xmlns:xsi="http://www.w3.org/2001/XMLSchema-instance"

         xsi:schemaLocation="http://maven.apache.org/POM/4.0.0 http://maven.apache.org/xsd/maven-4.0.0.xsd">

    <!-- 基本信息 -->

    <description>SpringBoot 多模块构建示例</description>

    <modelVersion>4.0.0</modelVersion>

    <name>project-aggregation</name>

    <packaging>pom</packaging>

    <!-- 项目说明:这里作为聚合工程的父工程 -->

    <groupId>com.pu</groupId>

    <artifactId>project-aggregation</artifactId>

    <version>1.0-SNAPSHOT</version>

    <!-- 继承说明:这里继承SpringBoot提供的父工程 -->

    <parent>

        <groupId>org.springframework.boot</groupId>

        <artifactId>spring-boot-starter-parent</artifactId>

        <version>2.1.5.RELEASE</version>

        <relativePath/>

    </parent>

    <!-- 模块说明:这里声明多个子模块 -->

    <modules>

        <module>helloworld</module>

        <module>mybatistest</module>

    </modules>

    <!-- 在properties中统一控制依赖包的版本,更清晰-->

    <properties>

        <java.version>1.8</java.version>

        <fastjson.version>1.2.32</fastjson.version>

        <spring-cloud.version>Greenwich.SR1</spring-cloud.version>

        <feign.version>2.1.1.RELEASE</feign.version>

        <eureka-client.version>2.1.1.RELEASE</eureka-client.version>

        <zkclient.version>0.10</zkclient.version>

        <poi.version>3.13</poi.version>

        <lombok.version>1.18.6</lombok.version>

    </properties>

    <!--在此处统一加,子项目pom就可以不用引入了-->

    <dependencies>

        <dependency>

            <groupId>org.springframework.boot</groupId>

            <artifactId>spring-boot-starter-web</artifactId>

        </dependency>

        <dependency>

            <groupId>org.springframework.boot</groupId>

            <artifactId>spring-boot-starter-test</artifactId>

            <scope>test</scope>

        </dependency>

        <dependency>

            <groupId>org.springframework.cloud</groupId>

            <artifactId>spring-cloud-starter-netflix-eureka-client</artifactId>

        </dependency>

        <!-- lombok -->

        <dependency>

            <groupId>org.projectlombok</groupId>

            <artifactId>lombok</artifactId>

        </dependency>

        <dependency>

            <groupId>org.apache.poi</groupId>

            <artifactId>poi</artifactId>

        </dependency>

        <dependency>

            <groupId>org.apache.poi</groupId>

            <artifactId>poi-ooxml-schemas</artifactId>

        </dependency>

        <dependency>

            <groupId>org.apache.poi</groupId>

            <artifactId>poi-ooxml</artifactId>

        </dependency>

        <dependency>

            <groupId>com.alibaba</groupId>

            <artifactId>fastjson</artifactId>

        </dependency>

    </dependencies>

    <!--dependencyManagement用于管理依赖版本号-->

    <dependencyManagement>

        <dependencies>

            <dependency>

                <groupId>org.springframework.cloud</groupId>

                <artifactId>spring-cloud-dependencies</artifactId>

                <version>${spring-cloud.version}</version>

                <type>pom</type>

                <scope>import</scope>

            </dependency>

            <dependency>

                <groupId>org.springframework.cloud</groupId>

                <artifactId>spring-cloud-starter-netflix-eureka-client</artifactId>

                <version>${eureka-client.version}</version>

            </dependency>

            <!--feign -->

            <dependency>

                <groupId>org.springframework.cloud</groupId>

                <artifactId>spring-cloud-starter-openfeign</artifactId>

                <version>${feign.version}</version>

            </dependency>

            <dependency>

                <groupId>com.alibaba</groupId>

                <artifactId>fastjson</artifactId>

                <version>${fastjson.version}</version>

            </dependency>

            <dependency>

                <groupId>org.apache.poi</groupId>

                <artifactId>poi</artifactId>

                <version>${poi.version}</version>

            </dependency>

            <dependency>

                <groupId>org.apache.poi</groupId>

                <artifactId>poi-ooxml-schemas</artifactId>

                <version>${poi.version}</version>

            </dependency>

            <dependency>

                <groupId>org.apache.poi</groupId>

                <artifactId>poi-ooxml</artifactId>

                <version>${poi.version}</version>

            </dependency>

            <!-- lombok -->

            <dependency>

                <groupId>org.projectlombok</groupId>

                <artifactId>lombok</artifactId>

                <version>${lombok.version}</version>

            </dependency>

        </dependencies>

    </dependencyManagement>

    <!--该插件作用是打一个可运行的包,必须要写在需要打包的项目里。这里的父模块不需要打包运行,所以删掉该插件。-->

    <!--<build>-->

    <!--<plugins>-->

    <!--<plugin>-->

    <!--<groupId>org.springframework.boot</groupId>-->

    <!--<artifactId>spring-boot-maven-plugin</artifactId>-->

    <!--</plugin>-->

    <!--</plugins>-->

    <!--</build>-->

</project>
2.建子模块module项目helloworld和mybatistest
父工程右键--》new-->module
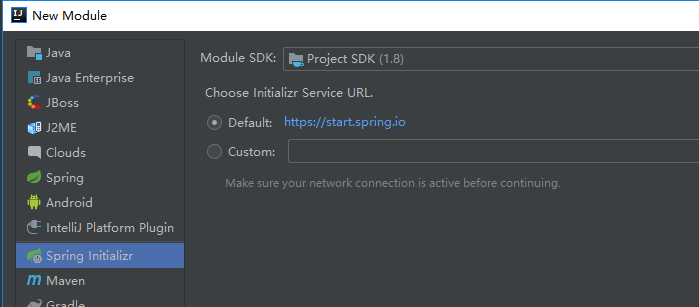
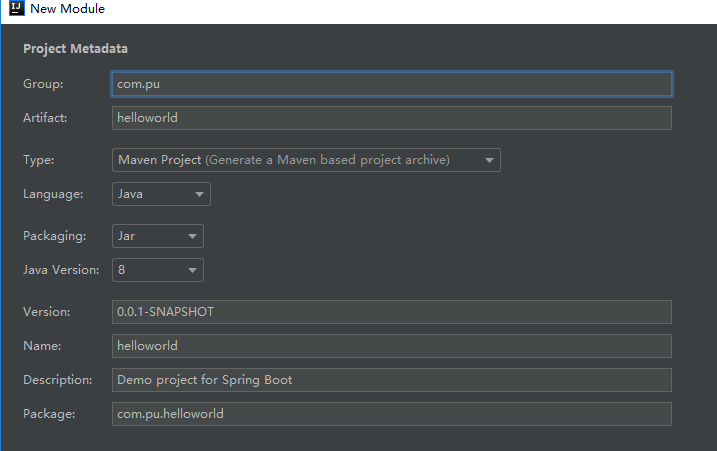
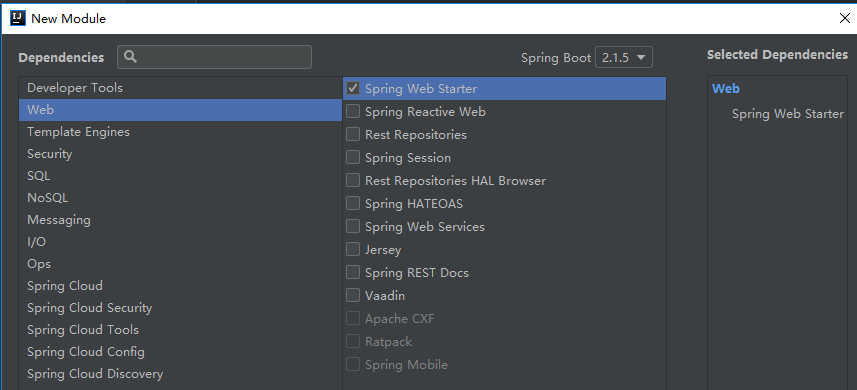

finish,
helloworld的pom.xml
<?xml version="1.0" encoding="UTF-8"?>

<project xmlns="http://maven.apache.org/POM/4.0.0" xmlns:xsi="http://www.w3.org/2001/XMLSchema-instance"

         xsi:schemaLocation="http://maven.apache.org/POM/4.0.0 http://maven.apache.org/xsd/maven-4.0.0.xsd">

    <modelVersion>4.0.0</modelVersion>

    <!-- 基本信息 -->

    <groupId>com.pu</groupId>

    <artifactId>helloworld</artifactId>

    <version>0.0.1-SNAPSHOT</version>

    <packaging>jar</packaging>

    <name>helloworld</name>

    <description>Demo project for Spring Boot</description>

    <!-- 继承本项目的父工程 -->

    <parent>

        <groupId>com.pu</groupId>

        <artifactId>project-aggregation</artifactId>

        <version>1.0-SNAPSHOT</version>

        <relativePath>../pom.xml</relativePath><!-- lookup parent from repository -->

    </parent>

    <dependencies>

        <dependency>

            <groupId>org.springframework.boot</groupId>

            <artifactId>spring-boot-starter-data-redis</artifactId>

            <scope>test</scope>

        </dependency>

    </dependencies>

    <build>

        <plugins>

            <plugin>

                <groupId>org.springframework.boot</groupId>

                <artifactId>spring-boot-maven-plugin</artifactId>

            </plugin>

        </plugins>

    </build>

</project>
同理建另一个module mybatistest,它的pom.xml
<?xml version="1.0" encoding="UTF-8"?>

<project xmlns="http://maven.apache.org/POM/4.0.0" xmlns:xsi="http://www.w3.org/2001/XMLSchema-instance"

         xsi:schemaLocation="http://maven.apache.org/POM/4.0.0 http://maven.apache.org/xsd/maven-4.0.0.xsd">

    <modelVersion>4.0.0</modelVersion>

    <groupId>com.example</groupId>

    <artifactId>mybatistest</artifactId>

    <version>0.0.1-SNAPSHOT</version>

    <packaging>jar</packaging>

    <name>mybatistest</name>

    <description>Demo project for Spring Boot</description>

    <!-- 继承本项目的父工程 -->

    <parent>

        <groupId>com.pu</groupId>

        <artifactId>project-aggregation</artifactId>

        <version>1.0-SNAPSHOT</version>

        <relativePath>../pom.xml</relativePath> <!-- lookup parent from repository -->

    </parent>

    <properties>

        <java.version>1.8</java.version>

    </properties>

    <dependencies>

    </dependencies>

    <build>

        <plugins>

            <plugin>

                <groupId>org.springframework.boot</groupId>

                <artifactId>spring-boot-maven-plugin</artifactId>

            </plugin>

        </plugins>

    </build>

</project>
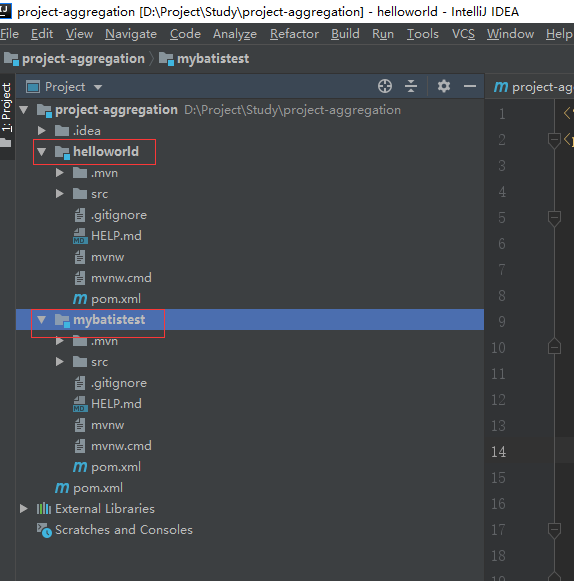
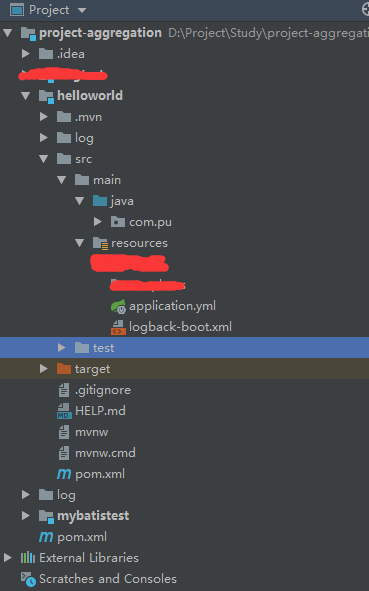
至此,聚合工程创建完毕,目录结构如下:
3.编写测试类
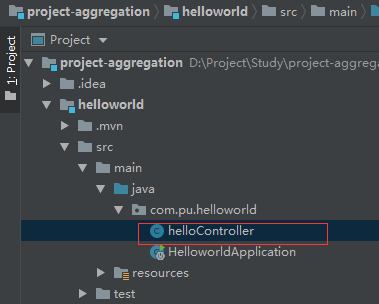
helloController.java
package com.pu.helloworld;

import org.springframework.web.bind.annotation.RequestMapping;

import org.springframework.web.bind.annotation.RequestParam;

import org.springframework.web.bind.annotation.RestController;

@RestController

public class helloController {

    @RequestMapping(value="/hello")

    //required=false 表示url中可以不传入id参数,此时就使用默认参数

    public String say(@RequestParam(value="id",required=false,defaultValue = "hello world") String input){

        return "your input :"+input;

    }

}
4.启动测试
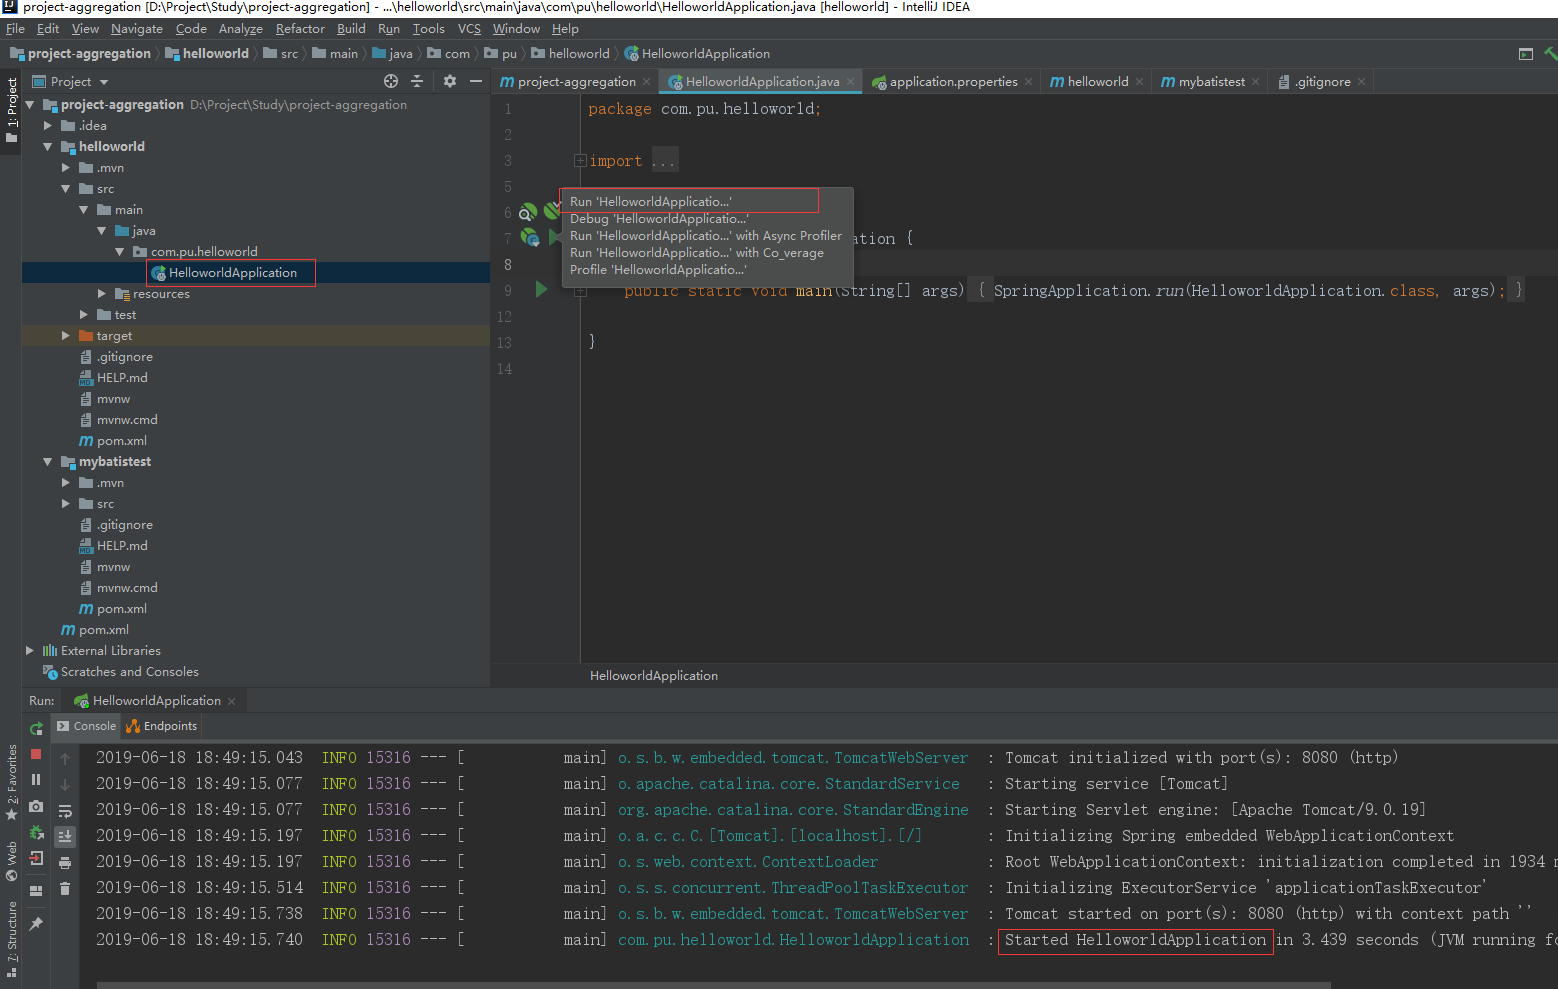
url测试
idea菜单:Tools-->HTTP Client-->Test RESTful Web Service

单击左上角运行

5.打包helloworld
helloworld工程目录
依次点clean-->compile-->package
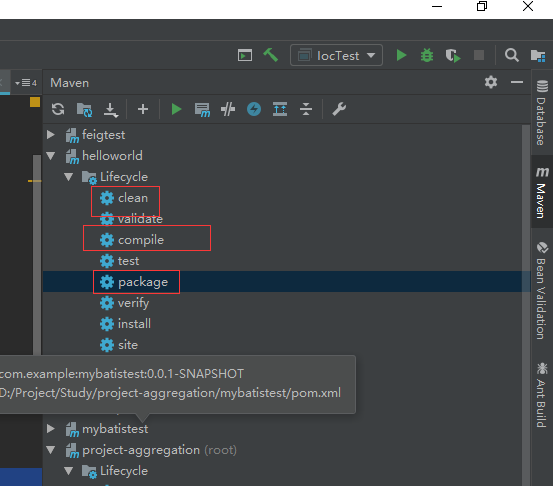
结果

压缩软件打开
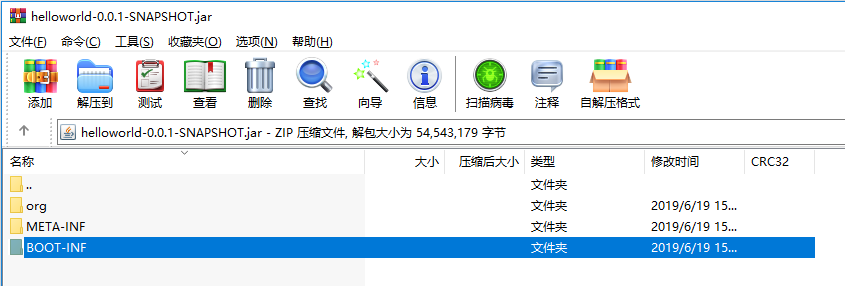
相关jar包已经打进去了

配置文件
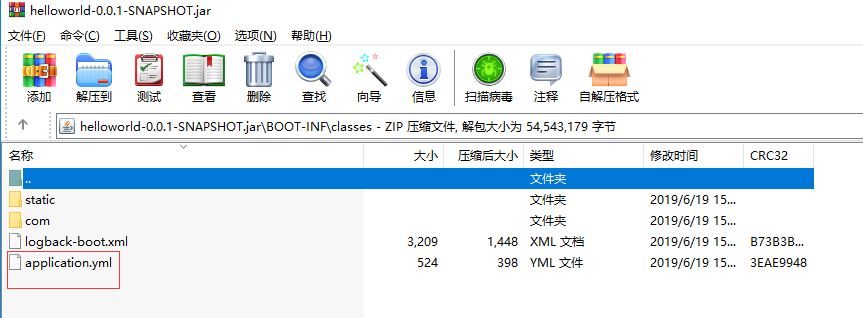
配置pom还是helloworld的pom.xml,并没有添加父pom内容,因为上面打包时已经把所需要的jar包打进去了
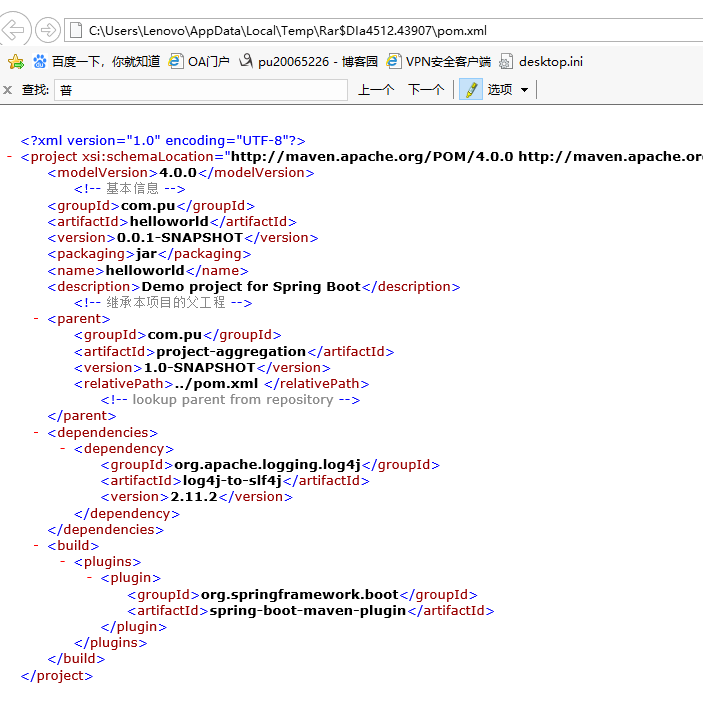
6.服务器发布
[testapp@localhost ~/javaProject/service-helloworld]$ pwd

/home/ap/testapp/javaProject/service-helloworld

[testapp@localhost ~/javaProject/service-helloworld]$ ll

总用量

-rw-rw-r--  testapp testapp       6月   : application.yml

-rw-rw-r--  testapp testapp  6月   : helloworld-0.0.-SNAPSHOT.jar

drwxrwxr-x  testapp testapp        6月   : log

-rw-rw-r--  testapp testapp      6月   : logback-boot.xml

-rw-rw-r--  testapp testapp       6月   : start.sh

-rw-rw-r--  testapp testapp        6月   : stop.sh

[testapp@localhost ~/javaProject/service-helloworld]$ cat application.yml

spring:

  application:

    name: service-helloword

server:

  port:

eureka:

  client:

    serviceUrl:

      #指向注册中心

      defaultZone: http://192.168.111.133:8888/eureka/

  instance:

    # 每间隔1s,向服务端发送一次心跳,证明自己依然”存活“

    lease-renewal-interval-in-seconds:

    # 告诉服务端,如果我2s之内没有给你发心跳,就代表我“死”了,将我踢出掉。

    lease-expiration-duration-in-seconds:

logging:

  config: classpath:logback-boot.xml[testapp@localhost ~/javaProject/service-helloworld]$ cat start.sh

nohup java -jar /home/ap/testapp/javaProject/service-helloworld/helloworld-0.0.-SNAPSHOT.jar --spring.config.location=/home/ap/testapp/javaProject/service-helloworld/application.yml --spring.application.index= --server.port= >/dev/null >& &

[testapp@localhost ~/javaProject/service-helloworld]$ sh start.sh

[testapp@localhost ~/javaProject/service-helloworld]$ cd log

[testapp@localhost ~/javaProject/service-helloworld/log]$ cat sys.log

-- ::, INFO (SpringApplication.java:)- No active profile set, falling back to default profiles: default

-- ::, INFO (StartupInfoLogger.java:)- Started HelloworldApplication in 44.58 seconds (JVM running for 60.889)

-- ::, DEBUG (helloController.java:)- your input :hello world

[testapp@localhost ~/javaProject/service-helloworld/log]$
注册中心
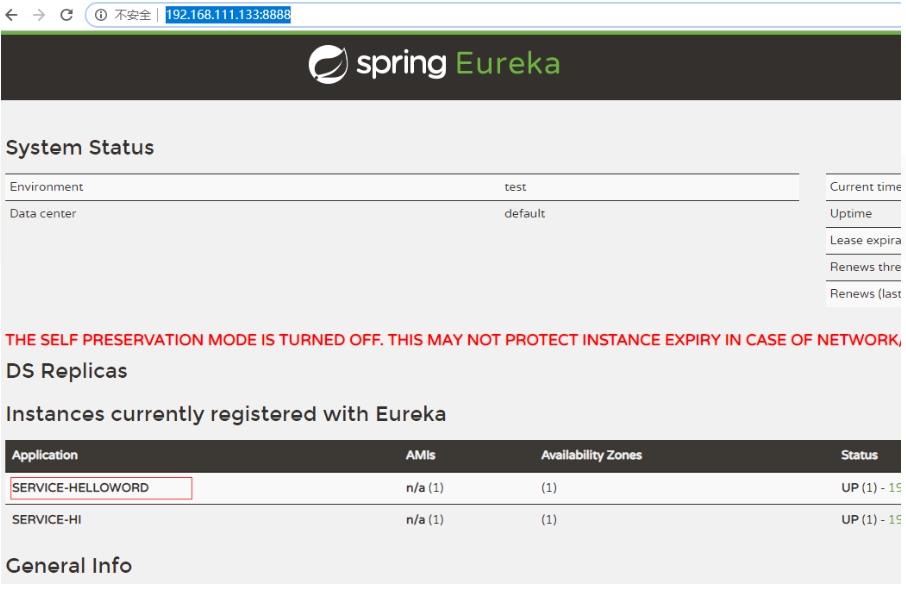
浏览器测试

附
logback-boot.xml
<?xml version="1.0" encoding="UTF-8"?>

<configuration>

    <!-- %m输出的信息,%p日志级别,%t线程名,%d日期,%c类的全名,%i索引【从数字0开始递增】,,, -->

    <!-- appender是configuration的子节点,是负责写日志的组件。 -->

    <!-- ConsoleAppender:把日志输出到控制台 -->

    <appender name="STDOUT" class="ch.qos.logback.core.ConsoleAppender">

        <encoder>

            <pattern>%d %p (%file:%line\)- %m%n</pattern>

            <!-- 控制台也要使用UTF-8,不要使用GBK,否则会中文乱码 -->

            <charset>UTF-8</charset>

        </encoder>

    </appender>

    <!-- RollingFileAppender:滚动记录文件,先将日志记录到指定文件,当符合某个条件时,将日志记录到其他文件 -->

    <!-- 以下的大概意思是:1.先按日期存日志,日期变了,将前一天的日志文件名重命名为XXX%日期%索引,新的日志仍然是sys.log -->

    <!--             2.如果日期没有发生变化,但是当前日志的文件大小超过1KB时,对当前日志进行分割 重命名-->

    <appender name="syslog"

              class="ch.qos.logback.core.rolling.RollingFileAppender">

        <File>log/sys.log</File>

        <!-- rollingPolicy:当发生滚动时,决定 RollingFileAppender 的行为,涉及文件移动和重命名。 -->

        <!-- TimeBasedRollingPolicy: 最常用的滚动策略,它根据时间来制定滚动策略,既负责滚动也负责出发滚动 -->

        <rollingPolicy class="ch.qos.logback.core.rolling.TimeBasedRollingPolicy">

            <!-- 活动文件的名字会根据fileNamePattern的值,每隔一段时间改变一次 -->

            <!-- 文件名:log/sys.2017-12-05.0.log -->

            <fileNamePattern>log/sys.%d.%i.log</fileNamePattern>

            <!-- 每产生一个日志文件,该日志文件的保存期限为30天 -->

            <maxHistory>30</maxHistory>

            <timeBasedFileNamingAndTriggeringPolicy class="ch.qos.logback.core.rolling.SizeAndTimeBasedFNATP">

                <!-- maxFileSize:这是活动文件的大小,默认值是10MB,本篇设置为1KB,只是为了演示 -->

                <maxFileSize>1KB</maxFileSize>

            </timeBasedFileNamingAndTriggeringPolicy>

        </rollingPolicy>

        <encoder>

            <!-- pattern节点,用来设置日志的输入格式 -->

            <pattern>

                %d %p (%file:%line\)- %m%n

            </pattern>

            <!-- 记录日志的编码 -->

            <charset>UTF-8</charset> <!-- 此处设置字符集 -->

        </encoder>

    </appender>

    <!-- 控制台输出日志级别 -->

    <root level="info">

        <appender-ref ref="STDOUT"/>

    </root>

    <!-- 指定项目中某个包,当有日志操作行为时的日志记录级别 -->

    <!-- com.appley为根包,也就是只要是发生在这个根包下面的所有日志操作行为的权限都是DEBUG -->

    <!-- 级别依次为【从高到低】:FATAL > ERROR > WARN > INFO > DEBUG > TRACE  -->

    <logger name="com.pu" level="DEBUG">

        <appender-ref ref="syslog"/>

    </logger>

</configuration>
application.yml
spring:

  application:

    name: service-helloword

server:

  port: 8704

eureka:

  client:

    serviceUrl:

      #指向注册中心

      defaultZone: http://192.168.111.133:8888/eureka/

  instance:

    # 每间隔1s,向服务端发送一次心跳,证明自己依然”存活“

    lease-renewal-interval-in-seconds: 1

    # 告诉服务端,如果我2s之内没有给你发心跳,就代表我“死”了,将我踢出掉。

    lease-expiration-duration-in-seconds: 2

logging:

  config: classpath:logback-boot.xml
spring boot创建多模块聚合工程的更多相关文章
- 利用spring boot创建java app
利用spring boot创建java app 背景 在使用spring框架开发的过程中,随着功能以及业务逻辑的日益复杂,应用伴随着大量的XML配置和复杂的bean依赖关系,特别是在使用mvc的时候各 ...
- spring cloud教程之使用spring boot创建一个应用
<7天学会spring cloud>第一天,熟悉spring boot,并使用spring boot创建一个应用. Spring Boot是Spring团队推出的新框架,它所使用的核心技术 ...
- Spring Kafka整合Spring Boot创建生产者客户端案例
每天学习一点点 编程PDF电子书.视频教程免费下载:http://www.shitanlife.com/code 创建一个kafka-producer-master的maven工程.整个项目结构如下: ...
- eclipse创建多模块maven工程小结
创建maven工程步骤 1 新建一个maven工程,如下图所示: 2 选择项目名称(或项目目录),如下图所示: 3 填写maven工程相关信息,注意父maven工程的packing方式是pom,如下图 ...
- Spring Boot的每个模块包详解
Spring Boot的每个模块包详解,具体如下: 1.spring-boot-starter 这是Spring Boot的核心启动器,包含了自动配置.日志和YAML. 2.spring-boot-s ...
- 【spring boot】5.spring boot 创建web项目并使用jsp作前台页面
贼烦的是,使用spring boot 创建web项目,然后我再idea下创建的,but 仅仅启动spring boot的启动类,就算整个项目都是好着的,就算是能够进入controller中,也不能成功 ...
- Spring Boot 创建hello world项目
Spring Boot 创建hello world项目 1.创建项目 最近在学习Spring Boot,这里记录使用IDEA创建Spring Boot的的过程 在1出勾选,选择2,点击Next 这里填 ...
- 【spring】1.2、Spring Boot创建项目
Spring Boot创建项目 在1.1中,我们通过"Spring Starter Project"来创建了一个项目,实际上是使用了Pivotal团队提供的全新框架Spring B ...
- spring boot 创建定时任务
@Scheduled默认创建的线程是单线程,任务的执行会受到上一个任务的影响,创建定时任务也比较简单 123456789101112 @Component@Configuration //1.主要用于 ...
随机推荐
- SpringBoot 参数检查 Controller中检查参数是否合法
springboot 验证 默认使用的是hibernate validator ,不用额外增加引用包,springboot已经内置包含. 设置pom相关依赖 <?xml version=&quo ...
- Java:CAS(乐观锁)
本文讲解CAS机制,主要是因为最近准备面试题,发现这个问题在面试中出现的频率非常的高,因此把自己学习过程中的一些理解记录下来,希望能对大家也有帮助. 什么是悲观锁.乐观锁?在java语言里,总有一些名 ...
- dp(买票优惠)
CodeForces - 1154F There are n shovels in the nearby shop. The i-th shovel costs ai bourles. Misha h ...
- 找不到opencv_world320d.dll的问题
OpenCV执行时出现找不到opencv_world320d.dll的问题,解决办法:把自己opencv文件目录下的D:\opencv3.2.0\opencv\build\x64\vc14\bin(本 ...
- Java ——数字图像处理(Java Graphics及其API简介)
1.创建一个Graphics对象BufferedImage bi = new BufferedImage(120,120, BufferedImage.TYPE_INT_ARGB);Graphics2 ...
- 搜索---DFS
DFS 广度优先一层一层遍历,每一层得到的所有新节点,要用队列存储起来以备下一层遍历的时候再遍历. 而深度优先遍历搜索在得到一个新节点时立即对新节点进行遍历:从节点0出发开始遍历,得到新节点6 ...
- 类的基本概念及self是什么东西?
class 类 对一类拥有相同属性的对象的抽象.蓝图.原型,在类中定义了这些对象都具备的属性.共同方法 object对象 一个对象就是一个类的实例化模型,一个类必须经过实例化后才能在程序中调用,一个类 ...
- python学习笔记(7)文件的访问与函数式编程
一.文件读写的3中方法 1.直接读入 fiel1=open('test.txt') file2=open('output.txt') while True: line=file1.readLine() ...
- HTML导航框架实现
导航栏界面(html_contents.html) <!DOCTYPE html> <html> <head> <meta charset=” utf-8” ...
- 一、Rabbit使用-安装教程
首先我去官网上面下载RabbitMQ安装包:https://www.rabbitmq.com/which-erlang.html 现在下载的版本是3.7.17 因为我erlong安装的是20.3
