006 使用SpringMVC开发restful API四--用户信息的修复与删除,重在注解的定义
一:任务
1.任务
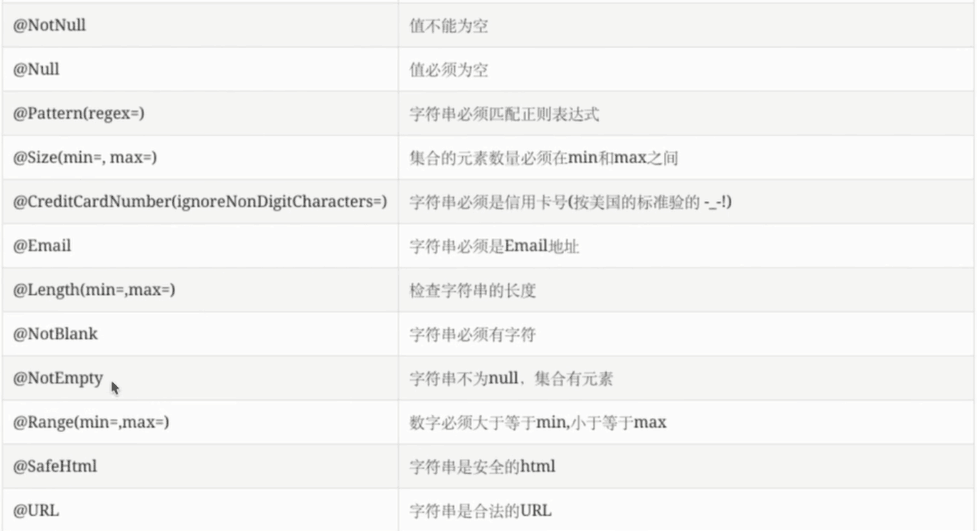
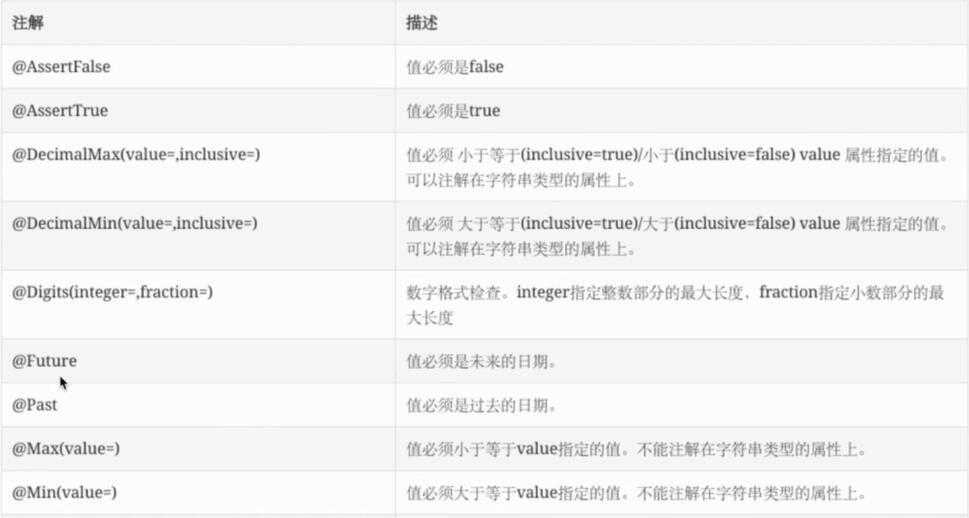
常用的验证注解
自定义返回消息
自定义校验注解
二:Hibernate Validator
1.常见的校验注解
2.程序
测试类
/**
* @throws Exception
* 更新程序,主要是校验程序的验证
*
*/
@Test
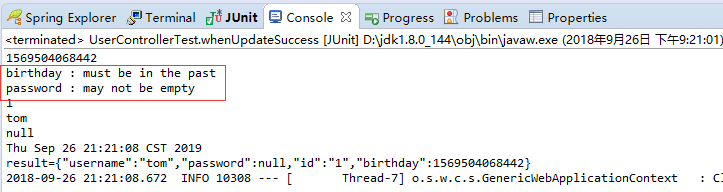
public void whenUpdateSuccess() throws Exception {
//JDK1.8的特性
Date date=new Date(LocalDateTime.now().plusYears(1).
atZone(ZoneId.systemDefault()).toInstant().toEpochMilli());
System.out.println(date.getTime());
String content="{\"id\":\"1\",\"username\":\"tom\",\"password\":null,\"birthday\":"+date.getTime()+"}";
String result=mockMvc.perform(MockMvcRequestBuilders.put("/user/1")
.contentType(MediaType.APPLICATION_JSON_UTF8)
.content(content))
.andExpect(MockMvcResultMatchers.status().isOk())
.andExpect(MockMvcResultMatchers.jsonPath("$.id").value("1"))
.andReturn().getResponse().getContentAsString();
System.out.println("result="+result);
}
User.java
 package com.cao.dto;

 import java.util.Date;

 import javax.validation.constraints.Past;

 import org.hibernate.validator.constraints.NotBlank;

 import com.fasterxml.jackson.annotation.JsonView;

 public class User {

     //接口

     public interface UserSimpleView {};

     public interface UserDetailView extends UserSimpleView {};    //继承之后,可以展示父的所有

     private String username;

     @NotBlank

     private String password;

     private String id;

     private Date birthday;

     @JsonView(UserSimpleView.class)

     public String getUsername() {

         return username;

     }

     public void setUsername(String username) {

         this.username = username;

     }

     @JsonView(UserDetailView.class)

     public String getPassword() {

         return password;

     }

     public void setPassword(String password) {

         this.password = password;

     }

     @JsonView(UserSimpleView.class)

     public String getId() {

         return id;

     }

     public void setId(String id) {

         this.id = id;

     }

     @Past

     @JsonView(UserSimpleView.class)

     public Date getBirthday() {

         return birthday;

     }

     public void setBirthday(Date birthday) {

         this.birthday = birthday;

     }

 }
控制类
 @PutMapping("/{id:\\d+}")

     public User update(@Valid @RequestBody User user,BindingResult errors){

         if(errors.hasErrors()) {

             errors.getAllErrors().stream().forEach(error->{

                 FieldError fieldError=(FieldError)error;

                 String message=fieldError.getField()+" : "+fieldError.getDefaultMessage();

                 System.out.println(message);

             }

         );

         }

         System.out.println(user.getId());

         System.out.println(user.getUsername());

         System.out.println(user.getPassword());

         System.out.println(user.getBirthday());

         user.setId("1");

         return user;

     }
效果:
3.完善,自定义提示信息
打印的提示信息是英文的,这里提示中文的
在类上进行定义
 package com.cao.dto;

 import java.util.Date;

 import javax.validation.constraints.Past;

 import org.hibernate.validator.constraints.NotBlank;

 import com.fasterxml.jackson.annotation.JsonView;

 public class User {

     //接口

     public interface UserSimpleView {};

     public interface UserDetailView extends UserSimpleView {};    //继承之后,可以展示父的所有

     private String username;

     @NotBlank(message="密码不能为空")

     private String password;

     private String id;

     private Date birthday;

     @JsonView(UserSimpleView.class)

     public String getUsername() {

         return username;

     }

     public void setUsername(String username) {

         this.username = username;

     }

     @JsonView(UserDetailView.class)

     public String getPassword() {

         return password;

     }

     public void setPassword(String password) {

         this.password = password;

     }

     @JsonView(UserSimpleView.class)

     public String getId() {

         return id;

     }

     public void setId(String id) {

         this.id = id;

     }

     @Past(message="生日必须是过去的时间")

     @JsonView(UserSimpleView.class)

     public Date getBirthday() {

         return birthday;

     }

     public void setBirthday(Date birthday) {

         this.birthday = birthday;

     }

 }
效果

三:自定义校验注解
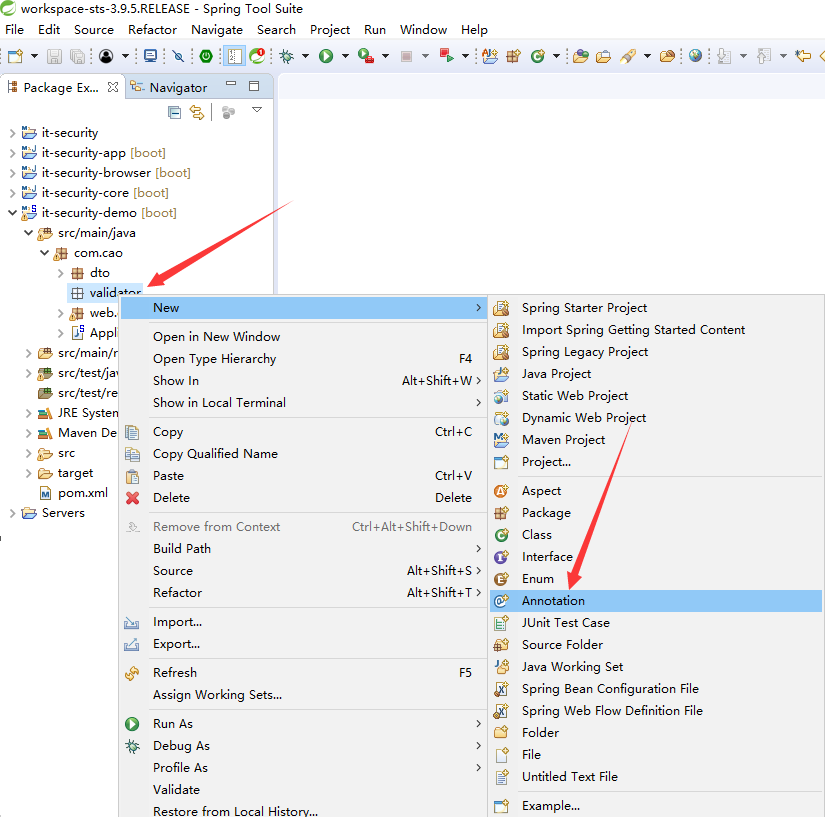
1.新建一个Annotation
2.程序
校验类
 package com.cao.validator;

 import java.lang.annotation.ElementType;

 import java.lang.annotation.Retention;

 import java.lang.annotation.RetentionPolicy;

 import java.lang.annotation.Target;

 import javax.validation.Constraint;

 import javax.validation.Payload;

 @Target({ElementType.METHOD,ElementType.FIELD})

 @Retention(RetentionPolicy.RUNTIME)

 @Constraint(validatedBy = { MyContraintValidator.class })

 public @interface MyConstraint {

     //必写

     String message() default "{org.hibernate.validator.constraints.NotBlank.message}";

     Class<?>[] groups() default { };

     Class<? extends Payload>[] payload() default { };

     //

 }
校验处理类
import javax.validation.ConstraintValidatorContext; import org.springframework.beans.factory.annotation.Autowired; import com.cao.service.HelloService;
import com.cao.service.impl.HelloServiceImpl; public class MyContraintValidator implements ConstraintValidator<MyConstraint,Object> { //这个校验中可以注入spring容器中的任何东西
@Autowired
public HelloService hello; @Override
public void initialize(MyConstraint constraintAnnotation) {
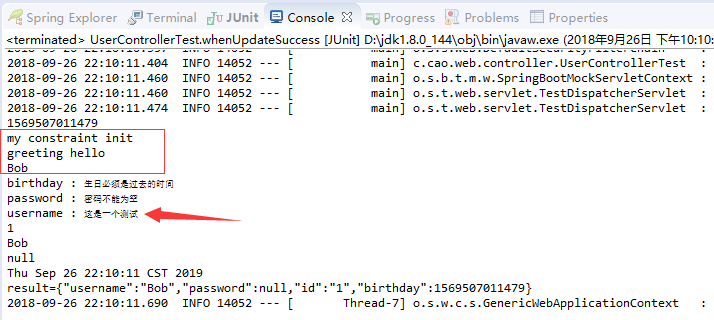
System.out.println("my constraint init");
} @Override
public boolean isValid(Object value, ConstraintValidatorContext context) {
hello.greeting("tomm");
System.out.println(value);
return false;
} }
注入使用的服务
 package com.cao.service;

 public interface HelloService {

     public String greeting(String name);

 }
 package com.cao.service.impl;

 import org.springframework.stereotype.Service;

 import com.cao.service.HelloService;

 //成为Spring容器中的服务了

 @Service

 public class HelloServiceImpl implements HelloService {

     @Override

     public String greeting(String name) {

         System.out.println("greeting hello");

         return "hello "+name;

     }

 }
使用,放在User.java上
@MyConstraint(message="这是一个测试")

private String username;
测试类
     /**

      * @throws Exception

      *  更新程序,主要是校验程序的验证

      *

      */

     @Test

     public void whenUpdateSuccess() throws Exception {

         //JDK1.8的特性

         Date date=new Date(LocalDateTime.now().plusYears(1).

                 atZone(ZoneId.systemDefault()).toInstant().toEpochMilli());

         System.out.println(date.getTime());

         String content="{\"id\":\"1\",\"username\":\"Bob\",\"password\":null,\"birthday\":"+date.getTime()+"}";

         String result=mockMvc.perform(MockMvcRequestBuilders.put("/user/1")

                 .contentType(MediaType.APPLICATION_JSON_UTF8)

                 .content(content))

             .andExpect(MockMvcResultMatchers.status().isOk())

             .andExpect(MockMvcResultMatchers.jsonPath("$.id").value("1"))

             .andReturn().getResponse().getContentAsString();

         System.out.println("result="+result);

     }
效果
四:用户删除
1.程序
测试类
 /**

      *  删除程序,主要是校验程序的验证

      * @throws Exception

      */

     @Test

     public void whenDeleteSuccess() throws Exception {

         mockMvc.perform(MockMvcRequestBuilders.delete("/user/1")

                 .contentType(MediaType.APPLICATION_JSON_UTF8))

             .andExpect(MockMvcResultMatchers.status().isOk());

     }
控制类
 @DeleteMapping("/{id:\\d+}")

     public void delete(@PathVariable String id){

         System.out.println("id="+id);

     }
006 使用SpringMVC开发restful API四--用户信息的修复与删除,重在注解的定义的更多相关文章
- 003 使用SpringMVC开发restful API--查询用户
一:介绍说明 1.介绍 2.restful api的成熟度 二:编写Restful API的测试用例 1.引入spring的测试框架 在effective pom中查找 2.新建测试包,测试类 3.测 ...
- 004 使用SpringMVC开发restful API二--编写用户详情
一:编写用户详情服务 1.任务 @PathVariable隐射url片段到java方法的参数 在url声明中使用正则表达式 @JsonView控制json输出内容 二:@PathVariable 1. ...
- 007 使用SpringMVC开发restful API五--异常处理
一:任务 1.任务 Spring Boot中默认的错误机制处理机制 自定义异常处理 二:Spring Boot中的默认错误处理机制 1.目前 浏览器访问的时候, restful 接口主要是根据状态码进 ...
- 005 使用SpringMVC开发restful API三--处理创建请求
一:主要任务 1.说明 @RequestBody 映射请求体到java方法的参数 日期类型参数的处理 @Valid注解 BindingResult验证请求参数的合法性并处理校验结果 二:@Reques ...
- 使用Spring MVC开发RESTful API
第3章 使用Spring MVC开发RESTful API Restful简介 第一印象 左侧是传统写法,右侧是RESTful写法 用url描述资源,而不是行为 用http方法描述行为,使用http状 ...
- springmvc/springboot开发restful API
非rest的url写法: 查询 GET /user/query?name=tom 详情 GET /user/getinfo? 创建 POST /user/create?name=tom 修改 POST ...
- ASP.NET Core Web API 开发-RESTful API实现
ASP.NET Core Web API 开发-RESTful API实现 REST 介绍: 符合REST设计风格的Web API称为RESTful API. 具象状态传输(英文:Representa ...
- flask开发restful api系列(8)-再谈项目结构
上一章,我们讲到,怎么用蓝图建造一个好的项目,今天我们继续深入.上一章中,我们所有的接口都写在view.py中,如果几十个,还稍微好管理一点,假如上百个,上千个,怎么找?所有接口堆在一起就显得杂乱无章 ...
- flask开发restful api
flask开发restful api 如果有几个原因可以让你爱上flask这个极其灵活的库,我想蓝图绝对应该算上一个,部署蓝图以后,你会发现整个程序结构非常清晰,模块之间相互不影响.蓝图对restfu ...
随机推荐
- 【原创】大数据基础之Hive(3)最简绿色部署
hadoop部署参考:https://www.cnblogs.com/barneywill/p/10428098.html 1 拷贝到所有服务器上并解压 # ansible all-servers - ...
- Python基础-入门之路PYTHON-包 相对导入&绝对导入
什么是包 包也是一种模块,但本质上就是一个文件夹 对于使用者而言 使用方式和模块没有任何区别 本质上就是一个文件夹 不同之处在于 多了一个__init__.py 叫包的初始化文件 import导入模块 ...
- Golang服务器热重启、热升级、热更新(safe and graceful hot-restart/reload http server)详解
服务端代码经常需要升级,对于线上系统的升级常用的做法是,通过前端的负载均衡(如nginx)来保证升级时至少有一个服务可用,依次(灰度)升级. 而另一种更方便的方法是在应用上做热重启,直接更新源码.配置 ...
- 关于deepin linux15.6-15.9.1系统播放视频卡顿解决办法
关于deepin linux15.6-15.9.1系统播放视频卡顿解决办法 chrome浏览器 关闭chrome硬件加速模式 设置>高级>使用硬件加速模式 注释:由于视频卡顿是因显卡驱动问 ...
- python http请求类
# -*- coding: UTF-8 -*- # coding="utf-8" import httplib2 import json from urllib.parse imp ...
- AI-restful接口写法
AI-restful接口写法 restful接口规范 http协议请求方式:GET POST DELETE PUT PATCH OPTION HEAD 设计接口时必须使用这种格式的数据 GET 查看数 ...
- mysql 5.7 ERROR 1820 (HY000):
在首次登录Mysql 5.7 后,mysql数据库做出了很多的调整.执行大部分操作会提示这个错误 : ERROR 1820 (HY000): You must reset your password ...
- Python深度学习案例1--电影评论分类(二分类问题)
我觉得把课本上的案例先自己抄一遍,然后将书看一遍.最后再写一篇博客记录自己所学过程的感悟.虽然与课本有很多相似之处.但自己写一遍感悟会更深 电影评论分类(二分类问题) 本节使用的是IMDB数据集,使用 ...
- jQuery分步步骤
插件描述:jQuery上一步.下一步,分步步骤,兼容性如下: 使用方法 1.引入样式和脚本 <link rel="stylesheet" type="text/cs ...
- Jmeter入门(压力测试)
Jmeter介绍 Jmeter是一款使用Java开发的,开源免费的,测试工具, 主要用来做功能测试和性能测试(压力测试/负载测试). 而且用Jmeter 来测试 Restful API, 非常好用. ...