ios原生项目内嵌u3d工程
本文一反常态,目标是把u3d工程以framewWork形式 内嵌原生IOS项目
1、xcode中新建Cocoa Touch FrameWork。取名u3dFrameWork
2、把u3d导出的xcode中,Class、Library 拷贝到u3dFrameWork 中 采用
 方式引入
方式引入
从library中移除掉libil2cpp
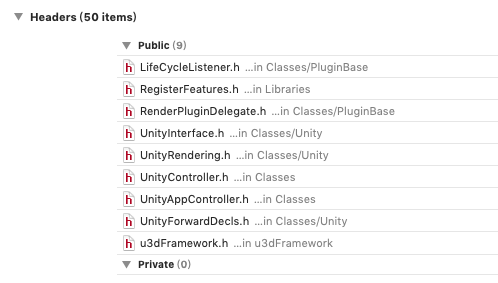
3 以下头文件移动到public
4、Build Phases 下头文件引用中 移除RegisterMonoModules.h compile sources 中移除main.mm 和RegisterMonoModules.cpp
5、配置修改
- Build Settings -> Header Search Paths:
$(inherited) "$(SRCROOT)/Classes" "$(SRCROOT)" $(SRCROOT)/Classes/Native $(SRCROOT)/Libraries/bdwgc/include $(SRCROOT)/Libraries/libil2cpp/include - Build Settings -> Library Search Paths:
$(inherited) "$(SRCROOT)" "$(SRCROOT)/Libraries" - Build Settings -> Prefix Header:
Classes/Prefix.pch - Build Settings -> Mismatched Return Type:
Yes - Build Settings -> Enable C++ Exceptions:
Yes - Build Settings -> Other Linker Flags:
$(inherited) -weak_framework CoreMotion -weak-lSystem - Build Settings -> Mach-O Type:
Static Library - Build Settings ->Other C Flags -> $(inherited) -DINIT_SCRIPTING_BACKEND=1 -fno-strict-overflow -DRUNTIME_IL2CPP=1
- Build Settings -> Build Avtive Achitecture Only:
No
6 u3dFramework.h添加文件引用
#import <u3dFramework/UnityAppController.h>
#import <u3dFramework/UnityController.h>
#import <u3dFramework/RenderPluginDelegate.h>
#import <u3dFramework/UnityInterface.h>
#import <u3dFramework/UnityRendering.h>
#import <u3dFramework/RegisterFeatures.h>
#import <u3dFramework/UnityForwardDecls.h>
#import <u3dFramework/LifeCycleListener.h>
7、

新建UnityController.h****************************
#import <Foundation/Foundation.h>
#import "UnityAppController.h"
@interface UnityController:UnityAppController
@property (nonatomic, readonly, weak) UIView *playView; /* 展示Unity的view */
+ (instancetype)instance;
- (void)initUnity;
- (void)pauseUnity;
- (void)startUnity;
- (BOOL)isPaused;
@end
新建UnityController.mm************************
#import "UnityController.h"
#import "UnityAppController.h"
#import "DisplayManager.h"
#import "UnityView.h"
#import "UnityAppController+ViewHandling.h"
#import "UnityAppController+Rendering.h"
@interface UnityController()
@property (nonatomic, assign) BOOL isInitUnity;
@end
@implementation UnityController
+ (instancetype)instance {
return (UnityController *)[[UIApplication sharedApplication] valueForKeyPath:@"delegate.unityController"];
}
- (instancetype)init
{
self = [super init];
if (self) {
self.isInitUnity = NO;
// 注册Unity的事件
[[NSNotificationCenter defaultCenter] addObserver:self selector:@selector(appDidBecomeActive:) name:UIApplicationDidBecomeActiveNotification object:nil];
[[NSNotificationCenter defaultCenter] addObserver:self selector:@selector(appWillEnterForeground:) name:UIApplicationWillEnterForegroundNotification object:nil];
[[NSNotificationCenter defaultCenter] addObserver:self selector:@selector(appWillResignActive:) name:UIApplicationWillResignActiveNotification object:nil];
[[NSNotificationCenter defaultCenter] addObserver:self selector:@selector(appWillTerminate:) name:UIApplicationWillTerminateNotification object:nil];
[[NSNotificationCenter defaultCenter] addObserver:self selector:@selector(appDidReceiveMemoryWarning:) name:UIApplicationDidReceiveMemoryWarningNotification object:nil];
}
return self;
}
- (UIView *)playView {
return self.unityView;
}
static const int constsection = 0;
- (void)initUnity {
if (!self.isInitUnity) {
if ([UIDevice currentDevice].generatesDeviceOrientationNotifications == NO)
[[UIDevice currentDevice] beginGeneratingDeviceOrientationNotifications];
UnityInitApplicationNoGraphics([[[NSBundle mainBundle] bundlePath] UTF8String]);
[self selectRenderingAPI];
[UnityRenderingView InitializeForAPI: self.renderingAPI];
_window = nil;
_unityView = [self createUnityView];
[DisplayManager Initialize];
_mainDisplay = [DisplayManager Instance].mainDisplay;
[_mainDisplay createWithWindow: _window andView: _unityView];
[super applicationDidBecomeActive:[UIApplication sharedApplication]];
self.isInitUnity = YES;
}
}
- (void)pauseUnity {
//[self applicationWillResignActive:[UIApplication sharedApplication]];
UnityPause(1);
}
- (void)startUnity {
//[self applicationDidBecomeActive:[UIApplication sharedApplication]];
UnityPause(0);
}
- (BOOL)isPaused {
if (UnityIsPaused() == 1) {
return YES;
}
else {
return NO;
}
}
- (void)appWillEnterForeground:(NSNotification *)notification {
[self applicationWillEnterForeground:[UIApplication sharedApplication]];
}
- (void)appDidBecomeActive:(NSNotification *)notification {
if (nil == self.unityView) {
return;
}
[self applicationDidBecomeActive:[UIApplication sharedApplication]];
}
- (void)appWillResignActive:(NSNotification *)notification {
[self applicationWillResignActive:[UIApplication sharedApplication]];
}
- (void)appWillTerminate:(NSNotification *)notification {
[self applicationWillTerminate:[UIApplication sharedApplication]];
}
- (void)appDidReceiveMemoryWarning:(NSNotification *)notification {
[self applicationDidReceiveMemoryWarning:[UIApplication sharedApplication]];
}
@end
UnityAppController.h做如下修改******************************
inline UnityAppController* GetAppController()
{
return (UnityAppController *)[[UIApplication sharedApplication] valueForKeyPath:@"delegate.unityController"];
}
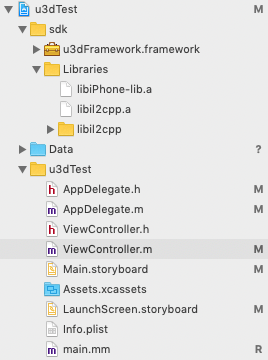
二 新建ios原生工程
新建sdk文件夹。将上歩FrameWork和Libraries放入sdk中。Libraries中保留libiPhone-lib.a libil2cpp.a libil2cpp 引入sdk文件夹
拷贝u3d工程中Data文件夹 引入工程
Build Settings -> Header Search Paths:$(PROJECT_DIR)/sdk/Libraries/libil2cpp/include
Build Settings -> Library Search Paths: $(inherited) $(PROJECT_DIR)/sdk/Libraries
Build Settings -> Other Linker Flags:-force_load "$(PROJECT_DIR)/sdk/u3dFramework.framework/u3dFramework"
AppDelegate.m做如下修改
#import "AppDelegate.h"
#import <u3dFramework/u3dFramework.h>
@interface AppDelegate ()
@property(strong,nonatomic) UnityController *unityController;
@end
@implementation AppDelegate
- (BOOL)application:(UIApplication *)application didFinishLaunchingWithOptions:(NSDictionary *)launchOptions {
// Override point for customization after application launch.
if (_unityController == nil)
_unityController = [[UnityController alloc] init];
return YES;
}
ViewController.m做如下操作******************************
#import "ViewController.h"
#import <u3dFramework/u3dFramework.h>
@interface ViewController ()
@end
@implementation ViewController
- (void)viewDidLoad {
[super viewDidLoad];
// Do any additional setup after loading the view, typically from a nib.
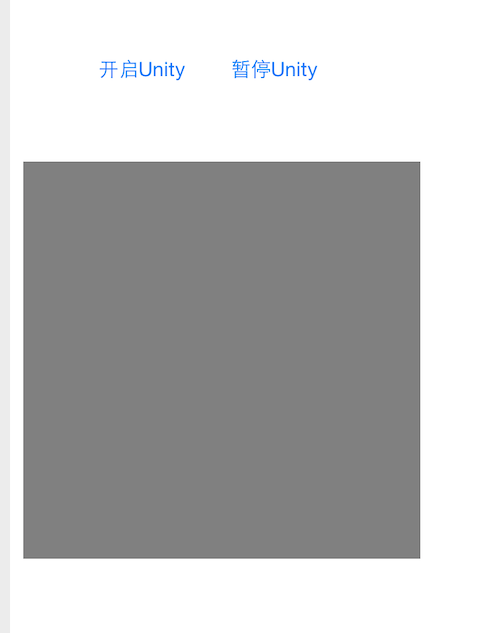
UIButton *button = [UIButton buttonWithType:UIButtonTypeRoundedRect];
button.frame = CGRectMake(60, 60, 80, 40);
[button setTitle:@"开启Unity" forState:UIControlStateNormal];
[self.view addSubview:button];
[button addTarget:self action:@selector(clickHandler:) forControlEvents:UIControlEventTouchUpInside];
UIButton *button1 = [UIButton buttonWithType:UIButtonTypeRoundedRect];
button1.frame = CGRectMake(160, 60, 80, 40);
[button1 setTitle:@"暂停Unity" forState:UIControlStateNormal];
[self.view addSubview:button1];
[button1 addTarget:self action:@selector(clickHandler1:) forControlEvents:UIControlEventTouchUpInside];
// 供Unity显示的View
UIView *view = [[UIView alloc] initWithFrame:CGRectMake(10, 150, 300, 300)];
[view setBackgroundColor:[UIColor grayColor]];
[view setTag:22];
[self.view addSubview:view];
}
- (void)didReceiveMemoryWarning {
[super didReceiveMemoryWarning];
// Dispose of any resources that can be recreated.
}
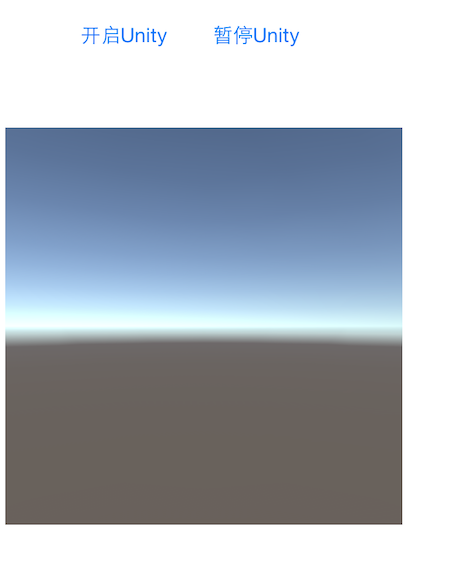
- (void) clickHandler:(id)sender
{
[[UnityController instance] initUnity];
[UnityController instance].playView.frame = [self.view viewWithTag:22].bounds;
[[self.view viewWithTag:22] addSubview:[UnityController instance].playView];
}
- (void) clickHandler1:(id)sender
{
if ([[UnityController instance] isPaused]) {
[[UnityController instance] startUnity];
}
else {
[[UnityController instance] pauseUnity];
}
}
@end
ios原生项目内嵌u3d工程的更多相关文章
- iOS原生项目中集成React Native
1.本文的前提条件是,电脑上已经安装了CocoaPods,React Native相关环境. 2.使用Xcode新建一个工程.EmbedRNMeituan [图1] 3.使用CocoaPods安装Re ...
- iOS原生项目集成React Native模块
今天周末,弄弄Native和React Native之间的交互.首先,先在iOS原生项目中集成React Native模块: 注意事项: 1.因为react native的版本问题,部分细节可能有所不 ...
- iOS 建立项目过滤机制 —— 给工程添加忽略文件.gitignore
目前iOS 项目 主要忽略 临时文件.配置文件.或者生成文件等,在不同开发端这些文件会大有不同,如果 git add .把这些文件都push到远程, 就会造成不同开发端频繁改动和提交的问题. ...
- cocos2d导入iOS原生项目
最近公司最新发下任务让融合一个cocos2dx写的游戏项目融合进现有项目,当看到要求时内心瞬间无数羊驼奔腾.------ 虽说内心是拒绝的,但是任务已经派发就必须要完成啊.所以在网上搜了大量的融入教程 ...
- ios下app内嵌h5页面是video适配问题
ios下做新闻详情用h5页面实现然后打包到app中,其中新闻详情页会有视频,安卓下video的poster可以做到适应video大小,但是ios下会按照poster图片大小将video等比撑大,但是视 ...
- React Native项目集成iOS原生模块
今天学习一下怎么在React Native项目中集成iOS原生模块,道理和在iOS原生项目中集成React Native模块类似.他们的界面跳转靠的都是iOS原生的UINavigationContro ...
- React Native与原生项目连接与发布
前面的各种环境配置按照官方文档一步一步来,挺详细,宝宝在这里就不多说废话了. 其次,前面的配置,我参照的这个博主的文章React Native 集成到iOS原生项目 下面是宝宝掉过的坑(半径15M): ...
- iOS原生混合RN开发最佳实践
iOS原生混合RN开发详解 做过原生iOS开发或者Android开发的同学们肯定也都了解Hybrid,有一些Hybrid的开发经验,目前我们企业开发中运用最广泛的Hybrid App技术就是原生与H5 ...
- 查看和指定SpringBoot内嵌Tomcat的版本
查看当前使用的Tomcat版本号 Maven Repository中查看 比如我们需要查Spring Boot 2.1.4-RELEASE的内嵌Tomcat版本, 可以打开链接: https://mv ...
随机推荐
- servlet 表单加上multipart/form-data后request.getParameter获取NULL(已解决)
先上结论(可能不对,因为这是根据实践猜测而来,欢迎指正) 表单改为multipart/form-data传值后,数据就不能通过普通的request.getParameter获取. 文件和文件名通过Fi ...
- python之列表和生成器表达式篇
一.协程函数的应用 写一个装饰器用于让协程函数不需要输入再执行一次next()函数 分析: 在装饰器中生成该协程函数的生成器, 并且执行一次next()函数 def firstNext(func): ...
- Mac Mysql 修改初始化密码
第一步: 点击系统偏好设置->最下边点MySQL,在弹出页面中,关闭服务 第二步:进入终端输入:cd /usr/local/mysql/bin/回车后 登录管理员权限 sudo su回车后输入以 ...
- web建包创建类
1.创建一个人类名
- GMA Round 1 YGGDRASIL
传送门 YGGDRASIL 在YGGDRASIL世界,一年有213天. Demiurge推广种植了一种植物,姑且称之为“黄金果”,它第一期生长需要140天,此后第i期生长需要的天数$a_i$满足$a_ ...
- 【jvm】windows下查看java进程下多线程的相关信息
微软工具:Process Explorer v15.3 下载地址:http://technet.microsoft.com/en-us/sysinternals/bb896653.aspx 参考教程: ...
- SpringCloud无废话入门02:Ribbon负载均衡
1.白话负载均衡 在上一篇的介绍中,我们创建了两个一模一样的服务提供者:Provider1和Provider2,然后它们提供的服务也一模一样,都叫Hello-Service.为什么一样的服务我们要部署 ...
- 08、共享变量(Broadcast Variable和Accumulator)
共享变量工作原理 Spark一个非常重要的特性就是共享变量. 默认情况下,如果在一个算子的函数中使用到了某个外部的变量,那么这个变量的值会被拷贝到每个task中.此时每个task只能操作自己的那份 ...
- 在Mac平台上安装配置ELK时的一些总结
一.前言 大数据处理是流行的一些表现,在不断壮大的数据处理中,怎么样处理数据才是我们继续做好开发的正道.本文章来自网络,不敢原创,但是也有很大借鉴. 二.MAC安装ELK 首先是安装elast ...
- jQuery CSS 操作 - offset() 方法
今天在一个页面需要知道jquery版本号,来决定使用什么样的方法,有以下方式可以获取到 $.fn.jquery $.prototype.jquery 这两种方式都可以获取到jquery的版本号 --- ...