SpringBoot2.0之整合Kafka
maven依赖:
<project xmlns="http://maven.apache.org/POM/4.0.0" xmlns:xsi="http://www.w3.org/2001/XMLSchema-instance"

    xsi:schemaLocation="http://maven.apache.org/POM/4.0.0 http://maven.apache.org/xsd/maven-4.0.0.xsd">

    <modelVersion>4.0.0</modelVersion>

    <groupId>com.itmayiedu</groupId>

    <artifactId>springboot2.0_kafka</artifactId>

    <version>0.0.1-SNAPSHOT</version>

    <parent>

        <groupId>org.springframework.boot</groupId>

        <artifactId>spring-boot-starter-parent</artifactId>

        <version>2.0.1.RELEASE</version>

    </parent>

    <dependencies>

        <!-- springBoot集成kafka -->

        <dependency>

            <groupId>org.springframework.kafka</groupId>

            <artifactId>spring-kafka</artifactId>

        </dependency>

        <!-- SpringBoot整合Web组件 -->

        <dependency>

            <groupId>org.springframework.boot</groupId>

            <artifactId>spring-boot-starter-web</artifactId>

        </dependency>

    </dependencies>

</project>
yml:
# kafka

spring:

  kafka:

    # kafka服务器地址(可以多个)

    bootstrap-servers: 192.168.91.1:9092,192.168.91.3:9092,192.168.91.4:9092

    consumer:

      # 指定一个默认的组名

      group-id: kafka2

      # earliest:当各分区下有已提交的offset时,从提交的offset开始消费;无提交的offset时,从头开始消费

      # latest:当各分区下有已提交的offset时,从提交的offset开始消费;无提交的offset时,消费新产生的该分区下的数据

      # none:topic各分区都存在已提交的offset时,从offset后开始消费;只要有一个分区不存在已提交的offset,则抛出异常

      auto-offset-reset: earliest

      # key/value的反序列化

      key-deserializer: org.apache.kafka.common.serialization.StringDeserializer

      value-deserializer: org.apache.kafka.common.serialization.StringDeserializer

    producer:

      # key/value的序列化

      key-serializer: org.apache.kafka.common.serialization.StringSerializer

      value-serializer: org.apache.kafka.common.serialization.StringSerializer

      # 批量抓取

      batch-size: 65536

      # 缓存容量

      buffer-memory: 524288

      # 服务器地址

      bootstrap-servers: 192.168.91.1:9092,192.168.91.3:9092,192.168.91.4:9092
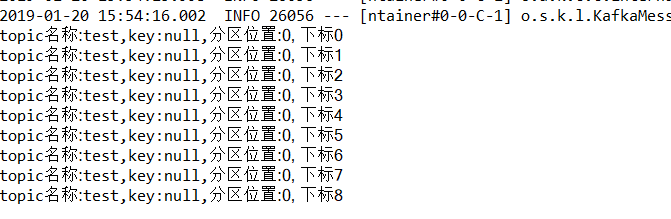
消费者:消费 topic为“test”的消息
/**

     * 消费者使用日志打印消息

     */

    @KafkaListener(topics = "test")   //监听同一个主题

    public void receive(ConsumerRecord<?, ?> consumer) {

        System.out.println("topic名称:" + consumer.topic() + ",key:" + consumer.key() + ",分区位置:" + consumer.partition()

                + ", 下标" + consumer.offset());

    }
可以看到分区都是0昂~ tets创建时候 partition是1哦 就是在proker1上创建的主题
写个controller,自己生产 ,自己消费
import org.apache.kafka.clients.consumer.ConsumerRecord;

import org.springframework.beans.factory.annotation.Autowired;

import org.springframework.boot.SpringApplication;

import org.springframework.boot.autoconfigure.SpringBootApplication;

import org.springframework.kafka.annotation.KafkaListener;

import org.springframework.kafka.core.KafkaTemplate;

import org.springframework.web.bind.annotation.RequestMapping;

import org.springframework.web.bind.annotation.RestController;

@RestController

@SpringBootApplication

public class KafkaController {

    /**

     * 注入kafkaTemplate

     */

    @Autowired

    private KafkaTemplate<String, String> kafkaTemplate;

    /**

     * 发送消息的方法

     *

     * @param key

     *            推送数据的key

     * @param data

     *            推送数据的data

     */

    private void send(String key, String data) {

        // topic 名称 key data 消息数据

        kafkaTemplate.send("my_test_topic", key, data);  //三个参数: topic名称      key   消息数据

    }

    // test 主题 1 my_test 3

    @RequestMapping("/kafka")

    public String testKafka() {

        int iMax = 6;

        for (int i = 1; i < iMax; i++) {  //循环发6次kafka消息

            send("key" + i, "data" + i);

        }

        return "success";

    }

    public static void main(String[] args) {

        SpringApplication.run(KafkaController.class, args);

    }

    /**

     * 消费者使用日志打印消息

     */

    @KafkaListener(topics = "my_test_topic")   //监听同一个主题

    public void receive(ConsumerRecord<?, ?> consumer) {

        System.out.println("topic名称:" + consumer.topic() + ",key:" + consumer.key() + ",分区位置:" + consumer.partition()

                + ", 下标" + consumer.offset());

    }

}
运行后:

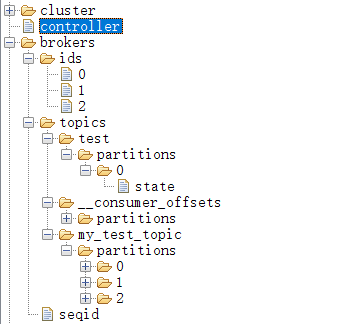
可以看到key与对应的分区存储情况! 分区就是不同的 broker 比如key1 和 key2 存放在 第三个broker~
也可以查看每个节点的日志 000000000.log的情况 我这边显示乱码 我就不多做展示了
看看我们的zk:
SpringBoot2.0之整合Kafka的更多相关文章
- SpringBoot2.0之整合Apollo
Spring Boot客户端对接阿波罗服务器端 核心源码都在这个压缩包里面 封装好了环境 运行shell脚本就ok了 下面进入到本地maven仓库: 远程仓库apollo的jar包 只能打包到本地或者 ...
- springboot2.0 快速集成kafka
一.kafka搭建 参照<kafka搭建笔记> 二.版本 springboot版本 <parent> <groupId>org.springframework.bo ...
- SpringBoot2.0之整合ElasticSearch
就类比数据库到时候去实现 服务器端配置 集群名字 与yml名字一致 pom: <project xmlns="http://maven.apache.org/POM/4.0.0&qu ...
- SpringBoot2.0之整合ActiveMQ(发布订阅模式)
发布订阅模式与前面的点对点模式很类似,简直一毛一样 注意:发布订阅模式 先启动消费者 公用pom: <project xmlns="http://maven.apache.org/PO ...
- SpringBoot2.0之整合ActiveMQ(点对点模式)
<project xmlns="http://maven.apache.org/POM/4.0.0" xmlns:xsi="http://www.w3.org/20 ...
- SpringBoot2.0之整合Dubbo
Dubbo支持协议 Dubbo支持dubbo.rmi.hessian.http.webservice.thrift.redis等多种协议,但是Dubbo官网是推荐我们使用Dubbo协议的. Sprin ...
- 基于 SpringBoot2.0+优雅整合 SpringBoot+Mybatis
SpringBoot 整合 Mybatis 有两种常用的方式,一种就是我们常见的 xml 的方式 ,还有一种是全注解的方式.我觉得这两者没有谁比谁好,在 SQL 语句不太长的情况下,我觉得全注解的方式 ...
- springboot2.0 Mybatis 整合
原文:https://blog.csdn.net/Winter_chen001/article/details/80010967 环境/版本一览: 开发工具:Intellij IDEA 2017.1. ...
- 每天学点SpringCloud(一):使用SpringBoot2.0.3整合SpringCloud
最近开始学习SpringCloud,在此把我学习的过程记录起来,跟大家分享一下,一起学习.想学习SpringCloud的同学赶快上车吧. 本次学习使用得SpringBoot版本为2.0.3.RELEA ...
随机推荐
- NGINX快速部署
NGINX快速部署 #!/bin/bash ############################################################################## ...
- 在CentOS中安装输入法
1.需要root权限,所以要用root登录 ,或su root 2.yum install "@Chinese Support" 3.exit 4.回到桌面,system-> ...
- 内核源码阅读vim+cscope+ctags+taglist
杜斌博客:http://blog.db89.org/kernel-source-read-vim-cscope-ctags-taglist/ 武特博客:http://edsionte.com/tech ...
- 3993: [SDOI2015]星际战争
3993: [SDOI2015]星际战争 Time Limit: 10 Sec Memory Limit: 128 MBSec Special JudgeSubmit: 1244 Solved: ...
- JAVA性能调试+JProfiler使用相关
一.JProfiler下载.安装与激活 1.1 下载 直接官网下载(https://www.ej-technologies.com/download/jprofiler/files) 建议下载9.X系 ...
- redo binlog
w https://dev.mysql.com/doc/refman/5.7/en/innodb-redo-log.html https://dev.mysql.com/doc/refman/5.7/ ...
- 蒙特卡罗树搜索(MCTS)【转】
简介 最近AlphaGo Zero又火了一把,paper和各种分析文章都有了,有人看到了说不就是普通的Reinforcement learning吗,有人还没理解估值网络.快速下子网络的作用就放弃了. ...
- mysql-5.7.16-linux-glibc2.5-x86_64精简后的主从配置
1.创建复制账号,并授予复制权限CREATE USER 'fansik'@'10.%' IDENTIFIED BY 'fansik';GRANT REPLICATION SLAVE ON *.* TO ...
- $.messager.confirm修改弹出框按钮提示文字
$.messager.confirm 默认提示语为“OK”和“Cancel”.引入中文控件后变为“确定”和“取消” <script src="../js/locale/easyui-l ...
- Android中的动画使用总结
android中动画可分为三种:帧动画,补间动画,和属性动画.其中属性动画是google推荐的,它可以实现前面两种动画的效果,运用起来更加灵活. 帧动画:顾名思义,就是一帧一帧的图片,快速播放形成的动 ...