【Ray Tracing The Next Week 超详解】 光线追踪2-2
Chapter 2:Bounding Volume Hierarchies
今天我们来讲层次包围盒,乍一看比较难,篇幅也多,但是咱们一步一步来,相信大家应该都能听懂
BVH 和 Perlin textures是这本书中最难的两章,为什么把BVH放在第二章讲呢,据说,层次包围盒的渲染效率是比较高的,考虑到大家的渲染时间开销,所以先讲这个
光线 - 物体相交是光线跟踪器中的主要时间瓶颈,运行时间与物体数量成线性关系。但它是对同一模型的重复搜索,所以我们可以采用二分搜索的速度进行对数级复杂度搜索。因为我们在同一模型上发送数百万到数十亿的光线,我们可以对模型进行分类,然后每个光线交叉点可以是次线性搜索。两个最常见的两类是
1)划分空间
2)划分对象
后者通常更容易编码,并且运行速度与大多数模型一样快。 关键思想是找到一个完全包围(边界)所有对象的体积。例如,你计算得出了10个对象包围盒。任何未与包围盒相交的射线肯定不会和十个对象相交。如果射线击中了包围盒,那么它可能会击中十个物体中的一个。所以伪代码:
if (ray hits bounding object)

    return whether ray hits bounded objects

else

    return false
最关键的一件事情是我们如何将各个物体划分到每个子集中,单个子集为一个包围盒
引用书上一张图
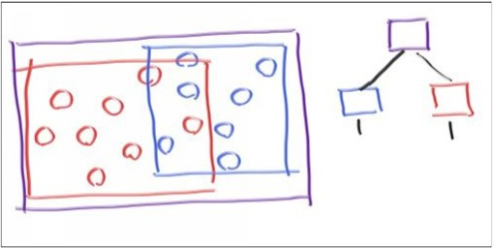
蓝色和红色边界包含在紫色边界中,但它们可能重叠,并且它们不是有序的,它们只是单纯地被包含在内部。
右边是左图的树结构
对应的检测伪代码是:
if (hits purple)

    hit0 = hits blue enclosed objects

    hit1 = hits red enclosed objects

if (hit0 or hit1)

  return true and info of closer hit

return false
好了,我们下面就来实现上面的伪代码框架
我们需要将场景中的物体进行划分,且包围盒需要非常紧凑,以及考虑光线与包围盒相交的方法,计算量尽量少。 在大多数模型的实践中,轴对齐的盒子(axis - aligned bounding box,即AABB)比较好一些,我们只需要知道光线是否击中盒体,而无需操心撞击点的任何信息
有一种常用的“slab”的方法,它是基于n个维度的AABB,就是取n个坐标轴上的区间表示,称为“slabs”
一维空间的一个区间,比如:x∈【3,5】,它是一条线段
二维空间的一个区间,比如:x∈【3,5】,y∈【3,5】,它是一块矩形区域
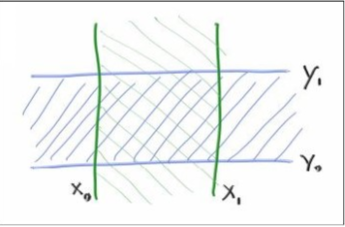
我们来确定光线与区间的相交信息
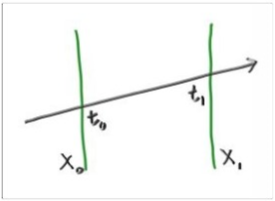
>假设,上述图中的这种情况,我们的光线和 x = x0, x = x1 相交于 t0 和 t1
回顾视线方程:p(t) = a + t *b,若为x区间相交,则方程写为 x(t) = a + t * b
则 x0 = a.x + t0 * b.x => t0 = (x0 - a.x) / b.x
同理可得 t1 = (x1 - a.x) / b.x
>如果是二维的情况,那么,就要加上y(t) = a + t * b
我们的工作就是:
计算Q1(tx0,tx1)
计算Q2(ty0,ty1)
Q1 和 Q2 是否有交集
大致几种分类情况如下:(下面红色代表ty,绿色代表tx)

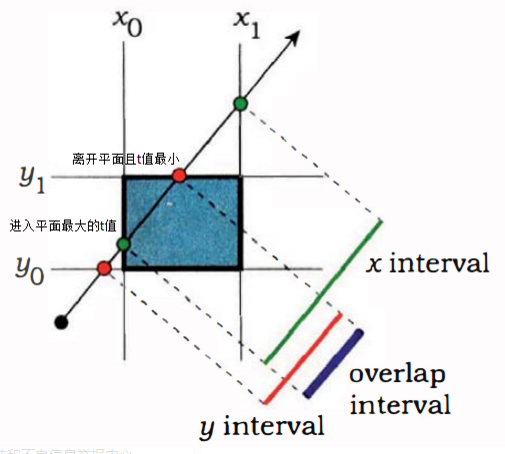
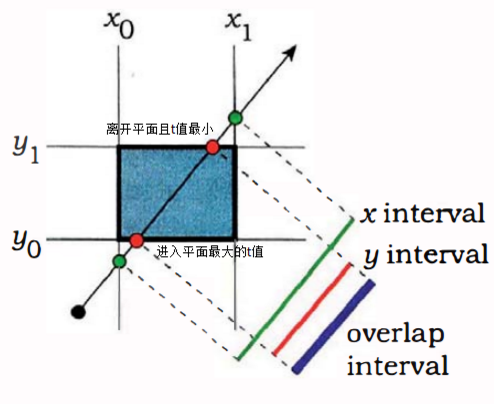
综上,我们发现:
如果 两个区间的左端点最大值 小于 右端点的最小值
光线一定和区域有交点
反之
光线和区域相离
>如果是三维的,那么同理,步骤如下:
计算Q1(tx0,tx1)
计算Q2(ty0,ty1)
计算Q3(tz0,tz1)
Q1、Q2和Q3是否有交集
代码简单描写为:
_min 和 _max 分别指的是包围盒中三个维度区间的左端点集合和右端点集合
它们是aabb的两个数据成员
(这个代码只用来理解用)
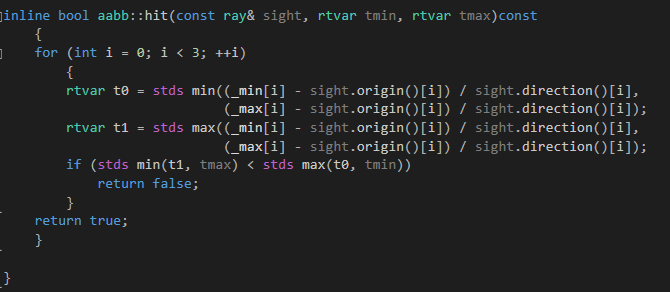
后来我们观察发现,一般情况下满足 t0 <= t1 ,但是有时候 t0 > t1
当且仅当视线的方向向量在当前计算维度的分量中为负,此时 t0 > t1
所以,我们改写成如下形式:
inline bool aabb::hit(const ray& sight, rtvar tmin, rtvar tmax)const

    {

    for (int i = ; i < ; ++i)

        {

        rtvar div = 1.0 / sight.direction()[i];

        rtvar t1 = (_min[i] - sight.origin()[i]) / sight.direction()[i];

        rtvar t2 = (_max[i] - sight.origin()[i]) / sight.direction()[i];

        if (div < .)stds swap(t1, t2);

        if (stds min(t2, tmax) <= stds max(t1, tmin))

            return false;

        }

    return true;

    }
同时,我们的相交类也要改一下
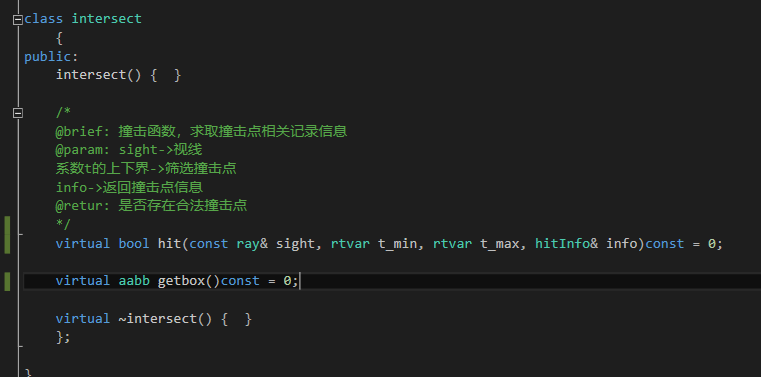
我们从现在开始增加各个子类实现
关于sphere,球体的三个维度的左端点集合和右端点集合分别为
aabb sphere::getbox()const

    {

    return aabb(_heart - rtvec(_radius, _radius, _radius), _heart + rtvec(_radius, _radius, _radius));

    }
对于moving_sphere我们需要综合开始时刻和结束时刻两个球的盒体的边界
aabb _surrounding_box(aabb box1, aabb box2);
但是,出于某种考虑,我觉得把它放在aabb盒体类中作为静态成员函数比较好
/// aabb_box.hpp

// -----------------------------------------------------

// [author]        lv

// [begin ]        2019.1

// [brief ]        the aabb-class for the ray-tracing project

//                from the 《ray tracing the next week》

// -----------------------------------------------------

namespace rt

{

//the statement of aabb class

class aabb

    {

public:

    aabb() {  }

    aabb(const rtvec& a, const rtvec& b);

    inline bool hit(const ray& sight, rtvar tmin, rtvar tmax)const;

    static aabb _surrounding_box(aabb box1, aabb box2);

public:

    inline rtvec min()const { return _min; }

    inline rtvec max()const { return _max; }

private:

    rtvec _min;

    rtvec _max;

    };

//the implementation of aabb class

inline aabb::aabb(const rtvec& a, const rtvec& b)

    :_min(a)

    , _max(b)

    {

    }

inline bool aabb::hit(const ray& sight, rtvar tmin, rtvar tmax)const

    {

    for (int i = ; i < ; ++i)

        {

        rtvar div = 1.0 / sight.direction()[i];

        rtvar t1 = (_min[i] - sight.origin()[i]) / sight.direction()[i];

        rtvar t2 = (_max[i] - sight.origin()[i]) / sight.direction()[i];

        if (div < .)stds swap(t1, t2);

        if (stds min(t2, tmax) <= stds max(t1, tmin))

            return false;

        }

    return true;

    }

aabb aabb::_surrounding_box(aabb box1, aabb box2)

    {

    auto fmin = [](const rtvar a, const rtvar b) {return a < b ? a : b; };

    auto fmax = [](const rtvar a, const rtvar b) {return a > b ? a : b; };

    rtvec min{    fmin(box1.min().x(),box2.min().x()),

                fmin(box1.min().y(),box2.min().y()),

                fmin(box1.min().z(),box2.min().z()) };

    rtvec max{    fmax(box1.max().x(),box2.max().x()),

                fmax(box1.max().y(),box2.max().y()),

                fmax(box1.max().z(),box2.max().z()) };

    return aabb(min, max);

    }

}
aabb moving_sphere::getbox()const

    {

    rtvec delt{ _radius, _radius, _radius };

    return aabb::_surrounding_box(aabb(_heart1 - delt, _heart1 + delt), aabb(_heart2 - delt, _heart2 + delt));

    }
现在我们开始着手,划分物体,并解决“光线是否击中了当前盒体”这个开篇的问题
首先,我们需要创建像开篇那张图中的一颗盒体范围树
树节点定义:
class bvh_node :public intersect

    {

public:

    bvh_node() {  }

    bvh_node(intersect** world, const int n, const rtvar time1, const rtvar time2);

    virtual bool hit(const ray& sight, rtvar t_min, rtvar t_max, hitInfo& info)const override;

    virtual aabb getbox()const override;

private:

    intersect* _left;

    intersect* _right;

    aabb _box;

    };
aabb bvh_node::getbox()const

    {

    return _box;

    }
构造函数中那两个时间实在不知道有什么用(=.=)
之后我们就需要写hit函数了,其实很好写
树结构,遍历左子树遍历右子树,返回离eye最近的撞击点信息即可
bool bvh_node::hit(const ray& sight, rtvar t_min, rtvar t_max, hitInfo& info)const

    {

    if (_box.hit(sight, t_min, t_max))

        {

        hitInfo linfo, rinfo;

        bool lhit = _left->hit(sight, t_min, t_max, linfo);

        bool rhit = _right->hit(sight, t_min, t_max, rinfo);

        if (lhit && rhit)

            {

            if (linfo._t < rinfo._t)

                info = linfo;

            else

                info = rinfo;

            return true;

            }

        else if (lhit)

            {

            info = linfo;

            return true;

            }

        else if (rhit)

            {

            info = rinfo;

            return true;

            }

        else

            return false;

        }

    else

        return false;

    }

}
构造函数设计:
1)随机选择一个轴
2)使用库qsort对物体进行排序
3)在每个子树中放一半物体
并且特判了两种情况(物体个数为1 或者 2)
如果我只有一个元素,我在每个子树中复制它。两个物体的话,一边一个。
明确检查三个元素并且只跟随一个递归可能会有所帮助,但我认为整个方法将在以后进行优化。即:
inline bvh_node::bvh_node(intersect** world, const int n, const rtvar time1, const rtvar time2)

    {

    int axis = static_cast<int>( * lvgm::rand01());

    if (axis == )

        qsort(world, n, sizeof(intersect*), _x_cmp);

    else if (axis == )

        qsort(world, n, sizeof(intersect*), _y_cmp);

    else

        qsort(world, n, sizeof(intersect*), _z_cmp);

    if (n == )

        _left = _right = world[];

    else if (n == )

        _left = world[],

        _right = world[];

    else

        _left = new bvh_node(world, n / , time1, time2),

        _right = new bvh_node(world + n / , n - n / , time1, time2);

    aabb lbox = _left->getbox();

    aabb rbox = _right->getbox();

    _box = aabb::_surrounding_box(lbox, rbox);

    }
比较函数以_x_cmp为例:
inline    int _x_cmp(const void * lhs, const void * rhs)

    {

    intersect * lc = *(intersect**)lhs;

    intersect * rc = *(intersect**)rhs;

    aabb lbox = lc->getbox();

    aabb rbox = rc->getbox();

    if (lbox.min().x() - rbox.min().x() < .)

        return -;

    else

        return ;

    }
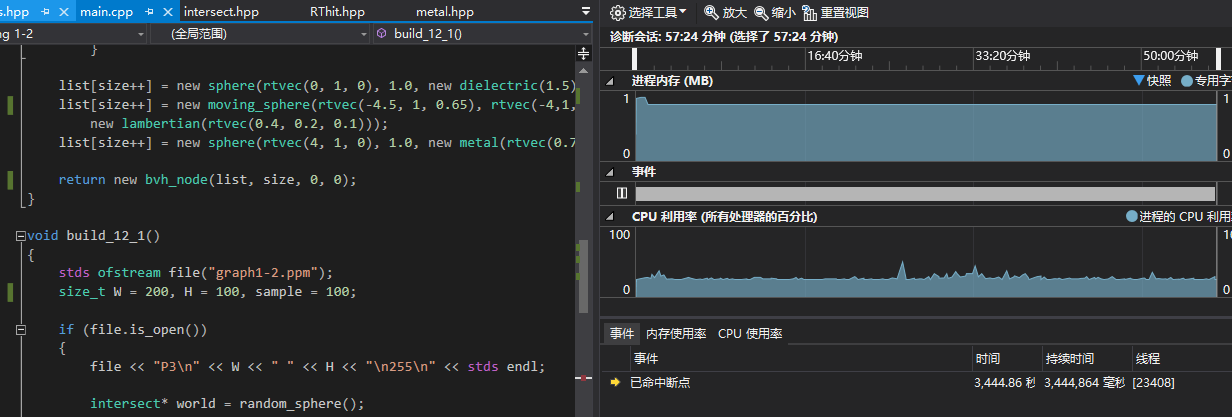
整个方法在之后可能会优化,但是目前确实不咋好:
测试代码
#define LOWPRECISION

#include <fstream>

#include "RTmaterial.hpp"

#include "RThit.hpp"

#include "camera.hpp"

using namespace rt;

int Cnt;

rtvec lerp(const ray& sight, intersect* world, int depth)

{

    hitInfo info;

    if (world->hit(sight, (rtvar)0.001, rtInf(), info))

    {

        ray scattered;

        rtvec attenuation;

        if (depth <  && info.materialp->scatter(sight, info, attenuation, scattered))

            return attenuation * lerp(scattered, world, depth + );

        else

            return rtvec(, , );

    }

    else

    {

        rtvec unit_dir = sight.direction().ret_unitization();

        rtvar t = 0.5*(unit_dir.y() + .);

        return (. - t)*rtvec(., ., .) + t*rtvec(0.5, 0.7, 1.0);

    }

}

intersect* random_sphere()

{

    int cnt = ;

    intersect **list = new intersect*[cnt + ];

    list[] = new sphere(rtvec(, -, ), , new lambertian(rtvec(0.5, 0.5, 0.5)));

    int size = ;

    for (int a = -; a < ; ++a)

        for (int b = -; b < ; ++b)

        {

            rtvar choose_mat = lvgm::rand01();

            rtvec center(a + 0.9 * lvgm::rand01(), 0.2, b + 0.9*lvgm::rand01());

            if ((center - rtvec(, 0.2, )).normal()>0.9)

            {

                if (choose_mat < 0.55)

                    list[size++] = new moving_sphere(center, center + rtvec(, 0.5*lvgm::rand01(), ), ., ., 0.2,

                        new lambertian(rtvec(lvgm::rand01()*lvgm::rand01(), lvgm::rand01()*lvgm::rand01(), lvgm::rand01()*lvgm::rand01())));

                else if (choose_mat < 0.85)

                    list[size++] = new sphere(center, 0.2,

                        new metal(rtvec(0.5*( + lvgm::rand01()), 0.5*( + lvgm::rand01()), 0.5*( + lvgm::rand01())), 0.5*lvgm::rand01()));

                else

                    list[size++] = new sphere(center, 0.2,

                        new dielectric(1.5));

            }

        }

    list[size++] = new sphere(rtvec(, , ), 1.0, new dielectric(1.5));

    list[size++] = new moving_sphere(rtvec(-4.5, , 0.65), rtvec(-,,0.15), ., ., 1.0,

        new lambertian(rtvec(0.4, 0.2, 0.1)));

    list[size++] = new sphere(rtvec(, , ), 1.0, new metal(rtvec(0.7, 0.6, 0.5), .));

    return new intersections(list, size);

}

void build_12_1()

{

    stds ofstream file("graph1-2.ppm");

    size_t W = , H = , sample = ;

    if (file.is_open())

    {

        file << "P3\n" << W << " " << H << "\n255\n" << stds endl;

        intersect* world = random_sphere();

        rtvec lookfrom(, , );

        rtvec lookat(, , );

        float dist_to_focus = 10.0;

        float aperture = 0.0;

        camera cma(lookfrom, lookat, rtvec(, , ), , rtvar(W) / rtvar(H), aperture, 0.7*dist_to_focus, ., .);

        for (int y = H - ; y >= ; --y)

            for (int x = ; x < W; ++x)

            {

                rtvec color;

                for (int cnt = ; cnt < sample; ++cnt)

                {

                    lvgm::vec2<rtvar> para{

                        (lvgm::rand01() + x) / W,

                        (lvgm::rand01() + y) / H };

                    color += lerp(cma.get_ray(para), world, );

                }

                color /= sample;

                color = rtvec(sqrt(color.r()), sqrt(color.g()), sqrt(color.b()));    //gamma 校正

                int r = int(255.99 * color.r());

                int g = int(255.99 * color.g());

                int b = int(255.99 * color.b());

                file << r << " " << g << " " << b << stds endl;

            }

        file.close();

        if (world)delete world;

        stds cout << "complished" << stds endl;

    }

    else

        stds cerr << "open file error" << stds endl;

}

int main()

{

    build_12_1();

}
main.cpp
有点伤心且不知所措,但其实还是学了很多相交的知识的~
感谢您的阅读,生活愉快~
【Ray Tracing The Next Week 超详解】 光线追踪2-2的更多相关文章
- 【Ray Tracing The Next Week 超详解】 光线追踪2-9
我们来整理一下项目的代码 目录 ----include --hit --texture --material ----RTdef.hpp ----ray.hpp ----camera.hpp ---- ...
- 【Ray Tracing The Next Week 超详解】 光线追踪2-6 Cornell box
Chapter 6:Rectangles and Lights 今天,我们来学习长方形区域光照 先看效果 light 首先我们需要设计一个发光的材质 /// light.hpp // ------- ...
- 【Ray Tracing in One Weekend 超详解】 光线追踪1-4
我们上一篇写了Chapter5 的第一个部分表面法线,那么我们来学剩下的部分,以及Chapter6. Chapter5:Surface normals and multiple objects. 我们 ...
- 【Ray Tracing The Next Week 超详解】 光线追踪2-7 任意长方体 && 场景案例
上一篇比较简单,很久才发是因为做了一些好玩的场景,后来发现这一章是专门写场景例子的,所以就安排到了这一篇 Preface 这一篇要介绍的内容有: 1. 自己做的光照例子 2. Cornell box画 ...
- 【Ray Tracing The Next Week 超详解】 光线追踪2-8 Volume
Preface 今天有两个东东,一个是体积烟雾,一个是封面图 下一篇我们总结项目代码 Chapter 8:Volumes 我们需要为我们的光线追踪器添加新的物体——烟.雾,也称为participat ...
- 【Ray Tracing The Next Week 超详解】 光线追踪2-5
Chapter 5:Image Texture Mapping 先看效果: 我们之前的纹理是利用的是撞击点p处的位置信息,比如大理石纹理 而我们今天的图片映射纹理采用2D(u,v)纹理坐标来进行. 在 ...
- 【Ray Tracing in One Weekend 超详解】 光线追踪1-8 自定义相机设计
今天,我们来学习如何设计自定义位置的相机 ready 我们只需要了解我们之前的坐标体系,或者说是相机位置 先看效果 Chapter10:Positionable camera 这一章我们直接用概念 ...
- 【Ray Tracing The Next Week 超详解】 光线追踪2-4 Perlin noise
Preface 为了得到更好的纹理,很多人采用各种形式的柏林噪声(该命名来自于发明人 Ken Perlin) 柏林噪声是一种比较模糊的白噪声的东西:(引用书中一张图) 柏林噪声是用来生成一些看似杂乱 ...
- 【Ray Tracing The Next Week 超详解】 光线追踪2-3
Preface 终于到了激动人心的纹理章节了 然鹅,看了下,并不激动 因为我们之前就接触过 当初有一个 attenuation 吗? 对了,这就是我们的rgb分量过滤器,我们画出的红色.蓝色.绿色等 ...
随机推荐
- python的类的继承-接口继承-归一化设计
1.先在子类本身找,如果子类没有,会去父类找 class Dad: '这个是爸爸类' money=10#Dad类的数据属性 def __init__(self,name): print("爸 ...
- matplotlib交互模式与pacharm单独Figure设置
matplotlib交互模式与pacharm单独Figure设置 觉得有用的话,欢迎一起讨论相互学习~Follow Me Matpotlib交互模式 在运行python程序时有时候需要生成以下的 动态 ...
- webGL和three.js的关系
如今浏览器的功能越来越强大,而且这些功能可能通过JavaScript直接调用.你可以用HTML5标签轻松地添加音频和视频,而且可以在HTML5画布上创建各种交互组件.现在这个功能集合里又有了一个新成员 ...
- Redis记录-Redis高级应用
Redis数据库可以使用安全的方案,使得进行连接的任何客户端在执行命令之前都需要进行身份验证.要保护Redis安全,需要在配置文件中设置密码. 示例 下面的示例显示了保护Redis实例的步骤. 127 ...
- [转载]Supporting OData $inlinecount with the new Web API OData preview package
http://www.strathweb.com/2012/08/supporting-odata-inlinecount-with-the-new-web-api-odata-preview-pac ...
- dwz中给表单项获取,设置值
$.pdialog._current.find('form input#inputId').val(54);
- Flex 编写 loading 组件
Flex 界面初始化有时那个标准的进度条无法显示,界面长时间会处理空白的状态!我们来自定义一个进度条, 这个进度条加载在 Application 应用程序界面的 <s:Application 标 ...
- 洛谷 P1563 玩具谜题
如果你想不耗费脑力做出这个题目,往下看: 本萌新看到这个题目,想到了乘法法则,题目中左右方向要判断两次,很耗脑力,和乘法中的正负号判断非常像. 抽象一点:这个人向内向外就是乘法中括号外的正负号,他的左 ...
- Spark笔记之使用UDF(User Define Function)
一.UDF介绍 UDF(User Define Function),即用户自定义函数,Spark的官方文档中没有对UDF做过多介绍,猜想可能是认为比较简单吧. 几乎所有sql数据库的实现都为用户提供了 ...
- python之pip安装mysql-python失败
前言 由于公司使用的python版本是python2,并且连接mysql的包是mysql-python,但是mysql-python 使用pip安装报错,需要C++环境等依赖,于是使用wheel直接安 ...