LPC-LINK 2

LPC-Link 2 is an extensible, stand-alone debug adapter that can be configured to support various development tools
and IDEs by downloadable firmwares.
Available firmware images include:
- LPCXpresso IDE debugger by NXP
- CMSIS-DAP by ARM
- J-Link by Segger (see more information here and specifically note the Terms of Use from Segger)
The board is supported by the LPCXpresso IDE and all development environments that supports the J-Link and CMSIS-DAP interface.
This product is delivered with a 10-pos IDC Ribbon Cable. Note that an adapter is needed to connect to the older 2x10-pos 100 mil pitch ARM debug connectors.
LPC-Link 2 is the latest addition to the LPCXpresso development platform.
There is an add-on board called LabTool that turn the LPC-Link 2 into a powerful debug tool with analogue oscilloscope and digital logic analyzer functionality.
Note
that LPC-Link 2 firmware in combination with the LPCXpresso IDE supports the Cortex-Mx cores in the LPC family,
but not the older ARM7/ARM9 cores. Read this FAQ entry for more information.
LPC-Link 2
| SWD/JTAG interface voltage | 1.2V - 5.5V supported |
| Dimensions | 84 x 37 mm |
| Powering | Via USB cable from PC |
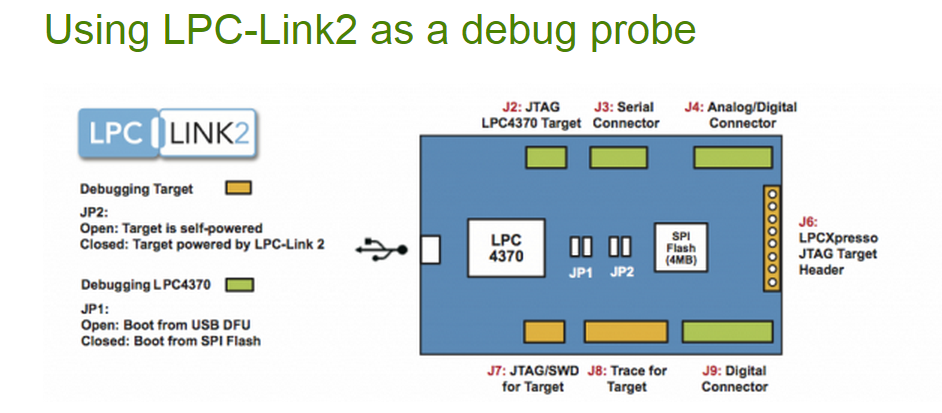
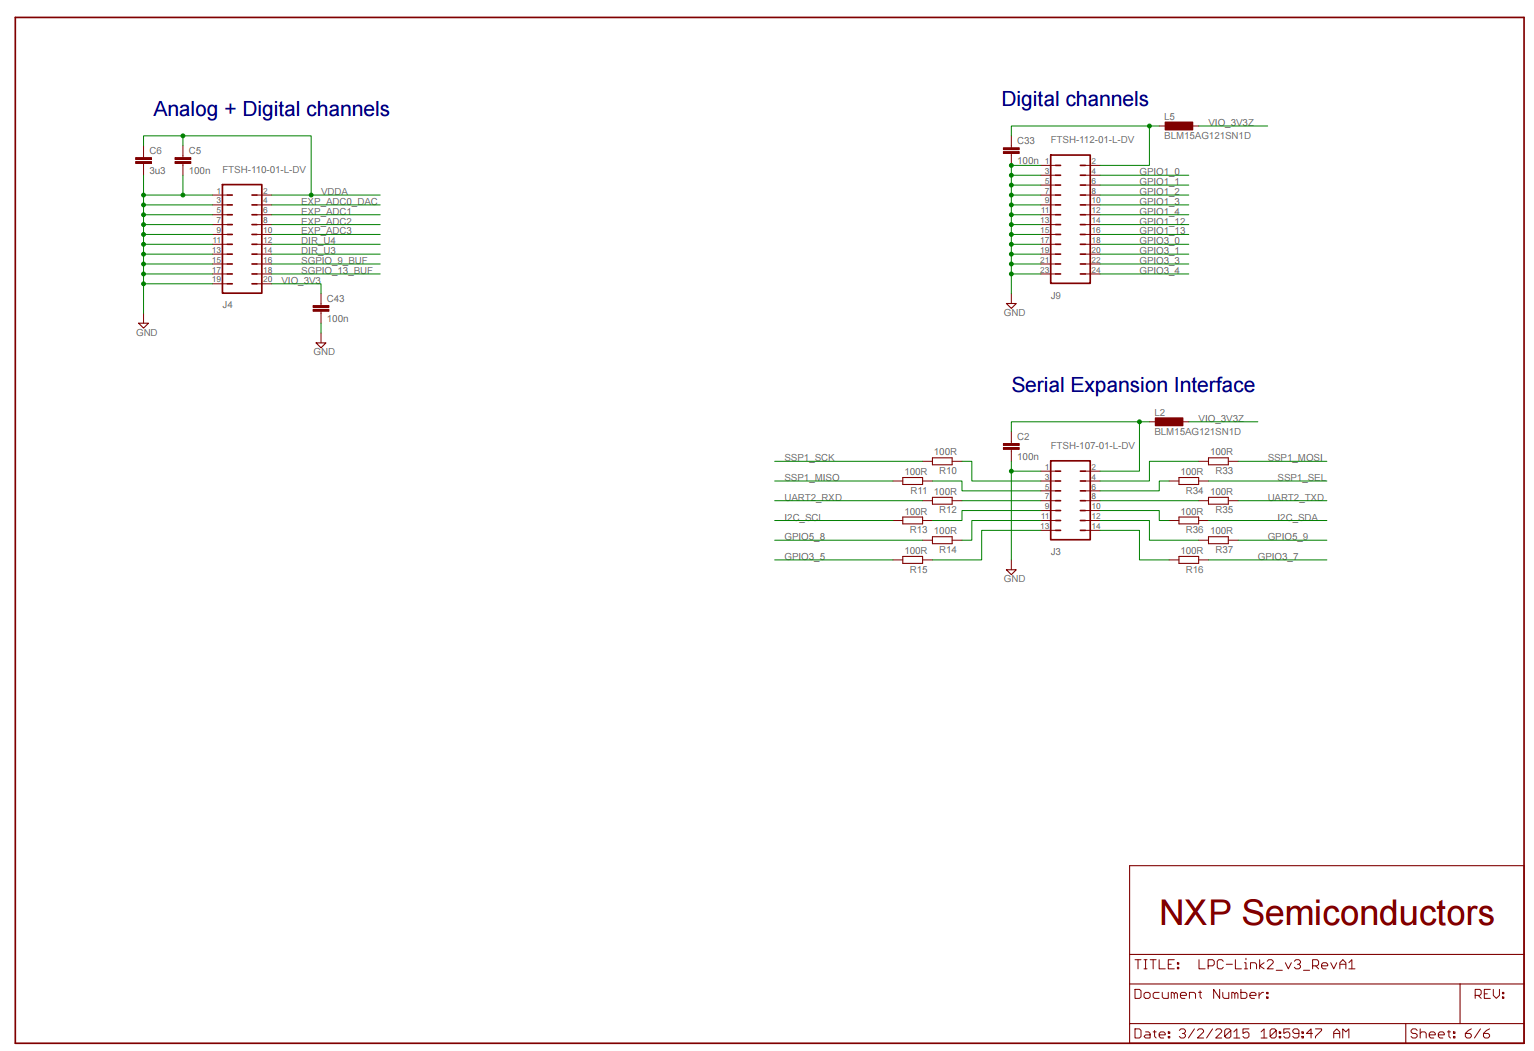
| Connectors | • standard 10-pin Cortex debug connector (note: 50 mil pitch connector) • 20-pin Cortex trace connector (note: 50 mil pitch connector) • analog expansion header • digital expansion header • serial expansion header |
| Supported development tools | • Compatible with the LPCXpresso IDE - LPC-Link 2 is auto-detected by LPCXpresso. • Compatible with tools/IDEs that support the Segger J-Link via downloadable firmware image • Compatible with tools/IDEs that support CMSIS-DAP by ARM via downloadable firmware image |
The following resources are available for download.
Documents
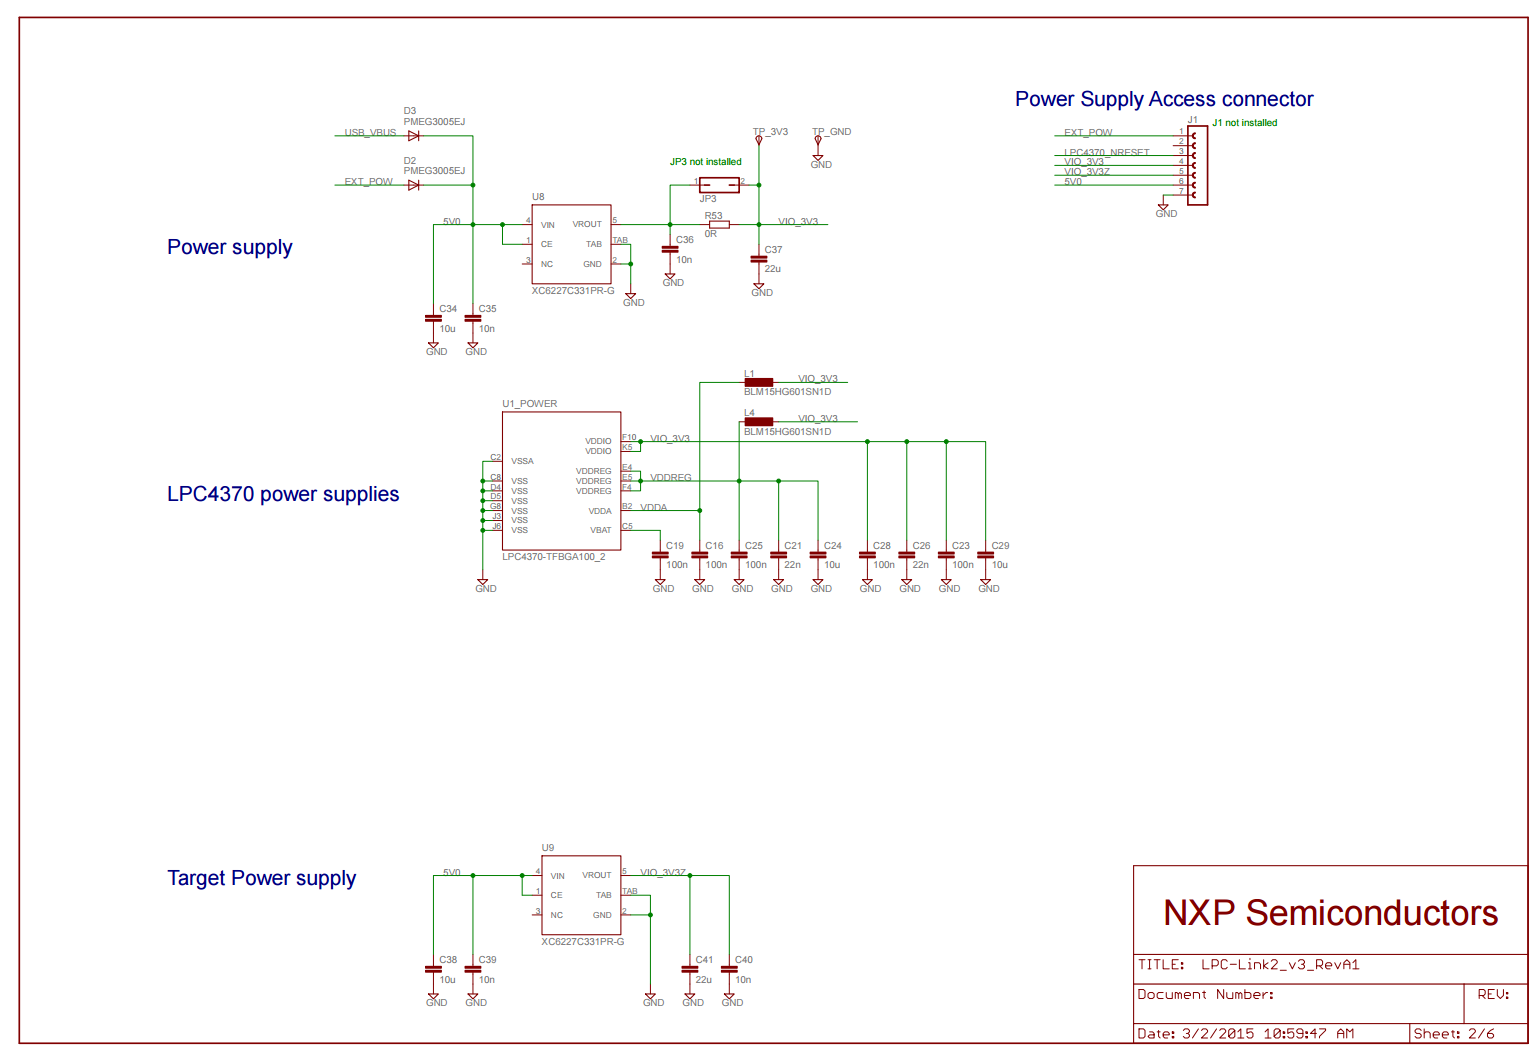
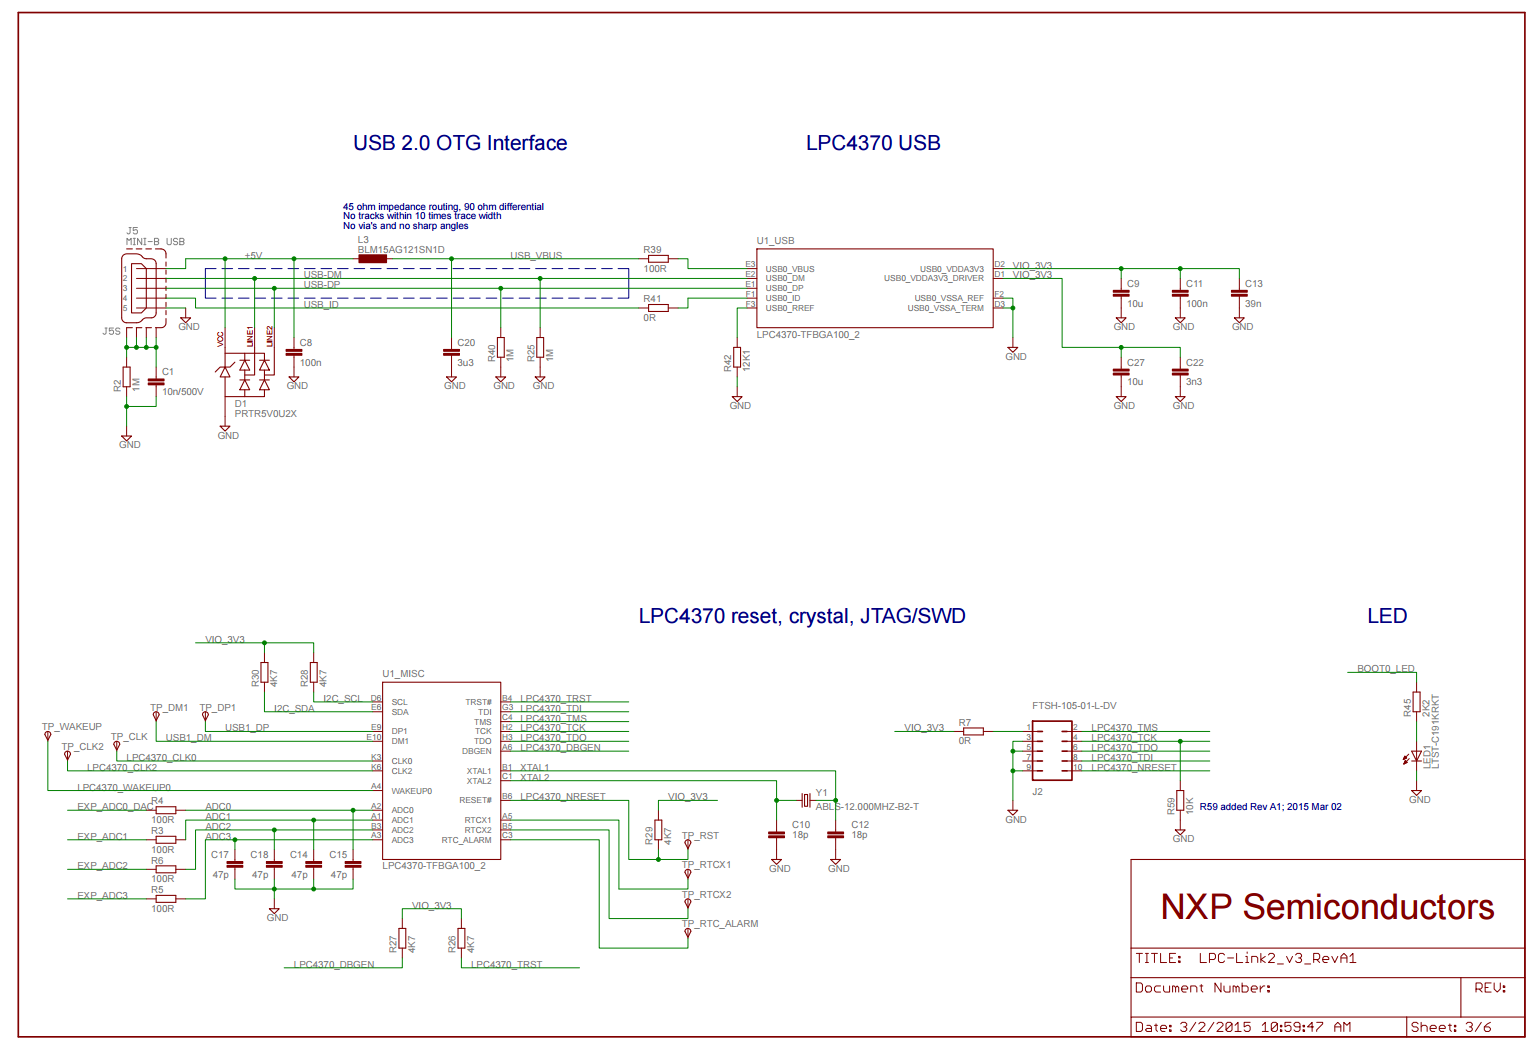
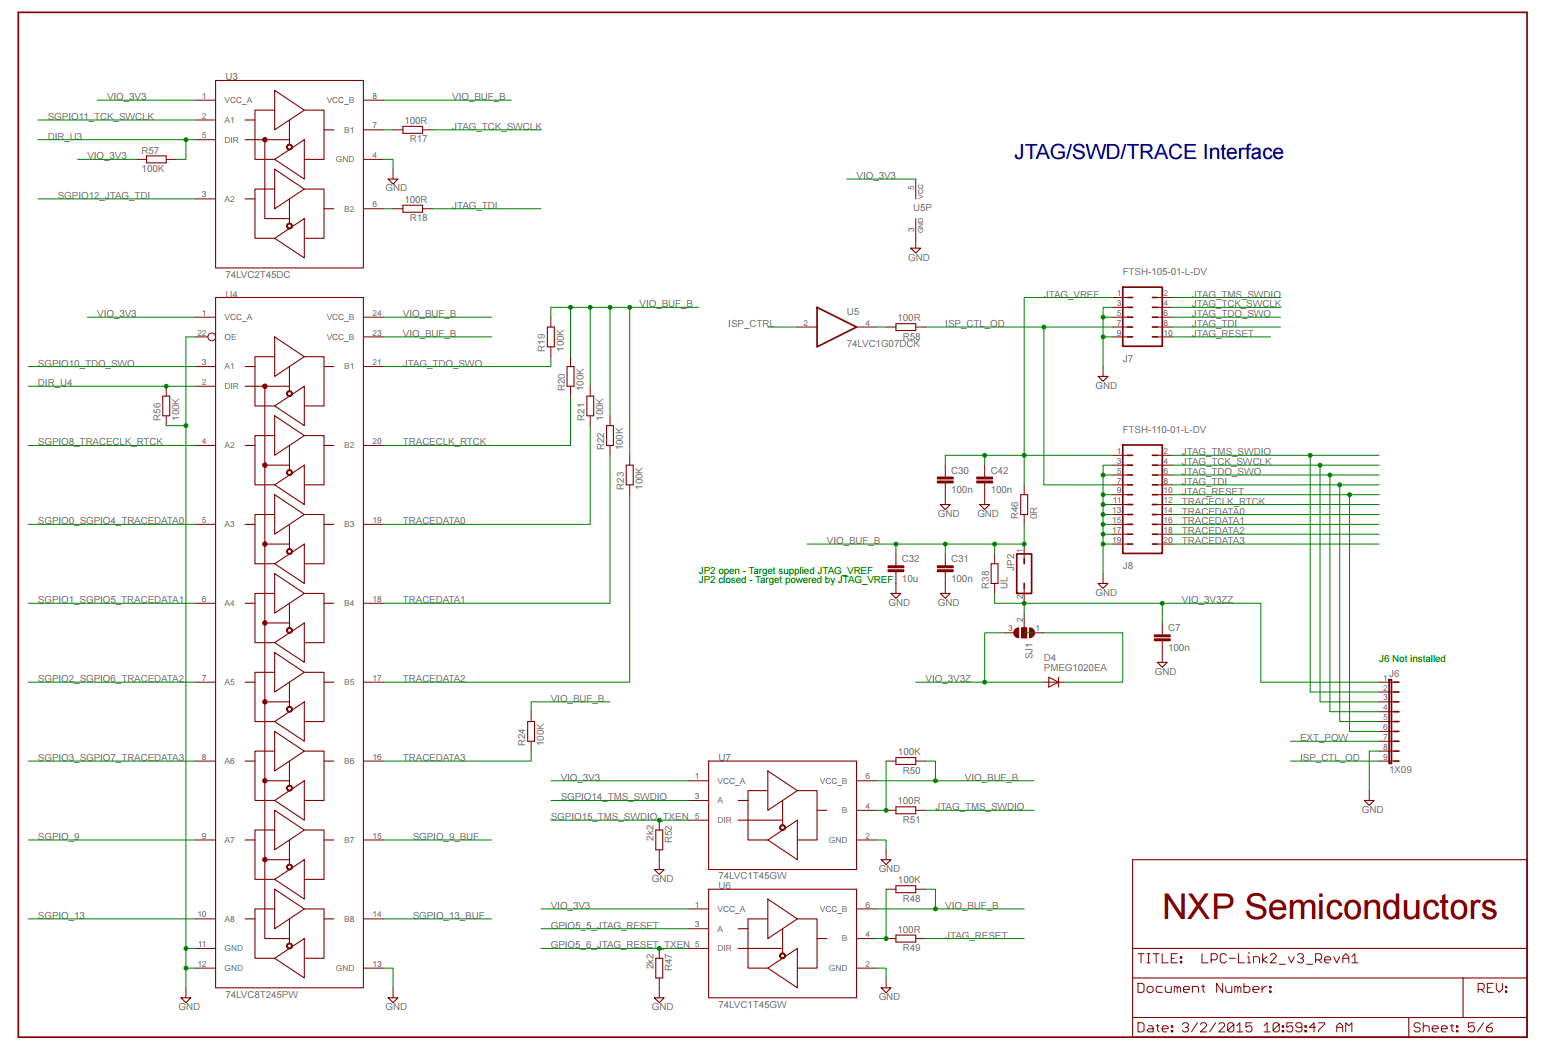
- LPC-Link 2 Schematics (in pdf) LPC-Link 2 Schematics (recommended design with pull-down on LPC4370 jtag interface)
- LPC-Link 2 TP-locations
- LPC-Link 2 connector positions (in pdf)
- Embedded Artists' general RoHS 2 declaration
- LPC4370 product page (the LPC4370 is a tripple core processor, 1xCM4+2xCM0, and have a fast ADC, 80Msample/sec)
Forum and Support
- Visit NXP's LPCXpresso Website
- NXP's LPCXpresso FAQ about 'Debug Probes and Hardware'
- LPCXpresso Forum
External Resources
NXP Press Release
LPC-Link2 Configuration Tool
Download the LPCXpresso IDE

LPC-Link 2 firmware
Features
- Supports all ARM based NXP devices which are also supported by J-Link Lite.
- JTAG, SWD + SWO supported
- Fully compatible to and same features as J-Link Lite
Limitations
- May be used with ARM based NXP devices only.
- Only debugging on evaluation boards is allowed.
Debugging on custom hardware is not supported and not allowed. - No production flash programming support.
- Unlimited breakpoints in flash available for evaluation only.
- No support is given.
By using an original SEGGER J-Link PRO, J-Link ULTRA+ or J-Link PLUS, all these limitations will be gone.
Using LPC-Link2 as an evaluation board
LPC-Link2 can also be used as an evaluation board for the NXP LPC4370 MCU, a 204 MHz Cortex-M4 MCU with an 80 MHz ADC and two extra Cortex-M0 cores.
LPC-Link2 is designed to be booted from USB, making it very simple to re-purpose the board by simply power cycling it and downloading a new program into the board via USB, using the DFUSectool ! If you don't want to use the USB boot capability to boot the board on each power cycle, a 1MB SPIFI FLASH is also available on the board for standalone operation.
Or if you have access to another debug probe - such as another LPC-Link2 - you can use the SWD/JTAG connector on the board to download and debug applications with an IDE such as Keil, IAR, or LPCXpresso.
There is more information on this in the FAQ "Using an LPC-Link2 as an LPC4370 evaluation board".
Getting started with LPC-Link 2
- Download the LPC-Link 2 configuration tool here
- Start the LPC Link configuration tool WITHOUT having LPC-Link 2 connected to the PC.
- In the configuration tool, select J-Link firmware as image to be downloaded
- Follow the instructions in the configuration tool
- Power-cycle LPC-Link 2. It will now enumerate as a J-Link
LPC-Link 2 Configuration Tool
Important Notes : Read before downloading and using
- The use of the LPC-Link2 Configuration Tool is no longer recommended
- The functionality offered by this tool has been superseded by LPCScrypt.
- Download LPCScrypt to obtain the latest versions of CMSIS-DAP
and J-Link firmware for LPC-Link2 or LPCXpresso V2/V3 boards.
The LPC-Link 2 Configuration Tool (LCT) is a Windows tool that installs the CMSIS-DAP/VCOM/LPCSIO
or JLINK firmware on LPCXpresso V2/V3 and LPC-Link 2 boards.
This package provides the Link Configuration Tool, all necessary Windows drivers, a User Manual,
and the source and project files to rebuild the programming algorithm firmware used by the LCT.
The V2 version provides expanded capability for LPCXpresso V2/V3 boards with improvements to CMSIS-DAP,
a UART bridge connected to the target processor (LPCXpresso V2/V3 boards only),
and a LPCSIO bridge that provides communication to I2C and SPI slave devices on LPCXpresso V3 boards.
For LPC-Link 2 boards, an updated version of CMSIS-DAP provides faster programming and more stable operation.
This version also adds support for J-Link - please see SEGGER's website for more information:
for lpc-link2 boards and for LPCXpresso V2/V3 boards.
Firmware included in this package:
- LPCXpresso V2/V3 boards: CMSIS-DAP debugger + VCOM (UART bridge connected to target processor)
+ LPCSIO bridge (I2C + SPI + GPIO bridge connected to target processor) - LPC-Link 2 boards: CMSIS-DAP firmware
- LPC-Link 2 and LPCXpresso V2 and V3 boards: J-Link firmware
If you are using LPC-Link 2 or LPCXpresso V2/V3 boards with the LPCXpresso-IDE, you do not need to use this tool.
Note that the LCT requires NET4.5.1 to be installed prior to use.
This package will automatically download and install NET4.5.1 if it is needed.
The older v1.xx versions of the LCT require NET4 to be download and installed manually prior to use.
Getting Started
Go here to get a quick guide on how to use the LCT tool to install firmware on supported boards. The LCT installer will install a User Manual that shows the LCT steps to program the firmware into your board. This User Manual can be selected from the start menu.
Known issues
- The LCT may not correctly enumerate when used with a Virtual Machine (VM). It is recommended not to use this on a VM.
- Version of the LCT >= v2.01 will not work on Windows XP systems. You can only use the v2.00 older version for Windows XP systems. Download it here.
LPCScrypt
LPCScrypt Overview
Important Note :
From v1.5 onwards, LPCScrypt is the recommenced tool for programming the latest versions
of CMSIS-DAP and J-Link firmware onto LPC-Link2 or LPCXpresso V2/V3 boards.
LPCScrypt is a command-line based, fast flash, EEPROM, OTP
and security programming tool for the LPC1800 and LPC4300 series of microcontrollers.
Key features include:
- Multi-Platform Support (Windows, Mac, Linux)
- Scriptable command line interface
- Programming of internal and SPIFI flash
- Support for a wide range of SPIFI devices (via use of LPCOpen lpcspifilib)
- Optimised for high speed operation - typically 100-300KB/sec,
depending upon flash device, host OS and host computer.
- Programming EEPROM (internal flash parts only)
- Programming One-Time Programmable (OTP) memory
- Images and scripts to program LPC-Link2 and LPCXpresso V2/V3 debug probe firmware
LPCScrypt consists of two parts, a multi-platform command line tool and an MCU firmware monitor.
In use, the firmware monitor is downloaded to the target MCU
using USB DFU support built into the on-chip ROM (using USB0 or USB1).
The firmware creates a virtual serial port (VCOM) over USB to communicate with the host.
The LPCScrypt host tool provides a command-line interface to the firmware,
giving access to the programmable features of the MCU.
It can be invoked with a single command or a script file containing a sequence of commands.
Standard host tools, such as Windows batch files or Linux/Mac shell scripts,
can be used with the LPCScrypt host tool to automate multiple operations,
such as binary file encryption, programming binary files to flash devices,
setting boot options, configuring VID/PID, and finally simulating MCU reset.
LPCScrypt is flexible and fast, and is suitable for one off programming and testing or semi-automated production programming.
An enhanced version of LPCScrypt with additional support for the security features of the LPC18S00 and LPC43S00 parts is available,
subject to Export Control regulations. This enhanced version adds:
- Generating and programming 128 bit AES keys
- Encrypting and programming secure images
Contact your local NXP representative to obtain the enhanced version.
Latest Release Information
Latest release : 1.5.2 build 588, 23 June 2015
- Windows Only: Added Start menu shortcuts for booting LPCScrypt and programming debug probe firmware
- Windows Only: Added CMSIS-DAP driver to drivers directory
- Improved scripts to program debug probe firmware
Previous release : v1.5 build 562, 1 June 2015
- Added binaries for CMSIS-DAP (V5.112) and Segger J-Link debug probe firmware
- Added scripts to enable easy programming of CMSIS-DAP and J-Link firmware
- Added Debug Probe Firmware Programming guide
- Added support for new SPIFI devices – W25Q128FV and MX25L1606
Previous release : v1.3 build 496, 12 March 2015
- Added support for connections via USB1 as well as USB0
- Added support for new SPIFI devices – W25Q40CV and PM25LQ032C
Currently supported SPIFI devices:
- PM25LQ032C
- MX25L1606E
- MX25L1635E
- MX25L3235E
- MX25L6435E
- MX25L8035E
- S25FL016K
- S25FL032P
- S25FL064P
- S25FL129P 64kSec
- S25FL129P 256kSec
- S25FL164K
- S25FL256S 64kSec
- S25FL256S 256kSec
- S25FL512S
- W25Q40CV
- W25Q32FV
- W25Q64FV
- W25Q128FV
- W25Q80BV
LPCScrypt Downloads
| Download | Notes | |
| LPCScrypt Documentation | Please download and read the documentation before installing/using LPCScrypt | |
| Windows Installer | v1.5.2 build 588 | Supported platforms: Windows Vista or later, 32 or 64 bit |
| Mac OS X Installer | v1.5.2 build 588 | Supported platforms: Mac OS X Mountain Lion (10.8.5) or later |
| Linux Installer | v1.5.2 build 588 | Supported platforms: LPCScrypt is only tested and supported on recent distributions of Ubuntu and Fedora (32 or 64 bit). It *may* work on other distributions but we cannot provide support if it does not. |

LPC4337/43S37/18S37 LPCXpresso Boards LINK2


LPC-LINK 2的更多相关文章
- LabTool : LPC LINK2, LPC4370 cheap scope: 80Ms/s 12 bit
80MHz 12 bit ADC processor LPC4370.LPCxpresso do a LPC LINK2 and LABTOOLS open source oscilloscope d ...
- oracle db link的查看创建与删除
1.查看dblink select owner,object_name from dba_objects where object_type='DATABASE LINK'; 或者 select * ...
- 功能实现:PLC对LPC的音量控制
设计方案1: 在PLC上,当使用QDial调节音量时,触发QDial的SIGNAL:ValueChange(),对应SLOT向LPC发送自定义键码0x22; 在LPC上,当接收到0x22键码时,执行操 ...
- 解决Java程序连接mysql数据库出现CommunicationsException: Communications link failure错误的问题
一.背景 最近在家里捣鼓一个公司自己搭建的demo的时候,发现程序一启动就会出现CommunicationsException: Communications link failure错误,经过一番排 ...
- 解决绝对定位div position: absolute 后面的<a> Link不能点击
今天布局的时候,遇到一个bug,当DIV设置为绝对定位时,这个div后面的相对定位的层里面的<a>Link标签无法点击. 网上的解决方案是在绝对定位层里面添加:pointer-events ...
- LINK : fatal error LNK1123: 转换到 COFF 期间失败: 文件无效或损坏
同时安装了VS2012和VS2010,用VS2010 时 >LINK : fatal error LNK1123: 转换到 COFF 期间失败: 文件无效或损坏 问题说明:当安装VS2012之后 ...
- VS2013的 Browser Link 引起的问题
环境:vs2013 问题:在调用一个WebApi的时候出现了错误: 于是我用Fiddler 4直接调用这个WebApi,状态码是200(正常的),JSon里却提示在位置9409处文本非法, 以Text ...
- angular中的compile和link函数
angular中的compile和link函数 前言 这篇文章,我们将通过一个实例来了解 Angular 的 directives (指令)是如何处理的.Angular 是如何在 HTML 中找到这些 ...
- AngularJS之指令中controller与link(十二)
前言 在指令中存在controller和link属性,对这二者心生有点疑问,于是找了资料学习下. 话题 首先我们来看看代码再来分析分析. 第一次尝试 页面: <custom-directive& ...
随机推荐
- 20155310 2016-2017-2 《Java程序设计》第五周学习总结
20155310 2016-2017-2 <Java程序设计>第五周学习总结 教材学习内容总结 •收集对象的行为,像是新增对象的add()方法.移除对象的remove()方法等,都是定义在 ...
- CF11D A Simple Task(状压DP)
\(solution:\) 思路大家应该都懂: 状压DP:\(f[i][j]\),其中 \(i\) 这一维是需要状压的,用来记录19个节点每一个是否已经走过(走过为 \(1\) ,没走为 \(0\) ...
- [HAOI2008]移动玩具(状压&带权二分图)
题目描述 • 一个 4 × 4 的 0/1 矩阵 • 每次可以交换相邻两个元素 • 求从初始状态到目标状态的最小交换次数 输入格式 前四行,每行一个长为 4 的 0/1 字符串,描述初始状态. 后四行 ...
- Html设置html与body元素高度问题
为什么要设置HTML和body的高度? 在一些比较正规的网站经常见到会设置html与body的高度.是为了后面的div高度正确的显示. div的100%是从其上一级div的宽高继承来的,有一点很关键, ...
- Quartus II 破解教程—FPGA入门教程【钛白Logic】
这一节主要说明如何破解Quartus II 13.1.首先找到我们提供的破解工具,这里我们的电脑是64位的,所以使用64位破解器.如下图. 第一步:将破解工具拷贝到安装目录下“D:\altera\13 ...
- 关于内核中spinlock的一些个人理解 【转】
由于2.6内核可以抢占,应该在驱动程序中使用 preempt_disable() 和 preempt_enable(),从而保护代码段不被抢占(禁止 IRQ 同时也就隐式地禁止了抢占).preempt ...
- Daemon函数的用法
Daemon函数的用法 说明: 让一个程序后台运行. 原型: #include <unistd.h> int daemon(int nochdir, int noclose); #incl ...
- C++获取文件夹下所有文件名
查找文件需要一个结构体和几个函数.结构体为struct _finddata_t,函数为_findfirst.findnext和_findclose. struct _finddata_t 这个结构体是 ...
- KVM -> 虚拟化简介&虚拟机安装_01
什么是虚拟化? 在计算机技术中,虚拟化(技术)或虚拟技术(英语:Virtualization)是一种资源管理技术,是将计算机的各种实体资源(CPU.内存.磁盘空间.网络适配器等),予以抽象.转换后呈现 ...
- 为什么尽量别用 setInterval
为什么尽量别用setInterval 在开发一个在线聊天工具时,经常会有过多少毫秒就重复执行一次某操作的需求.“没问题”,大家都说,“用setInterval好了.”我觉得这个点子很糟糕. 原因之 ...

