家庭版记账本app进度之关于listview显示账单,并为其添加点击事件
这个主要学习是关于listview的学习。
怎样去自定义adapter,以及使用。自己创建文件,还有就是为listview的每一个子控件添加点击事件。
在整个过程中收获到的知识点如下:
一、对于数据库查找方面的知识点:
ORDER BY从句后跟要排序的列。ORDER BY 从句出现在SELECT语句的最后。
排序有升序和降序之分,ASC表示升序排序,DESC表示降序排序。如果不指明排序顺序,默认的排序顺序为升序ASC。如果要降序,必须书写DESC关键字
对于一些网上的例子:这样更容易理解:
悄悄的成长い 2020/2/6 9:18:52
1.升序排序
【训练1】 查询雇员姓名和工资,并按工资从小到大排序。
输入并执行查询:
Sql代码
SELECT ename, sal FROM emp ORDER BY sal;
悄悄的成长い 2020/2/6 9:19:03
注意:若省略ASC和DESC,则默认为ASC,即升序排序。
2.降序排序
【训练2】 查询雇员姓名和雇佣日期,并按雇佣日期排序,后雇佣的先显示。
输入并执行查询:
Sql代码
SELECT ename,hiredate FROM emp ORDER BY hiredate DESC;
悄悄的成长い 2020/2/6 9:19:17
注意: DESC表示降序排序,不能省略。
3.多列排序
可以按多列进行排序,先按第一列,然后按第二列、第三列......。
【训练3】 查询雇员信息,先按部门从小到大排序,再按雇佣时间的先后排序。
输入并执行查询:
Sql代码
SELECT ename,deptno,hiredate FROM emp ORDER BY deptno,hiredate;
悄悄的成长い 2020/2/6 9:20:04
说明:该排序是先按部门升序排序,部门相同的情况下,再按雇佣时间升序排序。
4.在排序中使用别名
如果要对计算列排序,可以为计算列指定别名,然后按别名排序。
【训练4】 按工资和工作月份的乘积排序。
输入并执行查询:
Sql代码
SELECT empno, ename, sal*Months_between(sysdate,hiredate) AS total FROM emp
ORDER BY total;
但是自己实际应用时候的写法是“mingzi asc”这两个是写在一个括号里面,中间用空格分开。
二、关于一个类继承一个接口的时候的操作:
Serializable是Java提供的序列化接口,是一个空接口,为对象提供标准的序列化与反序列化操作。使用Serializable实现序列化过程相当简单,只需要在类声明的时候指定一个标识,便可以自动的实现默认的序列化过程。
private static final long serialVersionUID = 1L;
上面已经说明让对象实现序列化,只需要让当前类实现Serializable接口,并且声明一个serialVersionUID就可以了,非常的简单方便。实际上serialVersionUID都不是必须的,没有它同样可以正常的实现序列化操作。
User类就是一个实现了Serialzable的类,它是可以被序列化和反序列化的。
public class User implements Serializable {
private static final long serialVersionUID = 1L;
private String userId;
private String userName;
}
通过Serializable实现对象的序列化过程非常的简单,无需任何操作,系统就为我们自动实现了。如何进行对象的序列化与反序列化操作也是非常的简单,只需要通过ObjectOutputStream,ObjectInputStream进行操作就可以了。
//序列化过程
public void toSerial() {
try {
User user = new User("id", "user");
ObjectOutputStream objectOutputStream = new ObjectOutputStream(new FileOutputStream("user.txt"));
objectOutputStream.writeObject(user);
objectOutputStream.close();
} catch (IOException e) {
e.printStackTrace();
}
}
//反序列化过程
public void fromSerial(){
try {
ObjectInputStream objectInputStream = new ObjectInputStream(new FileInputStream("user.txt"));
User user = (User) objectInputStream.readObject();
objectInputStream.close();
} catch (IOException e) {
e.printStackTrace();
} catch (ClassNotFoundException e) {
e.printStackTrace();
}
三、关于cuosor的相关知识点
Cursor 是每行的集合。使用 moveToFirst() 定位第一行。你必须知道每一列的名称。你必须知道每一列的数据类型。Cursor 是一个随机的数据源。所有的数据都是通过下标取得。
关于 Cursor 的重要方法:
·close()——关闭游标,释放资源
·copyStringToBuffer(int columnIndex, CharArrayBuffer buffer)——在缓冲区中检索请求的列的文本,将将其存储
·getColumnCount()——返回所有列的总数
·getColumnIndex(String columnName)——返回指定列的名称,如果不存在返回-1
·getColumnIndexOrThrow(String columnName)——从零开始返回指定列名称,如果不存在将抛出IllegalArgumentException 异常。
·getColumnName(int columnIndex)——从给定的索引返回列名
·getColumnNames()——返回一个字符串数组的列名
·getCount()——返回Cursor 中的行数
·moveToFirst()——移动光标到第一行
·moveToLast()——移动光标到最后一行
·moveToNext()——移动光标到下一行
·moveToPosition(int position)——移动光标到一个绝对的位置
·moveToPrevious()——移动光标到上一行
下面是自己研究使用listview的具体实验代码:
MessageAdapter.java
package com.example.thetrueappwen;

import android.content.Context;

import android.graphics.Color;

import android.view.LayoutInflater;

import android.view.View;

import android.view.ViewGroup;

import android.widget.BaseAdapter;

import android.widget.ListView;

import android.widget.TextView;

import java.util.List;

public class MessageAdapter extends BaseAdapter

{

    private List<Message> mlist;

    private Context mContext;

    private LayoutInflater mlayoutInflater;

    public MessageAdapter(Context context, List<Message> list){

        mContext=context;

        mlist=list;

        mlayoutInflater= LayoutInflater.from(context);

    }

    @Override

    public int getCount() {//返回一共有多少条记录

        return mlist.size();

    }

    @Override

    public Object getItem(int position) {//返回当前的item对象

        return mlist.get(position);

    }

    @Override

    public long getItemId(int position) {//返回当前item的id

        return position;

    }

    @Override

    public View getView(int position, View convertView, ViewGroup parent) {

        ViewHolder viewHolder;

        if(convertView==null)

        {

            viewHolder=new ViewHolder();

            convertView=mlayoutInflater.inflate(R.layout.list_viewlayout,null);

            viewHolder.kindtxt=convertView.findViewById(R.id.kindtxt);

            viewHolder.datatxt=convertView.findViewById(R.id.datatxt);

            viewHolder.jinetxt=convertView.findViewById(R.id.jinetxt);

            // viewHolder.eventtxt=convertView.findViewById(R.id.eventtxt);

            // viewHolder.choicetxt=convertView.findViewById(R.id.choicetxt);

            // viewHolder.timetxt=convertView.findViewById(R.id.timetxt);

            convertView.setTag(viewHolder);

        }else{

            viewHolder=(ViewHolder) convertView.getTag();

        }

        Message message=mlist.get(position);

        viewHolder.kindtxt.setText(message.userkind);

        viewHolder.datatxt.setText(message.userdata);

        viewHolder.jinetxt.setText(message.usermoney);

        viewHolder=new ViewHolder();

        viewHolder.listwen=convertView.findViewById(R.id.list_view);

        if(message.userchoice.equals("收入"))

        {

            convertView.setBackgroundColor(Color.parseColor("#008577"));//背景色

        }

        else

        {

            convertView.setBackgroundColor(Color.parseColor("#D81B60"));//背景色

        }

        //   viewHolder.eventtxt.setText(message.userevent);

        //  viewHolder.timetxt.setText(message.usertime);

        //   viewHolder.choicetxt.setText(message.userchoice);

        return convertView;

    }

    private static class ViewHolder{//该类中包括item文件(activity_news_list_view)中所有需要显示内容的组件

        public TextView kindtxt;

        public TextView datatxt;

        public TextView jinetxt;

        public ListView listwen;

       // public TextView eventtxt;

        //public TextView choicetxt;

        // public TextView timetxt;

    }

}
FrdFragment.java
package com.example.thetrueappwen;

import android.content.Context;

import android.content.Intent;

import android.database.Cursor;

import android.os.Bundle;

import android.view.LayoutInflater;

import android.view.View;

import android.view.ViewGroup;

import android.widget.AdapterView;

import android.widget.ListView;

import android.widget.Toast;

import androidx.annotation.Nullable;

import androidx.fragment.app.Fragment;

import java.util.ArrayList;

import java.util.List;

public class FrdFragment extends Fragment{

    private DBOpenMessage dbOpenMessage;

    private String username;

    private ListView listview;

    private List<Message> alllistmessage = new ArrayList<Message>();

    @Nullable

    @Override

    public View onCreateView(LayoutInflater inflater, @Nullable ViewGroup container, @Nullable Bundle savedInstanceState) {

        View view = inflater.inflate(R.layout.tab2, container, false);

        dbOpenMessage=new DBOpenMessage(getActivity(),"db_wen2",null,1);

        listview=(ListView)view.findViewById(R.id.list_view);

        getMessage1(username);

        final MessageAdapter adapter = new MessageAdapter(getActivity(), alllistmessage);

        listview.setAdapter(null);

        listview.setAdapter(adapter);

        listview.setOnItemClickListener(new AdapterView.OnItemClickListener() {

            @Override

            public void onItemClick(AdapterView parent, View view, int position, long id) {

             //   Intent intent=new Intent(getActivity(),AllMessage.class);

               // intent.putExtra("username",username2);

                //startActivity(intent);

                Message message = (Message) parent.getItemAtPosition(position);

                Intent intent = new Intent();

                intent.setClass(getActivity(), AllMessage.class);

                Bundle bundle = new Bundle();

                bundle.putSerializable("message", message);

                intent.putExtras(bundle);

                startActivity(intent);

            }

        });

        return view;

    }

//碎片和活动建立关联的时候调用

    @Override

    public void onAttach(Context context) {

        super.onAttach(context);

        username = ((AllWord) context).getTitles();

    }

  /*  private void xianshixinxi()

    {

        Cursor cursor1=dbOpenMessage.getReadableDatabase().query("db_wen2",null,"username=?",new String[]{username},null,null,null);

        ArrayList<Map<String,String>> resultlist=new ArrayList<Map<String,String >>();

    }*/

    private void getMessage1(String username) {

        Cursor cursor=dbOpenMessage.getAllCostData(username);

        if(cursor!=null){

            while(cursor.moveToNext()){

                Message message2=new Message();

                message2.userkind=cursor.getString(cursor.getColumnIndex("userkind"));

                message2.usermoney=cursor.getString(cursor.getColumnIndex("usermoney"));

                message2.userdata=cursor.getString(cursor.getColumnIndex("userdata"));

                message2.userevent=cursor.getString(cursor.getColumnIndex("userevent"));

                message2.userchoice=cursor.getString(cursor.getColumnIndex("userchoice"));

                message2.usertime=cursor.getString(cursor.getColumnIndex("usertime"));

                alllistmessage.add(message2);

            }

        }

    }

}
AllMessage.java
package com.example.thetrueappwen;

import android.content.Context;

import android.content.Intent;

import android.os.Bundle;

import android.widget.EditText;

import android.widget.TextView;

import androidx.appcompat.app.AppCompatActivity;

public class AllMessage extends AppCompatActivity

{

    private Context context;

    private Intent intent;

    private String username,usermoney,userkind ,userdata,usertime,userevent,userchoice;

    private Message message;

    private DBOpenMessage dbOpenMessage;

    private EditText jine5,neirong5;

    private TextView data5,time5,choice5,kind5;

    @Override

    protected void onCreate(Bundle savedInstanceState) {

        super.onCreate(savedInstanceState);

        setContentView(R.layout.all_message);

        context=this;

        intent=getIntent();

        username=intent.getStringExtra("username");//经检验已经成功

        jine5=(EditText)findViewById(R.id.jine5);

        neirong5=(EditText)findViewById(R.id.neirong5);

        data5=(TextView)findViewById(R.id.data5);

        time5=(TextView)findViewById(R.id.time5);

        choice5=(TextView)findViewById(R.id.choice5);

        kind5=(TextView)findViewById(R.id.kind5);

        dbOpenMessage=new DBOpenMessage(AllMessage.this,"db_wen2",null,1);

        Intent intent = this.getIntent();

        message=(Message)intent.getSerializableExtra("message");

        usermoney=message.getUsermoney();

        jine5.setText(usermoney);

        userevent=message.getUserevent();

        neirong5.setText(userevent);

        userdata=message.getUserdata();

        data5.setText(userdata);

        usertime=message.getUsertime();

        time5.setText(usertime);

        userchoice=message.getUserchoice();

        choice5.setText(userchoice);

        userkind=message.getUserkind();

        kind5.setText(userkind);

    }

    @Override

    public void onDestroy()

    {

        super.onDestroy();

        if(dbOpenMessage!=null)

            dbOpenMessage.close();

    }

}
还有就是四个布局文件:
tab2.xml
<?xml version="1.0" encoding="utf-8"?>

<RelativeLayout xmlns:android="http://schemas.android.com/apk/res/android"

    xmlns:app="http://schemas.android.com/apk/res-auto"

    xmlns:tools="http://schemas.android.com/tools"

    android:orientation="vertical"

    android:layout_width="match_parent"

    android:layout_height="match_parent"

    android:background="@color/qianhui"

    tools:context=".FrdFragment">

    <TextView

        android:id="@+id/wenwen"

    android:layout_width="wrap_content"

    android:layout_height="wrap_content"

        android:layout_marginLeft="40dp"

    android:text="粉红色表示支出项目"

        android:layout_marginTop="10dp"

    android:textSize="15dp"

    android:textColor="@color/colorAccent"/>

    <TextView

        android:layout_width="wrap_content"

        android:layout_height="wrap_content"

        android:layout_toRightOf="@+id/wenwen"

        android:layout_marginRight="40dp"

        android:layout_marginLeft="50dp"

        android:layout_marginTop="10dp"

        android:text="绿色表示收入项目"list

        android:textSize="15dp"

        android:textColor="@color/colorPrimary"/>

    <ListView

        android:layout_below="@+id/wenwen"

        android:layout_width="match_parent"

        android:layout_height="match_parent"

        android:id="@+id/list_view"/>

</RelativeLayout>
list_viewlayout.xml
<?xml version="1.0" encoding="utf-8"?>

<RelativeLayout xmlns:android="http://schemas.android.com/apk/res/android"

    android:orientation="vertical"

    android:focusable="false"

    android:layout_width="match_parent"

    android:layout_height="match_parent">

    <TextView

        android:id="@+id/kindtxt"

        android:layout_width="90dp"

        android:layout_height="80dp"

        android:layout_marginLeft="10dp"

        android:layout_alignParentLeft="true"

        android:gravity="center"

        android:singleLine="true"

        android:textSize="35sp"

        android:text="userkindtext"

        android:focusable="false"

        android:ellipsize="marquee" />

    <TextView

        android:id="@+id/datatxt"

        android:layout_width="150dp"

        android:layout_height="80dp"

        android:layout_toRightOf="@+id/kindtxt"

        android:layout_marginLeft="15dp"

        android:textSize="20sp"

        android:gravity="center"

        android:ellipsize="marquee"

        android:focusable="false"

        android:text="userdatatext"/>

    <TextView

        android:id="@+id/jinetxt"

        android:layout_width="120dp"

        android:layout_height="80dp"

        android:text="userjinetxt"

        android:textSize="30sp"

        android:layout_marginRight="10dp"

        android:layout_alignParentRight="true"

        android:singleLine="true"

        android:ellipsize="marquee"

        android:marqueeRepeatLimit="marquee_forever"

        android:focusable="false"

        android:gravity="center"/>

</RelativeLayout>
allword.xml
<?xml version="1.0" encoding="utf-8"?>

<LinearLayout

    xmlns:android="http://schemas.android.com/apk/res/android"

    xmlns:tools="http://schemas.android.com/tools"

    android:orientation="vertical"

    android:layout_width="match_parent"

    android:layout_height="match_parent"

    tools:context=".MainActivity">

    <include layout="@layout/top"/>

    <androidx.viewpager.widget.ViewPager

        android:id="@+id/id_viewpager"

        android:layout_width="match_parent"

        android:layout_height="0dp"

        android:layout_weight="1">

    </androidx.viewpager.widget.ViewPager>

    <include layout="@layout/bottom"/>

</LinearLayout>
all_message.xml
<?xml version="1.0" encoding="utf-8"?>

<LinearLayout xmlns:android="http://schemas.android.com/apk/res/android"

    xmlns:tools="http://schemas.android.com/tools"

    android:orientation="vertical"

    android:layout_width="match_parent"

    android:layout_height="match_parent"

    tools:context=".AllMessage">

    <TextView

        android:layout_width="match_parent"

        android:layout_height="wrap_content"

        android:text="对应的具体情况"

        android:textSize="30dp"

        android:gravity="center_horizontal"

        android:padding="5dp"

        android:background="@color/baise"

        android:layout_marginBottom="10dp"

        />

    <LinearLayout

        android:id="@+id/ming"

        android:layout_width="match_parent"

        android:layout_height="wrap_content"

        android:orientation="horizontal">

        <TextView

            android:layout_width="wrap_content"

            android:layout_height="wrap_content"

            android:text="对应的金额:"

            android:padding="8dp"

            android:background="@color/qianhuang"

            android:layout_marginRight="5dp"

            android:textSize="18sp" />

        <EditText

            android:id="@+id/jine5"

            android:layout_width="match_parent"

            android:layout_height="wrap_content"

            android:hint="请输入收入的金额"

            android:inputType="number"

            android:lines="2"

            android:padding="8dp"

            android:background="@color/baise"

            android:layout_marginBottom="10dp"

            />

    </LinearLayout>

    <EditText

        android:id="@+id/neirong5"

        android:layout_width="match_parent"

        android:layout_height="wrap_content"

        android:hint="请输入收入的相关内容"

        android:lines="8"

        android:padding="8dp"

        android:background="@color/baise"

        android:layout_marginBottom="10dp"

        android:inputType="textMultiLine"

        android:gravity="top"

        />

    <LinearLayout

        android:layout_width="match_parent"

        android:layout_height="wrap_content"

        android:orientation="horizontal">

        <TextView

            android:layout_width="wrap_content"

            android:layout_height="wrap_content"

            android:text="选择日期:"

            android:padding="8dp"

            android:background="@color/baise"

            android:textSize="18sp" />

        <TextView

            android:id="@+id/data5"

            android:layout_width="match_parent"

            android:layout_height="wrap_content"

            android:padding="8dp"

            android:background="@color/qianhuang"

            android:textSize="18sp" />

    </LinearLayout>

    <LinearLayout

        android:layout_width="match_parent"

        android:layout_height="wrap_content"

        android:layout_marginTop="10dp"

        android:orientation="horizontal">

        <TextView

            android:layout_width="wrap_content"

            android:layout_height="wrap_content"

            android:text="选择时间:"

            android:padding="8dp"

            android:background="@color/baise"

            android:textSize="18sp" />

        <TextView

            android:id="@+id/time5"

            android:layout_width="match_parent"

            android:layout_height="wrap_content"

            android:background="@color/qianhuang"

            android:padding="8dp"

            android:layout_marginBottom="10dp"

            android:textSize="18sp" />

    </LinearLayout>

    <TextView

        android:id="@+id/age"

        android:layout_width="wrap_content"

        android:layout_height="wrap_content"

        android:text="账单类别"

        android:background="@color/chengse"

        android:layout_gravity="center_horizontal"

        android:layout_marginBottom="10dp"

        android:layout_marginTop="15dp"

        android:textSize="25sp" />

    <TextView

        android:id="@+id/choice5"

        android:layout_width="wrap_content"

        android:layout_height="wrap_content"

        android:background="@color/qianhuang"

        android:padding="8dp"

        android:layout_gravity="center_horizontal"

        android:text="收出"

        android:layout_marginBottom="10dp"

        android:textSize="18sp" />

    <TextView

        android:id="@+id/kind5"

        android:layout_width="wrap_content"

        android:layout_height="wrap_content"

        android:background="@color/qianhuang"

        android:padding="8dp"

        android:layout_gravity="center_horizontal"

        android:text="类型"

        android:layout_marginBottom="10dp"

        android:textSize="18sp" />

</LinearLayout>
具体的是研究过如下:
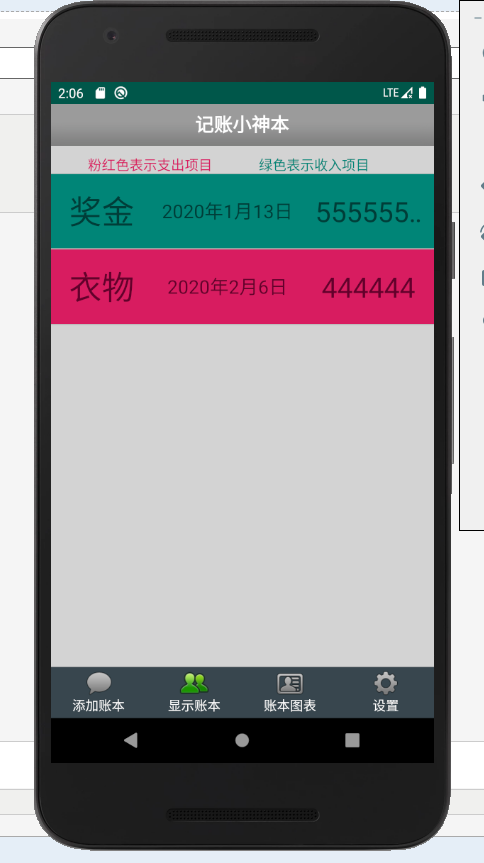
当点击其中一个账单的时候:

家庭版记账本app进度之关于listview显示账单,并为其添加点击事件的更多相关文章
- 家庭版记账本app进度之对于按钮的点击事件以及线性布局以及(alertdialog)等相关内容的应用测试
通过线性布局,制作出连个按钮还有文本输入框以及嘴上放的标题文本进行信息的相关显示,完后最后的信息的输入,之后在屏幕的的下方进行显示 当点击第一个按钮的时候,在下方就会简单的出现你自己刚刚输入的相关信息 ...
- 家庭版记账本app进度之关于android界面布局的相关学习
1.线性布局(linearlayout)是一种让视图水平或垂直线性排列的布局线性布局使用<LinearLayout>标签进行配置对应代码中的类是android.widget.LinearL ...
- 家庭版记账本app进度之编辑框组件
<EditText>中设置提示信息是用到的语句是android:hint来进行提示语句的书写. android:inputType可以将此编辑框设置为输入密码的编辑框(现实的是小黑点) a ...
- 家庭版记账本app开发完成
经过这几天关于android的相关学习,对于家庭版记账本app以及开发结束. 实现的功能为:用户的注册.登录.添加支出账单.添加收入账单.显示所有的该用户的账单情况(收入和支出).生产图表(直观的显示 ...
- 家庭记账本app进度之复选框以及相应滚动条的应用
这次主要是对于android中复选框的相应的操作.以及其中可能应用到的滚动条的相关应用.每一个复选框按钮都要有一个checkBox与之相对应. 推荐使用XML配置,基本语法如下:<CheckBo ...
- 家庭版记账本app之常用控件的使用方法
现在先介绍在android开发的时候会用的相关的控件,做一个基本的了解方便我们之后对其进行相关具体的操作.下面是相应额详细情况: TextView android:layout_width 和 and ...
- 家庭版记账本app开发进度相关界面的规划
总的app界面包括四个页面,页面可以来回滑动.设计的时候就和微信的四个页面类似. 由于没有找到合适的图标进行替换,在此仍应用微信对应的四个图标. 总的四个页面是: 1.增加收入或者支出的小账单.当点击 ...
- 家庭版记账本app开发进度。开发到现在整个app只剩下关于图表的设计了,具体功能如下
首先说一下自己的功能: 实现了用户的登录和注册.添加收入记账和添加支出记账.粗略显示每条账单基本情况.通过点击每条账单来显示具体的情况, 之后就是退出当前用户的操作. 具体的页面情况如下: 这就是整个 ...
- 家庭版记账本app开发之关于(数据库查找出数据)圆饼图的生成
这次完成的主要的怎样从数据库中调出数据.之后通过相关的数据,生成想要的圆饼图.以方便用户更加直观的看见关于账本的基本情况. 在圆饼图生成中用到了一些外部资源 具体的import如下: import c ...
随机推荐
- 幕布,workflowy的使用技巧
Q: 幕布免费用户导出文档为纯文本或opml: - 将文档Ctrl+C 复制到workflowy: - workflowy可以导出plain-text或opml: 注:已知这样的方法,注释的格式不会被 ...
- sessionStorage localStorage 和 cookie 之间的区别转
sessionStorage 和 localStorage 是HTML5 Web Storage API 提供的,可以方便的在web请求之间保存数据.有了本地数据,就可以避免数据在浏览器和服务器间不必 ...
- C3p0连接池-Java(新手)
1 数据库连接池 C3p0 和 Druid 1.1 定义 : 本质上就是个容器(集合) 存放数据库连接的容器 当系统初始化以后 容器被创建 容器中就会申请一些连接对象 当用户来访问的数据库的时候 从容 ...
- Nginx双机主备(Keepalived实现)
前言 首先介绍一下Keepalived,它是一个高性能的服务器高可用或热备解决方案,起初是专为LVS负载均衡软件设计的,Keepalived主要来防止服务器单点故障的发生问题,可以通过其与Nginx的 ...
- 推荐几个来自 MOOCs的 Data Science
数据科学是一个大领域,如果你想成为一个优秀的数据专家,自学是必要的技能. MOOCs是数据科学的主要来源.有许多网站提供了 MOOCs,比如Coursera.Coursera和Udacity都还不错. ...
- Python实现一个ORM模型类
ORM是三个单词首字母组合而成,包含了Object(对象-类),Relations(关系),Mapping(映射).解释过字面意思,但ORM的概念仍然模糊.私以为要理解一个事物,最好的法子是搞明白它出 ...
- 性能测试从零开始-LoadRunner入门
写在前面 又到了公司每月的读书会,经过上个月的试运行后,公司把读书会纳入每月的绩效考核中,听到这个消息,当时我的内心是崩溃的,不过从另一方面来讲,对于我来说也一件好事儿,这样可以督促自己养成读书的习惯 ...
- wr720n v4 折腾笔记(二):刷入不死Uboot
0x01 前言 接着上节刷入Openwrt开始说起,此次开始刷入不死Uboot,刷入之后就可以在Uboot里面随便刷机,再也不怕成砖了. 固件附件地址: 下载地址1(还是之前一的包) flash文件地 ...
- 李宏毅老师机器学习课程笔记_ML Lecture 1: ML Lecture 1: Regression - Demo
引言: 最近开始学习"机器学习",早就听说祖国宝岛的李宏毅老师的大名,一直没有时间看他的系列课程.今天听了一课,感觉非常棒,通俗易懂,而又能够抓住重点,中间还能加上一些很有趣的例子 ...
- 刷oj之类的题时java Scanner读取太慢解决之道
1.转载自一个 https://www.cpe.ku.ac.th/~jim/java-io.html 2.工具代码 class Reader { static BufferedReader reade ...