SpringMVC 3.1集成Spring Security 3.1
这篇算是一个入门文章,昨天看见有网友提问,spring mvc集成spring security 的时候出错,揣测了一下问题木有解决。我就帮忙给搭建了一个集成框架他说可以,他告诉我这样的文章网上少。今天我就分享在这里供入门学习。spring mvc我木有用过,所以我们这里重点讲解如何集成spring security ,spring security是一个非常好的开源权限框架(具体了解自己google,或者到spring 官网,这里我给一个DOC3.1:http://static.springsource.org/spring-security/site/docs/3.1.x/reference/springsecurity.html)。可以说不仅仅包含了权限,里面有一套完整的授权认证系统包括:权限、防止session攻击、支持信道安全、支持LDAP认证、支持OpenID、同时支持CAS集成单点登录等等,个人用过spring security 2.0基本大致一样,当时中文资源那个少啊,尤其集成SSH+spring security 更是少的可怜,最后还是硬着头皮上,最后拿下了这个框架,最起码了解了。当时就写了一个SSH+spring security的文章,还被某网站引用。好了废话不扯,我们今天在来集成一个springmvc3.1+spring security3.1.我们step by step go。
step1:搭建SpringMVC。
如果你会搭建或者搭建好了spring MVC那这一步可以略过了。首先下载spring mvc3.1 jar这个到官网下载或者google,需要的jar如图:

然后创建一个包新建一个spring mvc 的class、我的如下:
@Controller

public class RestConstroller {

    public RestConstroller() {}

    @RequestMapping(value = "/welcome", method = RequestMethod.GET)

    public String registPost() {

        return "/hello";

    }

}
上面采用spring 注解方式实例化class,这个我不多讲,spring mvc也没用过不敢乱点。官网有例子你自己照着做。http://static.springsource.org/spring/docs/3.1.x/spring-framework-reference/html/validation.html#format-configuring-FormattingConversionService
接着新建了一个view试图放了一个hello.jsp
然后新建一个spring-servlet.xml 这个是spring mvc的一个配置文件。
<?xml version="1.0" encoding="UTF-8"?>

<beans xmlns="http://www.springframework.org/schema/beans"

    xmlns:context="http://www.springframework.org/schema/context"

    xmlns:p="http://www.springframework.org/schema/p"

    xmlns:mvc="http://www.springframework.org/schema/mvc"

    xmlns:xsi="http://www.w3.org/2001/XMLSchema-instance"

    xsi:schemaLocation="

        http://www.springframework.org/schema/beans

        http://www.springframework.org/schema/beans/spring-beans.xsd

        http://www.springframework.org/schema/mvc

        http://www.springframework.org/schema/mvc/spring-mvc.xsd

        http://www.springframework.org/schema/context

        http://www.springframework.org/schema/context/spring-context.xsd">

     <!-- 启动注解驱动的Spring MVC功能,注册请求url和注解POJO类方法的映射-->

     <mvc:annotation-driven />

     <!-- 启动包扫描功能,以便注册带有@Controller、@Service、@repository、@Component等注解的类成为spring的bean -->

     <context:component-scan base-package="com.mvc.test" />  <!--这个包根据自己的项目来配置,我的是com.mvc.test-->

     <!-- 对模型视图名称的解析,在请求时模型视图名称添加前后缀 -->

     <bean class="org.springframework.web.servlet.view.InternalResourceViewResolver" p:prefix="/WEB-INF/view/" p:suffix=".jsp" />

</beans>

然后配置web.xml:

     <context-param>

        <param-name>contextConfigLocation</param-name>

        <!-- 应用上下文配置文件 -->

        <param-value>/WEB-INF/spring-servlet.xml</param-value>

    </context-param>

    <listener>

        <listener-class>org.springframework.web.context.ContextLoaderListener</listener-class>

    </listener>

  <!-- 配置spring核心servlet -->

  <servlet>

      <servlet-name>spring</servlet-name>

      <servlet-class>org.springframework.web.servlet.DispatcherServlet</servlet-class>

      <load-on-startup>1</load-on-startup>

  </servlet>

  <!-- url-pattern配置为/ 拦截 -->

  <servlet-mapping>

      <servlet-name>spring</servlet-name>

      <url-pattern>/</url-pattern>

  </servlet-mapping>
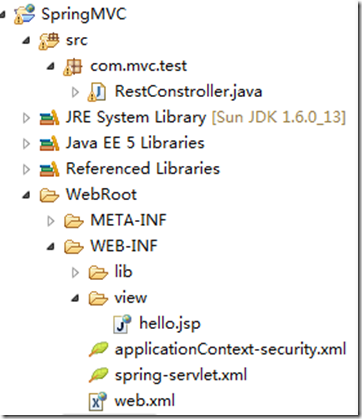
项目具体结构:

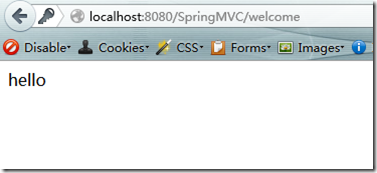
好了现在可以启动了,我这里启动的时候很不幸报错了,一看,缺少logger的jar,添加commons-logging-1.1.jar,ok启动访问http://localhost:8080/SpringMVC/welcome成功、
到这里spring mvc配置完成。下面我们的重点集成spring security 3.1
step 2 spring mvc3.1集成spring security 3.1
首先要讲一点大版本集成要注意一点,大版本号要保持一直,第一位的往往都是大版本号,小版本号影响不大。为什么要这样讲,当时我在集成SSH 的时候spring 用的是spring 2.X,然后去下载了一个spring security 3.X的死活不成功。后来在一片老外的文章中发现了,具体地址我忘记了,spring 2.X +spring security 2.X才能集成功,spring 3.X +spring security 3.X才能集成成功。现在想想真够二的、哈哈,好了小插曲过后,我们继续。
首先下载spring security 3.1jar,地址:http://www.springsource.org/spring-community-download。我这里有曾今下载的,就不用了、jar结构如下:

红色的呢,是源码包,我们不用加入,蓝色圈中的是两个例子、你可以部署学习一下。其他的就是我们需要的jar,可以根据包名称发现各个包都是一个spring security 的特性,一般来说我们把jar都加进去,随着项目需要都会用到的。
接下来我们需要新建一个applicationContext-security.xml文件,这个是spring security 配置必须的一个文件。内容如下:
<?xml version="1.0" encoding="UTF-8"?>

<b:beans xmlns="http://www.springframework.org/schema/security"

    xmlns:b="http://www.springframework.org/schema/beans"

    xmlns:xsi="http://www.w3.org/2001/XMLSchema-instance"

    xsi:schemaLocation="http://www.springframework.org/schema/beans

                        http://www.springframework.org/schema/beans/spring-beans-3.0.xsd

                        http://www.springframework.org/schema/security

                        http://www.springframework.org/schema/security/spring-security-3.1.xsd">

       <!-- 开启默认的拦截器 -->

      <http auto-config='true'>

         <!-- 允许访问的uri -->

        <intercept-url pattern="/**" access="ROLE_USER" />

       </http>

       <!-- 权限管理者 -->

       <authentication-manager>

           <!-- 权限提供者 -->

        <authentication-provider>

          <!-- 可提供登陆访问的用户 -->

          <user-service>

            <user name="haha" password="haha" authorities="ROLE_USER, ROLE_ADMIN" />

            <user name="xixi" password="xixi" authorities="ROLE_USER" />

          </user-service>

        </authentication-provider>

      </authentication-manager>

</b:beans>
里面大概解释了一下,其中http节点里面默认的开启的几个必须的拦截器,下面的user-service 就是可以登陆访问的用户列表,我们这里没有用数据库所以就这样配置了,如果使用数据库 配置一个dataSource即可,包括后面的authorities都是通过数据库管理用户权限的,这里我们暂时入门不做深入讲解。
然后我们需要一个spring security 的过滤器配置、web.xml完整配置。
<?xml version="1.0" encoding="UTF-8"?>

<web-app version="2.5"

    xmlns="http://java.sun.com/xml/ns/javaee"

    xmlns:xsi="http://www.w3.org/2001/XMLSchema-instance"

    xsi:schemaLocation="http://java.sun.com/xml/ns/javaee

    http://java.sun.com/xml/ns/javaee/web-app_2_5.xsd">

    <context-param>

        <param-name>contextConfigLocation</param-name>

        <!-- 应用上下文配置文件 -->

        <param-value>/WEB-INF/spring-servlet.xml,/WEB-INF/applicationContext-security.xml</param-value>

    </context-param>

    <listener>

        <listener-class>org.springframework.web.context.ContextLoaderListener</listener-class>

    </listener>

    <!-- spring securit start -->

    <filter>

      <filter-name>springSecurityFilterChain</filter-name>

      <filter-class>org.springframework.web.filter.DelegatingFilterProxy</filter-class>

    </filter>

    <filter-mapping>

      <filter-name>springSecurityFilterChain</filter-name>

      <url-pattern>/*</url-pattern>

    </filter-mapping>

    <!-- spring securit start -->

    <!-- 配置spring核心servlet -->

    <servlet>

        <servlet-name>spring</servlet-name>

        <servlet-class>org.springframework.web.servlet.DispatcherServlet</servlet-class>

        <load-on-startup>1</load-on-startup>

    </servlet>

    <!-- url-pattern配置为/,不带文件后缀,会造成其它静态文件(js,css等)不能访问。如配为*.do,则不影响静态文件的访问 -->

    <servlet-mapping>

        <servlet-name>spring</servlet-name>

        <url-pattern>/</url-pattern>

    </servlet-mapping>

    <welcome-file-list>

      <welcome-file>index.jsp</welcome-file>

   </welcome-file-list>

</web-app>
其中springSecurityFilterChain 过滤器必须放在最前面,因为spring security的安全机制是保护在web最外层的安全框架,所以你的任何访问都要经过spring security 投票机制授权才可以访问的,否则不允许访问。只有登陆用户才可以访问。
contextConfigLocation配置就是扫描我们的spring mvc和spring security配置文件。
具体完整的目录结构如下:
下面我们启动web看看会发生什么神奇的事情。下面我们访问http://localhost:8080/SpringMVC/welcome

奇迹发生了,我们并没有创建登陆页面,那这个登陆页面哪里来的呢?哈哈,不要着急,慢慢来讲,看看url spring_security_login ,还记得我们前面配置的spring security 的配置文件的<http>这个配置默认会开启几个过滤器,其中有一个就是拦截发现我们没登陆然后查找登陆页面,但为什么自动出来呢?其是它为我们默认了一个登陆页面,登陆页面我们可以指定一个,前面我们没指定所以检查发现没有它就默认了一个登陆页面给我们,下面我们登陆看看会发生什么情况。(什么你不知道账号密码?其实就是我们spring security配置的那个账号密码)。
输入账号密码结果:
跳转到了我们刚刚要访问的uri了,中间还会检查我们的账号是否有权,有权才会访问成功,无权则会转到无权访问页面。好了,到这里spring mvc+spring security 集成就完成了,剩下的工作就是一步一步的慢慢学习spring security 来使用更多的完善的功能。简单吧,就这点东西。
到这里我们再试试如果登录一个不存在的账号会发生什么情况、我输入了一个admin、结果出现如下图:

spring security已经帮我们检查了,账号不存在,他会把我们继续重定向到登录页面,知道登录成功,否则你永远都面对的是这个登录页面。
好了今天主要分享的就这点,师傅引进门修行靠个人。不过我想了想,还是再分享一点有用的、有的人会想如果我的登录页面需要自定义怎么办?下面我们就讲讲。
首先自定义登陆,我们需要修改applicationContext-security.xml 配置文件,修改如下:
    <!-- 开启默认的拦截器 -->

      <http auto-config='true'>

         <!-- 允许访问的uri -->

         <intercept-url pattern="/**" access="ROLE_USER" />

         <!-- 登陆页面配置 -->

          <form-login login-page="/login.jsp" default-target-url="/index.jsp" authentication-failure-url="/login.jsp?error=true"/>

       </http>

       <!-- 权限管理者 -->

       <authentication-manager>

           <!-- 权限提供者 -->

        <authentication-provider>

          <!-- 可提供登陆访问的用户 -->

          <user-service>

            <user name="haha" password="haha" authorities="ROLE_USER, ROLE_ADMIN" />

            <user name="xixi" password="xixi" authorities="ROLE_USER" />

          </user-service>

        </authentication-provider>

      </authentication-manager>
其中就多加 了一个form 配置节点,从命名可以看出login-page就是你的登陆页面,default-target-url是默认的登陆成功后的页面,authentication-failure-url就是当你输入非法账号或者密码自动重定向到login.jsp.
接下来创建我们自定义的登陆页面,我的就是login.jsp,有人到这里会想,form接下来该如何写呢?怎么写才能被拦截呢?如下:
    <h1>user login</h1>

    <form action="j_spring_security_check" method="post">

        用户名<input type="text" name="j_username"/><br/>

        密码<input type="password" name="j_password"/><br/>

        <input type="submit" value="submit"/>

    </form>
action="j_spring_security_check"必须这样写,否则拦截器拦截不到。登陆的字段j_username j_password必须这样写,否则你的登陆拦截器获取不到value。当然你也可以自定义,但前提是你必须继承UsernamePasswordAuthenticationFilter 过滤器去重写一下,这里我们就不麻烦了,而且一般情况下我们不需要重写,就用它提供的即可。好了,到这里我们可以启动服务器了。我们再次访问:http://localhost:8080/SpringMVC/welcome看看会发生神马变化。如图:

咦?这是什么情况?url变了,是我们要访问的登陆地址。可是页面的登陆form呢?不要着急,这种情况我当时见多了,第一反应login.jsp没有被放行,拦截下来了、受保护的资源。前面我们不是讲过spring security 是保护在web最外层的,访问任何资源需要投票,授权才能访问的,这个也不例外。
好了,知道什么情况了,我们修改吧!修改如下部分片段即可:
     <!-- 开启默认的拦截器 -->

      <http auto-config='true'>

         <!--对login.jsp放行,不用保护-->

         <intercept-url pattern="/login.jsp" filters="none" />

         <!-- 允许访问的uri -->

         <intercept-url pattern="/**" access="ROLE_USER" />

         <!-- 登陆页面配置 -->

         <form-login login-page="/login.jsp" default-target-url="/index.jsp" authentication-failure-url="/login.jsp?error=true"/>

       </http>
然后我们启动服务器再次访问http://localhost:8080/SpringMVC/welcome
不幸的事情又发生了,控制台报错,服务器启动失败!如下图:


其实大概的意思是讲下面的这个配置作废了。
<!--对login.jsp放行,不用保护-->
<intercept-url pattern="/login.jsp" filters="none" />这个配置是spring security 2.X中的,3.X以后作废了,使用新的方式了。不过错误告诉我们怎么使用新的标签了,就是新建一个节点标签,属性security="none" 来放行,好了,我们修改一下。修改部分配置如下:
       <!-- spring securit 3.X新的资源放行配置方式,不受保护的资源 -->

       <http pattern="/login.jsp" security="none"/>

       <!-- 开启默认的拦截器 -->

       <http auto-config='true'>

          <!-- 允许访问的uri -->

          <intercept-url pattern="/**" access="ROLE_USER" />

          <!-- 登陆页面配置 -->

          <form-login login-page="/login.jsp" default-target-url="/index.jsp" authentication-failure-url="/login.jsp?error=true"/>

        </http>
在http节点上面再加一个节点,然后配置不需要拦截的。pattern属性的意思就是通过正则表达式来匹配的。security="none"就是不安全的,意思就是不受spring security保护的资源,这里还要提一点,就是.jpg、.gif、.swf、.css、.js/等等资源文件都会被拦截下来,即使他是包含在一个已经放行的jsp页面或者uri的request、怎么理解?就是比如:我们的login.jsp放行了,但是我们没有放行.jpg这样的图片资源,当我们访问login.jsp的时候图片是不显示的,因为它没有被放行,从这里可以看出spring security是非常严格的检查机制。假如我们要放行那些怎么办?
spring security 2.X中配置如下:
  <http auto-config='true'>

      <!-- public 资源文件 –>

      <intercept-url pattern="/**/*.jpg" filters="none" />

      <intercept-url pattern="/**/*.png" filters="none" />

      <intercept-url pattern="/**/*.gif" filters="none" />

      <intercept-url pattern="/**/*.ico" filters="none" />

      <intercept-url pattern="/**/*.css" filters="none" />

      <intercept-url pattern="/**/*.js" filters="none" />

       <!-- 允许访问的uri -->

       <intercept-url pattern="/**" access="ROLE_USER" />

       <!-- 登陆页面配置 -->

       <form-login login-page="/login.jsp" default-target-url="/index.jsp" authentication-failure-url="/login.jsp?error=true"/>

     </http>
当然我们这里讲spring security 3.X,所以3.X的如下:
<http pattern="/**/*.jpg" security="none"/>

<http pattern="/**/*.png" security="none"/>

<http pattern="/**/*.gif" security="none"/>

<http pattern="/**/*.ico" security="none"/>

<http pattern="/**/*.css" security="none"/>

<http pattern="/**/*.js" security="none"/>

<!-- spring securit 3.X新的资源放行配置方式,不受保护的资源 -->

<http pattern="/login.jsp" security="none"/>

  <http auto-config='true'>

     <!-- 允许访问的uri -->

     <intercept-url pattern="/**" access="ROLE_USER" />

     <!-- 登陆页面配置 -->

     <form-login login-page="/login.jsp" default-target-url="/index.jsp" authentication-failure-url="/login.jsp?error=true"/>

   </http>
上面的pattern="/**/*.jpg" 配置意思就是放行,项目中所有的.jpg资源,以后的以此类推的原理。你亦可以放行某一个文件下的,具体就是正则表达式的配置。
好了,我们还是回到刚刚修改的放行资源试试,再次启动服务器访问:http://localhost:8080/SpringMVC/welcome

当我们再次访问的时候login.jsp已经出来了、这个时候我们登陆,成功后直接跳转到/welcome 的响应页面。结果如图;

这里我们没有配置用户资源访问权限,所以访问的资源直接可以访问,如果配置了访问权限登陆成功后,spring security还会检查是否有权访问,无权重定向。
好了到这里,今天分享的入门到此完毕。这个框架还是很值得学习的,功能比较强大,官方文档比较全面,可以好好研读一下,感谢抽宝贵的时间阅读。
SpringMVC 3.1集成Spring Security 3.1的更多相关文章
- SpringMVC 3.2集成Spring Security 3.2
参考:http://www.cnblogs.com/Beyond-bit/p/springmvc_and_springsecurity.html SpringMVC 3.2集成Spring Secur ...
- SpringMVC 3.2集成Spring Security 3.2集成mybaties
目录结构如下
- 【Spring】关于Boot应用中集成Spring Security你必须了解的那些事
Spring Security Spring Security是Spring社区的一个顶级项目,也是Spring Boot官方推荐使用的Security框架.除了常规的Authentication和A ...
- SpringBoot 集成Spring security
Spring security作为一种安全框架,使用简单,能够很轻松的集成到springboot项目中,下面讲一下如何在SpringBoot中集成Spring Security.使用gradle项目管 ...
- 关于Boot应用中集成Spring Security你必须了解的那些事
Spring Security Spring Security是Spring社区的一个顶级项目,也是Spring Boot官方推荐使用的Security框架.除了常规的Authentication和A ...
- Spring Boot中集成Spring Security 专题
check to see if spring security is applied that the appropriate resources are permitted: @Configurat ...
- SpringBoot集成Spring Security入门体验
一.前言 Spring Security 和 Apache Shiro 都是安全框架,为Java应用程序提供身份认证和授权. 二者区别 Spring Security:重量级安全框架 Apache S ...
- SpringBoot集成Spring Security(7)——认证流程
文章目录 一.认证流程 二.多个请求共享认证信息 三.获取用户认证信息 在前面的六章中,介绍了 Spring Security 的基础使用,在继续深入向下的学习前,有必要理解清楚 Spring Sec ...
- SpringBoot集成Spring Security(6)——登录管理
文章目录 一.自定义认证成功.失败处理 1.1 CustomAuthenticationSuccessHandler 1.2 CustomAuthenticationFailureHandler 1. ...
随机推荐
- swift:入门知识之函数与闭包
1.swift中使用关键字func来声明和定义一个函数.调用函数使用它的名字加上小括号中的参数列表. 2.swift使用->方向符号分隔参数的名字和返回值类型 3.swift使用元组(tuple ...
- Linux系统中的load average
1. load average 定义 linux系统中的Load对当前CPU工作量的度量.简单的说是进程队列的长度. Load Average 就是一段时间 (1 分钟.5分钟.15分钟) 内平均 L ...
- slot signal机制
有一个比较 经典的实现:http://sigslot.sourceforge.net/很精简的 signal slot的实现,跨平台.webrtc项目在用,我在自己项目里也用了.这个源码有2000多行 ...
- requirejs 优化压缩
1 配置node环境 2 配置built.js文档 3 执行命令node r.js -o built.js 文件目录: <!DOCTYPE HTML> <html lang=&quo ...
- MySQL工具:管理员必备的10款MySQL工具
MySQL是一个复杂的的系统,需要许多工具来修复,诊断和优化它.幸运的是,对于管理员,MySQL已经吸引了很多软件开发商推出高品质的开源工具来解决MySQL的系统的复杂性,性能和稳定性,其中大部分是免 ...
- hdu - 1728逃离迷宫 && hdu - 1175 连连看 (普通bfs)
http://acm.hdu.edu.cn/showproblem.php?pid=1728 这两道题花了一下午的时候调试,因为以前做过类似的题,但是判断方向的方法是错的,一直没发现啊,真无语. 每个 ...
- QQ邮箱附件发送
一.先造一个邮件发送的窗体 二.编辑邮件发送的代码(包括附件) ①附件添加对话框 string file; private void button6_Click(object sender, Even ...
- bzoj4026
直接按照欧拉函数的计算方式来即可 φ=区间积*区间出现(质数-1)的积/区间出现过的质数的积 区间积是满足类似区间减法的操作的(利用逆元) 由于强制在线,上主席树就可以了(维护每个质数上次出现的位置p ...
- IIS7或者IIS7.5部署MVC项目时出现404错误
IIS7或者IIS7.5部署MVC项目时出现404错误 服务器上需要安装Windows 补丁 kb980368 下载链接:http://support.microsoft.com/kb/980368
- POJ 2524 (简单并查集) Ubiquitous Religions
题意:有编号为1到n的学生,然后有m组调查,每组调查中有a和b,表示该两个学生有同样的宗教信仰,问最多有多少种不同的宗教信仰 简单并查集 //#define LOCAL #include <io ...