Spring源码解读(一)
前期准备
首先搭建一个简单的Spring Demo工程
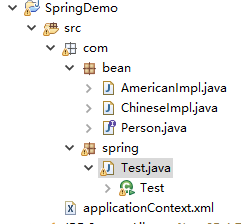
项目目录结构如下图所示:

applicationContect.xml (可以取其他文件名,只要在加载配置文件时指定文件路径)
<?xml version="1.0" encoding="UTF-8"?>

<beans

    xmlns="http://www.springframework.org/schema/beans"

    xmlns:xsi="http://www.w3.org/2001/XMLSchema-instance"

    xmlns:p="http://www.springframework.org/schema/p"

    xmlns:aop="http://www.springframework.org/schema/aop"

    xsi:schemaLocation="http://www.springframework.org/schema/beans

        http://www.springframework.org/schema/beans/spring-beans-3.0.xsd

        http://www.springframework.org/schema/aop

        http://www.springframework.org/schema/aop/spring-aop-3.0.xsd">

    <bean id="chinese" class="com.bean.ChineseImpl">

        <property name="name">

            <value>小明</value>

        </property>

        <property name="age">

            <value>10</value>

        </property>

    </bean>

    <bean id="american" class="com.bean.AmericanImpl">

        <property name="name">

            <value>Tom</value>

        </property>

        <property name="age">

            <value>15</value>

        </property>

    </bean>

</beans>
Person.java
package com.bean;

public interface Person{

    public void Speak();

}
ChineseImpl.java
package com.bean;

public class ChineseImpl implements Person{

    private String name;

    private int age;

    public String getName() {

        return name;

    }

    public void setName(String name) {

        this.name = name;

    }

    public int getAge() {

        return age;

    }

    public void setAge(int age) {

        this.age = age;

    }

    @Override

    public void Speak() {

        // TODO Auto-generated method stub

        System.out.println("I'm Chinese,My name is "+this.name+",I'm "+this.age+" years old!");

    }

}
AmericanImpl.java
package com.bean;

public class AmericanImpl implements Person{

    private String name;

    private int age;

    public String getName() {

        return name;

    }

    public void setName(String name) {

        this.name = name;

    }

    public int getAge() {

        return age;

    }

    public void setAge(int age) {

        this.age = age;

    }

    @Override

    public void Speak() {

        // TODO Auto-generated method stub

        System.out.println("I'm American,My name is "+this.name+",I'm "+this.age+" years old!");

    }

}
Test.java
package com.spring;

import org.springframework.context.ApplicationContext;

import org.springframework.context.support.ClassPathXmlApplicationContext;

import com.bean.Person;

public class Test {

    public static void main(String[] args) {

        ApplicationContext context = new ClassPathXmlApplicationContext("applicationContext.xml");

        Person person = (Person) context.getBean("chinese");

        person.Speak();

        person = (Person) context.getBean("american");

        person.Speak();

    }

}
下面将按照Spring初始化的过程:
构造函数
ClassPathXmlApplicationContext构造函数(ClassPathXmlApplicationContext[只能读放在web-info/classes目录下的配置文件],FileSystemXmlApplicationContext读具体路径)
    public ClassPathXmlApplicationContext(String configLocation) throws BeansException {

        this(new String[] {configLocation}, true, null);

    }
根据传入参数的不同,调用不同的构造函数,最终调用以下构造函数
    public ClassPathXmlApplicationContext(String[] configLocations, boolean refresh, ApplicationContext parent)

            throws BeansException {

        super(parent);

        setConfigLocations(configLocations);

        if (refresh) {

            refresh();

        }

    }
设置配置文件路径
即AbstractRefreshableConfigApplicationContext.setConfigLocations
    public void setConfigLocations(String... locations) {

        if (locations != null) {

            Assert.noNullElements(locations, "Config locations must not be null");

            this.configLocations = new String[locations.length];

            for (int i = 0; i < locations.length; i++) {

                this.configLocations[i] = resolvePath(locations[i]).trim();

            }

        }

        else {

            this.configLocations = null;

        }

    }
resolvePath:
    protected String resolvePath(String path) {

        return getEnvironment().resolveRequiredPlaceholders(path);

    }
此方法的目的在于将占位符(placeholder)解析成实际的地址。比如可以这么写: new ClassPathXmlApplicationContext("classpath:config.xml");那么classpath:就是需要被解析的
refesh()
Spring bean解析就在此方法,所以单独提出来。
AbstractApplicationContext.refresh:
@Override

    public void refresh() throws BeansException, IllegalStateException {

        synchronized (this.startupShutdownMonitor) {

            // Prepare this context for refreshing.

            prepareRefresh();

            // Tell the subclass to refresh the internal bean factory.

            ConfigurableListableBeanFactory beanFactory = obtainFreshBeanFactory();

            // Prepare the bean factory for use in this context.

            prepareBeanFactory(beanFactory);

            try {

                // Allows post-processing of the bean factory in context subclasses.

                postProcessBeanFactory(beanFactory);

                // Invoke factory processors registered as beans in the context.

                invokeBeanFactoryPostProcessors(beanFactory);

                // Register bean processors that intercept bean creation.

                registerBeanPostProcessors(beanFactory);

                // Initialize message source for this context.

                initMessageSource();

                // Initialize event multicaster for this context.

                initApplicationEventMulticaster();

                // Initialize other special beans in specific context subclasses.

                onRefresh();

                // Check for listener beans and register them.

                registerListeners();

                // Instantiate all remaining (non-lazy-init) singletons.

                finishBeanFactoryInitialization(beanFactory);

                // Last step: publish corresponding event.

                finishRefresh();

            }

            catch (BeansException ex) {

                logger.warn("Exception encountered during context initialization - cancelling refresh attempt", ex);

                // Destroy already created singletons to avoid dangling resources.

                destroyBeans();

                // Reset 'active' flag.

                cancelRefresh(ex);

                // Propagate exception to caller.

                throw ex;

            }

        }

    }
prepareRefresh
    protected void prepareRefresh() {

        this.startupDate = System.currentTimeMillis();

        this.active.set(true);

        if (logger.isInfoEnabled()) {

            logger.info("Refreshing " + this);

        }

        // Initialize any placeholder property sources in the context environment

        initPropertySources();

        // Validate that all properties marked as required are resolvable

        // see ConfigurablePropertyResolver#setRequiredProperties

        getEnvironment().validateRequiredProperties();

    }
属性校验
AbstractEnvironment.validateRequiredProperties:
    @Override

    public void validateRequiredProperties() throws MissingRequiredPropertiesException {

        this.propertyResolver.validateRequiredProperties();

    }
AbstractPropertyResolver.validateRequiredProperties:
    @Override

    public void validateRequiredProperties() {

        MissingRequiredPropertiesException ex = new MissingRequiredPropertiesException();

        for (String key : this.requiredProperties) {

            if (this.getProperty(key) == null) {

                ex.addMissingRequiredProperty(key);

            }

        }

        if (!ex.getMissingRequiredProperties().isEmpty()) {

            throw ex;

        }

    }
requiredProperties是通过setRequiredProperties方法设置的,保存在一个list里面,默认是空的,也就是不需要校验任何属性
BeanFactory创建
由 refesh() 中的 obtainFreshBeanFactory 调用 AbstractRefreshableApplicationContext.refreshBeanFactory:
    @Override

    protected final void refreshBeanFactory() throws BeansException {
     //如果存在就销毁

        if (hasBeanFactory()) {

            destroyBeans();

            closeBeanFactory();

        }

        try {

            DefaultListableBeanFactory beanFactory = createBeanFactory();

            beanFactory.setSerializationId(getId());

            customizeBeanFactory(beanFactory);

            loadBeanDefinitions(beanFactory);

            synchronized (this.beanFactoryMonitor) {

                this.beanFactory = beanFactory;

            }

        }

        catch (IOException ex) {

            throw new ApplicationContextException("I/O error parsing bean definition source for " + getDisplayName(), ex);

        }

    }
BeanFactory定制
AbstractRefreshableApplicationContext.customizeBeanFactory方法用于给子类提供一个自由配置的机会,默认实现:
protected void customizeBeanFactory(DefaultListableBeanFactory beanFactory) {

        if (this.allowBeanDefinitionOverriding != null) {

            beanFactory.setAllowBeanDefinitionOverriding(this.allowBeanDefinitionOverriding);

        }

        if (this.allowCircularReferences != null) {

            beanFactory.setAllowCircularReferences(this.allowCircularReferences);

        }

    }
Bean加载
AbstractXmlApplicationContext.loadBeanDefinitions,这个便是核心的bean加载了:
protected void loadBeanDefinitions(DefaultListableBeanFactory beanFactory) throws BeansException, IOException {

        // Create a new XmlBeanDefinitionReader for the given BeanFactory.

        XmlBeanDefinitionReader beanDefinitionReader = new XmlBeanDefinitionReader(beanFactory);

        // Configure the bean definition reader with this context's

        // resource loading environment.

        beanDefinitionReader.setEnvironment(this.getEnvironment());

        beanDefinitionReader.setResourceLoader(this);

        beanDefinitionReader.setEntityResolver(new ResourceEntityResolver(this));

        // Allow a subclass to provide custom initialization of the reader,

        // then proceed with actually loading the bean definitions.

        initBeanDefinitionReader(beanDefinitionReader);

        loadBeanDefinitions(beanDefinitionReader);

    }
Spring源码解读(一)的更多相关文章
- Spring源码解读之BeanFactoryPostProcessor的处理
前言 前段时间旁听了某课堂两节Spring源码解析课,刚好最近自己又在重新学习中,便在这里记录一下学习所得.我之前写过一篇博文,是介绍BeanFactoryPostProcessor跟BeanPost ...
- Spring源码解读--(一)源码下载
走在Java程序员这条路上,网上Java各种工具满天飞,写个简单的CRUD,相信是个开发都能写出来,于是在思考如何可以在同行业中更有竞争力(其实就是如何赚更多钱).那么,老大给我推荐了Spring源码 ...
- 【Spring源码解读】bean标签中的属性
说明 今天在阅读Spring源码的时候,发现在加载xml中的bean时,解析了很多标签,其中有常用的如:scope.autowire.lazy-init.init-method.destroy-met ...
- Spring源码解读:核心类DefaultListableBeanFactory的继承体系
1 简介 我们常用的ClassPathXmlApplicationContext是AbstractRefreshableApplicationContext的子类,而DefaultListableBe ...
- Spring源码解读Spring IOC原理
一.什么是Ioc/DI? IoC 容器:最主要是完成了完成对象的创建和依赖的管理注入等等. 先从我们自己设计这样一个视角来考虑: 所谓控制反转,就是把原先我们代码里面需要实现的对象创建.依赖的代码,反 ...
- spring源码解读之 JdbcTemplate源码
原文:https://blog.csdn.net/songjinbin/article/details/19857567 在Spring中,JdbcTemplate是经常被使用的类来帮助用户程序操作数 ...
- 《spring源码解读》 - IoC 之解析 import 标签
在上一文中我们分析了注册 BeanDefinition 的过程,在其中我们了解到在解析跟节点和子节点时分两种情况,对于默认名称空间的标签我们通过 DefaultBeanDefinitionDocume ...
- Spring源码解读(一):Spring的背景起源及框架整体介绍
一.前言 Spring起源于2002年Rod Johnson写的一本书<Expert One-on-One J2EE>,书里介绍了Java企业应用程序开发情况,并指出Java EE和EJB ...
- Spring 源码解读 推荐流程
Spring源代码解析(一):IOC容器:http://www.javaeye.com/topic/86339 Spring源代码解析(二):IoC容器在Web容器中的启动:http://www.ja ...
- 【Spring源码解读】bean标签中的属性(二)你可能还不够了解的 abstract 属性和 parent 属性
abstract 属性说明 abstract 在java的语义里是代表抽象的意思,用来说明被修饰的类是抽象类.在Spring中bean标签里的 abstract 的含义其实也差不多,表示当前bean是 ...
随机推荐
- CF1187E Tree Painting
思路: 树形dp,首先使用dp计算以1为根的时候的最大分数,同时得到各个子树i的最大分数dp[i].然后利用前面得到的dp数组分别计算以其他每个点作为根的时候的最大分数. 实现: #include & ...
- redis安装-备份-恢复
1.安装参考:https://www.jb51.net/article/146744.htm 2.安装ruby2.3.3 .gpg2 --keyserver hkp://keys.gnupg.net ...
- Reactor系列(二)Flux Mono创建
Flux Mono创建 视频讲解:https://www.bilibili.com/video/av78844777/ FluxMonoTestCase.java package com.exampl ...
- Netty学习篇①
什么是netty Netty封装了JDK自带的NIO,运用起来更加简单快速,Netty是一个异步事件驱动的网络应用框架,让开发更加简便 Netty相比JDK自带的NIO的优点 Netty的api调用简 ...
- 如何使用RedisTemplate访问Redis数据结构之list
Redis的List数据结构 这边我们把RedisTemplate序列化方式改回之前的 Jackson2JsonRedisSerializer<Object> jackson2JsonRe ...
- matplotlib 画图中的basemap安装问题
在我用matplotlib画图是会用到,basemap这个库,但是直接安装却会出现问题: 使用这条安装命令就能够安装功能了: conda install -c conda-forge basemap= ...
- 怎么保证 redis 和 db 中的数据一致
你只要用缓存,就可能会涉及到缓存与数据库双存储双写,你只要是双写,就一定会有数据一致性的问题,那么你如何解决一致性问题? 首先需要考虑到:更新数据库或者更新缓存都有可能失败,在这种前提下分析业务带来的 ...
- PB各对象常用事件
1.window中的事件 事件名 触发的时机 01.Activate 在窗口激活之前触发 02.Clicked 当用户用 ...
- 【转载】Jmeter接口测试+压力测试
jmeter是apache公司基于java开发的一款开源压力测试工具,体积小,功能全,使用方便,是一个比较轻量级的测试工具,使用起来非常简单.因为jmeter是java开发的,所以运行的时候必须先要 ...
- 论文阅读:Adaptive NMS: Refining Pedestrian Detection in a Crowd
论文阅读:Adaptive NMS: Refining Pedestrian Detection in a Crowd 2019年04月11日 23:08:02 Kivee123 阅读数 836 ...
