(3网络化部署)自己动手,编写神经网络程序,解决Mnist问题,并网络化部署
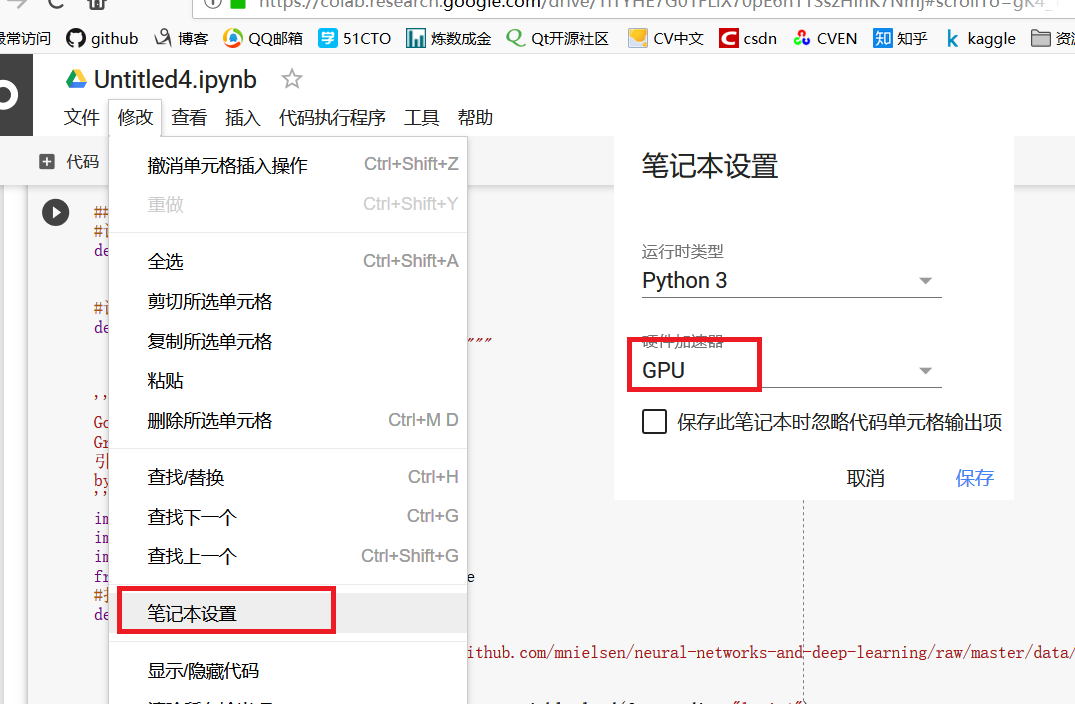
我们使用google提供的colab,对我们现有的GoNetwork进行适当修改,利用网络资源进行运算。
Colaboratory 是一款研究工具,用于进行机器学习培训和研究。它是一个 Jupyter 笔记本环境,不需要进行任何设置就可以使用。
Anaconda中自己带有Jupyter,启动后新建页面(具体内容可以参考相关资料)

在所有代码的修改中,以数据集的获取修改最为复杂。如果是jupyter,我们可以直接获取本机已经下载成功的数据集,但是对于colab,则无法获取本机数据,当然我们可以读取Google硬盘中的数据,但是这个过程比较麻烦。这里借鉴并且使用了keras获取数据集的相关代码,直接从Github上(或其他官网上)下载数据集,为我所用。由于相当于Google下载数据,所以速度非常快。
from keras.utils.data_utils import get_file
path='mnist.npz'
path = get_file(path,origin='https://s3.amazonaws.com/img-datasets/mnist.npz',file_hash='8a61469f7ea1b51cbae51d4f78837e45')
print(path)

#打开Mnist数据
def load_data():
path='mnist2.pkl.gz'
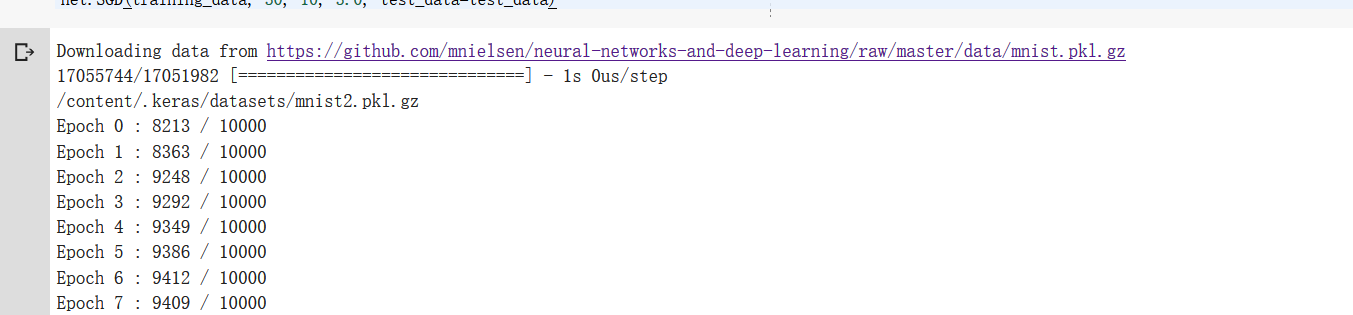
path = get_file(path,origin='https://github.com/mnielsen/neural-networks-and-deep-learning/raw/master/data/mnist.pkl.gz')
print(path)
f = gzip.open(path, 'rb')
training_data, validation_data, test_data = pickle.load(f, encoding="latin1")
# %load D:/dl4cv/GoNetwork/GoNetwork.py
# %load network.py

"""
network.py
~~~~~~~~~~
IT WORKS

A module to implement the stochastic gradient descent learning
algorithm for a feedforward neural network.  Gradients are calculated
using backpropagation.  Note that I have focused on making the code
simple, easily readable, and easily modifiable.  It is not optimized,
and omits many desirable features.
jsxyhelu添加了适当的中文注释
"""

#### Libraries
# Standard library
import random
# Third-party libraries
import numpy as np

class GoNetwork(object):

    def __init__(self, sizes):
        """size代表的是网络的分层结构,比如[2, 3, 1]
        The list ``sizes`` contains the number of neurons in the
        respective layers of the network.  For example, if the list
        was [2, 3, 1] then it would be a three-layer network, with the
        first layer containing 2 neurons, the second layer 3 neurons,
        and the third layer 1 neuron.  The biases and weights for the
        network are initialized randomly, using a Gaussian
        distribution with mean 0, and variance 1.  Note that the first
        layer is assumed to be an input layer, and by convention we
        won't set any biases for those neurons, since biases are only
        ever used in computing the outputs from later layers."""
        self.num_layers = len(sizes) #层数
        self.sizes = sizes #每层size
        self.biases = [np.random.randn(y, 1) for y in sizes[1:]]   #随机生成子节点
        # net.weights[1] 是⼀个存储着连接第⼆层和第三层神经元权重的 Numpy 矩阵。
        self.weights = [np.random.randn(y, x)
                        for x, y in zip(sizes[:-1], sizes[1:])]

    #前向网络,主要用于测试当前网络
    def feedforward(self, a):
        """Return the output of the network if ``a`` is input."""
        for b, w in zip(self.biases, self.weights):
            a = sigmoid(np.dot(w, a)+b)
        return a
    #随机梯度下降算法
    def SGD(self, training_data, epochs, mini_batch_size, eta,
            test_data=None):
        """Train the neural network using mini-batch stochastic
        gradient descent.  The ``training_data`` is a list of tuples
        ``(x, y)`` representing the training inputs and the desired
        outputs.  The other non-optional parameters are
        self-explanatory.  If ``test_data`` is provided then the
        network will be evaluated against the test data after each
        epoch, and partial progress printed out.  This is useful for
        tracking progress, but slows things down substantially."""

        training_data = list(training_data)
        n = len(training_data)

        if test_data:
            test_data = list(test_data)
            n_test = len(test_data)
        #⾸先随机地将训练数据打乱
        for j in range(epochs):
            random.shuffle(training_data)
            #再将它分成多个适当⼤⼩的⼩批量数据
            mini_batches = [
                training_data[k:k+mini_batch_size]
                for k in range(0, n, mini_batch_size)]
            #最主要的一行代码
            for mini_batch in mini_batches:
                self.update_mini_batch(mini_batch, eta)
            if test_data:
                print("Epoch {} : {} / {}".format(j,self.evaluate(test_data),n_test))
            else:
                print("Epoch {} complete".format(j))

    #根据单次梯度下降的迭代更新⽹络的权重和偏置
    def update_mini_batch(self, mini_batch, eta):
        """Update the network's weights and biases by applying
        gradient descent using backpropagation to a single mini batch.
        The ``mini_batch`` is a list of tuples ``(x, y)``, and ``eta``
        is the learning rate."""
        nabla_b = [np.zeros(b.shape) for b in self.biases]
        nabla_w = [np.zeros(w.shape) for w in self.weights]
        for x, y in mini_batch:
            delta_nabla_b, delta_nabla_w = self.backprop(x, y)
            nabla_b = [nb+dnb for nb, dnb in zip(nabla_b, delta_nabla_b)]
            nabla_w = [nw+dnw for nw, dnw in zip(nabla_w, delta_nabla_w)]
        self.weights = [w-(eta/len(mini_batch))*nw
                        for w, nw in zip(self.weights, nabla_w)]
        self.biases = [b-(eta/len(mini_batch))*nb
                       for b, nb in zip(self.biases, nabla_b)]

    #反向传播就是一种快速计算代价函数梯度的方法,也就是计算delta的一种方法
    def backprop(self, x, y):
        """Return a tuple ``(nabla_b, nabla_w)`` representing the
        gradient for the cost function C_x.  ``nabla_b`` and
        ``nabla_w`` are layer-by-layer lists of numpy arrays, similar
        to ``self.biases`` and ``self.weights``."""
        nabla_b = [np.zeros(b.shape) for b in self.biases]
        nabla_w = [np.zeros(w.shape) for w in self.weights]
        # feedforward
        activation = x
        activations = [x] # list to store all the activations, layer by layer
        zs = [] # list to store all the z vectors, layer by layer
        for b, w in zip(self.biases, self.weights):
            z = np.dot(w, activation)+b
            zs.append(z)
            activation = sigmoid(z)
            activations.append(activation)
        # backward pass
        delta = self.cost_derivative(activations[-1], y) * sigmoid_prime(zs[-1]) #bp1
        nabla_b[-1] = delta  #bp3
        nabla_w[-1] = np.dot(delta, activations[-2].transpose())  #bp4
        # Note that the variable l in the loop below is used a little
        # differently to the notation in Chapter 2 of the book.  Here,
        # l = 1 means the last layer of neurons, l = 2 is the
        # second-last layer, and so on.  It's a renumbering of the
        # scheme in the book, used here to take advantage of the fact
        # that Python can use negative indices in lists.
        for l in range(2, self.num_layers):
            z = zs[-l]
            sp = sigmoid_prime(z)
            delta = np.dot(self.weights[-l+1].transpose(), delta) * sp #bp2,注意这里的+1,其实是计算了下一层了
            nabla_b[-l] = delta
            nabla_w[-l] = np.dot(delta, activations[-l-1].transpose())
        return (nabla_b, nabla_w)
    #evaluate评价函数
    def evaluate(self, test_data):
        """Return the number of test inputs for which the neural
        network outputs the correct result. Note that the neural
        network's output is assumed to be the index of whichever
        neuron in the final layer has the highest activation."""
        test_results = [(np.argmax(self.feedforward(x)), y)
                        for (x, y) in test_data]
        return sum(int(x == y) for (x, y) in test_results)
    #cost代价函数
    def cost_derivative(self, output_activations, y):
        """Return the vector of partial derivatives \partial C_x /
        \partial a for the output activations."""
        return (output_activations-y)

#########helper函数########
#计算sigmoid,这个函数来自定义
def sigmoid(z):
    """The sigmoid function."""
    return 1.0/(1.0+np.exp(-z))
#计算sigmoid的导数,这个函数可以被证明
def sigmoid_prime(z):
    """Derivative of the sigmoid function."""
    return sigmoid(z)*(1-sigmoid(z))

'''
GoDateSets:
GreenOpen 系列
引入数据集
by:jsxyhelu 2018/3/31
'''
import pickle
import gzip
import numpy as np
from keras.utils.data_utils import get_file
#打开Mnist数据
def load_data():
    path='mnist2.pkl.gz'
    path = get_file(path,origin='https://github.com/mnielsen/neural-networks-and-deep-learning/raw/master/data/mnist.pkl.gz')
    print(path)
    f = gzip.open(path, 'rb')
    training_data, validation_data, test_data = pickle.load(f, encoding="latin1")
    f.close()
    return (training_data, validation_data, test_data)

#对读取的数据进行重新封装
def load_data_wrapper():
    tr_d, va_d, te_d = load_data()
    training_inputs = [np.reshape(x, (784, 1)) for x in tr_d[0]]
    training_results = [vectorized_result(y) for y in tr_d[1]]
    training_data = zip(training_inputs, training_results)
    validation_inputs = [np.reshape(x, (784, 1)) for x in va_d[0]]
    validation_data = zip(validation_inputs, va_d[1])
    test_inputs = [np.reshape(x, (784, 1)) for x in te_d[0]]
    test_data = zip(test_inputs, te_d[1])
    return (training_data, validation_data, test_data)

#返回OneHot图
def vectorized_result(j):
    e = np.zeros((10, 1))
    e[j] = 1.0
    return e

import numpy as np
import random

training_data, validation_data, test_data = load_data_wrapper()
training_data = list(training_data)

net = GoNetwork([784, 30, 10])
net.SGD(training_data, 30, 10, 3.0, test_data=test_data)
(3网络化部署)自己动手,编写神经网络程序,解决Mnist问题,并网络化部署的更多相关文章
- (2编写网络)自己动手,编写神经网络程序,解决Mnist问题,并网络化部署
基于<神经网络和深度学习>这本绝好的教材提供的相关资料和代码,我们自己动手编写"随机取样的梯度下降神经网络".为了更好地说明问题,我们先从简单的开始: 1.sigmod ...
- (12网络化部署深化下)自己动手,编写神经网络程序,解决Mnist问题,并网络化部署
网络化部署一直是我非常想做的,现在已经基本看到了门路.今天早上实验,发现在手机上的支持也非常好(对于相机的支持还差一点),证明B/S结构的框架是非常有生命力的.下一步就是要将这个过程深化.总结,并且封 ...
- (13flask继续研究)自己动手,编写神经网络程序,解决Mnist问题,并网络化部署
解决3个问题: 1.自己实现一例flask项目: 2.在flask中,如何调用json传值: 3.进一步读懂现有代码. Flask 在整个系统中是作为一个后台框架,对外提供 api 服务,因此对它的理 ...
- (6CBIR模拟问题)自己动手,编写神经网络程序,解决Mnist问题,并网络化部署
个方面: 最初的图像检索研究主要集中在如何选择合适的全局特征去描述图像内容和采用什么样的相似性度量方法进行图像匹配. 第二个研究热点是基于区域的图像检索方法,其主要思想是图像分割技术提取出图像中的物体 ...
- (5keras自带的模型之间的关系)自己动手,编写神经网络程序,解决Mnist问题,并网络化部署
其中: 1.VGG 网络以及从 2012 年以来的 AlexNet 都遵循现在的基本卷积网络的原型布局:一系列卷积层.最大池化层和激活层,最后还有一些全连接的分类层. 2.ResNet 的作者将 ...
- (4运行例子)自己动手,编写神经网络程序,解决Mnist问题,并网络化部署
1.联通ColaB 2.运行最基础mnist例子,并且打印图表结果 # https://pypi.python.org/pypi/pydot#!apt-get -qq install -y gra ...
- 编写一个程序解决选择问题。令k=N/2。
import java.util.Arrays; /** * 选择问题,确定N个数中第K个最大值 * @author wulei * 将前k个数读进一个数组,冒泡排序(递减),再将剩下的元素逐个读入, ...
- 【续集】在 IIS 中部署 ASP.NET 5 应用程序遭遇的问题
dudu 的一篇博文:在 IIS 中部署 ASP.NET 5 应用程序遭遇的问题 针对 IIS 部署 ASP.NET 5 应用程序的问题,在上面博文中主要采用两种方式尝试: VS2015 的 Publ ...
- OWIN系列之自己动手编写中间件
一.前言 1.基于OWIN的项目摆脱System.Web束缚脱颖而出,轻量级+跨平台,使得ASP.NET应用程序只需依赖这个抽象接口,不用关心所运行的Web服务器. 2.OWIN.dll介绍 使用反编 ...
随机推荐
- iOS 开发笔记-获取某个APP素材
2019.02.01 更新 以下这种方式只适合越狱的手机,目前12.1以后,iTools已经不适合了,请看最下面第二种方式. 有时候,我们看到别人的APP做得挺漂亮的,那么我们想查看该APP的图片素材 ...
- mybatis核心文件详解
MyBatis配置文件详解 configuration 这是配置文件的根元素标签,所有的其他元素都要在这个标签下使用. environments 用于管理所有环境,并可以指定默认使用哪个环境,通 ...
- Hive自定义函数UDF和UDTF
UDF(user defined functions) 用于处理单行数据,并生成单个数据行. PS: l 一个普通UDF必须继承自“org.apache.hadoop.hive.ql.exec.UDF ...
- php 文件远程下载
getFile(“http://pic4.nipic.com/20091217/3885730_124701000519_2.jpg”,”,’xuxin’);/*** php实现下载远程图片保存到本地 ...
- linux中安装oracle数据库
1. 执行 ./runInstaller 提示 /tmp 的空间过小执行 mount -o remount,size=1G,noatime /tmp重新设置 /tmp 的大小 2. 安装完成数据库之后 ...
- kali linux主题下载
主题下载网站 https://www.gnome-look.org/ 下载好安装包后解压 将文件夹移动到 usr/share/theme/ 下 mv download ../usr/share/the ...
- spring aop:aspectj-autoproxy 配置
经常遇到aop-aspectJ的通知不被执行的问题 解决方法:http://blog.csdn.net/qwdafedv/article/details/53005210 首先,确保配置文件都已经是正 ...
- Sitecore营销自动化
增加与战略性自动化营销系统的互动 Sitecore营销自动化基于DMS中的Sitecore个性化功能.营销自动化系统使用诸如位置,设备和先前访问或购买之类的客户数据来影响用户沿着购买路径的旅程.这些系 ...
- oracle查询每隔5分钟区间内的数据量
SELECT COUNT (DISTINCT tmp.PLATE) totalNum, tmp.newTime FROM ( SELECT T .LICENSE_PLATE plate, TO_CHA ...
- Swift 了解(2)
循环(Loops) 1. For条件递增语句 ; counter < ; counter++ ) { liftWeights( ) } 语法是这样的:用for作为循环的开始,告诉Xcode你要声 ...