springboot web开发【转】【补】
pom.xml引入webjars的官网
https://www.thymeleaf.org/doc/tutorials/3.0/usingthymeleaf.html
静态资源映射规则
静态资源就是不经过servlet 或者说不通过controller绕业务代码 中的文件。
静态资源自动配置类 WebMvcAuotConfiguration.java
@Override

public void addResourceHandlers(ResourceHandlerRegistry registry) {

    if (!this.resourceProperties.isAddMappings()) {

        logger.debug("Default resource handling disabled");

        return;

    }

    Integer cachePeriod = this.resourceProperties.getCachePeriod();

        //jar包中静态资源文件夹映射

    if (!registry.hasMappingForPattern("/webjars/**")) {

        customizeResourceHandlerRegistration(

                registry.addResourceHandler("/webjars/**")

                        .addResourceLocations(

                                "classpath:/META-INF/resources/webjars/")

                .setCachePeriod(cachePeriod));

    }

    String staticPathPattern = this.mvcProperties.getStaticPathPattern();

      //静态资源文件夹映射

    if (!registry.hasMappingForPattern(staticPathPattern)) {

        customizeResourceHandlerRegistration(

                registry.addResourceHandler(staticPathPattern)

                        .addResourceLocations(

                                this.resourceProperties.getStaticLocations())

                .setCachePeriod(cachePeriod));

    }

}
静态资源目录
在springboot默认的静态资源目录有
- "classpath:/META-INF/resources/", (推荐)
- "classpath:/resources/", (不推荐使用)
- "classpath:/static/", (推荐)
- "classpath:/public/"
- "/":当前项目的根路径
所以当访问以上5个目录中的文件时,都会直接获取,比如访问 http://localhost:8080/springbootdemo/abc.html , 另外静态资源目录下的index.html和favicon.ico也是默认静态文件可直接访问。
webjars静态资源目录
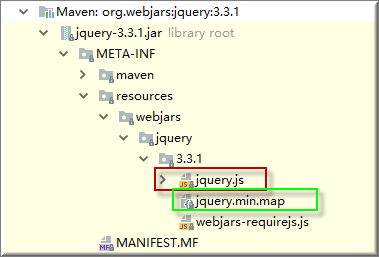
除了以上5个目录, 还有一个特殊的目录 "classpath:/META-INF/resources/webjars/" , 用于访问jar包的方式引入静态资源 。
比如我们想访问jquery-3.3.1.jar中的jquery.js那么使用以下两个路径都可以直接访问到,
http://localhost:8080/springbootdemo/webjars/jquery/3.3.1/jquery.js
http://localhost:8080/springbootdemo/webjars/jquery/3.3.1/jquery.min.js
至于为什么不是.../jquery.js/jquery.min.js的形式访问目前暂不研究。
引静态jar
<dependency>

    <!-- 前端jquery包 -->

    <groupId>org.webjars</groupId>

    <artifactId>jquery</artifactId>

    <version>3.3.1</version>

</dependency>

<dependency>

    <!-- 前端bootstrap包 -->

    <groupId>org.webjars</groupId>

    <artifactId>bootstrap</artifactId>

    <version>4.0.0</version>

</dependency>
静态资源属性配置类 ResourceProperties.java
可以设置静态资源目录, 静态资源缓存时间等等
@ConfigurationProperties(prefix = "spring.resources", ignoreUnknownFields = false)

public class ResourceProperties implements ResourceLoaderAware {

  //可以设置和静态资源有关的参数,缓存时间等
在application.properties中对应配置如下, 我自己项目暂未启用,位于application-static-cache.properties中
#配置静态资源映射

spring.mvc.static-path-pattern=/static/**

#也可以自己指定静态资源, 这会使默认的静态资源失效

spring.resources.static-locations=classpath:/mystatic,classpath:/yourstatic

# 资源缓存时间,单位秒,30天

spring.resources.cache-period=2592000

# 开启gzip压缩

spring.resources.chain.gzipped=true

# 启用缓存

spring.resources.chain.cache=true

# Enable the Spring Resource Handling chain. Disabled by default unless at least one strategy has been enabled.

spring.resources.chain.enabled=true

# 开启版本控制策略,默认为false

spring.resources.chain.strategy.content.enabled=true

# 指定要应用的版本的路径,多个以逗号分隔,默认为:[/**]

spring.resources.chain.strategy.content.paths=/**

# 设定Session的追踪模式(cookie, url, ssl)

server.session.tracking-modes=cookie
thymeleaf模板
https://www.thymeleaf.org/doc/tutorials/3.0/usingthymeleaf.html
1、引入thymeleaf依赖
<!-- 切换thymeleaf版本 -->

<properties>

        <thymeleaf.version>3.0.9.RELEASE</thymeleaf.version>

        <!-- 布局功能的支持程序  thymeleaf3适配layout2以上版本 , thymeleaf2 适配 layout1版本 -->

        <thymeleaf-layout-dialect.version>2.2.2</thymeleaf-layout-dialect.version>

</properties>

<dependency>

    <groupId>org.springframework.boot</groupId>

    <artifactId>spring-boot-starter-thymeleaf</artifactId>

</dependency>
2、Thymeleaf使用
配置属性类
@ConfigurationProperties(prefix = "spring.thymeleaf")
public class ThymeleafProperties {
private static final Charset DEFAULT_ENCODING = Charset.forName("UTF-8");
private static final MimeType DEFAULT_CONTENT_TYPE = MimeType.valueOf("text/html");
public static final String DEFAULT_PREFIX = "classpath:/templates/";
public static final String DEFAULT_SUFFIX = ".html";
...
日期格式化配置
日期格式化配置的地方有很
请求时--仅当前Controller接收指定格式的日期字符串
@RequestMapping("/MyMybatisController")

@Controller

public class MyMybatisController {

    /**

     * web数据绑定器,在获取到数据前,做一些预处理,仅对当前Controller有效。

     *

     * @param binder

     * @throws Exception

     */

    @InitBinder

    public void initBinder(WebDataBinder binder) throws Exception {

        //允许Long类型为空

        binder.registerCustomEditor(Long.class, new CustomNumberEditor(Long.class, true));

        //设置接收的日期,把默认的yyyy/MM/dd HH:mm:ss格式改成yyyy-MM-dd HH:mm:ss

        binder.registerCustomEditor(java.util.Date.class, new CustomDateEditor(new SimpleDateFormat("yyyy-MM-dd HH:mm:ss"), true));

    }

}
请求时--application.properties统一配置接收指定日期格式字符串
对所有Controller都有效
spring.mvc.date-format=yyyy-MM-dd HH:mm:ss
返回时--所有@ResponseBody返回时格式化Date类型成字符串
@Configuration//指明当前类是一个配置类;就是来替代之前的Spring配置文件

public class MyConfiguration {

    /**

     * 对@ResponseBody返回的Object类中的各对象对特殊处理

     * @return

     */

    @Bean

    public ObjectMapper getObjectMapper() {

        //返回时把日期从默认的long类似必成yyyy年MM月dd日 HH:mm:ss返回

        return new ObjectMapper().setDateFormat(new SimpleDateFormat("yyyy年MM月dd日 HH:mm:ss"));

    }

}
返回时--thymeleaf中格式化Date类型成字符串
<td th:text="${#dates.format(emp.birth,'yyyy-MM-dd HH:mm:ss') }"></td>
1. Spring MVC auto-configuration (了解不够)
Spring Boot 自动配置好了SpringMVC
以下是SpringBoot对SpringMVC的默认配置:(WebMvcAutoConfiguration)
Inclusion of
ContentNegotiatingViewResolverandBeanNameViewResolverbeans.自动配置了ViewResolver(视图解析器:根据方法的返回值得到视图对象(View),视图对象决定如何渲染(转发?重定向?))
ContentNegotiatingViewResolver:组合所有的视图解析器的;
如何定制:我们可以自己给容器中添加一个视图解析器;自动的将其组合进来;
Support for serving static resources, including support for WebJars (see below).静态资源文件夹路径,webjars
Static
index.htmlsupport. 静态首页访问Custom
Faviconsupport (see below). favicon.ico自动注册了 of
Converter,GenericConverter,Formatterbeans.Converter:转换器; public String hello(User user):类型转换使用Converter
Formatter格式化器; 2017.12.17===Date;
        @Bean
        @ConditionalOnProperty(prefix = "spring.mvc", name = "date-format")//在文件中配置日期格式化的规则
        public Formatter<Date> dateFormatter() {
            return new DateFormatter(this.mvcProperties.getDateFormat());//日期格式化组件
        }
自己添加的格式化器转换器,我们只需要放在容器中即可
Support for
HttpMessageConverters(see below).HttpMessageConverter:SpringMVC用来转换Http请求和响应的;User---Json;
HttpMessageConverters是从容器中确定;获取所有的HttpMessageConverter;自己给容器中添加HttpMessageConverter,只需要将自己的组件注册容器中(@Bean,@Component)
Automatic registration of
MessageCodesResolver(see below).定义错误代码生成规则Automatic use of a
ConfigurableWebBindingInitializerbean (see below).我们可以配置一个ConfigurableWebBindingInitializer来替换默认的;(添加到容器)
初始化WebDataBinder;
请求数据=====JavaBean;
org.springframework.boot.autoconfigure.web:web的所有自动场景;
If you want to keep Spring Boot MVC features, and you just want to add additional MVC configuration (interceptors, formatters, view controllers etc.) you can add your own @Configuration class of type WebMvcConfigurerAdapter, but without @EnableWebMvc. If you wish to provide custom instances of RequestMappingHandlerMapping, RequestMappingHandlerAdapter or ExceptionHandlerExceptionResolver you can declare a WebMvcRegistrationsAdapter instance providing such components.
If you want to take complete control of Spring MVC, you can add your own @Configuration annotated with @EnableWebMvc.
扩展SpringMVC(了解不够)
比如我们需要扩展SpringMVC中的视图跳转功能
    <mvc:view-controller path="/hello" view-name="success"/>

    <mvc:interceptors>

        <mvc:interceptor>

            <mvc:mapping path="/hello"/>

            <bean></bean>

        </mvc:interceptor>

    </mvc:interceptors>
在SpringBoot中只需编写一个配置类(@Configuration)继承 WebMvcConfigurerAdapter类型;不能标注@EnableWebMvc; 既保留了所有的自动配置,也能用我们扩展的配置;
//使用WebMvcConfigurerAdapter可以来扩展SpringMVC的功能

@Configuration

public class MyMvcConfig extends WebMvcConfigurerAdapter {

    @Override

    public void addViewControllers(ViewControllerRegistry registry) {

       // super.addViewControllers(registry);

        //浏览器发送 /atguigu 请求来到 success

        registry.addViewController("/atguigu").setViewName("success");

    }

}
原理:
1)、WebMvcAutoConfiguration是SpringMVC的自动配置类
2)、在做其他自动配置时会导入;@Import(EnableWebMvcConfiguration.class)
    @Configuration

    public static class EnableWebMvcConfiguration extends DelegatingWebMvcConfiguration {

      private final WebMvcConfigurerComposite configurers = new WebMvcConfigurerComposite();

     //从容器中获取所有的WebMvcConfigurer

      @Autowired(required = false)

      public void setConfigurers(List<WebMvcConfigurer> configurers) {

          if (!CollectionUtils.isEmpty(configurers)) {

              this.configurers.addWebMvcConfigurers(configurers);

                //一个参考实现;将所有的WebMvcConfigurer相关配置都来一起调用;

                @Override

             // public void addViewControllers(ViewControllerRegistry registry) {

              //    for (WebMvcConfigurer delegate : this.delegates) {

               //       delegate.addViewControllers(registry);

               //   }

              }

          }

    }
3)、容器中所有的WebMvcConfigurer都会一起起作用;
4)、我们的配置类也会被调用;
效果:SpringMVC的自动配置和我们的扩展配置都会起作用;
3、全面接管SpringMVC
SpringBoot对SpringMVC的自动配置不需要了,所有都是我们自己配置;所有的SpringMVC的自动配置都失效了
我们需要在配置类中添加@EnableWebMvc即可;
//使用WebMvcConfigurerAdapter可以来扩展SpringMVC的功能

@EnableWebMvc

@Configuration

public class MyMvcConfig extends WebMvcConfigurerAdapter {

    @Override

    public void addViewControllers(ViewControllerRegistry registry) {

       // super.addViewControllers(registry);

        //浏览器发送 /atguigu 请求来到 success

        registry.addViewController("/atguigu").setViewName("success");

    }

}
这会让SpringBoot的WebMvcAutoConfiguration.java中各种自动配置Bean无效,在控制台也也就再打印如HiddenHttpMethodFilter等信息 , 且静态资源目录也失效,极不推荐做全面 接管。
public class WebMvcAutoConfiguration {

    public static final String DEFAULT_PREFIX = "";

    public static final String DEFAULT_SUFFIX = "";

    @Bean

    @ConditionalOnMissingBean(HiddenHttpMethodFilter.class)

    public OrderedHiddenHttpMethodFilter hiddenHttpMethodFilter() {

        return new OrderedHiddenHttpMethodFilter();

    }
........
原理:
为什么@EnableWebMvc后SpringBoot的自动配置就失效了;
1)@EnableWebMvc
导入了DelegatingWebMvcConfiguration 类
@Import(DelegatingWebMvcConfiguration.class)

public @interface EnableWebMvc {
2)、DelegatingWebMvcConfiguration
继承了WebMvcConfigurationSupport
@Configuration

public class DelegatingWebMvcConfiguration extends WebMvcConfigurationSupport {
3)、WebMvcAutoConfiguration
@ConditionalOnMissingBean 容器中没有这个组件才会生效, 而上面就是导入了这个组件,所以 WebMvcAutoConfiguration 无效了.
@Configuration

@ConditionalOnWebApplication

@ConditionalOnClass({Servlet.class, DispatcherServlet.class, WebMvcConfigurerAdapter.class})

@ConditionalOnMissingBean(WebMvcConfigurationSupport.class)//容器中没有这个组件的时候,这个自动配置类才生效

@AutoConfigureOrder(Ordered.HIGHEST_PRECEDENCE + 10)

@AutoConfigureAfter({DispatcherServletAutoConfiguration.class, ValidationAutoConfiguration.class})

public class WebMvcAutoConfiguration {
4)、@EnableWebMvc将WebMvcConfigurationSupport组件导入进来;
5)、导入的WebMvcConfigurationSupport只是SpringMVC最基本的功能;
5、如何修改SpringBoot的默认配置
模式:
1)、SpringBoot在自动配置很多组件的时候,先看容器中有没有用户自己配置的(@Bean、@Component)如果有就用用户配置的,如果没有,才自动配置;如果有些组件可以有多个(ViewResolver)将用户配置的和自己默认的组合起来;
2)、在SpringBoot中会有非常多的xxxConfigurer帮助我们进行扩展配置
3)、在SpringBoot中会有很多的xxxCustomizer帮助我们进行定制配置
国际化
1)、指定国际化配置文件位置
在application.properties中配置如下, 如果不配置,则默认文件为classpath:messages.properties / messages_zh_CN.properties
spring.messages.basename=i18n.international
2)、编写国际化配置文件,抽取页面需要显示的国际化消息
\src\main\resources\i18n\international.properties
# default location is "classpath:message.properties", changed in application.properties , add "spring.messages.basename=i18n.international" to specified internationalResource here

login.btn=登陆~

login.password=密码~

login.rememberMe=记住我~

login.tip=请登陆~

login.username=用户名~
\src\main\resources\i18n\international_en_US.properties
login.btn=Sign In

login.password=Password

login.rememberMe=Remember Me

login.tip=Please sign in

login.username=UserName
\src\main\resources\i18n\international_zh_CN.properties
login.btn=登录

login.password=密码

login.rememberMe=记住我

login.tip=请登录

login.username=用户名
springboot资源国际化自动化配置组件
@ConfigurationProperties(prefix = "spring.messages")

public class MessageSourceAutoConfiguration {

    /**

     * Comma-separated list of basenames (essentially a fully-qualified classpath

     * location), each following the ResourceBundle convention with relaxed support for

     * slash based locations. If it doesn't contain a package qualifier (such as

     * "org.mypackage"), it will be resolved from the classpath root.

     */

    private String basename = "messages";

    //我们的配置文件可以直接放在类路径下叫messages.properties;

    @Bean

    public MessageSource messageSource() {

        ResourceBundleMessageSource messageSource = new ResourceBundleMessageSource();

        if (StringUtils.hasText(this.basename)) {

            //设置国际化资源文件的基础名(去掉语言国家代码的)

            messageSource.setBasenames(StringUtils.commaDelimitedListToStringArray(

                    StringUtils.trimAllWhitespace(this.basename)));

        }

        if (this.encoding != null) {

            messageSource.setDefaultEncoding(this.encoding.name());

        }

        messageSource.setFallbackToSystemLocale(this.fallbackToSystemLocale);

        messageSource.setCacheSeconds(this.cacheSeconds);

        messageSource.setAlwaysUseMessageFormat(this.alwaysUseMessageFormat);

        return messageSource;

    }
3)、idea配置properties防乱码
idea的properties中内容在页面中展示乱码解决方法==>https://www.cnblogs.com/whatlonelytear/articles/9430768.html
4)、html中引用
<html lang="en"  xmlns:th="http://www.thymeleaf.org">

    <body>

        <h1 th:text="#{login.tip}">Please sign in</h1>

        <input type="checkbox" value="remember-me"/> [[#{login.rememberMe}]]

    </body>

</html>
通过手动点击切换国际化资源
springboot自动化配置国际化的解析器为localeResolver()方法
国际化Locale(区域信息对象);LocaleResolver(获取区域信息对象);
WebMvcAutoConfiguration.java 的自动化配置bean
当ConditionalOnMissingBean即LocaleResolver不存在时,本自动化配置Bean才有效, 所以我们可以自定义一个MyLocaleResolver implements LocaleResolver来替换当前自动化配置
//在WebMvcAutoConfiguration.java中配有bean如下, 当ConditionalOnMissingBean即LocaleResolver不存在时,本自动化配置Bean才有效,

//所以我们可以自定义一个MyLocaleResolver implements LocaleResolver来替换当前自动化配置

@Bean

@ConditionalOnMissingBean

@ConditionalOnProperty(prefix = "spring.mvc", name = "locale")

public LocaleResolver localeResolver() {

    if (this.mvcProperties.getLocaleResolver() == WebMvcProperties.LocaleResolver.FIXED) {

        return new FixedLocaleResolver(this.mvcProperties.getLocale());

    }

    //默认的就是根据请求头带来的区域信息获取Locale进行国际化

    AcceptHeaderLocaleResolver localeResolver = new AcceptHeaderLocaleResolver();

    localeResolver.setDefaultLocale(this.mvcProperties.getLocale());

    return localeResolver;

}
自定义MyLocaleResolver.java
/**

 * 可以在连接上携带区域信息

 */

public class MyLocaleResolver implements LocaleResolver {

    /**

     * 如果带了lang=zh_CN或lang=en_US形式的参数,则设置成lang的本地化,不然设置默认的

     * @param request

     * @return

     */

    @Override

    public Locale resolveLocale(HttpServletRequest request) {

        String l = request.getParameter("lang");

        Locale locale = Locale.getDefault();

        if (l != null && !"".equals(l)) {

            String[] split = l.split("_");

            locale = new Locale(split[0], split[1]);

        }

        return locale;

    }

    @Override

    public void setLocale(HttpServletRequest request, HttpServletResponse response, Locale locale) {

    }

}
在任意一个@Configuration添加MyLocalResolver.java
 @Bean

    public LocaleResolver localeResolver(){

        return new MyLocaleResolver();

    }

}
SpringBoot默认的错误处理机制
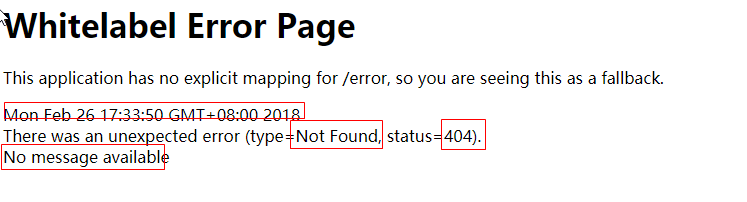
默认效果
浏览器返回Error Page页面 , 是因为请求时Header头Accept指定了明确的接收类型text/html ,SpringBoot后台做了特殊处理

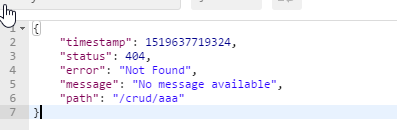
postman返回的是json报文,是因为请求时Header头Accept没有指定明确的接收类型 ,SpringBoot后台做了特殊处理

基本流程
一但系统出现4xx或者5xx之类的错误;ErrorPageCustomizer就会生效(定制错误的响应规则);就会来到 /error 请求;就会被BasicErrorController处理;
参照ErrorMvcAutoConfiguration配置类;它给容器中添加了以下错误处理的相关组件。
1、ErrorPageCustomizer.java (注册错误页)
该bean用于注册错误页面, 配置系统出现错误后跳转到哪
    private static class ErrorPageCustomizer implements ErrorPageRegistrar, Ordered {

        .....

        @Override

        public void registerErrorPages(ErrorPageRegistry errorPageRegistry) {

            ErrorPage errorPage = new ErrorPage(this.properties.getServletPrefix()

                    + this.properties.getError().getPath());

            errorPageRegistry.addErrorPages(errorPage);

        }

        .....

    }
其中getPath()内部其实使用了 "/error" , ${error.path:/error}的意思是如果没有error.path配置属性, 则取"/error"值
    @Value("${error.path:/error}")

    private String path = "/error";  系统出现错误以后来到/error请求进行处理;(web.xml注册的错误页面规则)
2、BasicErrorController (处理"/error"错误请求)
@Controller

@RequestMapping("${server.error.path:${error.path:/error}}")

public class BasicErrorController extends AbstractErrorController {

...

    @Override

    public String getErrorPath() {

        return this.errorProperties.getPath();

    }

    @RequestMapping(produces = "text/html")//产生html类型的数据;浏览器发送的请求来到这个方法处理

    public ModelAndView errorHtml(HttpServletRequest request,

            HttpServletResponse response) {

        HttpStatus status = getStatus(request);
     //获取错误信息 , 而错误信息都在共享区的 DefaultErrorAttributes中

        Map<String, Object> model = Collections.unmodifiableMap(getErrorAttributes(

                request, isIncludeStackTrace(request, MediaType.TEXT_HTML)));

        response.setStatus(status.value());

        //去哪个页面作为错误页面;包含页面地址和页面内容

        ModelAndView modelAndView = resolveErrorView(request, response, status, model);

        return (modelAndView != null ? modelAndView : new ModelAndView("error", model));

    }

    @RequestMapping

    @ResponseBody//产生json数据,其他客户端来到这个方法处理;postman,java代码调用等场景

    public ResponseEntity<Map<String, Object>> error(HttpServletRequest request) {

        Map<String, Object> body = getErrorAttributes(request,

                isIncludeStackTrace(request, MediaType.ALL));

        HttpStatus status = getStatus(request);

        return new ResponseEntity<Map<String, Object>>(body, status);

    }

...

}
resolveErrorView(...)方法内容
遍历所有ErrorViewResolver ,而接下来的DefaultErrorViewResolver这个在Configuration中注册的Bean就继承自ErrorViewResolver (在该类上Ctrl + T , 直接跳转到唯一实现类DefaultErrorViewResolver.java)
protected ModelAndView resolveErrorView(HttpServletRequest request,

        HttpServletResponse response, HttpStatus status, Map<String, Object> model) {

    //遍历所有ErrorViewResolver ,而接下来的DefaultErrorViewResolver这个在Configuration中注册的Bean就继承自ErrorViewResolver

    for (ErrorViewResolver resolver : this.errorViewResolvers) {

        ModelAndView modelAndView = resolver.resolveErrorView(request, status, model);

        if (modelAndView != null) {

            return modelAndView;

        }

    }

    return null;

}
4、DefaultErrorViewResolver(默认的错误视图处理解析器)
根据resolve(...)方法可知thymeleaf模板引擎可用时, 去resources/templates/error/4xx.html或404.html中找, 如果模板引擎不可用, 则去静态资源文件夹 resources/static/4xx.html或400.html中找
@Override

public ModelAndView resolveErrorView(HttpServletRequest request, HttpStatus status,

                                     Map<String, Object> model) {

    ModelAndView modelAndView = resolve(String.valueOf(status), model);

    if (modelAndView == null && SERIES_VIEWS.containsKey(status.series())) {

        modelAndView = resolve(SERIES_VIEWS.get(status.series()), model);

    }

    return modelAndView;

}

private ModelAndView resolve(String viewName, Map<String, Object> model) {

    //默认SpringBoot可以去找到一个页面?  error/404

    String errorViewName = "error/" + viewName;

    //试着获取模板引擎

    TemplateAvailabilityProvider provider = this.templateAvailabilityProviders

        .getProvider(errorViewName, this.applicationContext);

    if (provider != null) {

        //如果模板引擎可用,则返回到errorViewName指定的视图地址

        return new ModelAndView(errorViewName, model);

    }

    //模板引擎不可用,就在静态资源文件夹下找errorViewName对应的页面   error/404.html

    return resolveResource(errorViewName, model);

}
4、DefaultErrorAttributes (页面错误共享信息对象)
DefaultErrorAttributes.java
@Order(Ordered.HIGHEST_PRECEDENCE)

public class DefaultErrorAttributes

        implements ErrorAttributes, HandlerExceptionResolver, Ordered {

    ...

    @Override

    public Map<String, Object> getErrorAttributes(RequestAttributes requestAttributes,

            boolean includeStackTrace) {

        Map<String, Object> errorAttributes = new LinkedHashMap<String, Object>();

        errorAttributes.put("timestamp", new Date());

        addStatus(errorAttributes, requestAttributes);

        addErrorDetails(errorAttributes, requestAttributes, includeStackTrace);

        addPath(errorAttributes, requestAttributes);

        return errorAttributes;

    }

    ...

}
如何定制错误响应
1)、如何定制错误的页面;
1. 有模板引擎的情况下;error/状态码; 【将错误页面命名为 错误状态码.html 放在模板引擎文件夹里面的 error文件夹下】,发生此状态码的错误就会来到 对应的页面;
我们可以使用4xx和5xx作为错误页面的文件名来匹配这种类型的所有错误,精确优先(优先寻找精确的状态码.html);
页面能获取的信息;
timestamp:时间戳
path: 请求路径

status:状态码

error:错误提示

exception:异常对象

message:异常消息

errors:JSR303数据校验的错误都在这里
2. 没有模板引擎(模板引擎找不到这个错误页面),静态资源文件夹下找;
3. 以上都没有错误页面,就是默认来到SpringBoot默认的错误提示页面
public class ErrorMvcAutoConfiguration {

...

    @Configuration

...

    protected static class WhitelabelErrorViewConfiguration {

        private final ErrorMvcAutoConfiguration.SpelView defaultErrorView = new ErrorMvcAutoConfiguration.SpelView("<html><body><h1>Whitelabel Error Page</h1><p>This application has no explicit mapping for /error, so you are seeing this as a fallback.</p><div id='created'>${timestamp}</div><div>There was an unexpected error (type=${error}, status=${status}).</div><div>${message}</div></body></html>");

...

}
4. 4xx.html / 5xx.html / 400.html / 500.html修改
所以在templates/error/4xx.html中可以自由改造默认的属性了
<p th:text="${error}"></p>
2)、如何定制错误的json数据;
1)、自定义异常处理器 MyExceptionAdvice.java , 但是这种模式没有自适应性, 会导致浏览器访问也统一返回json
@ControllerAdvice//自定义异常拦截处理器
public class MyExceptionHandler {
@ResponseBody//返回转成json
@ExceptionHandler(UserNotExistException.class)//自定义异常
public Map<String,Object> handleException(Exception e){
Map<String,Object> map = new HashMap<>();
map.put("code","user.notexist");
map.put("message",e.getMessage());
return map;
}
}
2)、转发到/error进行自适应响应效果处理
自定义异常处理器 MyExceptionAdvice.java
@ControllerAdvice

public class MyExceptionAdvice {

    @ExceptionHandler(UserNotExistException.class)

    public String handleException(Exception e, HttpServletRequest request){

        Map<String,Object> map = new HashMap<>();

        //传入我们自己的错误状态码  4xx 5xx,否则就不会进入定制错误页面的解析流程

        /**

         * Integer statusCode = (Integer) request

         .getAttribute("javax.servlet.error.status_code");

         */

        request.setAttribute("javax.servlet.error.status_code",500);

        map.put("code","user.notexist");

        map.put("message",e.getMessage());

        //转发到/error

        return "forward:/error";

    }

}
3)、将我们的定制数据携带出去;
自定义异常处理器 MyExceptionAdvice.java
@ControllerAdvice

public class MyExceptionAdvice {

    /**

     * 自定义异常处理&返回定制json数据 , 但是这种模式有自适应性, 浏览器返回网页, postman返回json

     * 此种方式的跳转,不能将自定义参数携带出去

     */

    @ExceptionHandler(UserNotFoundException.class)

    public String  satifiedHandleException(Exception e, HttpServletRequest request){

        Map<String,Object> map = new HashMap<>();

        //传入我们自己的错误状态码  4xx 5xx,否则就不会进入定制错误页面的解析流程,

        // 因为在BasicErrorController的父类AbstractErrorController方法getStatus(HttpServletRequest request)中Integer statusCode = (Integer) request.getAttribute("javax.servlet.error.status_code");默认获取的是200,

        // 导致不会进入/error拦截界面.

        //而此处设置400,500目的正是为了跳到对应的error/400.html, error/500.html中去

        request.setAttribute("javax.servlet.error.status_code",500);

        //但是此种方式的跳转,不能将自定义参数携带出去

        map.put("extInfo1","info1");

        map.put("extInfo2",e.getMessage());

        request.setAttribute("extInfo",map);//在自定义的MyErrorAttribute.java中获取

        //注意,转发到"/error"

        return "forward:/error";

    }

}
出现错误以后,会来到/error请求,会被BasicErrorController处理,响应出去可以获取的数据是由getErrorAttributes得到的(是AbstractErrorController(ErrorController)规定的方法);
方式1(不推荐)、完全来编写一个ErrorController的实现类【或者是编写AbstractErrorController的子类】,放在容器中;
方式2(推荐)、页面上能用的数据,或者是json返回能用的数据都是通过ErrorAttributes.getErrorAttributes()得到;所以我们可以自定义一个ErrorAttributes
//给容器中加入我们自己定义的ErrorAttributes
@Component
public class MyErrorAttributes extends DefaultErrorAttributes {
@Override
public Map<String, Object> getErrorAttributes(RequestAttributes requestAttributes, boolean includeStackTrace) {
Map<String, Object> map = super.getErrorAttributes(requestAttributes, includeStackTrace);
map.put("company","atguigu");
return map;
}
}
那这个自定义的bean是如何替换原来的呢,重点在于@ConditionalOnMissingBean(...)
public class ErrorMvcAutoConfiguration {

...

    @Bean

    //表示如果ErrorAttributes.class或其子类一开始全不存在, 才会创建本bean, 而当我们自定义的MyErrorAttributes正是继承自DefaultErrorAttributes(继承自ErrorAttributes)

    @ConditionalOnMissingBean(value = {ErrorAttributes.class},search = SearchStrategy.CURRENT )

    public DefaultErrorAttributes errorAttributes() {

        return new DefaultErrorAttributes();

    }

    ...

}
最终的效果:响应是自适应的,通过定制ErrorAttributes改变需要返回的内容如下图
{

    "timestamp": "2019年05月10日 14:01:23",

    "status": 500,

    "error": "Internal Server Error",

    "exception": "com.example.demo.bean.exception.UserNotFoundException",

    "message": "abc",

    "path": "/springbootdemo/ThymeleafController/thymeleaf",

    "company": "KingCompany",

    "extInfo": {

        "extInfo1": "info1",

        "extInfo2": "abc"

    }

}
8、配置嵌入式Servlet容器
方式1、修改和server有关的配置(ServerProperties【也是EmbeddedServletContainerCustomizer】);
server.port=8081

server.context-path=/crud

server.tomcat.uri-encoding=UTF-8

#通用的Servlet容器设置

server.xxx

#Tomcat的设置

server.tomcat.xxx
方式2、编写一个EmbeddedServletContainerCustomizer:嵌入式的Servlet容器的定制器;来修改Servlet容器的配置
@Bean  //一定要将这个定制器加入到容器中

public EmbeddedServletContainerCustomizer embeddedServletContainerCustomizer(){

    return new EmbeddedServletContainerCustomizer() {

        //定制嵌入式的Servlet容器相关的规则

        @Override

        public void customize(ConfigurableEmbeddedServletContainer container) {

            container.setPort(8083);

        }

    };

}
Servlet三大组件配置【Servlet、Filter、Listener】
MyServlet.java--ServletRegistrationBean
import javax.servlet.ServletException;

import javax.servlet.http.HttpServlet;

import javax.servlet.http.HttpServletRequest;

import javax.servlet.http.HttpServletResponse;

import java.io.IOException;

public class  MyServlet extends HttpServlet {

    @Override

    protected void doGet(HttpServletRequest req, HttpServletResponse resp) throws ServletException, IOException {

        String ret = "MyServlet visited";

        System.err.println(ret);

        resp.getWriter().write(ret);

    }

    @Override

    protected void doPost(HttpServletRequest req, HttpServletResponse resp) throws ServletException, IOException {

        System.err.println("MyServlet visited");

        doGet(req,resp);

    }

}
MyFilter.java--FilterRegistrationBean
import javax.servlet.*;

import java.io.IOException;

public class MyFilter implements Filter {

    @Override

    public void init(FilterConfig filterConfig) throws ServletException {

        System.err.println("MyFilter init");

    }

    @Override

    public void doFilter(ServletRequest request, ServletResponse response, FilterChain chain) throws IOException, ServletException {

        System.err.println("MyFilter visited");

        chain.doFilter(request, response);

    }

    @Override

    public void destroy() {

        System.err.println("MyFilter destroy");

    }

}
MyListener.java--ServletListenerRegistrationBean
listener分很多种类型, 以ServletContextListener为例
import javax.servlet.ServletContextEvent;

import javax.servlet.ServletContextListener;

import javax.servlet.ServletException;

import javax.servlet.http.HttpServlet;

import javax.servlet.http.HttpServletRequest;

import javax.servlet.http.HttpServletResponse;

import java.io.IOException;

public class MyListener implements ServletContextListener {

    @Override

    public void contextInitialized(ServletContextEvent sce) {

        System.err.println("ServletContextListener contextInitialized");

    }

    @Override

    public void contextDestroyed(ServletContextEvent sce) {

        System.err.println("ServletContextListener contextDestroyed");

    }

}
最后把以上三大组合直接放在一个@Configuration中
import com.example.demo.bean.Student;

import com.fasterxml.jackson.databind.ObjectMapper;

import org.springframework.boot.web.servlet.FilterRegistrationBean;

import org.springframework.boot.web.servlet.ServletListenerRegistrationBean;

import org.springframework.boot.web.servlet.ServletRegistrationBean;

import org.springframework.context.annotation.Bean;

import org.springframework.context.annotation.Configuration;

import java.text.SimpleDateFormat;

import java.util.Arrays;

@Configuration//指明当前类是一个配置类;就是来替代之前的Spring配置文件

public class MyServletFilterListenerConfiguration {

    // http://localhost:8080/springbootdemo/MyServlet2

    @Bean

    public ServletRegistrationBean myServlet(){

        ServletRegistrationBean registrationBean = new ServletRegistrationBean(new MyServlet(),"/MyServlet2");

        return registrationBean;

    }

    @Bean

    public FilterRegistrationBean myFilter(){

        FilterRegistrationBean registrationBean = new FilterRegistrationBean();

        registrationBean.setFilter(new MyFilter());

        registrationBean.setUrlPatterns(Arrays.asList("/MyServlet2","/myServlet3"));

        return registrationBean;

    }

    @Bean

    public ServletListenerRegistrationBean myListener(){

        ServletListenerRegistrationBean<MyListener> registrationBean = new ServletListenerRegistrationBean<MyListener>(new MyListener());

        return registrationBean;

    }

}
于是可以理解SpringBoot默认的Servlet配置
默认拦的就是所有请求
@AutoConfigureOrder(-2147483648)

@Configuration

@ConditionalOnWebApplication

@ConditionalOnClass({DispatcherServlet.class})

@AutoConfigureAfter({EmbeddedServletContainerAutoConfiguration.class})

public class DispatcherServletAutoConfiguration {

    ...

    @Configuration

    ...

    protected static class DispatcherServletRegistrationConfiguration {

    ...

        @Bean(name = {"dispatcherServletRegistration"})

        @ConditionalOnBean(value = {DispatcherServlet.class},name = {"dispatcherServlet"})

        public ServletRegistrationBean dispatcherServletRegistration(DispatcherServlet dispatcherServlet) {

            //默认拦截: /  所有请求;包静态资源,但是不拦截jsp请求;   /*会拦截jsp

            //可以通过server.servletPath来修改SpringMVC前端控制器默认拦截的请求路径

            ServletRegistrationBean registration = new ServletRegistrationBean(dispatcherServlet, new String[]{this.serverProperties.getServletMapping()});

            registration.setName("dispatcherServlet");

            registration.setLoadOnStartup(this.webMvcProperties.getServlet().getLoadOnStartup());

            if (this.multipartConfig != null) {

                registration.setMultipartConfig(this.multipartConfig);

            }

            return registration;

        }

    }

}
替换为其他嵌入式Servlet容器
Tomcat(默认使用)
<dependency>

   <groupId>org.springframework.boot</groupId>

   <artifactId>spring-boot-starter-web</artifactId>

   引入web模块默认就是使用嵌入式的Tomcat作为Servlet容器;

</dependency>
Jetty
<!-- 引入web模块 -->
<dependency>
<groupId>org.springframework.boot</groupId>
<artifactId>spring-boot-starter-web</artifactId>
<exclusions>
<exclusion>
<artifactId>spring-boot-starter-tomcat</artifactId>
<groupId>org.springframework.boot</groupId>
</exclusion>
</exclusions>
</dependency>
<!--引入其他的Servlet容器-->
<dependency>
<artifactId>spring-boot-starter-jetty</artifactId>
<groupId>org.springframework.boot</groupId>
</dependency>
Undertow
<!-- 引入web模块 -->
<dependency>
<groupId>org.springframework.boot</groupId>
<artifactId>spring-boot-starter-web</artifactId>
<exclusions>
<exclusion>
<artifactId>spring-boot-starter-tomcat</artifactId>
<groupId>org.springframework.boot</groupId>
</exclusion>
</exclusions>
</dependency>
<!--引入其他的Servlet容器-->
<dependency>
<artifactId>spring-boot-starter-undertow</artifactId>
<groupId>org.springframework.boot</groupId>
</dependency>
嵌入式Servlet容器自动配置原理
步骤:
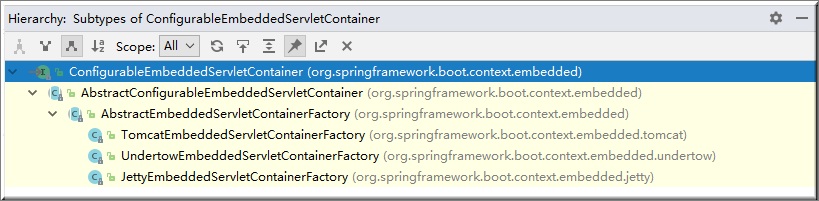
1)、SpringBoot根据EmbeddedServletContainerAutoConfiguration导入的依赖情况,给容器中添加相应的EmbeddedServletContainerFactory【TomcatEmbeddedServletContainerFactory】
2)、容器中某个组件要创建对象就会触发后置处理器EmbeddedServletContainerCustomizerBeanPostProcessor;只要是嵌入式的Servlet容器工厂,后置处理器就工作;
3)、后置处理器,从容器中获取所有的EmbeddedServletContainerCustomizer,调用定制器的定制方法customize(ConfigurableEmbeddedServletContainer container) 给容器配置属性
EmbeddedServletContainerAutoConfiguration.java 嵌入式的Servlet容器自动配置
@AutoConfigureOrder(Ordered.HIGHEST_PRECEDENCE)

@Configuration

@ConditionalOnWebApplication

//导入BeanPostProcessorsRegistrar,给容器中导入一些组件, 比较重要的有 EmbeddedServletContainerCustomizerBeanPostProcessor,它是一个后置处理器,用于在bean初始化前后(创建完对象,还没赋值赋值)执行初始化工作

@Import(BeanPostProcessorsRegistrar.class)

public class EmbeddedServletContainerAutoConfiguration {

    @Configuration

    @ConditionalOnClass({ Servlet.class, Tomcat.class })//判断当前是否引入了Tomcat依赖;

    //判断当前容器没有用户自己定义EmbeddedServletContainerFactory:嵌入式的Servlet容器工厂(作用:创建嵌入式的Servlet容器)

    @ConditionalOnMissingBean(value = EmbeddedServletContainerFactory.class, search = SearchStrategy.CURRENT)

    public static class EmbeddedTomcat {

        @Bean

        public TomcatEmbeddedServletContainerFactory tomcatEmbeddedServletContainerFactory() {

            return new TomcatEmbeddedServletContainerFactory();

        }

    }

    /**

     * Nested configuration if Jetty is being used.

     */

    @Configuration

    @ConditionalOnClass({ Servlet.class, Server.class, Loader.class,WebAppContext.class })

    @ConditionalOnMissingBean(value = EmbeddedServletContainerFactory.class, search = SearchStrategy.CURRENT)

    public static class EmbeddedJetty {

        @Bean

        public JettyEmbeddedServletContainerFactory jettyEmbeddedServletContainerFactory() {

            return new JettyEmbeddedServletContainerFactory();

        }

    }

...
EmbeddedServletContainerFactory(嵌入式Servlet容器工厂)和 EmbeddedServletContainer(嵌入式的Servlet容器)
public class TomcatEmbeddedServletContainerFactory extends AbstractEmbeddedServletContainerFactory implements ResourceLoaderAware
public interface EmbeddedServletContainerFactory {

   //获取嵌入式的Servlet容器

   EmbeddedServletContainer getEmbeddedServletContainer(ServletContextInitializer... initializers);

}
TomcatEmbeddedServletContainerFactory.java
该Factory通过ServerProperties(本身就是EmbeddedServletContainerCustomizer子类)、EmbeddedServletContainerCustomizer 定制化Servlet容器配置 , 而EmbeddedServletContainerCustomizer 又是通过EmbeddedServletContainerCustomizerBeanPostProcessor后置处理器配置的
public class TomcatEmbeddedServletContainerFactory    extends AbstractEmbeddedServletContainerFactory implements ResourceLoaderAware {

    ...

    @Override

    public EmbeddedServletContainer getEmbeddedServletContainer(

          ServletContextInitializer... initializers) {

        //创建一个Tomcat

       Tomcat tomcat = new Tomcat();

        //配置Tomcat的基本环节

       File baseDir = (this.baseDirectory != null ? this.baseDirectory

             : createTempDir("tomcat"));

       tomcat.setBaseDir(baseDir.getAbsolutePath());

       Connector connector = new Connector(this.protocol);

       tomcat.getService().addConnector(connector);

       customizeConnector(connector);

       tomcat.setConnector(connector);

       tomcat.getHost().setAutoDeploy(false);

       configureEngine(tomcat.getEngine());

       for (Connector additionalConnector : this.additionalTomcatConnectors) {

          tomcat.getService().addConnector(additionalConnector);

       }

       prepareContext(tomcat.getHost(), initializers);

        //将配置好的Tomcat传入进去,返回一个EmbeddedServletContainer;并且启动Tomcat服务器

       return getTomcatEmbeddedServletContainer(tomcat);

    }

...

}
EmbeddedServletContainerCustomizerBeanPostProcessor.java 后置处理器
public class EmbeddedServletContainerCustomizerBeanPostProcessor implements BeanPostProcessor, BeanFactoryAware {

    //初始化之前

    @Override

    public Object postProcessBeforeInitialization(Object bean, String beanName) throws BeansException {

        //如果当前初始化的是一个ConfigurableEmbeddedServletContainer类型的组件

       if (bean instanceof ConfigurableEmbeddedServletContainer) {

          postProcessBeforeInitialization((ConfigurableEmbeddedServletContainer) bean);

       }

       return bean;

    }

    private void postProcessBeforeInitialization(ConfigurableEmbeddedServletContainer bean) {

        //获取所有的定制器,调用每一个定制器的customize方法来给Servlet容器进行属性赋值;

        for (EmbeddedServletContainerCustomizer customizer : getCustomizers()) {

            customizer.customize(bean);

        }

    }

    private Collection<EmbeddedServletContainerCustomizer> getCustomizers() {

        if (this.customizers == null) {

            this.customizers = new ArrayList<EmbeddedServletContainerCustomizer>(

                //从容器中获取所有这个类型的组件:EmbeddedServletContainerCustomizer

                this.beanFactory.getBeansOfType(EmbeddedServletContainerCustomizer.class,false, false).values());

            Collections.sort(this.customizers, AnnotationAwareOrderComparator.INSTANCE);

            this.customizers = Collections.unmodifiableList(this.customizers);

        }

        return this.customizers;

    }

}
嵌入式Servlet容器启动原理
什么时候创建嵌入式的Servlet容器工厂?什么时候获取嵌入式的Servlet容器并启动Tomcat;
获取嵌入式的Servlet容器工厂:
1)、SpringBoot应用启动运行run(xxx.class, arg)方法
2)、refreshContext(context);SpringBoot刷新IOC容器【创建IOC容器对象,并初始化容器,创建容器中的每一个组件】;如果是web应用创建AnnotationConfigEmbeddedWebApplicationContext,否则:AnnotationConfigApplicationContext
3)、refresh(context);刷新刚才创建好的ioc容器;
public void refresh() throws BeansException, IllegalStateException {

   synchronized (this.startupShutdownMonitor) {

      // Prepare this context for refreshing.

      prepareRefresh();

      // Tell the subclass to refresh the internal bean factory.

      ConfigurableListableBeanFactory beanFactory = obtainFreshBeanFactory();

      // Prepare the bean factory for use in this context.

      prepareBeanFactory(beanFactory);

      try {

         // Allows post-processing of the bean factory in context subclasses.

         postProcessBeanFactory(beanFactory);

         // Invoke factory processors registered as beans in the context.

         invokeBeanFactoryPostProcessors(beanFactory);

         // Register bean processors that intercept bean creation.

         registerBeanPostProcessors(beanFactory);

         // Initialize message source for this context.

         initMessageSource();

         // Initialize event multicaster for this context.

         initApplicationEventMulticaster();

         // Initialize other special beans in specific context subclasses.

         onRefresh();

         // Check for listener beans and register them.

         registerListeners();

         // Instantiate all remaining (non-lazy-init) singletons.

         finishBeanFactoryInitialization(beanFactory);

         // Last step: publish corresponding event.

         finishRefresh();

      }

      catch (BeansException ex) {

         if (logger.isWarnEnabled()) {

            logger.warn("Exception encountered during context initialization - " +

                  "cancelling refresh attempt: " + ex);

         }

         // Destroy already created singletons to avoid dangling resources.

         destroyBeans();

         // Reset 'active' flag.

         cancelRefresh(ex);

         // Propagate exception to caller.

         throw ex;

      }

      finally {

         // Reset common introspection caches in Spring's core, since we

         // might not ever need metadata for singleton beans anymore...

         resetCommonCaches();

      }

   }

}
4)、onRefresh(); web的ioc容器重写了onRefresh方法
5)、web ioc容器会创建嵌入式的Servlet容器;createEmbeddedServletContainer();
6)、获取嵌入式的Servlet容器工厂:
EmbeddedServletContainerFactory containerFactory = getEmbeddedServletContainerFactory();
从ioc容器中获取EmbeddedServletContainerFactory 组件;TomcatEmbeddedServletContainerFactory创建对象,后置处理器一看是这个对象,就获取所有的定制器来先定制Servlet容器的相关配置;
7)、使用容器工厂获取嵌入式的Servlet容器:this.embeddedServletContainer = containerFactory.getEmbeddedServletContainer(getSelfInitializer());
8)、嵌入式的Servlet容器创建对象并启动Servlet容器;
先启动嵌入式的Servlet容器,再将ioc容器中剩下没有创建出的对象获取出来;
IOC容器启动创建嵌入式的Servlet容器
IOC容器是什么? Spring框架IOC容器和AOP解析==>https://www.cnblogs.com/xiaoxing/p/5836835.html
使用外置Servlet容器
步骤
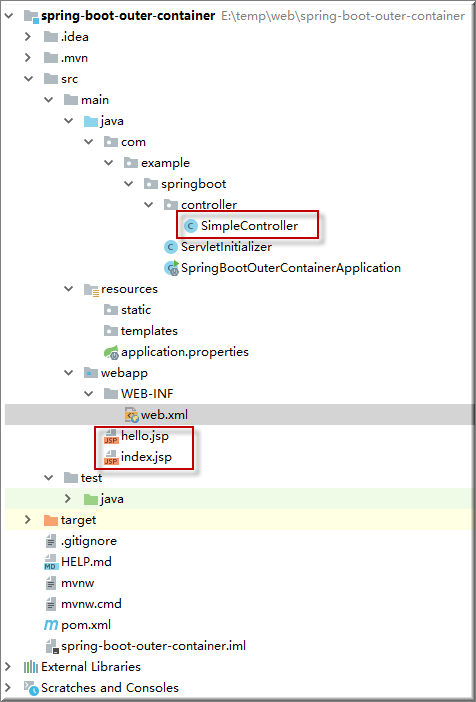
1. 创建打war包项目 , 非打 jar包项目
如果使用idea创建SpringBoot的war项目,则一开始就会自动创建SpringBootServletInitializer.java , 这是使用外围容器初始化必要的类。
//类名随意,只要继承SpringBootServletInitializer即可

public class ServletInitializer extends SpringBootServletInitializer {

    @Override

    protected SpringApplicationBuilder configure(SpringApplicationBuilder application) {

        return application.sources(SpringBootOuterContainerApplication.class);

    }

}
2. pom.xml中明确指定Tomcat的<scoper>为provided;
provided意为目标环境已经提供了, 打包时就不需要打进去了。
<dependency>

   <groupId>org.springframework.boot</groupId>

   <artifactId>spring-boot-starter-tomcat</artifactId>

   <scope>provided</scope>

</dependency>
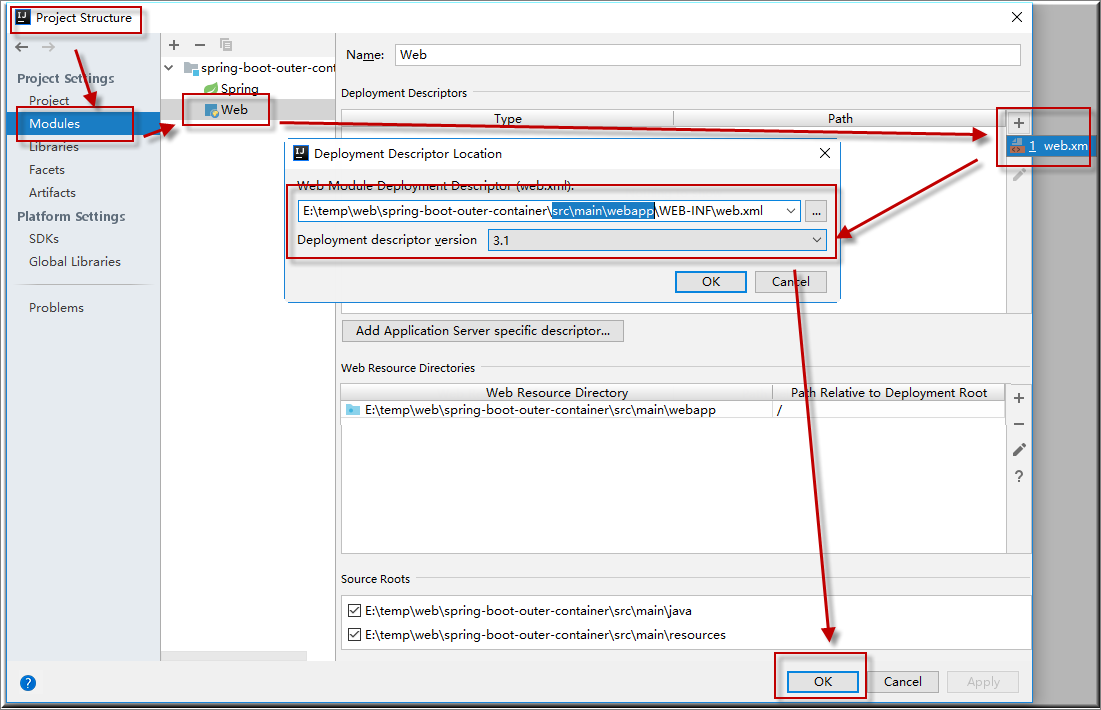
3. 配置webapp目录及web.xml
idea中默认不会有该目录, 需要在Project Structure的Modules的Web模块中手动配置上下文根目录和web.xml
Project Structure | Modules | Web | 配置上下文路径(一开始该路径不存在)

Project Structure | Modules | Web | 配置web.xml (一开始该文件不存在, 注意添加时手动加上src\main\webapp路径)
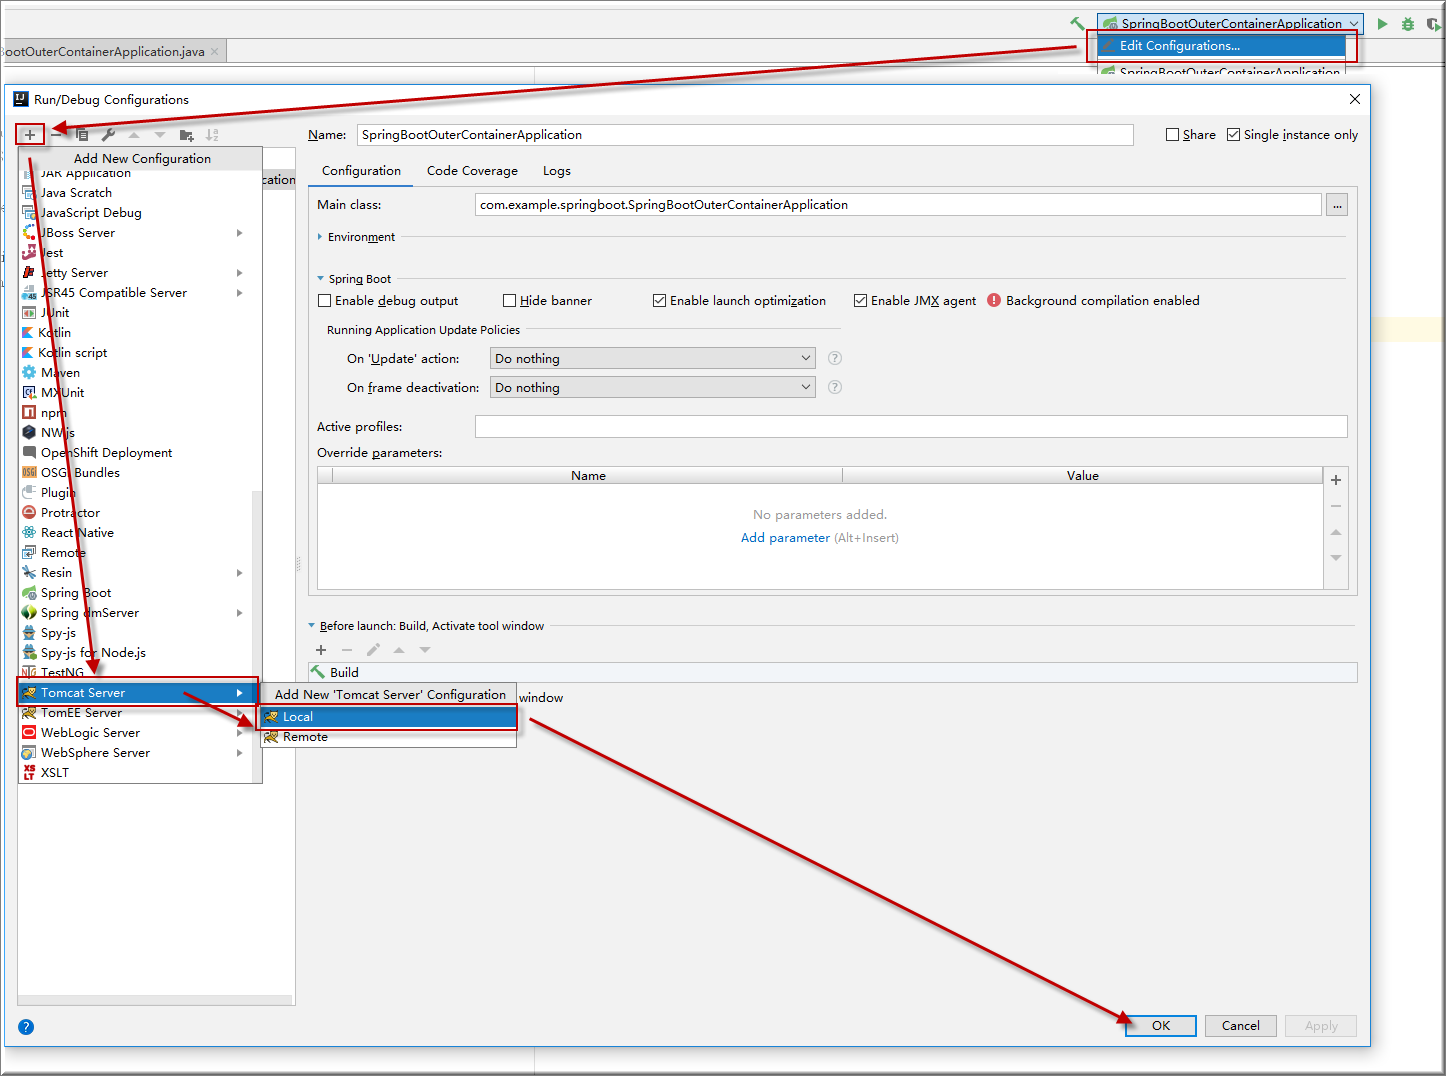
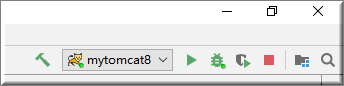
4. 添加外置tomcat
右上 Edit Configurations | 添加tomcat配置 | Tomcat Server | Local | OK
Run/Debug Configurations | Tomcat Server | 取tomcat服务名 mytomcat8 | Server选项卡 | Configure | 配置Tomcat8路径 | OK
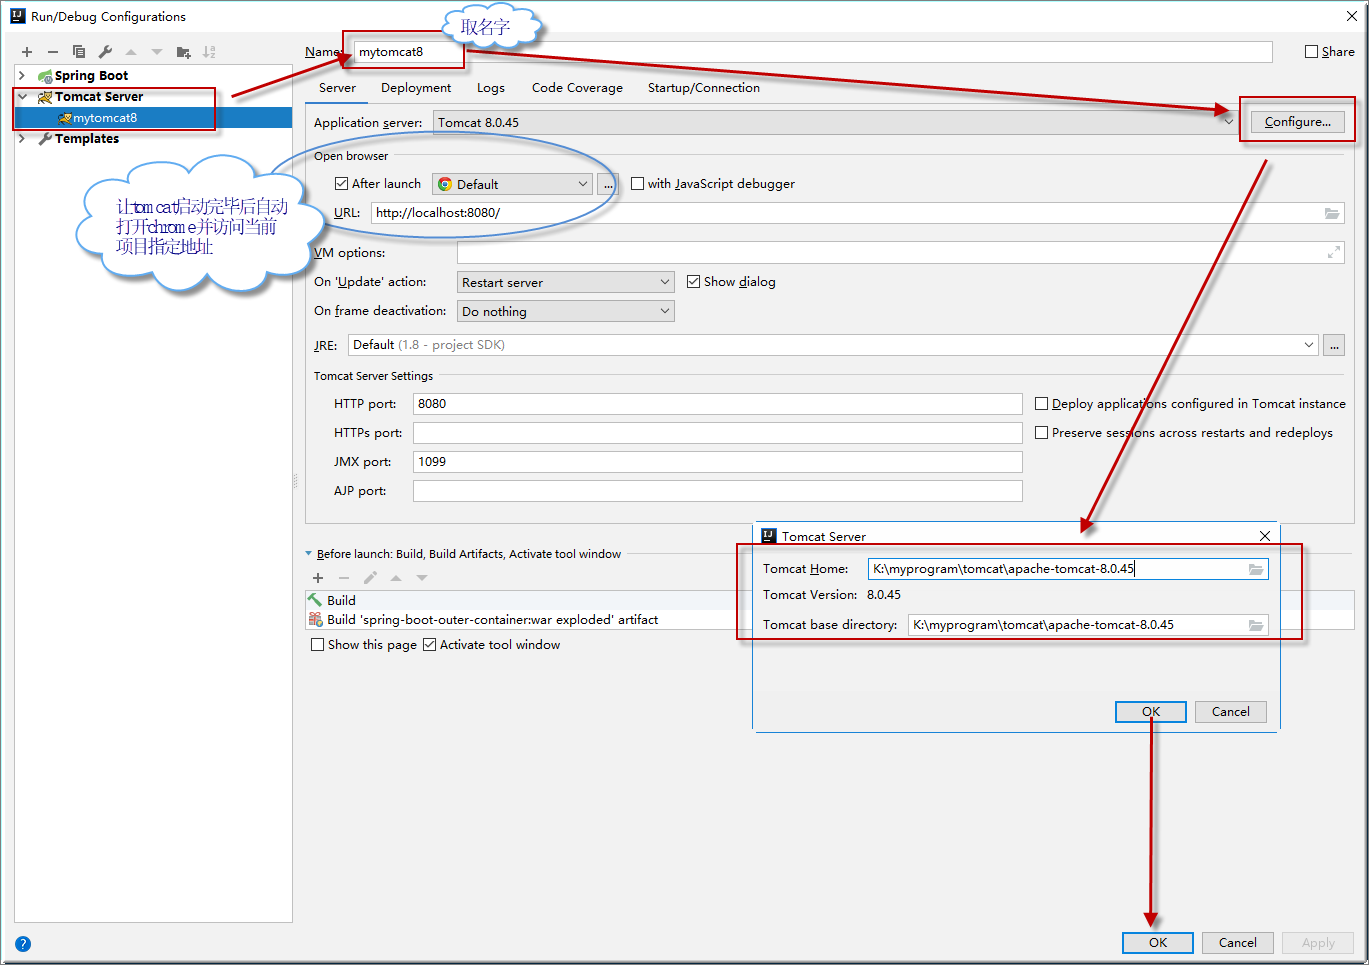
Run/Debug Configurations | Tomcat Server | 取tomcat服务名 mytomcat8 | Deployment选项卡 |添加需要布署的war包| OK

5. 做一些测试用jsp和Controller
6. 启动服务器
将会自动打开chrome浏览器并自动访问http://localhost:8080/ (因为没有指定context上下文,默认即是/)
外部Servlet容器原理
- jar包:执行SpringBoot主类的main方法 --> 启动ioc容器 --> 创建嵌入式的Servlet容器;
- war包:启动服务器,服务器启动SpringBoot应用【SpringBootServletInitializer】,启动ioc容器;
servlet3.0(Spring注解版): 8.2.4 Shared libraries / runtimes pluggability:
规则:
1)、服务器启动(web应用启动)会创建当前web应用里面每一个jar包里面ServletContainerInitializer实例:
2)、ServletContainerInitializer的实现放在jar包的META-INF/services文件夹下,有一个名为javax.servlet.ServletContainerInitializer的文件,内容就是ServletContainerInitializer的实现类的全类名 (spring-web-5.1.6.RELEASE.jar里面有一个)
3)、还可以使用@HandlesTypes,在应用启动的时候加载我们感兴趣的类;
流程:
1)、启动Tomcat
2)、org\springframework\spring-web\4.3.14.RELEASE\spring-web-4.3.14.RELEASE.jar!\META-INF\services\javax.servlet.ServletContainerInitializer:
Spring的web模块里面有这个文件:org.springframework.web.SpringServletContainerInitializer
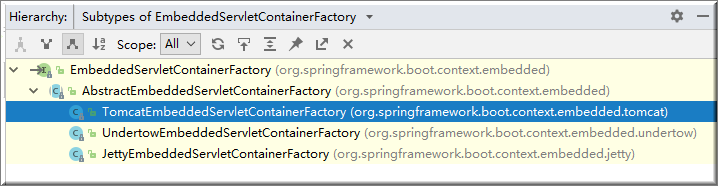
3)、SpringServletContainerInitializer上的注解@HandlesTypes(WebApplicationInitializer.class) 标注的所有这个类型的类都传入到onStartup方法的Set<Class<?>>;为这些WebApplicationInitializer类型的类创建实例;
而WebApplicationInitializer是接口, 其实现类如下图
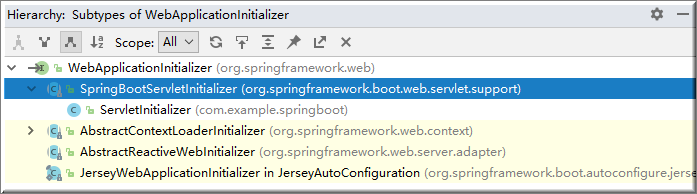
4)、每一个WebApplicationInitializer都调用自己的onStartup;
5)、相当于我们的SpringBootServletInitializer的类会被创建对象,并执行onStartup方法 ,而自定义类ServletInitializer 正是SpringBootServletInitializer的子类,即WebApplicationInitializer 的子孙类。
6)、SpringBootServletInitializer实例(自定义类Servletinitializer)执行onStartup的时候会createRootApplicationContext;创建容器
protected WebApplicationContext createRootApplicationContext(

      ServletContext servletContext) {

    //1、创建SpringApplicationBuilder

   SpringApplicationBuilder builder = createSpringApplicationBuilder();

   StandardServletEnvironment environment = new StandardServletEnvironment();

   environment.initPropertySources(servletContext, null);

   builder.environment(environment);

   builder.main(getClass());

   ApplicationContext parent = getExistingRootWebApplicationContext(servletContext);

   if (parent != null) {

      this.logger.info("Root context already created (using as parent).");

      servletContext.setAttribute(

            WebApplicationContext.ROOT_WEB_APPLICATION_CONTEXT_ATTRIBUTE, null);

      builder.initializers(new ParentContextApplicationContextInitializer(parent));

   }

   builder.initializers(

         new ServletContextApplicationContextInitializer(servletContext));

   builder.contextClass(AnnotationConfigEmbeddedWebApplicationContext.class);

    //调用configure方法,子类重写了这个方法,将SpringBoot的主程序类传入了进来

   builder = configure(builder);

    //使用builder创建一个Spring应用

   SpringApplication application = builder.build();

   if (application.getSources().isEmpty() && AnnotationUtils

         .findAnnotation(getClass(), Configuration.class) != null) {

      application.getSources().add(getClass());

   }

   Assert.state(!application.getSources().isEmpty(),

         "No SpringApplication sources have been defined. Either override the "

               + "configure method or add an @Configuration annotation");

   // Ensure error pages are registered

   if (this.registerErrorPageFilter) {

      application.getSources().add(ErrorPageFilterConfiguration.class);

   }

    //启动Spring应用

   return run(application);

}
7)、Spring的应用就启动并且创建IOC容器
public ConfigurableApplicationContext run(String... args) {

   StopWatch stopWatch = new StopWatch();

   stopWatch.start();

   ConfigurableApplicationContext context = null;

   FailureAnalyzers analyzers = null;

   configureHeadlessProperty();

   SpringApplicationRunListeners listeners = getRunListeners(args);

   listeners.starting();

   try {

      ApplicationArguments applicationArguments = new DefaultApplicationArguments(

            args);

      ConfigurableEnvironment environment = prepareEnvironment(listeners,

            applicationArguments);

      Banner printedBanner = printBanner(environment);

      context = createApplicationContext();

      analyzers = new FailureAnalyzers(context);

      prepareContext(context, environment, listeners, applicationArguments,

            printedBanner);

       //刷新IOC容器

      refreshContext(context);

      afterRefresh(context, applicationArguments);

      listeners.finished(context, null);

      stopWatch.stop();

      if (this.logStartupInfo) {

         new StartupInfoLogger(this.mainApplicationClass)

               .logStarted(getApplicationLog(), stopWatch);

      }

      return context;

   }

   catch (Throwable ex) {

      handleRunFailure(context, listeners, analyzers, ex);

      throw new IllegalStateException(ex);

   }

}
启动Servlet容器,再启动SpringBoot应用
样例下载地址: https://files.cnblogs.com/files/whatlonelytear/spring-boot-outer-container.zip
参考
Thymeleaf入门(一)——入门与基本概述==>https://www.cnblogs.com/jiangbei/p/8462294.html
springboot web开发【转】【补】的更多相关文章
- SpringBoot Web开发(5) 开发页面国际化+登录拦截
SpringBoot Web开发(5) 开发页面国际化+登录拦截 一.页面国际化 页面国际化目的:根据浏览器语言设置的信息对页面信息进行切换,或者用户点击链接自行对页面语言信息进行切换. **效果演示 ...
- SpringBoot Web开发(4) Thymeleaf模板与freemaker
SpringBoot Web开发(4) Thymeleaf模板与freemaker 一.模板引擎 常用得模板引擎有JSP.Velocity.Freemarker.Thymeleaf SpringBoo ...
- 【SpringBoot】SpringBoot Web开发(八)
本周介绍SpringBoot项目Web开发的项目内容,及常用的CRUD操作,阅读本章前请阅读[SpringBoot]SpringBoot与Thymeleaf模版(六)的相关内容 Web开发 项目搭建 ...
- SpringBoot(四): SpringBoot web开发 SpringBoot使用jsp
1.在SpringBoot中使用jsp,需要在pom.xml文件中添加依赖 <!--引入Spring Boot内嵌的Tomcat对JSP的解析包--> <dependency> ...
- Spring-boot -Web开发
1).创建SpringBoot应用,选中我们需要的模块: 2).SpringBoot已经默认将这些场景配置好了,只需要在配置文件中指定少量配置就可以运行起来 3).自己编写业务代码: 文件名的功能 x ...
- SpringBoot Web开发(3) WebMvcConfigurerAdapter过期替代方案
springboot2.0中 WebMvcConfigurerAdapter过期替代方案 最近在学习尚硅谷的<springboot核心技术篇>,项目中用到SpringMVC的自动配置和扩展 ...
- SpringBoot——Web开发(静态资源映射)
静态资源映射 SpringBoot对于SpringMVC的自动化配置都在WebMVCAutoConfiguration类中. 其中一个静态内部类WebMvcAutoConfigurationAdapt ...
- [SpringBoot——Web开发(使用Thymeleaf模板引擎)]
[文字只能描述片段信息,具体细节参考代码] https://github.com/HCJ-shadow/SpringBootPlus 引入POM依赖 <properties> <ja ...
- web开发-CORS支持
一.简介 Web 开发经常会遇到跨域问题,解决方案有:jsonp,iframe,CORS 等等 1.1.CORS与JSONP相比 1.JSONP只能实现GET请求,而CORS支持所有类型的HTTP请求 ...
随机推荐
- springmvc:入门环境搭建
引入依赖(pom.xml): <!-- 版本锁定 --> <properties> <spring.version>5.0.2.RELEASE</spring ...
- CentOS + Nginx 的常用操作指令总结
CentOS + Nginx 的常用操作指令总结 一. 关于CentOS 查看 yum 源是否存在 yum list | grep nginx 如果不存在 或者 不是自己想要的版本 可以自己设置Ngi ...
- php连接数据库查询方法(还少一种pdo方法)
<?php header("content-type:text/html;charset=utf-8"); $conn = mysql_connect("local ...
- 【Scala学习笔记】一、函数式编程的思想
1. 函数是头等值. 在函数编程中,函数也是值,与整数和字符串处于同一地位.函数可以像变量一样被创建,修改,并当成变量一样传递,返回或是在函数中嵌套函数. 函数可以当做参数传递给其他函数. ...
- Javaweb Form表单查询
1.表单(form),是一种可以由用户输入,并提交给服务器端的一个图形界面,有如下性质: (1)表单中可以输入一些内容,这些输入功能由控件提供,叫做表单元素 (2)表单中一般都有一个按钮负责提交 (3 ...
- beego应用做纯API后端如何使用jwt实现无状态权限验证
jwt是什么,可以百度下其它文章,我原来看到一个讲的详细的,现在找不到了.先简单介绍下我个人的理解,就是一个token,只不过通过加密解密的手段,能让这一串字符带有一些简单的信息.这样解密jwt后不用 ...
- 直接删除mysql的日志导致mysql无法启动
--02T08::.750000Z [Warning] [MY-] [Server] 'NO_ZERO_DATE', 'NO_ZERO_IN_DATE' and 'ERROR_FOR_DIVISION ...
- oracle-约束-序列
概要图 一 约束 --问题:往表中插入数据的时候,可能出现一些问题,比如:重复插入数据,内容不对(性别) --如何保证数据库表中数据的完整性和一致性呢? 约束是强加在表上的规则或条件,确保数据库满足业 ...
- php require_once的使用方法
学习笔记 require_once 语句和 require 语句完全相同,唯一区别是 PHP 会检查该文件是否已经被包含过,如果是则不会再次包含. equire_once() 为了避免重复加载文件. ...
- C#中的事件注册和注销
C#中的事件注册和注销 由于.NET框架对消息循环机制进行了很好的封装,开发人员不再需要深入的了解Windows事件/消息实现的具体机制,也无需创建复杂的事件结构体和所谓的消息句柄.我们所要做的无非就 ...