安装seafile记录文档
安装yum-cron、iptables 、关闭selinux
    yum -y install cronie

    yum -y install yum-cron

    systemctl start yu,-cron

    systemctl start yumcron

    systemctl start yum-cron

    yum -y install yum-cron

    systemctl status yum-cron

    sed -i 's/SELINUX=enforcing/SELINUX=disablde/g' /etc/selinux/config

    reboot

    systemctl stop firewalld

    systemctl disable firewalld

    reboot

    rpm -Uvh iptables-1.4.21-35.el7.x86_64.rpm

    rpm -Uvh iptables-services-1.4.21-35.el7.x86_64.rpm

    #下面几个包不装的话运行createrepo会报错

    rpm -ivh deltarpm-3.5-0.5.20090913git.el6.x86_64.rpm

    rpm -ivh python-deltarpm-3.5-0.5.20090913git.el6.x86_64.rpm

    rpm -ivh createrepo-0.9.9-24.el6.noarch.rpm
配置iptables规则
配置完需要重启此服务
vim /etc/sysconfig/iptables

-A INPUT -p tcp -m state --state NEW -m tcp --dport 22 -j ACCEPT

-A INPUT -m state --state NEW -m tcp -p tcp --dport 3306 -j ACCEPT

-A INPUT -m state --state NEW -m tcp -p tcp --dport 8080 -j ACCEPT

-A INPUT -m state --state NEW -m tcp -p tcp --dport 8000 -j ACCEPT

-A INPUT -m state --state NEW -m tcp -p tcp --dport 8082 -j ACCEPT
配置本地源
chown 755 CentOS-7-x86_64-Everything-2003.iso

mkdir -p /mnt/iso

mount -o loop CentOS-7-x86_64-Everything-2003.iso  /mnt/iso

cp -r /mnt/iso/Packages /root/Packages

rm -rf /etc/yum.repos.d/Centos*

vim local.repo

[local_server]

name = This is a local repo

baseurl = file:///root/Packages

enabled = 1

gpgcheck = 0

#保存退出

createrepo -d /root/Packages/

yum repolist

yum clean all

yum makecache
配置python环境
vim /etc/profile.d/python.sh

alias python='/usr/local/bin/python3.6'

alias pip='/usr/local/bin/pip3.6'

#保存退出

chmod 755 /etc/profile.d/python.sh

source /etc/profile.d/python.sh
安装mysql
#解压包,然后移动到本地源内

cd MariaDB

mv * ../Packages

#重新生成一下源数据

createrepo -d /root/Packages/

yum repolist

rm -rf /var/cache/yum

yum makecache

#安装

sudo yum install MariaDB-server MariDB-client

#查看状态

service mariadb.service status

systemctl enable --now mariadb

#设置mysql账号密码

mysql_secure_installation

#全是y
修改mysql存储目录到其他地方
最好还是配置一下,毕竟是数据。
systemctl stop mariadb.service

#创建好需要移动的目录

mkdir -p /data/seafile

chown -R mysql:mysql /data/seafile

cp -a /var/lib/mysql /data/seafile

vim /etc/my.cnf.d/server.cnf

#在 【mysqld】下插入以下配置

#--------------------------add by root-----------------------------

# add for moving data to /home/mariadb设置数据存放目录为/data/seafile/mysql  socket路径保持不变

#

datadir=/data/seafile/mysql

socket=/var/lib/mysql/mysql.sock

#default-character-set=utf8 增加utf8代码支持

character_set_server=utf8

#SET配置MariaDB慢查询

slow_query_log=on

slow_query_log_file=/data/seafile/mysql/slow_query_log.log

long_query_time=2

#--------------------------end-------------------------------------

vim /etc/my.cnf

#添加以下配置

[mysqld]

datadir=/data/seafile/mysql/

socket=/var/lib/mysql/mysql.sock

server_id=101

log-bin = mysql-bin

[client-server]

port=3306

socket=/var/lib/mysql/mysql.sock

#--------------------------end-------------------------------------

touch /data/seafile/mysql/slow_query_log.log

chown mysql:mysql /data/seafile/mysql/slow_query_log.log

#修改 /usr/lib/systemd/systemd/mariadb.service

vim /usr/lib/systemd/systemd/mariadb.service

#将里面的ProtectHome 参数改为false,然后保存退出

systemctl daemon-reload

service mariadb.service restart
数据库配置
mysql -uroot -p

MariaDB [(none)]> SHOW VARIABLES LIKE 'character%';

+--------------------------+----------------------------+

| Variable_name            | Value                      |

+--------------------------+----------------------------+

| character_set_client     | utf8                       |

| character_set_connection | utf8                       |

| character_set_database   | utf8                       |

| character_set_filesystem | binary                     |

| character_set_results    | utf8                       |

| character_set_server     | utf8                       |

| character_set_system     | utf8                       |

| character_sets_dir       | /usr/share/mysql/charsets/ |

+--------------------------+----------------------------+

8 rows in set (0.010 sec)

#--------------------------next----------------------------------

MariaDB [(none)]> show global variables like "%datadir%";

+---------------+----------------------+

| Variable_name | Value                |

+---------------+----------------------+

| datadir       | /data/seafile/mysql/ |

+---------------+----------------------+

1 row in set (0.002 sec)

#--------------------------next----------------------------------

MariaDB [(none)]> grant all privileges on *.* to 'root'@'%' identified by 'seafile.2019' with grant option;

Query OK, 0 rows affected (0.004 sec)

#--------------------------next----------------------------------

MariaDB [(none)]> flush privileges;

Query OK, 0 rows affected (0.003 sec)

#--------------------------next----------------------------------

MariaDB [(none)]> exit

Bye
安装python3
#--------------------------安装包--------------------------------

#先解压python-rpm,并将帮移动到Packages,然后执行下面的命令

createrepo -d /root/Packages/

yum repolist

rm -rf /var/cache/yum

yum makecache

yum install openssl-devel bzip2-devel expat-devel gdbm-devel readline-devel sqlite-devel

yum install zlib-devel bzip2-devel openssl-devel ncurses-devel sqlite-devel readline-devel tk-devel gcc make

#------------------------编译安装python3----------------------------

#上传python3压缩包

tar -xzvf Python-3.6.5.tgz -C /tmp

cd /tmp

./configure --prefix=/usr/local

make all && make install

createrepo -d /root/Packages/

yum repolist

rm -rf /var/cache/yum

yum makecache

#------------------------安装pip------------------------------

#上传压缩包

tar -xzf pip-18.1.tar.gz

cd pip-18.1

sudo python setup.py install
安装ffmpeg-rpm
#--------------------上传包,并移动到Packages ------------------------

createrepo -d /root/Packages/

yum repolist

rm -rf /var/cache/yum

yum makecache

yum install python-setuptools python-imaging MySQL-python python-memcached python-ldap python-urllib3 ffmpeg ffmpeg-devel python-requests

#--------------------------next----------------------------------

#上传moviepy包,并安装相应的包

pip install Pillow-5.2.0-cp36-cp36m-manylinux1_x86_64.whl

pip install decorator-4.3.0-py2.py3-none-any.whl

pip install tqdm-4.26.0-py2.py3-none-any.whl

pip install numpy-1.15.1-cp36-cp36m-manylinux1_x86_64.whl

tar -xzf imageio-2.4.1.tar.gz && rm imageio-2.4.1.tar.gz -f

tar -xzf moviepy-0.2.3.5.tar.gz && rm moviepy-0.2.3.5.tar.gz -f

cd imageio-2.4.1/ && python setup.py install

cd ../moviepy-0.2.3.5/ && python setup.py install

sudo yum install java-1.7.0-openjdk poppler-utils python-setuptools  python-imaging MySQL-python mariadb-server python-memcached python-ldap  python-urllib3

#--------------------------next----------------------------------

#上传boto包,并安装

cd boto

sudo python setup.py install

yum -y install java-1.7.0-openjdk

yum -y install java-1.8.0-openjdk

yum -y install poppler-utils

sudo easy_install pip

Searching for pip

Best match: pip 18.1

Processing pip-18.1-py2.7.egg

pip 18.1 is already the active version in easy-install.pth

Installing pip script to /usr/bin

Installing pip2.7 script to /usr/bin

Installing pip2 script to /usr/bin

Using /usr/lib/python2.7/site-packages/pip-18.1-py2.7.egg

Processing dependencies for pip

Finished processing dependencies for pip

sudo pip install boto

Requirement already satisfied: boto in /usr/lib/python2.7/site-packages/boto-2.49.0-py2.7.egg (2.49.0)

#--------------------------next----------------------------------
安装seafile
- 上传包并解压
#--------------------------next----------------------------------

#上传包,并解压

tar -zxf seafile-pro-server_7.0.19_x86-64.tar.gz

cd seafile-pro-server-7.0.19/
- 启动mysql服务
./setup-seafile-mysql.sh

Checking python on this machine ...

  Checking python module: python-mysqldb ... Done.

Checking for java ...Done.

-----------------------------------------------------------------

This script will guide you to setup your seafile server using MySQL.

Make sure you have read seafile server manual at

        https://github.com/haiwen/seafile/wiki

Press ENTER to continue

-----------------------------------------------------------------

What is the name of the server? It will be displayed on the client.

3 - 15 letters or digits

[ server name ] seafile

What is the ip or domain of the server?

For example: www.mycompany.com, 192.168.1.101

[ This server's ip or domain ] 10.224.91.79

Where do you want to put your seafile data?

Please use a volume with enough free space

[ default "/data/seafile_pro/seafile-data" ]

Which port do you want to use for the seafile fileserver?

[ default "8082" ]

-------------------------------------------------------

Please choose a way to initialize seafile databases:

-------------------------------------------------------

[1] Create new ccnet/seafile/seahub databases

[2] Use existing ccnet/seafile/seahub databases

[ 1 or 2 ] 1

What is the host of mysql server?

[ default "localhost" ]

What is the port of mysql server?

[ default "3306" ]

What is the password of the mysql root user?

[ root password ]

verifying password of user root ...  done

Enter the name for mysql user of seafile. It would be created if not exists.

[ default "seafile" ]

Enter the password for mysql user "seafile":

[ password for seafile ]

Enter the database name for ccnet-server:

[ default "ccnet-db" ]

Enter the database name for seafile-server:

[ default "seafile-db" ]

Enter the database name for seahub:

[ default "seahub-db" ]

---------------------------------

This is your configuration

---------------------------------

    server name:            seafile

    server ip/domain:       10.224.91.79

    seafile data dir:       /data/seafile_pro/seafile-data

    fileserver port:        8082

    database:               create new

    ccnet database:         ccnet-db

    seafile database:       seafile-db

    seahub database:        seahub-db

    database user:          seafile

---------------------------------

Press ENTER to continue, or Ctrl-C to abort

---------------------------------

Generating ccnet configuration ...

done

Successly create configuration dir /data/seafile_pro/ccnet.

Generating seafile configuration ...

Done.

done

Generating seahub configuration ...

----------------------------------------

Now creating ccnet database tables ...

----------------------------------------

----------------------------------------

Now creating seafile database tables ...

----------------------------------------

----------------------------------------

Now creating seahub database tables ...

----------------------------------------

creating seafile-server-latest symbolic link ...  done

-----------------------------------------------------------------

Your seafile server configuration has been finished successfully.

-----------------------------------------------------------------

run seafile server:     ./seafile.sh { start | stop | restart }

run seahub  server:     ./seahub.sh  { start <port> | stop | restart <port> }

-----------------------------------------------------------------

If you are behind a firewall, remember to allow input/output of these tcp ports:

-----------------------------------------------------------------

port of seafile fileserver:   8082

port of seahub:               8000

When problems occur, Refer to

        https://github.com/haiwen/seafile/wiki

for information.
- 启动seafile
./seafile.sh start

[root@localhost seafile-pro-server-7.0.19]# ./seafile.sh start

** Message: seafile-controller.c(1157): loading seafdav config from /data/seafile_pro/conf/seafdav.conf

[12/02/20 15:55:38] ../common/session.c(143): using config file /data/seafile_pro/conf/ccnet.conf

[12/02/20 15:55:38] ../common/license.c(406): Loading license file /data/seafile_pro/seafile-license.txt ..

[12/02/20 15:55:38] ../common/license.c(409): License file /data/seafile_pro/seafile-license.txt does not exist, allow at most 3 trial users

License file /data/seafile_pro/seafile-license.txt does not exist, allow at most 3 trial users

Starting seafile server, please wait ...

** Message: seafile-controller.c(1157): loading seafdav config from /data/seafile_pro/conf/seafdav.conf

Seafile server started

Done.
- 启动seahub
./seahub.sh start

LC_ALL is not set in ENV, set to en_US.UTF-8

Starting seahub at port 8000 ...

----------------------------------------

It's the first time you start the seafile server. Now let's create the admin account

----------------------------------------

What is the email for the admin account?

[ admin email ] demo@demo.com

What is the password for the admin account?

[ admin password ]

Enter the password again:

[ admin password again ]

----------------------------------------

Successfully created seafile admin

----------------------------------------

Seahub is started

Done.
- 修改配置文件
vim conf/gunicorn.conf

#修改bindIP为0.0.0.0

# default localhost:8000

bind = "0.0.0.0:8000"

vim /etc/systemd/system/seafile.service

#添加以下配置

[Unit]

Description=Seafile Service

After=network.target mysql.service

Environment = “ LC_ALL = C”

[Service]

Type=oneshot

RemainAfterExit= yes

ExecStart=/data/seafile_pro/seafile-server-latest/seafile.sh start

ExecStart=/data/seafile_pro/seafile-server-latest/seahub.sh start

ExecStop=/data/seafile_pro/seafile-server-latest/seafile.sh stop

ExecStop=/data/seafile_pro/seafile-server-latest/seahub.sh stop

[Install]

WantedBy=multi-user.target

#保存退出

systemctl enable seafile

systemctl is-enabled seafile #查看状态
安装Office预览
#上传LibreOffice包,并解压

tar -xzf LibreOffice_6.4.7_Linux_x86-64_rpm.tar.gz

tar -xzf LibreOffice_6.4.7_Linux_x86-64_rpm_helppack_zh-CN.tar.gz

tar -xzf LibreOffice_6.4.7_Linux_x86-64_rpm_langpack_zh-CN.tar.gz

cd LibreOffice_6.4.7.2_Linux_x86-64_rpm/RPMS/ && sudo yum install ./*.rpm /*

cd LibreOffice_6.4.7.2_Linux_x86-64_rpm_langpack_zh-CN/RPMS && sudo yum install ./*.rpm /*

cd LibreOffice_6.4.7.2_Linux_x86-64_rpm_helppack_zh-CN/RPMS && sudo yum install ./*.rpm /*
重启机器
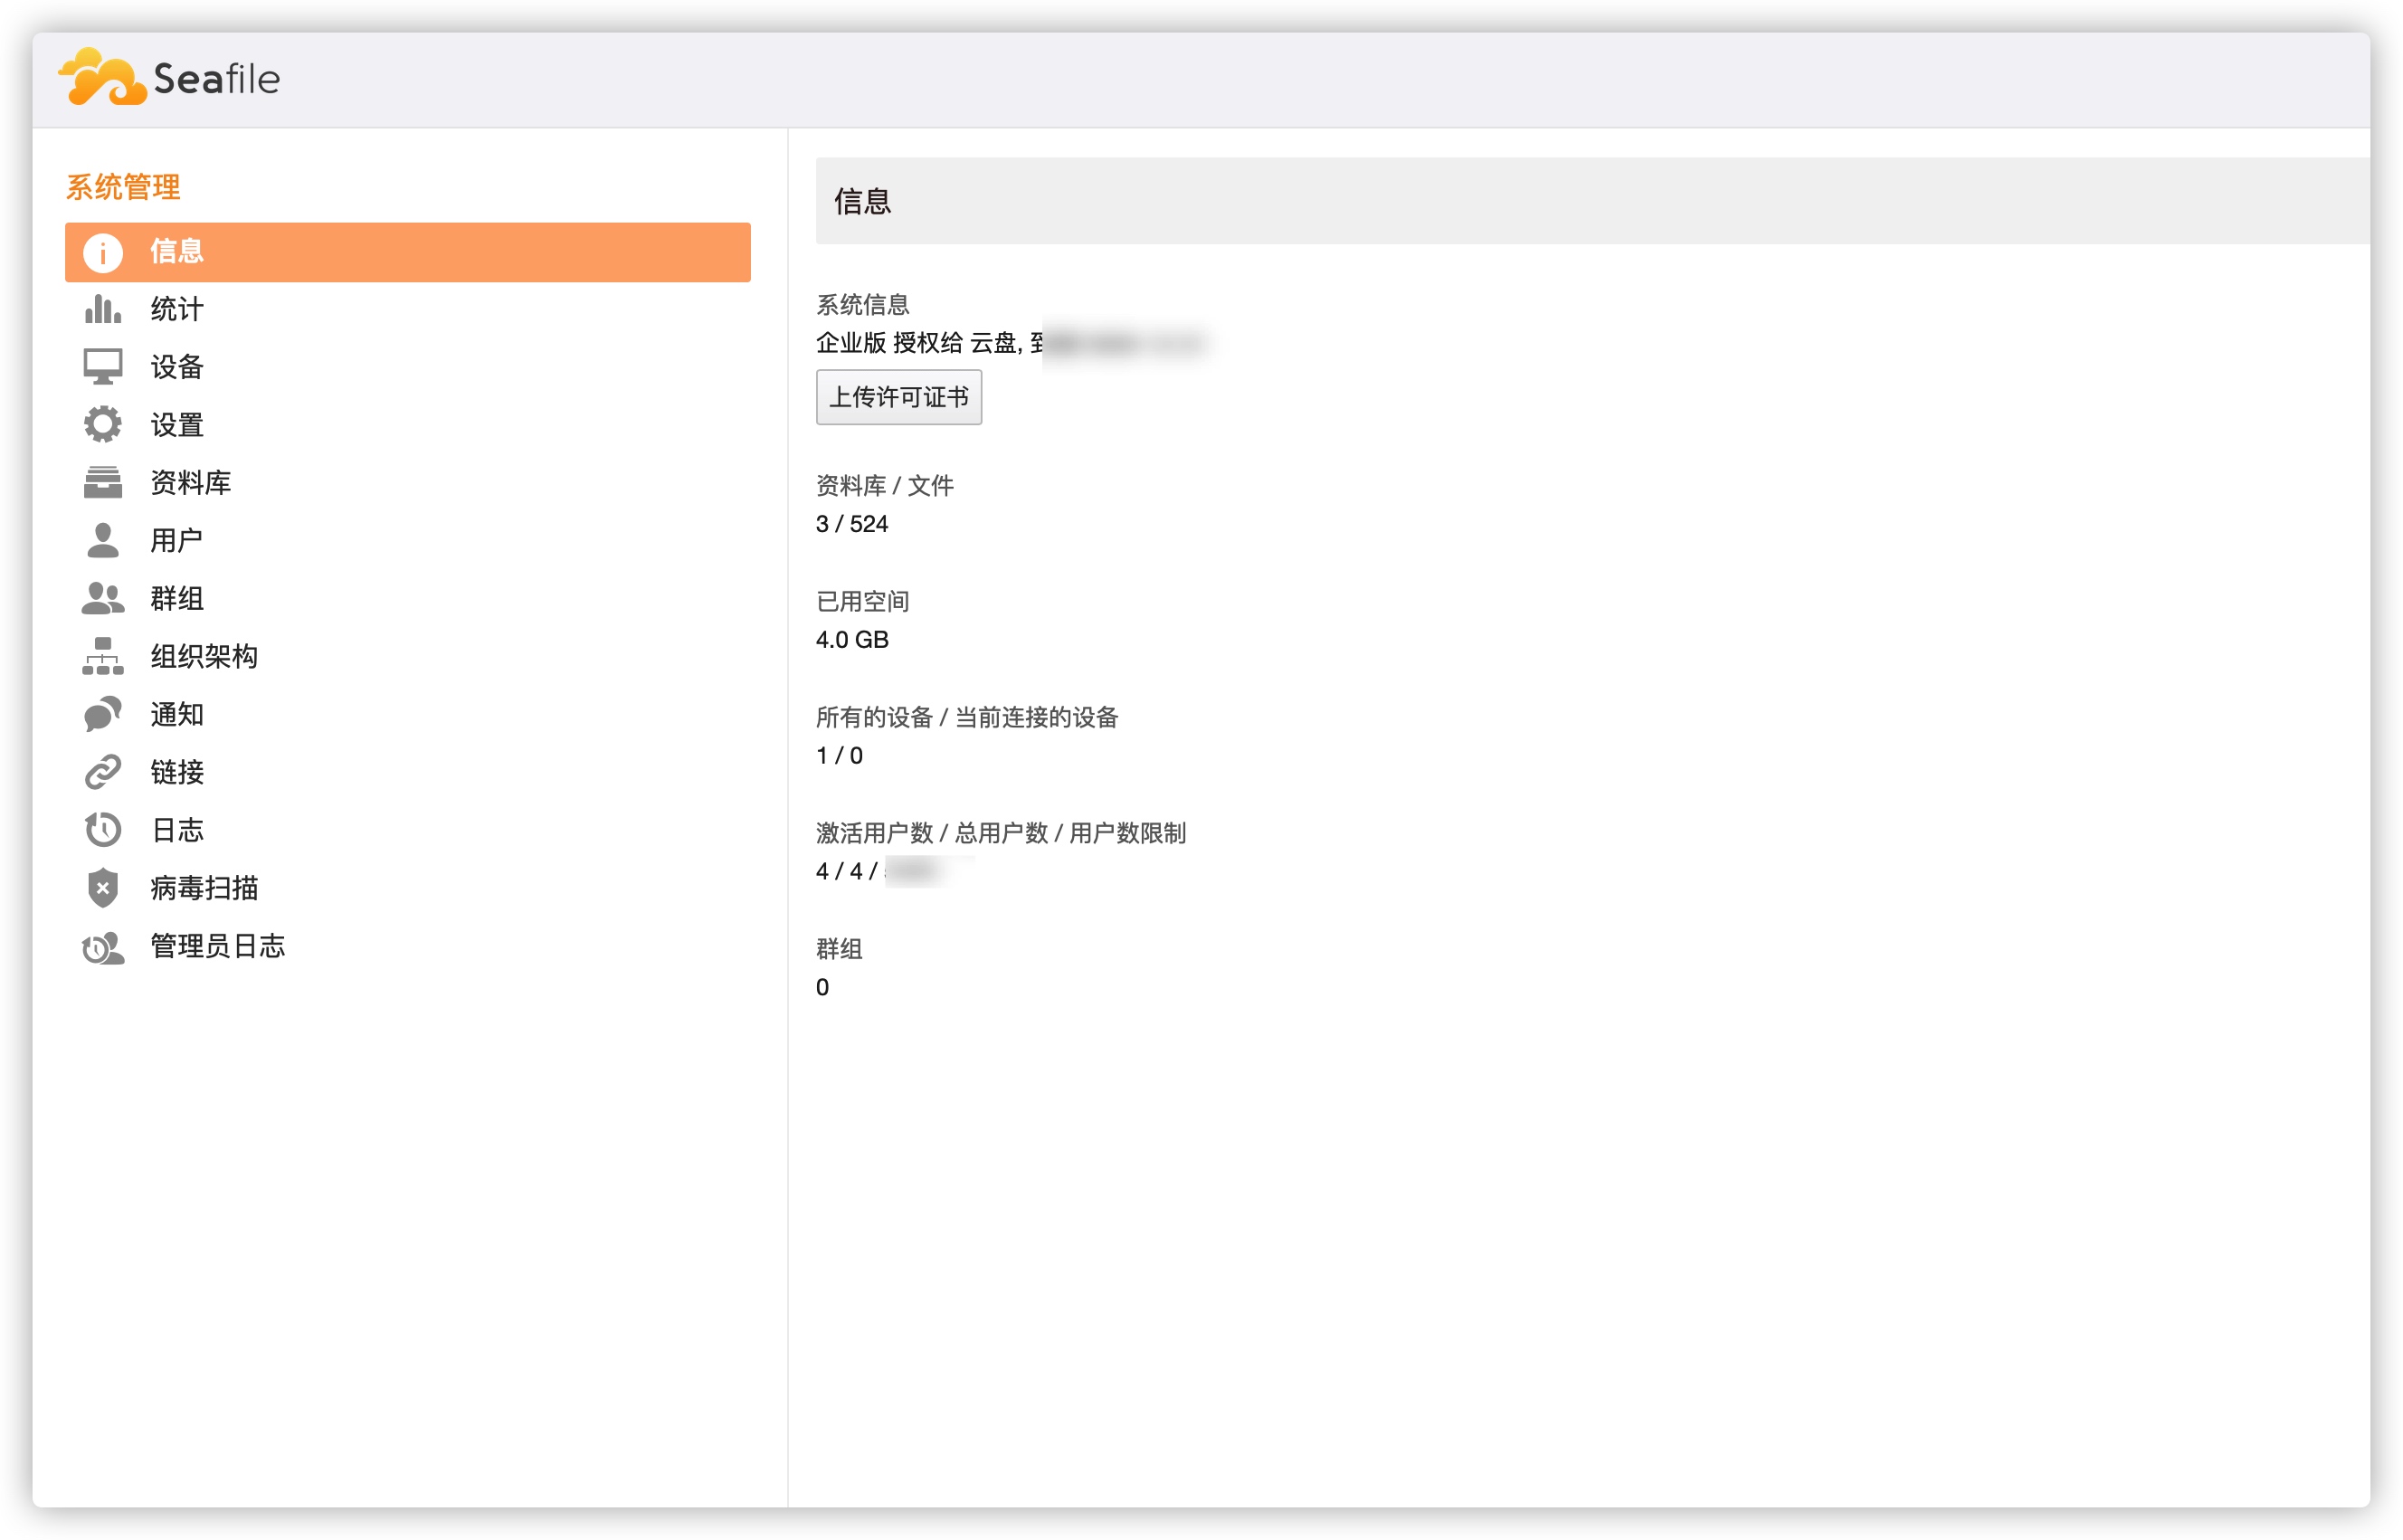
重启后什么都不用动,服务器重启好后访问你的地址,查看是否可以访问并登陆,如果可以那就上传你的许可证吧。
问题解决
无法下载大文件
其实用默认的就行,比较开了比较耗服务器资源
vim conf/seafile.conf

#添加以下配置

[fileserver]

# 上传文件最大限制为200M,默认是无限制.

max_upload_size=200

# 最大下载目录限制为200M, 默认是100M. 还不够就往大的设置就好了,只要你的服务器吃得消

max_download_dir_size=200
无法搜索文件
讲一下我的排错思路吧。
- 首先查看一下es是否起来了
ps aux | grep -o [j]ava[[:space:]].*elasticsearch.pid$
- 上面没有进程的话,那就是es没有起来。解决方案我使用的是官方的,
- 如果上面有进程的,那就看seahub的启动日志,看看什么报错
tail -f seahub.log

#Web界面操作一下看看什么报错了
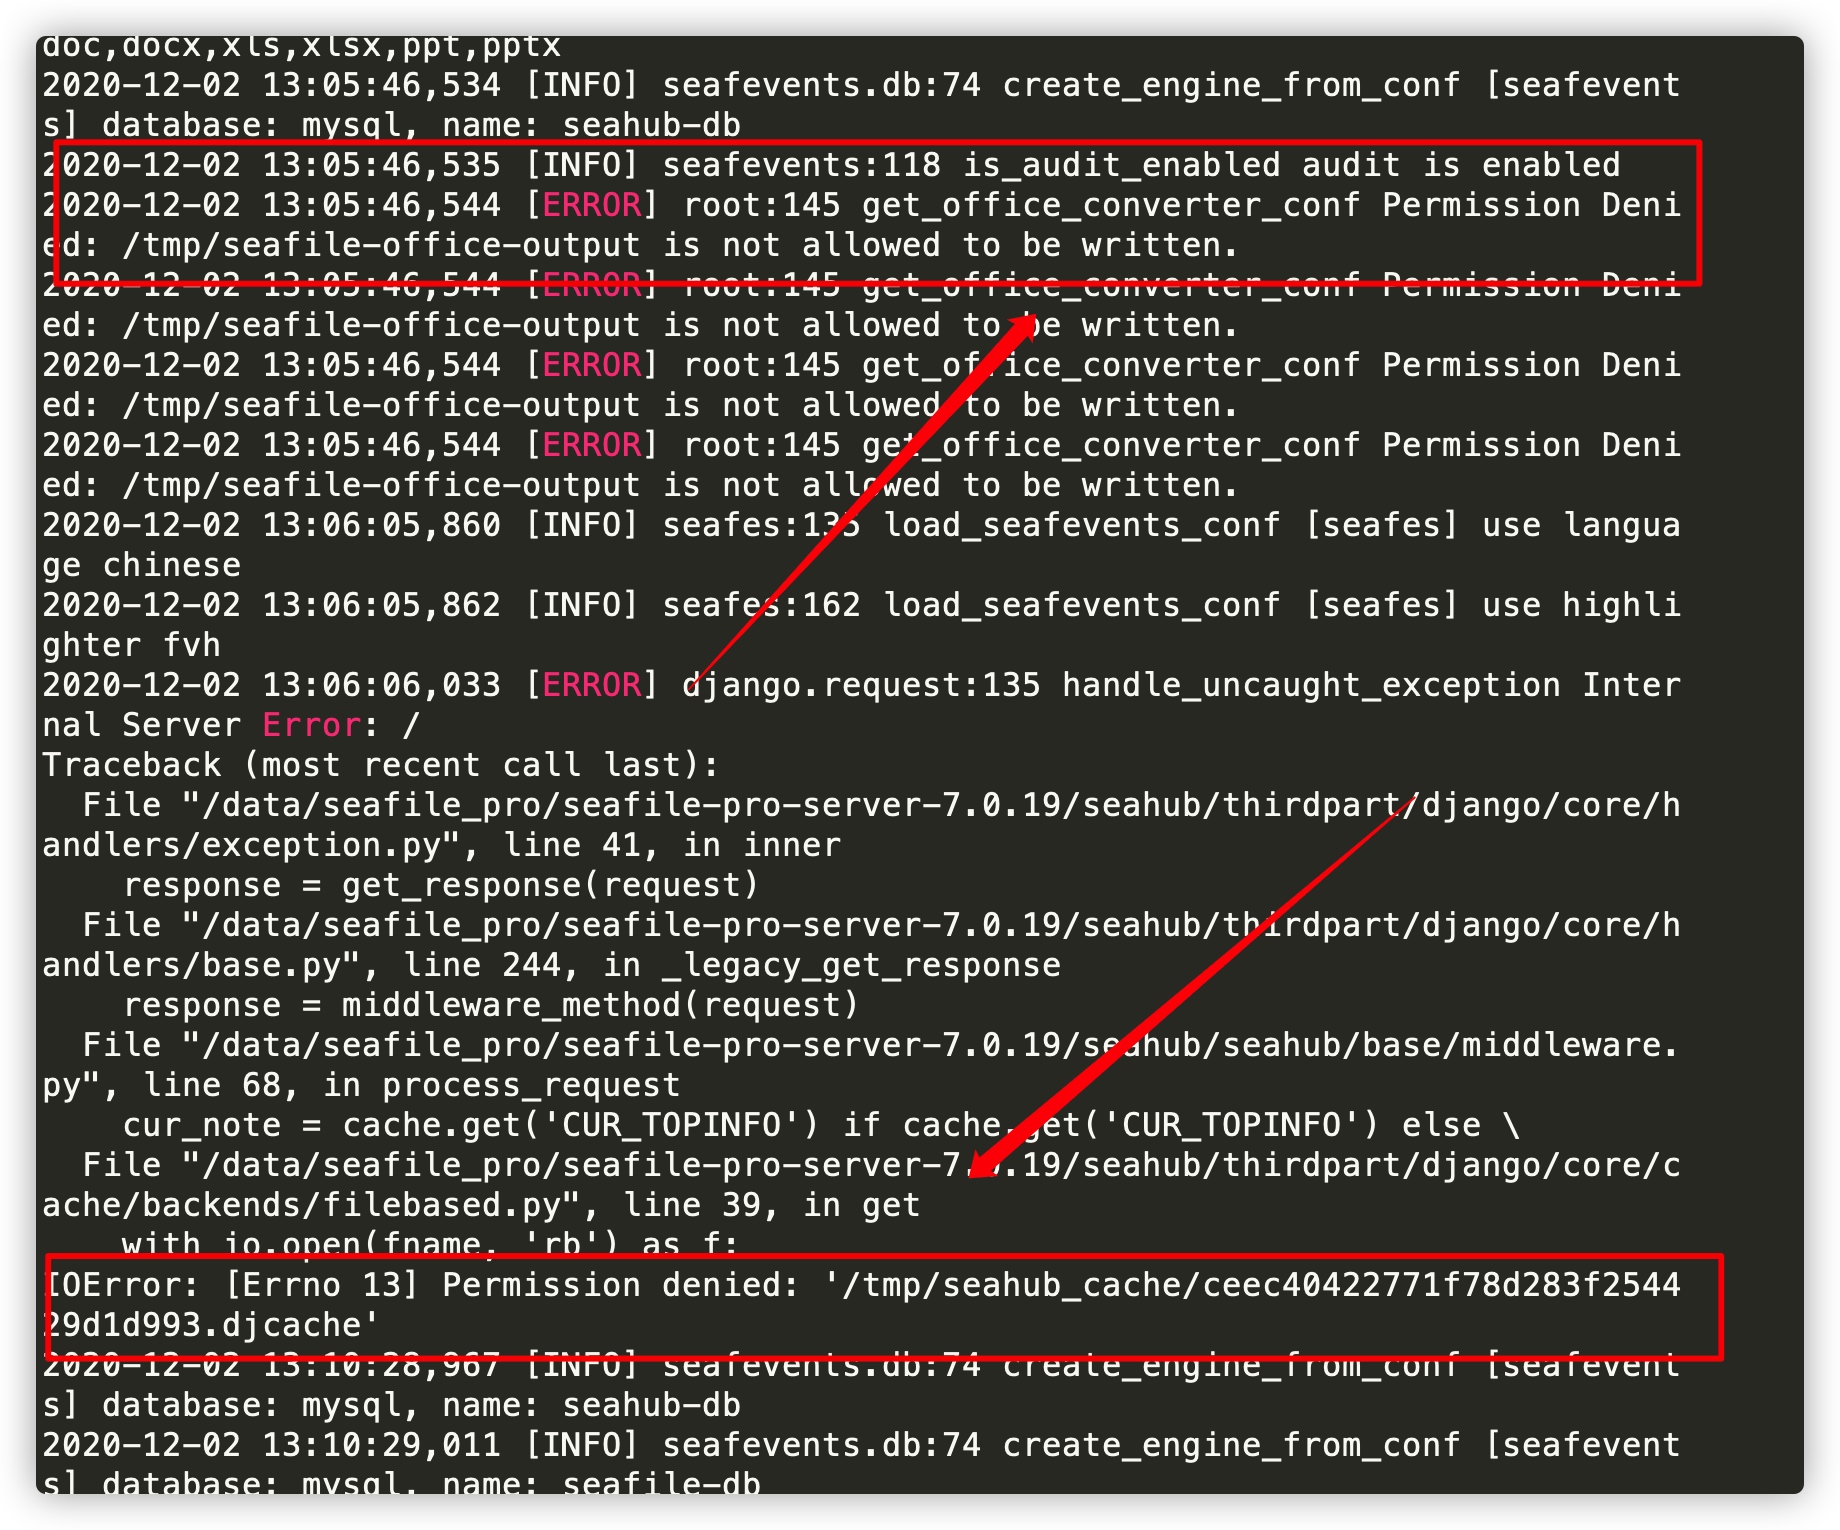
比如我这就是自己漏掉了,忘记给office缓存文件权限了,然后还一个也是没有权限。给一下权限,不会的看看上一步官方文档,按照操作就行了。操作完毕后重启服务,再看下有没有报错,我这给了权限后seahub就没有报错了,不过web界面报错了,好像报Sorry, but the requested page is unavailable due to a server hiccup. Our engineers have been notified, so check back later.反正就是登陆界面都访问不了,报错是不是这个就不是很确定了。
- 查看配置文件
查看一下配置文件是不是都对的。我这是·
ccnet.conf配置文件被我瞎改改改坏掉了。把URL改成自己的ip+端口就好了,如:
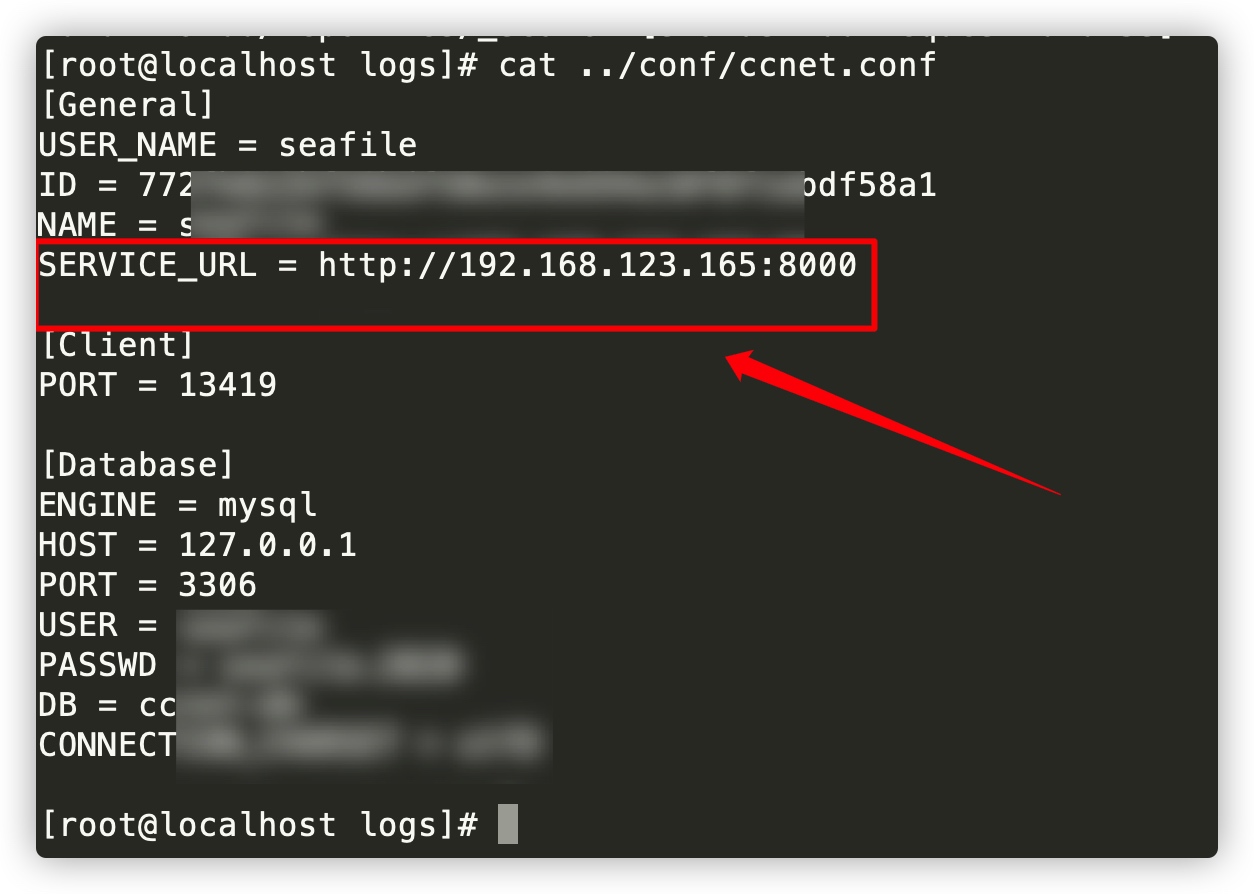
重启,访问。搜索索引需要等待一会才行。
以上是我解决几个问题的思路大家可以参考一下,如有不对请指正。

安装seafile记录文档的更多相关文章
- Docker版EKL安装记录文档
Docker版EKL安装记录文档 拉取已下三个镜像 docker.io/logstash 7.5.2 b6518c95ed2f 6 months ago 805 MB docker.io/kibana ...
- Mongo-Connector 安装及使用文档
# Mongo-Connector 安装及使用文档 ------ > * 工具介绍> * 安装前准备> * 安装步骤> * 命令详解> * 有可能的坑> * 其他文 ...
- k8s实验操作记录文档
k8s实验操作记录文档,仅供学习参考! 文档以实验操作的过程及内容为主进行记录,涉及少量的介绍性文字(来自网络开源). 仅汇总主题所有链接,详细内容查看需要切换到相关链接.https://github ...
- 英文VS2010安装中文版MSDN文档方法
英文VS2010安装中文版MSDN文档方法 2010-06-01 11:52 by 李永京, 51409 阅读, 50 评论, 收藏, 编辑 在2010年4月12号发布Visual Studio 20 ...
- P6 EPPM 16 R1安装和配置文档
白桃花心木P6企业项目组合管理文档库 描述 链接 下载 零件号 16 R1用户和集成文档 查看库 下载 E68199-01 16 R1安装和配置文档 查看库 下载 E68198-01 描述 链接 ...
- pyqt助手中安装Qt帮助文档
一.个人安装环境 1.Windows7x64_SP1 2.anaconda2.5.0 + python2.7(anaconda集成,不需单独安装) 3.pyinstaller3.0 4.通过Anaco ...
- matlab2018a安装后帮助文档打不开解决方法
安装matlab2018a破解版后,帮助文档提示需要许可证问题(破解版没有可用许可证): 解决方法是把文档设置为离线即可(预设---->帮助---->安装在本地---->小窗口)
- Where is the kernel documentation?; Ubuntu 上如何安装 linux 内核文档;fedora 上如何安装linux内核文档?
有时候,linux内核文档对我们很重要,我们可以在linux系统中安装,并及时查看: 参考链接:https://askubuntu.com/questions/841043/where-is-the- ...
- 从架构开始谈dubbo(二)-----zookeeper安装和dubbo文档查阅
一.Zookeeper下载与安装 1.官网地址下载 https://zookeeper.apache.org/ 2.找到图中英文位置(英文不好,安图操作就好了,计算机很多东西如果你没法很好的记忆,就画 ...
随机推荐
- IC晶圆缺货涨价浪潮持续上涨 无线路由芯片WiFi模块受波及严重
正是多事之秋,继受美国贸易战影响后.由于晶圆供不应求,市场各大行业IC纷纷出现了断货,缺货,涨价的现象.这给了本来低迷的经济市场又一重创.WiFi路由芯片的无线路由模块必不可免的受到了波及. 晶圆代工 ...
- 用GitHub Pages搭建博客(三)
本篇介绍通过git工具替换网站主题,并发布 Jekyll和Hexo的简要介绍 GitHub Pages是基于Jekyll构建的,Jekyll 是一个简单的博客形态的静态站点生产工具,它有一个模版目 ...
- 什么是 RedLock
Redis 官方站这篇文章提出了一种权威的基于 Redis 实现分布式锁的方式名叫 Redlock,此种方式比原先的单节点的方法更安全.它可以保证以下特性: 安全特性:互斥访问,即永远只有一个 cli ...
- .netcore基于mysql的codefirst
.netcore基于mysql的codefirst 此文仅是对于netcore基于mysql的简单的codefirst实现的简单记录.示例为客服系统消息模板的增删改查实现 第一步.创建实体项目,并在其 ...
- How to refresh datasource args caller[X++]
To refresh datasource args caller, you must add override method close on form like source code belo ...
- WSL Ubuntu 18.04 LTS + VS Code
WSL Ubuntu 18.04 LTS + VS Code WSL(Windows Subsystem for Linux)使得Windows用户能够在Windows系统上使用原生的Linux环 ...
- 自己常用的Content-Type几种值用法
Content-Type 的值类型: application/json:消息主体是序列化后的 JSON 字符串 这里要注意的是 我在使用webapi,前台使用$.ajax的时候 假如我要传递的数据为 ...
- 分布式流平台Kafka
提到Kafka很多人的第一印象就是它是一个消息系统,但Kafka发展至今,它的定位已远不止于此,而是一个分布式流处理平台.对于一个流处理平台通常具有三个关键能力: 1. 发布和订阅消息流,在这一点上它 ...
- git clone克隆github仓库慢,问题解决
导读 转载自:https://www.hangge.com/blog/cache/detail_2670.html 原因 由于国内网络问题,当我们使用 git clone 命令从 github ...
- 经典c程序100例==11--20
[程序11] 题目:古典问题:有一对兔子,从出生后第3个月起每个月都生一对兔子,小兔子长到第三个月 后每个月又生一对兔子,假如兔子都不死,问每个月的兔子总数为多少? 1.程序分析: 兔子的规律为数列1 ...