Vue基础(五)---- 前端路由
基本结构:
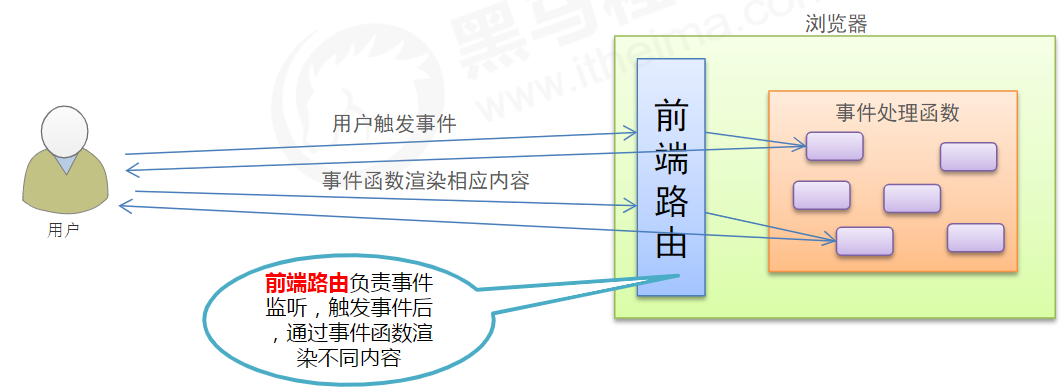
◆ 1、路由的基本概念与原理
◆ 2、vue-router的基本使用
◆ 3、vue-router嵌套路由
◆ 4、vue-router动态路由匹配
◆ 5、vue-router命名路由
◆ 6、vue-router编程式导航
◆ 7、基于vue-router的案例
◆ 1、路由的基本概念与原理
1.1 路由


<div id="app">

      <!-- router-link 是 vue 中提供的标签,默认会被渲染为 a 标签 -->

      <!-- to 属性默认会被渲染为 href 属性 -->

      <!-- to 属性的值默认会被渲染为 # 开头的 hash 地址 -->

      <router-link to="/user">User</router-link>

      <router-link to="/register">Register</router-link>

      <!-- 路由占位符 -->

      <!-- 将来通过路由规则匹配到的组件,将会被渲染到 router-view 所在的位置 -->

      <router-view></router-view>

 </div>
const User = {

  template: "<h1>User 组件</h1>",

};

const Register = {

  template: "<h1>Register 组件</h1>",

};
 // 创建路由实例对象

      const router = new VueRouter({

        // 所有的路由规则

        routes: [

          // 每个路由规则都是一个配置对象,其中至少包含 path 和 component 两个属性:

          // path 表示当前路由规则匹配的 hash 地址

          // component 表示当前路由规则对应要展示的组件

          { path: "/user", component: User },

          { path: "/register", component: Register },

        ],

      });
// 创建 vm 实例对象

      const vm = new Vue({

        // 指定控制的区域

        el: "#app",

        data: {},

        // 挂载路由实例对象

        // router: router(在ES6中如果属性名和值一样,可以简写)

        router,

      });
routes: [

          { path: '/', redirect: '/user'},

          { path: '/user', component: User },

          { path: '/register', component: Register }

]
<!DOCTYPE html>

<html lang="en">

  <head>

    <meta charset="UTF-8" />

    <meta name="viewport" content="width=device-width, initial-scale=1.0" />

    <meta http-equiv="X-UA-Compatible" content="ie=edge" />

    <title>Document</title>

    <!-- 导入 vue 文件 -->

    <script src="./lib/vue_2.5.22.js"></script>

    <script src="./lib/vue-router_3.0.2.js"></script>

  </head>

  <body>

    <!-- 被 vm 实例所控制的区域 -->

    <div id="app">

      <router-link to="/user">User</router-link>

      <router-link to="/register">Register</router-link>

      <!-- 路由占位符 -->

      <router-view></router-view>

    </div>

    <script>

      const User = {

        template: "<h1>User 组件</h1>",

      };

      const Register = {

        template: `<div>

          <h1>Register 组件</h1>

          <hr/>

          <!-- 子路由链接 -->

          <router-link to="/register/tab1">tab1</router-link>

          <router-link to="/register/tab2">tab2</router-link>

          <!-- 子路由的占位符 -->

          <router-view />

        <div>`,

      };

      const Tab1 = {

        template: "<h3>tab1 子组件</h3>",

      };

      const Tab2 = {

        template: "<h3>tab2 子组件</h3>",

      };

      // 创建路由实例对象

      const router = new VueRouter({

        // 所有的路由规则

        routes: [

          { path: "/", redirect: "/user" },

          { path: "/user", component: User },

          // children 数组表示子路由规则

          {

            path: "/register",

            component: Register,

            children: [

              { path: "/register/tab1", component: Tab1 },

              { path: "/register/tab2", component: Tab2 },

            ],

          },

        ],

      });

      // 创建 vm 实例对象

      const vm = new Vue({

        // 指定控制的区域

        el: "#app",

        data: {},

        // 挂载路由实例对象

        // router: router

        router,

      });

    </script>

  </body>

</html>
思考:<!–有如下3 个路由链接-->

<router-link to="/user/1">User1</router-link>

<router-link to="/user/2">User2</router-link>

<router-link to="/user/3">User3</router-link>

// 定义如下三个对应的路由规则,是否可行???

{ path: '/user/1', component: User1 }

{ path: '/user/2', component: User2 }

{ path: '/user/3', component: User3 }

// 太过于繁杂
var router = new VueRouter({

    routes: [

        // 动态路径参数以冒号开头

        { path: '/user/:id', component: User }

    ]

})

const User = {

        // 路由组件中通过$route.params获取路由参数

        template: '<div>User {{ $route.params.id }}</div>'

}

缺点:$route与对应路由形成高度耦合,不够灵活,所以可以使用props将组件和路由解耦
4.2 路由组件传递参数
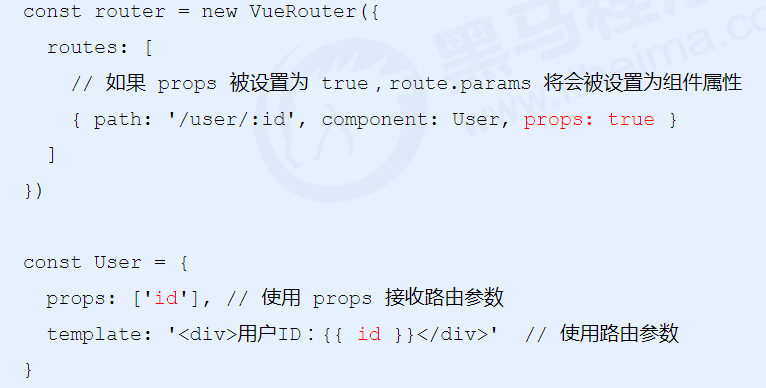
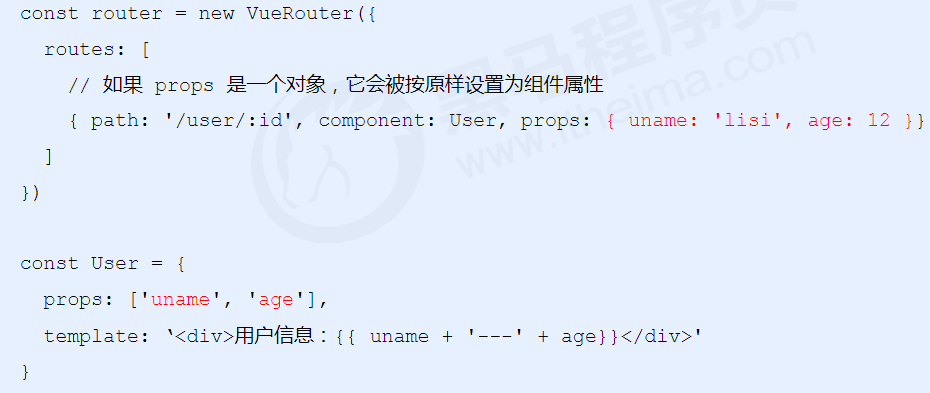
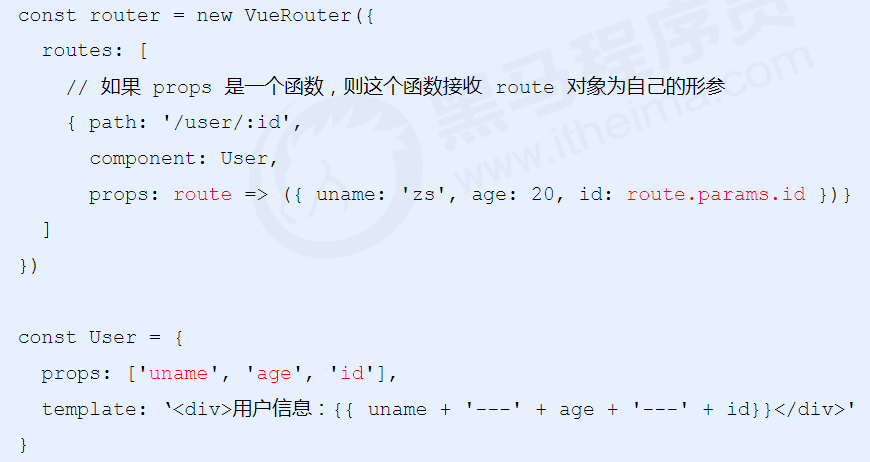
1. props的值为布尔类型-----------( 动态接收ID)


<!DOCTYPE html>

<html lang="en">

  <head>

    <meta charset="UTF-8" />

    <meta name="viewport" content="width=device-width, initial-scale=1.0" />

    <meta http-equiv="X-UA-Compatible" content="ie=edge" />

    <title>Document</title>

    <!-- 导入 vue 文件 -->

    <script src="./lib/vue_2.5.22.js"></script>

    <script src="./lib/vue-router_3.0.2.js"></script>

  </head>

  <body>

    <!-- 被 vm 实例所控制的区域 -->

    <div id="app">

      <router-link to="/user/1">User1</router-link>

      <router-link to="/user/2">User2</router-link>

      <router-link :to="{ name: 'user', params: {id: 3} }">User3</router-link>

      <router-link to="/register">Register</router-link>

      <!-- 路由占位符 -->

      <router-view></router-view>

    </div>

    <script>

      const User = {

        props: ["id", "uname", "age"],

        template: `<div>

          <h1>User 组件 -- 用户id为: {{id}} -- 姓名为:{{uname}} -- 年龄为:{{age}}</h1>

          <button @click="goRegister">跳转到注册页面</button>

        </div>`,

        methods: {

          goRegister: function () {

            this.$router.push("/register");

          },

        },

      };

      const Register = {

        template: `<div>

          <h1>Register 组件</h1>

          <button @click="goBack">后退</button>

        </div>`,

        methods: {

          goBack() {

            this.$router.go(-1);

          },

        },

      };

      // 创建路由实例对象

      const router = new VueRouter({

        // 所有的路由规则

        routes: [

          { path: "/", redirect: "/user" },

          {

            // 命名路由

            name: "user",

            path: "/user/:id",

            component: User,

            props: (route) => ({ uname: "zs", age: 20, id: route.params.id }),

          },

          { path: "/register", component: Register },

        ],

      });

      // 创建 vm 实例对象

      const vm = new Vue({

        // 指定控制的区域

        el: "#app",

        data: {},

        // 挂载路由实例对象

        // router: router

        router,

      });

    </script>

  </body>

</html>
◆ 7、基于vue-router的案例
<!DOCTYPE html>

<html lang="en">

  <head>

    <meta charset="UTF-8" />

    <title>基于vue-router的案例</title>

    <style type="text/css">

      html,

      body,

      #app {

        margin: 0;

        padding: 0px;

        height: 100%;

      }

      .header {

        height: 50px;

        background-color: #545c64;

        line-height: 50px;

        text-align: center;

        font-size: 24px;

        color: #fff;

      }

      .footer {

        height: 40px;

        line-height: 40px;

        background-color: #888;

        position: absolute;

        bottom: 0;

        width: 100%;

        text-align: center;

        color: #fff;

      }

      .main {

        display: flex;

        position: absolute;

        top: 50px;

        bottom: 40px;

        width: 100%;

      }

      .content {

        flex: 1;

        text-align: center;

        height: 100%;

      }

      .left {

        flex: 0 0 20%;

        background-color: #545c64;

      }

      .left a {

        color: white;

        text-decoration: none;

      }

      .right {

        margin: 5px;

      }

      .btns {

        width: 100%;

        height: 35px;

        line-height: 35px;

        background-color: #f5f5f5;

        text-align: left;

        padding-left: 10px;

        box-sizing: border-box;

      }

      button {

        height: 30px;

        background-color: #ecf5ff;

        border: 1px solid lightskyblue;

        font-size: 12px;

        padding: 0 20px;

      }

      .main-content {

        margin-top: 10px;

      }

      ul {

        margin: 0;

        padding: 0;

        list-style: none;

      }

      ul li {

        height: 45px;

        line-height: 45px;

        background-color: #a0a0a0;

        color: #fff;

        cursor: pointer;

        border-bottom: 1px solid #fff;

      }

      table {

        width: 100%;

        border-collapse: collapse;

      }

      td,

      th {

        border: 1px solid #eee;

        line-height: 35px;

        font-size: 12px;

      }

      th {

        background-color: #ddd;

      }

    </style>

    <script src="./lib/vue_2.5.22.js"></script>

    <script src="./lib/vue-router_3.0.2.js"></script>

  </head>

  <body>

    <!-- 要被 vue 实例所控制的区域 -->

    <div id="app">

      <!-- 路由占位符 -->

      <router-view></router-view>

    </div>

    <script>

      // 定义 APP 根组件

      const App = {

        template: `<div>

          <!-- 头部区域 -->

          <header class="header">传智后台管理系统</header>

          <!-- 中间主体区域 -->

          <div class="main">

            <!-- 左侧菜单栏 -->

            <div class="content left">

              <ul>

                <li><router-link to="/users">用户管理</router-link></li>

                <li><router-link to="/rights">权限管理</router-link></li>

                <li><router-link to="/goods">商品管理</router-link></li>

                <li><router-link to="/orders">订单管理</router-link></li>

                <li><router-link to="/settings">系统设置</router-link></li>

              </ul>

            </div>

            <!-- 右侧内容区域 -->

            <div class="content right"><div class="main-content">

              <router-view />

            </div></div>

          </div>

          <!-- 尾部区域 -->

          <footer class="footer">版权信息</footer>

        </div>`,

      };

      const Users = {

        data() {

          return {

            userlist: [

              { id: 1, name: "张三", age: 10 },

              { id: 2, name: "李四", age: 20 },

              { id: 3, name: "王五", age: 30 },

              { id: 4, name: "赵六", age: 40 },

            ],

          };

        },

        methods: {

          goDetail(id) {

            console.log(id);

            this.$router.push("/userinfo/" + id);

          },

        },

        template: `<div>

        <h3>用户管理区域</h3>

        <table>

          <thead>

            <tr><th>编号</th><th>姓名</th><th>年龄</th><th>操作</th></tr>

          </thead>

          <tbody>

            <tr v-for="item in userlist" :key="item.id">

              <td>{{item.id}}</td>

              <td>{{item.name}}</td>

              <td>{{item.age}}</td>

              <td>

                <a href="javascript:;" @click="goDetail(item.id)">详情</a>

              </td>

            </tr>

          </tbody>

        </table>

      </div>`,

      };

      const UserInfo = {

        props: ["id"],

        template: `<div>

          <h5>用户详情页 --- 用户Id为:{{id}}</h5>

          <button @click="goback()">后退</button>

        </div>`,

        methods: {

          goback() {

            // 实现后退功能

            this.$router.go(-1);

          },

        },

      };

      const Rights = {

        template: `<div>

        <h3>权限管理区域</h3>

      </div>`,

      };

      const Goods = {

        template: `<div>

        <h3>商品管理区域</h3>

      </div>`,

      };

      const Orders = {

        template: `<div>

        <h3>订单管理区域</h3>

      </div>`,

      };

      const Settings = {

        template: `<div>

        <h3>系统设置区域</h3>

      </div>`,

      };

      // 创建路由对象

      const router = new VueRouter({

        routes: [

          {

            path: "/",

            component: App,

            redirect: "/users",

            children: [

              { path: "/users", component: Users },

              { path: "/userinfo/:id", component: UserInfo, props: true },

              { path: "/rights", component: Rights },

              { path: "/goods", component: Goods },

              { path: "/orders", component: Orders },

              { path: "/settings", component: Settings },

            ],

          },

        ],

      });

      const vm = new Vue({

        el: "#app",

        router,

      });

    </script>

  </body>

</html>
Vue基础(五)---- 前端路由的更多相关文章
- Vue(三)之前端路由
01-前端路由 1.前端路由的实现原理 vue+vue-router 主要来做单页面应用(Single Page Application) 为什么我们要做单页面应用? (1)传统的开发方式 url改变 ...
- [Vue 牛刀小试]:第十二章 - 使用 Vue Router 实现 Vue 中的前端路由控制
一.前言 前端路由是什么?如果你之前从事的是后端的工作,或者虽然有接触前端,但是并没有使用到单页面应用的话,这个概念对你来说还是会很陌生的.那么,为什么会在单页面应用中存在这么一个概念,以及,前端路由 ...
- Vue(基础五)_vue中用ref和给dom添加事件的特殊情况
一.前言 这篇文章涉及的主要内容有: 1.ref绑定在标签上是获取DOM对象 2.ref绑定在子组件上获取的是子组件对象 3.案列:自动获取input焦点 二.主要内容 1.基础内容: ref 被用来 ...
- vue.js利用vue.router创建前端路由
node.js方式: 利用node.js安装vue-router模块 cnpm install vue-router 安装完成后我们引入这个模板! 下载vue-router利用script引入方式: ...
- vue基础五
条件渲染 1.v-if 1.1<template>中v-if条件组 因为 v-if 是一个指令,需要将它添加到一个元素上.但是如果我们想切换多个元素呢?此时我们可以把一个<templ ...
- vue基础总结
Vue语法: new Vue({ //挂载: el: '#app', //初始化数据: data: {}, //监听 data 的数据变化: watch: { todos: { //深度监视 hand ...
- 浅析使用vue-router实现前端路由的两种方式
关于vue-router 由于最近的项目中一直在使用vue,所以前端路由方案也是使用的官方路由vue-router,之前在angularJS项目中也是用过UI-router,感觉大同小异,不过很显然v ...
- [前端] VUE基础 (6) (v-router插件、获取原生DOM)
一.v-router插件 1.v-router插件介绍 v-router是vue的一个核心插件,vue+vue-router主要用来做SPA(单页面应用)的. 什么是SPA:就是在一个页面中,有多个页 ...
- 在Bootstrap开发框架基础上增加WebApi+Vue&Element的前端
基于Metronic的Bootstrap开发框架是我们稍早一点的框架产品,界面部分采用较新的Bootstrap技术,框架后台数据库支持Oracle.SqlServer.MySql.PostgreSQL ...
随机推荐
- PHP array_key_exists() 函数
实例 检查键名 "Volvo" 是否存在于数组中: <?php $a=array("Volvo"=>"XC90","B ...
- PHP array_walk_recursive() 函数
实例 对数组中的每个元素应用用户自定义函数: <?phpfunction myfunction($value,$key){echo "The key $key has the valu ...
- PHP frenchtojd() 函数
------------恢复内容开始------------ 实例 把法国共和历法的日期转换为儒略日计数,然后再转换回法国共和历法的日期: <?php$jd=frenchtojd(3,3,14) ...
- PHP ezmlm_hash() 函数
定义和用法 ezmlm_hash() 函数用于在 MySQL 数据库中保存 EZMLM 邮件列表的哈希值. 该函数接收一个 Email 地址参数,返回一个整数哈希值. 语法 int ezmlm_has ...
- 7.18 NOI模拟赛 因懒无名 线段树分治 线段树维护直径
LINK:因懒无名 20分显然有\(n\cdot q\)的暴力. 还有20分 每次只询问一种颜色的直径不过带修改. 容易想到利用线段树维护直径就可以解决了. 当然也可以进行线段树分治 每种颜色存一下直 ...
- Lambda表达式运行原理
目录 一.创建测试样例 二.利用Java命令编译分析 三.文末 JDK8引入了Lambda表达式以后,对我们写代码提供了很大的便利,那么Lambda表达式是如何运用简单表示来达到运行效果的呢?今天,我 ...
- SpringBoot之多模块项目
SpringBoot之多模块项目 说明:我们通过maven的父子工程来搭建springboot的多模块项目** 项目的整体结构 本项目涉及了到了五个模块 framework-web模块主要是放置前端的 ...
- django--各个文件的含义
当你创建项目或者应用后你是不是发现多了很多个文件,现在我们来看看各代表什么意思 与你项目名相同的文件夹:是项目的管理功能目录,这个目录的名称因用户所创建的项目名称的不同而不同 在该目录下还有四个文件: ...
- 2080ti的各种问题
1.循环登录 https://blog.csdn.net/miclover_feng/article/details/79201865 2.多版本cuda切换 https://blog.csdn.ne ...
- 我是键盘侠-键盘流神器Vimium
黑客的浏览器. Vimium本着Vim的精神为导航和控制提供键盘快捷键. 注意:谷歌不允许 Vimium在 Chrome Web Store页面和 新选项卡页面上运行.所以按键无效不要惊讶 Vimiu ...
