python RabbitMQ广播
消息公平分发
如果Rabbit只管按顺序把消息发到各个消费者身上,不考虑消费者负载的话,很可能出现,一个机器配置不高的消费者那里堆积了很多消息处理不完,同时配置高的消费者却一直很轻松。为解决此问题,可以在各个消费者端,配置perfetch=1,意思就是告诉RabbitMQ在我这个消费者当前消息还没处理完的时候就不要再给我发新消息了。

消费者端添加
channel.basic_qos(prefetch_count=1)
带消息持久化+公平分发的完整代码
生产者
import pika

#相当于声明一个socket

conn = pika.BlockingConnection(pika.ConnectionParameters('localhost'))

#声明一个管道

channel = conn.channel()

#声明queue

channel.queue_declare(queue='hello',durable=True)

channel.basic_publish(exchange='',

                      routing_key='hello',

                      body='Hello World!',

                      properties=pika.BasicProperties(

                          delivery_mode=2,

                      )

                      ) # routing_key 消息的key  body 消息的内容

print('Sent "hello world"')

conn.close()
消费者
import pika
#相当于声明一个socket
conn = pika.BlockingConnection(pika.ConnectionParameters('localhost')) #声明一个管道
channel = conn.channel() #声明queue 这里可以不用声明,但是如果消费者先运行,又不希望出错,就要消费者先运行
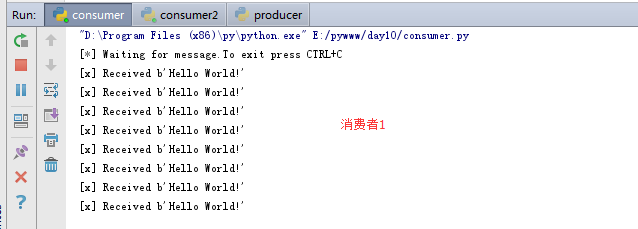
channel.queue_declare(queue='hello',durable=True) def callback(ch,method,properties,body):
print('[x] Received %r' % body )
ch.basic_ack(delivery_tag=method.delivery_tag)
channel.basic_qos(prefetch_count=1)
channel.basic_consume(callback, queue='hello' ) #消费消息 如果收到消息就调用CALLBACK函数处理 print('[*] Waiting for message.To exit press CTRL+C') channel.start_consuming() #开始收消息
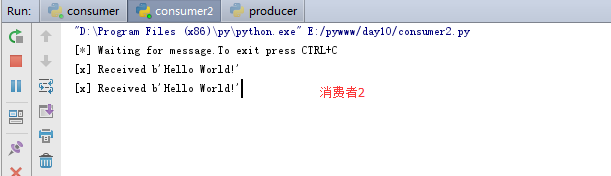
消费者2
import pika,time

#相当于声明一个socket

conn = pika.BlockingConnection(pika.ConnectionParameters('localhost'))

#声明一个管道

channel = conn.channel()

#声明queue  这里可以不用声明,但是如果消费者先运行,又不希望出错,就要消费者先运行

channel.queue_declare(queue='hello1',durable=True)

def callback(ch,method,properties,body):

    time.sleep(30)

    print('[x] Received %r' % body )

    ch.basic_ack(delivery_tag=method.delivery_tag)

channel.basic_qos(prefetch_count=1)

channel.basic_consume(callback, queue='hello1' ) #消费消息 如果收到消息就调用CALLBACK函数处理

print('[*] Waiting for message.To exit press CTRL+C')

channel.start_consuming() #开始收消息
消费者2 CALLBACK中sleep30s 在这个过程中 将不会接收到消息,那么消息会发送到消费者1
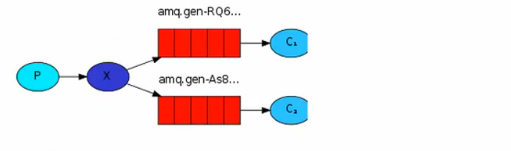
Publish\Subscribe(消息发布\订阅)
之前的例子都基本都是1对1的消息发送和接收,即消息只能发送到指定的queue里,但有些时候你想让你的消息被所有的Queue收到,类似广播的效果,这时候就要用到exchange了,
exchange是一个简单的东西,一端接收消息,另一端将消息推送到队列。exchange类型将决定这条消息是放到一个队列,还是很多队列,还是被删除。exchange 就像转发器。
exchange的类型:
fanout: 所有bind到此exchange的queue都可以就收消息。 纯广播 ,只要绑定exchange就可以接收到。
direct: 通过routingKey和exchange决定的那个唯一的queue可以接收消息。
topic 所有符合routingkey(此时可以是一个表达式)的routingkey所bind的queue可以接收消息。
headers 通过headers 来决定把消息发给哪些queue。
消息publisher 生产者
import pika

import sys

connection = pika.BlockingConnection(pika.ConnectionParameters(

    host='localhost'))

channel = connection.channel()

#发布方不需要声明queue 只需要有个exchange就可以了 , exchange_type 类型是 fanout

channel.exchange_declare(exchange='logs',exchange_type='fanout')

#message = ' '.join(sys.argv[1:]) or "info: Hello World!"

message = "info: Hello World!"

channel.basic_publish(exchange='logs',  # 发布广播的时候 exchange定义要一致

                      routing_key='',   #必须要写成空

                      body=message)     #发送的消息主体

print(" [x] Sent %r" % message)

connection.close()
消费者
import pika

connection = pika.BlockingConnection(pika.ConnectionParameters(

    host='localhost'))

channel = connection.channel()

channel.exchange_declare(exchange='logs', exchange_type='fanout') #exchange 转发器,exchange_type=fanout 绑定到这个转发器上的消费者都能接收到消息

result = channel.queue_declare(exclusive=True)  # 随机queue 不指定queue名字,rabbit会随机分配一个名字,exclusive=True会在使用此queue的消费者断开后,自动将queue删除

queue_name = result.method.queue #获取queueu的名字

channel.queue_bind(exchange='logs',  #绑定到这个转发器上,只能从这个转发器上接收

                   queue=queue_name)  #指定queue的名字 转发器把消息发送到这个queue上,消费者从这个queue上接收消息

print(' [*] Waiting for logs. To exit press CTRL+C')

def callback(ch, method, properties, body):

    print(" [x] %r" % body)

channel.basic_consume(callback,

                      queue=queue_name,

                      no_ack=True)

channel.start_consuming()
发送接收过程:
消费者要先在线,生产者发送消息,消费者才能接收到。
生产者

消费者1在线

消费者2在线

消费者3中断重新连接

广播并不会存下来,不在线就接收不到了。
有选择的接收消息(exchange type=direct)
RabbitMQ还支持根据关键字发送,即:队列绑定关键字,发送者将数据根据关键字发送到消息exchange,exchange根据 关键字 判定应该将数据发送至指定队列。

publisher
import pika

import sys

connection = pika.BlockingConnection(pika.ConnectionParameters(

        host='localhost'))

channel = connection.channel()

channel.exchange_declare(exchange='direct_logs',

                         type='direct')

severity = sys.argv[1] if len(sys.argv) > 1 else 'info'

message = ' '.join(sys.argv[2:]) or 'Hello World!'

channel.basic_publish(exchange='direct_logs',

                      routing_key=severity,

                      body=message)

print(" [x] Sent %r:%r" % (severity, message))

connection.close()
subscriber
import pika

import sys

connection = pika.BlockingConnection(pika.ConnectionParameters(

        host='localhost'))

channel = connection.channel()

channel.exchange_declare(exchange='direct_logs',

                         type='direct')

result = channel.queue_declare(exclusive=True)

queue_name = result.method.queue

severities = sys.argv[1:]

if not severities:

    sys.stderr.write("Usage: %s [info] [warning] [error]\n" % sys.argv[0])

    sys.exit(1)

for severity in severities:

    channel.queue_bind(exchange='direct_logs',

                       queue=queue_name,

                       routing_key=severity)

print(' [*] Waiting for logs. To exit press CTRL+C')

def callback(ch, method, properties, body):

    print(" [x] %r:%r" % (method.routing_key, body))

channel.basic_consume(callback,

                      queue=queue_name,

                      no_ack=True)

channel.start_consuming()
服务器端

消费者端

绑定哪个就能接收的哪个的消息。
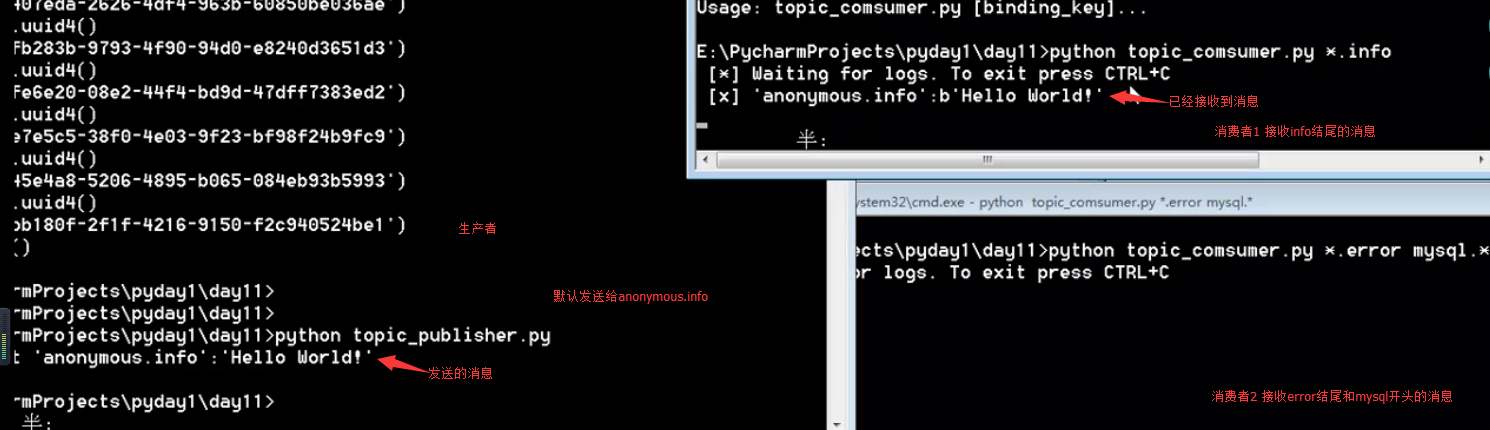
更细致的消息过滤(exchange type=topic)
上面的过滤条件是写死的,更细致的过滤条件就是在上面的基础上,对过滤参数的匹配。类似与正则匹配。

publisher
import pika

import sys

connection = pika.BlockingConnection(pika.ConnectionParameters(

        host='localhost'))

channel = connection.channel()

channel.exchange_declare(exchange='topic_logs',

                         type='topic')

routing_key = sys.argv[1] if len(sys.argv) > 1 else 'anonymous.info'

message = ' '.join(sys.argv[2:]) or 'Hello World!'

channel.basic_publish(exchange='topic_logs',

                      routing_key=routing_key,

                      body=message)

print(" [x] Sent %r:%r" % (routing_key, message))

connection.close()
subscriber
import pika

import sys

connection = pika.BlockingConnection(pika.ConnectionParameters(

        host='localhost'))

channel = connection.channel()

channel.exchange_declare(exchange='topic_logs',

                         type='topic')

result = channel.queue_declare(exclusive=True)

queue_name = result.method.queue

binding_keys = sys.argv[1:]

if not binding_keys:

    sys.stderr.write("Usage: %s [binding_key]...\n" % sys.argv[0])

    sys.exit(1)

for binding_key in binding_keys:

    channel.queue_bind(exchange='topic_logs',

                       queue=queue_name,

                       routing_key=binding_key)

print(' [*] Waiting for logs. To exit press CTRL+C')

def callback(ch, method, properties, body):

    print(" [x] %r:%r" % (method.routing_key, body))

channel.basic_consume(callback,

                      queue=queue_name,

                      no_ack=True)

channel.start_consuming()

python RabbitMQ广播的更多相关文章
- Python之路-python(rabbitmq、redis)
一.RabbitMQ队列 安装python rabbitMQ module pip install pika or easy_install pika or 源码 https://pypi.pytho ...
- python RabbitMQ队列/redis
RabbitMQ队列 rabbitMQ是消息队列:想想之前的我们学过队列queue:threading queue(线程queue,多个线程之间进行数据交互).进程queue(父进程与子进程进行交互或 ...
- python RabbitMQ队列使用(入门篇)
---恢复内容开始--- python RabbitMQ队列使用 关于python的queue介绍 关于python的队列,内置的有两种,一种是线程queue,另一种是进程queue,但是这两种que ...
- python RabbitMQ队列使用
python RabbitMQ队列使用 关于python的queue介绍 关于python的队列,内置的有两种,一种是线程queue,另一种是进程queue,但是这两种queue都是只能在同一个进程下 ...
- Python RabbitMQ消息队列
python内的队列queue 线程 queue:不同线程交互,不能夸进程 进程 queue:只能用于父进程与子进程,或者同一父进程下的多个子进程,进行交互 注:不同的两个独立进程是不能交互的. ...
- python Rabbitmq编程(一)
python Rabbitmq编程(一) 实现最简单的队列通信 send端 #!/usr/bin/env python import pika credentials = pika.PlainCred ...
- python rabbitMQ 发送端和接收端广播模式。
消费者模型: import pika,time consumer = pika.BlockingConnection\ (pika.ConnectionParameters('localhost')) ...
- RabbitMQ广播:direct模式
一. 消息的广播需要exchange:exchange是一个转发器,其实把消息发给RabbitMQ里的exchange fanout: 所有bind到此exchange的queue都可以接收消息,广播 ...
- Python Rabbit 广播模式
Exchange 在RabbitMQ下进行广播模式需要用到,exchange这个参数,它会把发送的消息推送到queues队列中,exchange必须要知道,它接下来收到的消息要分给谁,是要发给一个qu ...
随机推荐
- mp4 格式无法使用html5的video标签播放
只有视频编码为h264的视频才能在html5中使用video标签播放 我的解决方法为:下载魔影工厂,按照如下图所示步骤操作: width:600px;
- 一分钟看懂Docker的网络模式和跨主机通信
文章转载自:http://www.a-site.cn/article/169899.html Docker的四种网络模式Bridge模式 当Docker进程启动时,会在主机上创建一个名为docke ...
- docker安装mongo初体验
1.docker安装在此不做介绍,请自行百度:个人环境是在windows下运行cmd执行docker命令2.打算在docker下安装使用mongo,顺带熟悉docker,拉开篇章3.docker下安装 ...
- CMS: DNN And Umbraco
在比较了众多CMS系统后,还是把焦点定在DNN和Umbraco两个系统上,这两个系统都可以使用UserControl扩展自己需要的功能. DNN的架构比较复杂,Module.Skin.Containe ...
- 批量修改dos文件到unix
1. 安装dos2unix 2. 执行:find ./ -type f | xargs dos2unix
- PHP读取文件的多种方法
1.传统的方法 fopen, fclose feof:file.end of file 例子: $file_handle = fopen("c:\\myfile.txt", &qu ...
- Android Studio修改程序包名
我也是在网上看到的,并且这个方法只能这么修改:cn.example.xxx修改为cn.example.yyy ,修改到根目录下... refactor---rename修改 然后clean,buil ...
- 解决Eclipse中Android SDK Manager图标不见了的问题
在Eclipse中安装完ADT后,发现 Android SDK Manager图标不见了,Android Virtual Device Manager图标也不见了. 解决这个问题,可用如下方法: 打开 ...
- Mybatis-动态SQL语句
有些时候,sql语句where条件中,需要一些安全判断,例如按某一条件查询时如果传入的参数是空,此时查询出的结果很可能是空的,也许我们需要参数为空时,是查出全部的信息.使用Oracle的序列.mysq ...
- 计算F1Score
计算F1Score predictions = pval < epsilon fp = sum((predictions == 1) & (y == 0)) fn = sum((pred ...