延申三大问题中的第二个问题处理---收集查看k8s中pod的控制台日志
1.不使用logstash
2.步骤:
2.1 先获取一个文件的日志
2.2 再获取多个文件的日志
2.3 批量获取文件日志
pod日志文件路径
[root@worker hkd-eureka]# pwd/var/log/pods/test_cloud-eureka-0_26292b87-08d2-495e-a141-81304dd9ef07/hkd-eureka[root@worker hkd-eureka]# ll总用量 0lrwxrwxrwx 1 root root 165 7月 7 09:23 0.log -> /var/lib/docker/containers/24a1f5bc57a81fc61043ebc0ce4daff859096a8c026bf54497d434bdc538e7ee/24a1f5bc57a81fc61043ebc0ce4daff859096a8c026bf54497d434bdc538e7ee-json.log
2.1 先获取一个文件的日志
filebeat.yml文件配置
filebeat.inputs:- type: logenabled: truepaths:- /var/log/pods/test_cloud-eureka-*/*/*.logsymlinks: truefileds:level: eurekafields_under_root: truejson.keys_under_root: truejson.add_error_key: truejson.message_key: logtail_files: truemultiline.pattern: '^[0-9]{4}-[0-9]{2}-[0-9]{2}'multiline.negate: truemultiline.match: aftermultiline.timeout: 10soutput.elasticsearch:hosts: ["192.168.75.21:9200"]username: "elastic"password: "IjGj8QwWYeXY7rVoLLQ6"
es的Discover中查看
{"_index": "filebeat-7.5.0","_type": "_doc","_id": "7KAaJ3MBSoQZ5wHWGij-","_version": 1,"_score": null,"_source": {"@timestamp": "2020-07-07T02:28:03.237Z","ecs": {"version": "1.1.0"},"container": {"id": "hkd-eureka"},"log": {"offset": 238675,"file": {"path": "/var/log/pods/test_cloud-eureka-0_26292b87-08d2-495e-a141-81304dd9ef07/hkd-eureka/0.log"}},"stream": "stdout","time": "2020-07-07T02:28:02.722603324Z","input": {"type": "log"},"host": {"name": "worker","os": {"platform": "centos","version": "7 (Core)","family": "redhat","name": "CentOS Linux","kernel": "3.10.0-1062.el7.x86_64","codename": "Core"},"id": "a392797746874909a0980d75e417dc04","containerized": false,"hostname": "worker","architecture": "x86_64"},"agent": {"version": "7.5.0","type": "filebeat","ephemeral_id": "411e333b-208a-44e7-9ae0-6d4ae4b6e694","hostname": "worker","id": "d45e4661-8b64-4ee5-8d63-884e20096aee"}},"fields": {"@timestamp": ["2020-07-07T02:28:03.237Z"],"time": ["2020-07-07T02:28:02.722Z"]},"sort": [1594088883237]}
查看日志可以发现,filebeat中配置的fields.level没有生效,同时日志中有一个container.id,这个正好是容器名称,这样的话那就没必要在filebeat中新增fields.level了,直接根据container.id来区分不同的pod日志来源
同时还有个重大问题,里面没有日志数据,这俩问题还需要进一步处理
改造filebeat.yml配置文件
filebeat.inputs:- type: logenabled: truepaths:- /var/log/pods/test_cloud-eureka-*/*/*.logsymlinks: truesetup.ilm.enabled: falsesetup.template.settings:index.number_of_shards: 1index.number_of_replicas: 0index.codec: best_compressionoutput.elasticsearch:hosts: ["192.168.75.21:9200"]indices:- index: "hkd-eureka_%{+yyyy.MM.dd}"when.equals:container.id: "hkd-eureka"username: "elastic"password: "IjGj8QwWYeXY7rVoLLQ6"
改造后es中Discover日志查看结果
{"_index": "hkd-eureka_2020.07.07","_type": "_doc","_id": "W6BAJ3MBSoQZ5wHWHSto","_version": 1,"_score": null,"_source": {"@timestamp": "2020-07-07T03:09:41.177Z","input": {"type": "log"},"agent": {"id": "d45e4661-8b64-4ee5-8d63-884e20096aee","version": "7.5.0","type": "filebeat","ephemeral_id": "823fd876-9983-4382-91f7-bc9a263962c7","hostname": "worker"},"ecs": {"version": "1.1.0"},"host": {"name": "worker","architecture": "x86_64","os": {"family": "redhat","name": "CentOS Linux","kernel": "3.10.0-1062.el7.x86_64","codename": "Core","platform": "centos","version": "7 (Core)"},"id": "a392797746874909a0980d75e417dc04","containerized": false,"hostname": "worker"},"container": {"id": "hkd-eureka"},"log": {"offset": 372774,"file": {"path": "/var/log/pods/test_cloud-eureka-0_26292b87-08d2-495e-a141-81304dd9ef07/hkd-eureka/0.log"}},"message": "{\"log\":\"2020-07-07 11:09:40.862 INFO 1 --- [a-EvictionTimer] c.n.e.r.AbstractInstanceRegistry : Running the evict task with compensationTime 3ms\\n\",\"stream\":\"stdout\",\"time\":\"2020-07-07T03:09:40.865567577Z\"}"},"fields": {"@timestamp": ["2020-07-07T03:09:41.177Z"]},"sort": [1594091381177]}
可以看到有message字段了,也就是pod日志文件中的日志数据
2.2 再获取多个文件的日志
针对多个文件的配置
filebeat.inputs:- type: logenabled: truepaths:- /var/log/pods/test_cloud-eureka-*/*/*.logsymlinks: true- type: logenabled: truepaths:- /var/log/pods/test_cloud-config-*/*/*.logsymlinks: truesetup.ilm.enabled: falsesetup.template.settings:index.number_of_shards: 1index.number_of_replicas: 0index.codec: best_compressionoutput.elasticsearch:hosts: ["192.168.75.21:9200"]indices:- index: "filebeat-hkd-eureka_%{+yyyy.MM.dd}"when.equals:container.id: "hkd-eureka"- index: "filebeat-hkd-config_%{+yyyy.MM.dd}"when.equals:container.id: "hkd-config"username: "elastic"password: "IjGj8QwWYeXY7rVoLLQ6"
多个文件的es中Discover日志查看
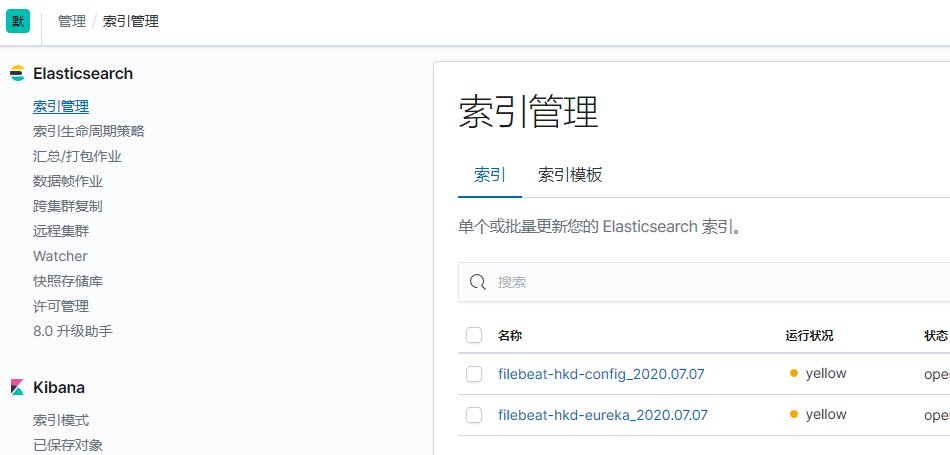
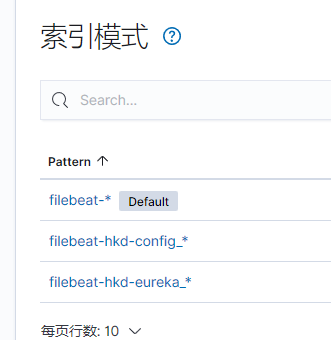
{"_index": "filebeat-hkd-eureka_2020.07.07","_type": "_doc","_id": "66B4J3MBSoQZ5wHWJjKY","_version": 1,"_score": null,"_source": {"@timestamp": "2020-07-07T04:10:53.451Z","container": {"id": "hkd-eureka"},"log": {"offset": 166290,"file": {"path": "/var/log/pods/test_cloud-eureka-0_6a964a51-f1de-4b5a-8cc4-03b495c42e82/hkd-eureka/0.log"}},"message": "{\"log\":\"2020-07-07 12:10:52.750 INFO 1 --- [a-EvictionTimer] c.n.e.r.AbstractInstanceRegistry : Running the evict task with compensationTime 0ms\\n\",\"stream\":\"stdout\",\"time\":\"2020-07-07T04:10:52.751269899Z\"}","input": {"type": "log"},"ecs": {"version": "1.1.0"},"host": {"containerized": false,"name": "worker","hostname": "worker","architecture": "x86_64","os": {"version": "7 (Core)","family": "redhat","name": "CentOS Linux","kernel": "3.10.0-1062.el7.x86_64","codename": "Core","platform": "centos"},"id": "a392797746874909a0980d75e417dc04"},"agent": {"type": "filebeat","ephemeral_id": "cea92563-33c5-450e-baf1-0dc1eb3059ca","hostname": "worker","id": "db1fe7ec-6e4e-468b-a9d9-d28e6a695b09","version": "7.5.0"}},"fields": {"@timestamp": ["2020-07-07T04:10:53.451Z"]},"sort": [1594095053451]}########################## 分割线 ##################################################{"_index": "filebeat-hkd-config_2020.07.07","_type": "_doc","_id": "xqB1J3MBSoQZ5wHW7jI5","_version": 1,"_score": null,"_source": {"@timestamp": "2020-07-07T04:08:28.817Z","container": {"id": "hkd-config"},"log": {"file": {"path": "/var/log/pods/test_cloud-config-0_cca3f5ee-16f1-44b4-9306-11d65e5ffc54/hkd-config/0.log"},"offset": 42984},"message": "{\"log\":\"2020-07-07 12:08:19.752 INFO 1 --- [trap-executor-0] c.n.d.s.r.a.ConfigClusterResolver : Resolving eureka endpoints via configuration\\n\",\"stream\":\"stdout\",\"time\":\"2020-07-07T04:08:19.753343937Z\"}","input": {"type": "log"},"host": {"name": "worker","hostname": "worker","architecture": "x86_64","os": {"version": "7 (Core)","family": "redhat","name": "CentOS Linux","kernel": "3.10.0-1062.el7.x86_64","codename": "Core","platform": "centos"},"id": "a392797746874909a0980d75e417dc04","containerized": false},"agent": {"type": "filebeat","ephemeral_id": "cea92563-33c5-450e-baf1-0dc1eb3059ca","hostname": "worker","id": "db1fe7ec-6e4e-468b-a9d9-d28e6a695b09","version": "7.5.0"},"ecs": {"version": "1.1.0"}},"fields": {"@timestamp": ["2020-07-07T04:08:28.817Z"]},"sort": [1594094908817]}
2.3 批量获取文件日志
在不使用logstash的情况下,暂时没有想到啥好办法能获取到指定索引,所以这次是获取所有日志文件写入到一个索引文件中,区分查找的话根据container.id字段的值进行操作
同时也提供了一个思路,在使用logstash的情况下,可以根据container.id的值来区分开不同的日志来源,并创建使用相对应的索引,这个有待后续研究
filebeat.yml配置文件
filebeat.inputs:- type: logenabled: truepaths:- /var/log/pods/*/*/*.logsymlinks: trueoutput.elasticsearch:hosts: ["192.168.75.21:9200"]username: "elastic"password: "IjGj8QwWYeXY7rVoLLQ6"
es中discover日志查看
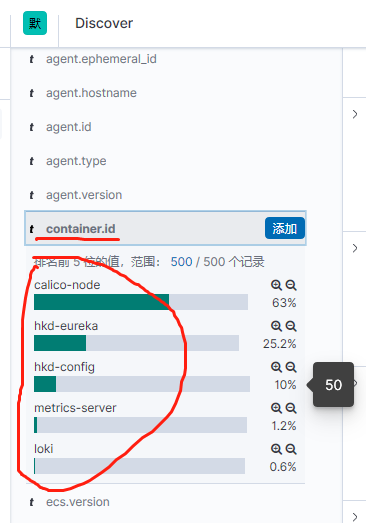
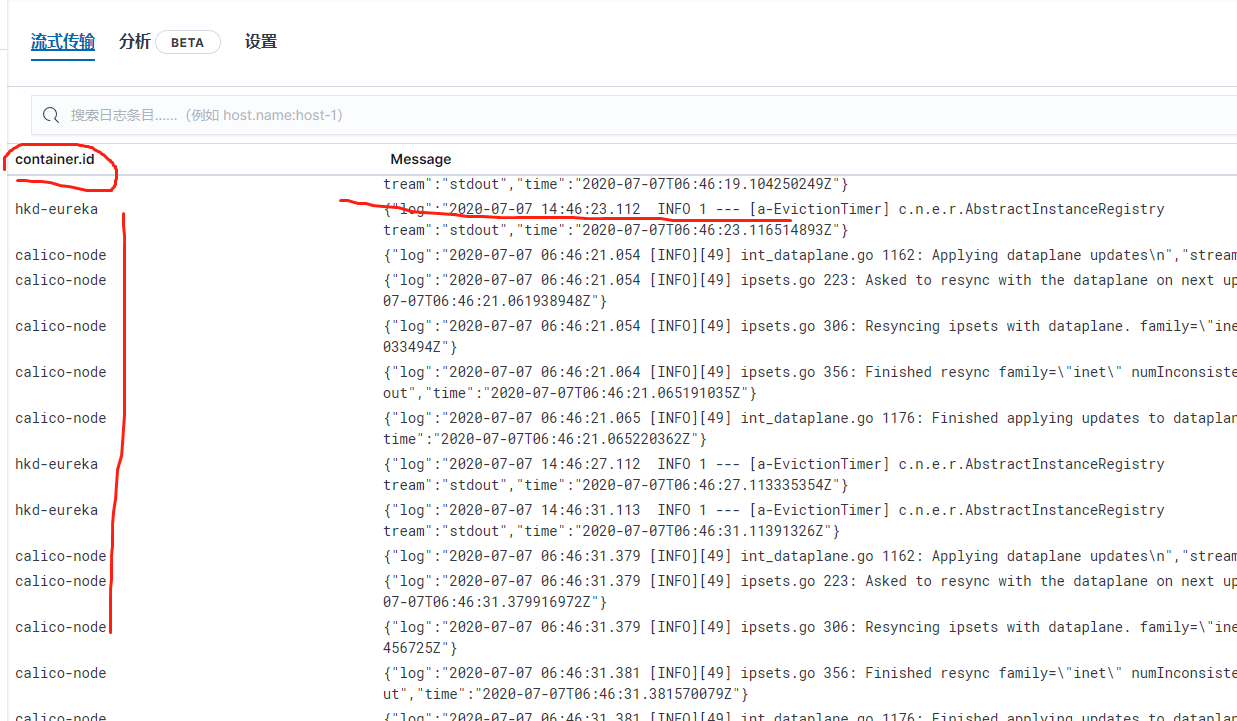
使用logstash处理日志来源并在es中创建相应的索引文件
filebeat.yml配置文件
filebeat.inputs:- type: logenabled: truepaths:- /var/log/pods/*/*/*.logsymlinks: trueoutput.logstash:hosts: ["192.168.75.21:5044"]
logstash配置文件:./config/conf.d/pods.conf
input {beats {port => "5044"}}output {#stdout {# codec => rubydebug#}elasticsearch {hosts => ["192.168.75.21:9200"]index => "%{[container][id]}-%{+yyyy.MM.dd}" # 注意这个数据user => "elastic"password => "IjGj8QwWYeXY7rVoLLQ6"}}
效果展示:
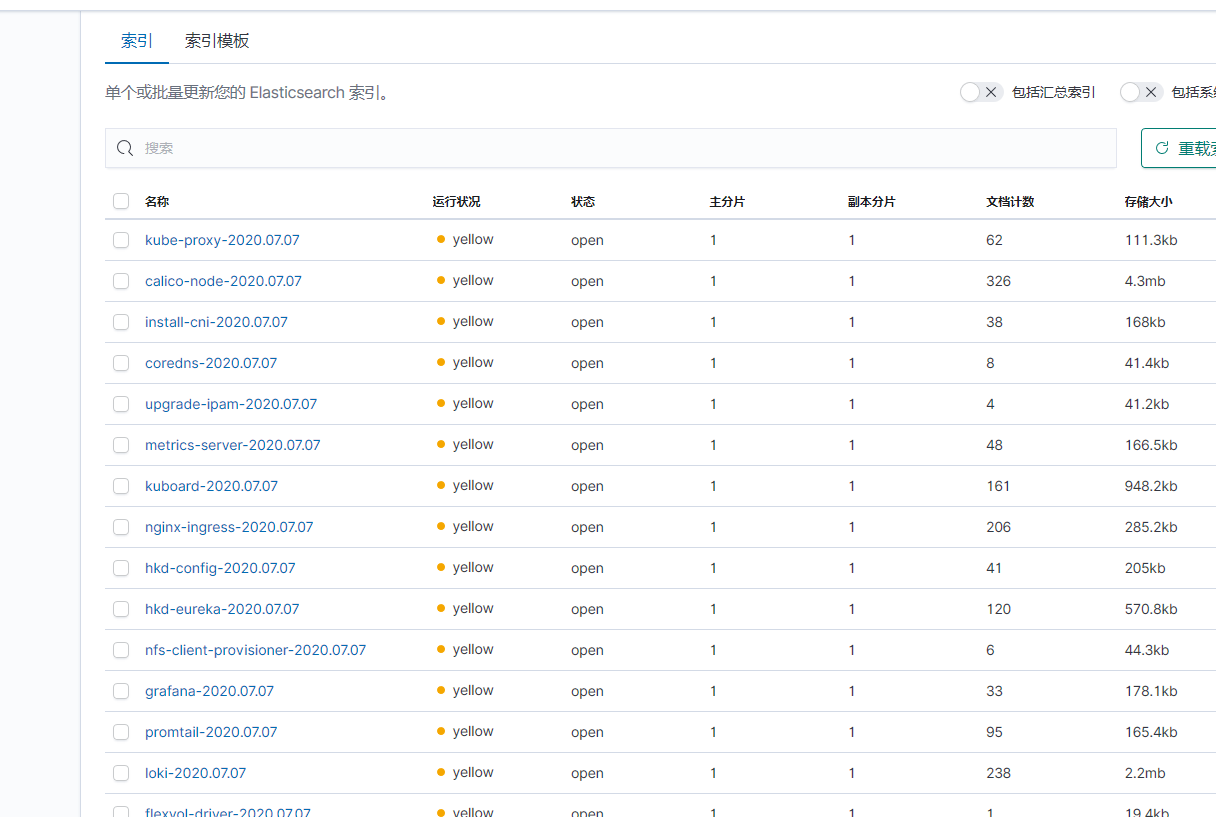
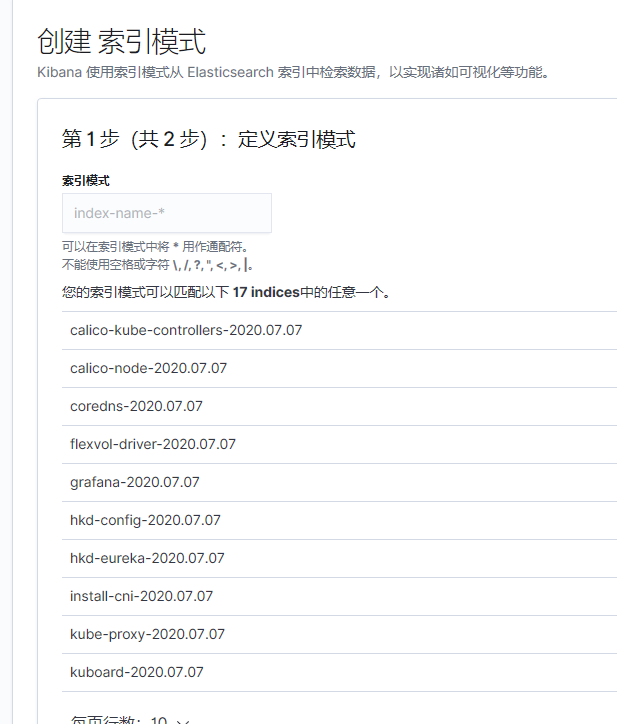
稍微延申一下,多个日志文件的话也可以使用logstash来这样处理
算是不怎么完美的解决这个问题了。
延申三大问题中的第二个问题处理---收集查看k8s中pod的控制台日志的更多相关文章
- 延申三大问题中的第三个问题处理---发布更新时先把服务从注册中心给down下来,等待一段时间后再能更新模块
一开始采取的思路大致如下: 在preStop中使用/bin/sh命令,先down 然后sleep一段时间, 这种思路的执行情况如下: 假若升级容器使用的镜像版本的话,先执行preStop中的命令,sl ...
- 查看k8s中etcd数据
#查看etcd pod kubectl get pod -n kube-system | grep etcd #进入etcd pod kubectl exec -it -n kube-system e ...
- 延申三大问题中的第一个问题处理---原先shell脚本中启动jar文件命令的配置,附加参数等
经过一系列的试错,最终采用的解决办法如下: 采用的配置文件 附加的启动参数 或者把这些都给统一添加到ConfigMap中
- Gradle查看Project中的所有 Task
查看Project中所有的Task:$ gradle tasks 查看Project中所有的properties:$ gradle properties 如: 参照了: https://www.jia ...
- Effective Objective-C 2.0 — 第二条:类的头文件中尽量少引入其他头文件
第二条:类的头文件中尽量少引入其他头文件 使用向前声明(forward declaring) @class EOCEmployer 1, 将引入头文件的实际尽量延后,只在确有需要时才引入,这样就可以减 ...
- 在SQL SERVER中获取表中的第二条数据
在SQL SERVER中获取表中的第二条数据, 思路:先根据时间逆排序取出前2条数据作为一个临时表,再按顺时排序在临时表中取出第一条数据 sql语句如下: select top 1 * from(se ...
- 剑指Offer:从第一个字符串中删除第二个字符串中出现过的所有字符
// 从第一个字符串中删除第二个字符串中出现过的所有字符 #include <stdio.h> char* remove_second_from_first( char *first, c ...
- Python之路【第二十篇】:待更新中.....
Python之路[第二十篇]:待更新中.....
- Python开发【第二十三篇】:持续更新中...
Python开发[第二十三篇]:持续更新中...
随机推荐
- Bash脚本debug攻略
初学Bash时, 我从未想过想过bash也能debug, 也从未想过去debug Bash脚本. 随着技术的增长, 写的脚本越来越复杂, 使用echo打印日志来调试脚本的方式越来越捉襟见肘了. 直到某 ...
- 牛客SQL刷题第三趴——SQL大厂面试真题
01 某音短视频 SQL156 各个视频的平均完播率 [描述]用户-视频互动表tb_user_video_log.(uid-用户ID, video_id-视频ID, start_time-开始观看时间 ...
- surging作者出具压测结果
前言 首先回应下@wen-wen 所贴的压测报告,我也把我和客户压测碰到的问题,和压测结果贴出来,这个结果是由客户提供的.不会有任何的舞弊手脚问题 问题一:Task.Run慎用 首先在最新的社区版本已 ...
- 从零开始在centos搭建博客(二)
本篇为备份篇. 因为装的东西不多,所以需要备份的只有mysql和wordpress的文件夹. 备份mysql mysql备份命令 使用mysqldump命令,格式如下: # 这是格式 mysqldum ...
- 解气!哈工大被禁用MATLAB后,国产工业软件霸气回击
提起哈尔滨工业大学,相信很多人都不会陌生. 它是中国顶级的C9院校之一,从1920年建校的百余年来,哈工大一直享誉"工科强校"的美称,因其在航天领域的不凡成就,更是被人们誉为&qu ...
- Lambda表达式无参数无返回值的练习和Lambda表达式有参数有返回值的练习
题目: 给定一个厨子Cook接口,内容唯一的抽象方法makeFood,且无参数.无返回值.如下: public interface Cook{ void makeFood(); } 在下面的代碼中,使 ...
- Linux上安装java
1,输入命令,查看是否已经安装了Openjdk:rpm -qa | grep java 如果有已经安装的java版本或者版本低于1.7,卸载该jdk:rpm -e 软件包名字 如果不能卸载,可以加上 ...
- javascript相邻节点元素获取
<script> window.onload = function () { var myLinkItem = document.getElementById('linkItem'); v ...
- 5.6 NOI模拟
\(5.6\ NOI\)模拟 明天就母亲节了,给家里打了个电话(\(lj\ hsez\)断我电话的电,在宿舍打不了,只能用教练手机打了) 其实我不是很能看到自己的\(future,\)甚至看不到高三的 ...
- 【原创】医鹿APP九价HPV数据抓包分析
本文所有教程及源码.软件仅为技术研究.不涉及计算机信息系统功能的删除.修改.增加.干扰,更不会影响计算机信息系统的正常运行.不得将代码用于非法用途,如侵立删! 医鹿APP九价HPV数据抓包分析 操作环 ...
