How to enable $Admin Shares in Windows 7
Quote from: http://www.wintips.org/how-to-enable-admin-shares-windows-7/
As “Administrative shares” are defined all the default network shares that can be accessed remotely only from network administrators. The Admin shares are hidden and they are disabled by default in a Windows 7 based computers in order to prevent unauthorized users to access or modify them through a network environment.
In this tutorial, we explain how to SECURELY enable Admin$ shares for your disk volumes (C$, D$, etc.) on a Windows 7 based computer, so they will be accessible (from another computer on your network) only by specific users.

Step 1: Ensure that both computers belong to the same Workgroup.
To check if both computers belong to the same workgroup, do the following:
Malwarebytes™ Protection Removes Spyware, Adware & Malware. Start Your Free Download Now!
1. Right-click on “Computer-Name” icon on your desktop and choose “Properties” or (additionally) navigate to Windows Control Panel, choose “System and Security” and select “System”,

2. Look at “WORKGROUP” name at the right and ensure that it is the same name on both computers (e.g. WORKGROUP)

Step 2: Specify which user(s) can access the Admin Shares (Disk Volumes).
The Administrative shares can be (and must be) accessed from Administrator users only. So if you want a user from your network to be able to access Admin($) shares, you must give to this user local Administrative rights on the computer that you want to enable Admin shares. To do that:
1. Go to your Windows control panel (“Start” > “Control Panel”).
2. Open “Add or remove user accounts”

3. Now create a new account on your computer with Administrative privileges. Additionally, if you have already setup an account, ensure that he has Administrator privileges (choose the Account you want, select “Change the account type” option and set him as “Administrator”).

4. Give a username for your new account (e.g. user), set it up as an Administrator user and press “Create Account” button.
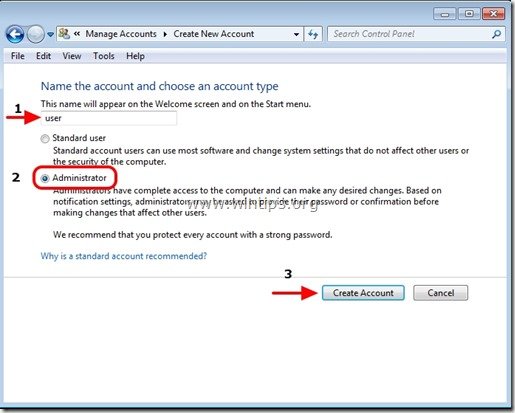
5. At this point the “Manage Accounts” options window should look like this:
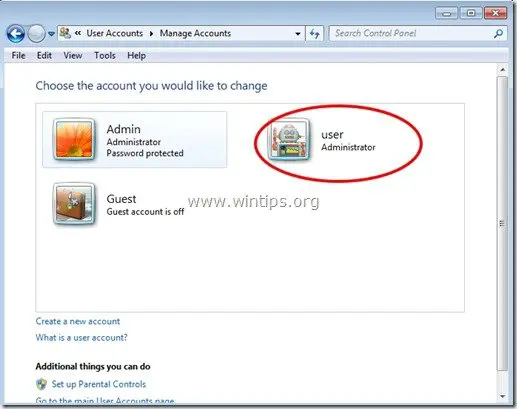
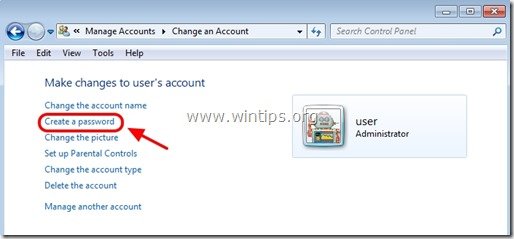
6. After you create your account your must specify a password. So click on the new account (e.g. user) and press “Create a password”.
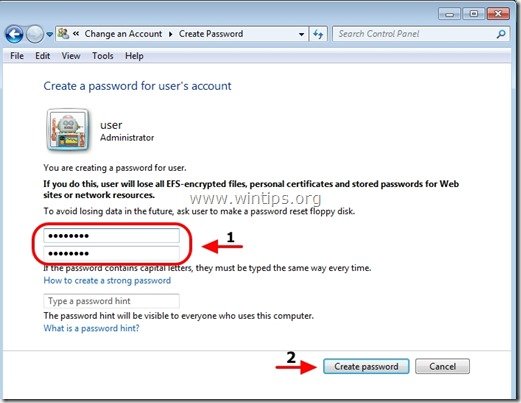
7. Type a strong password (2 times) and press “Create password” button.
Step 3: Enable “File and print sharing” through Windows Firewall.
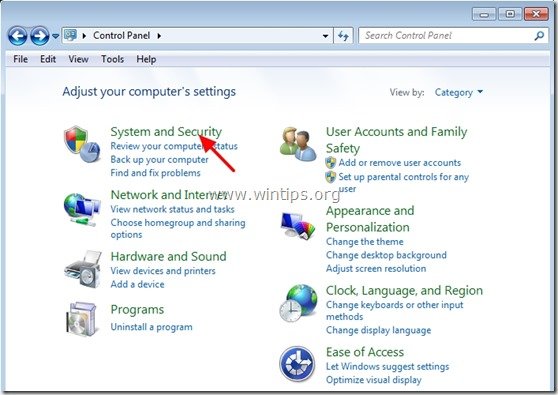
1. Navigate to Windows control panel and click on “System and Security”.
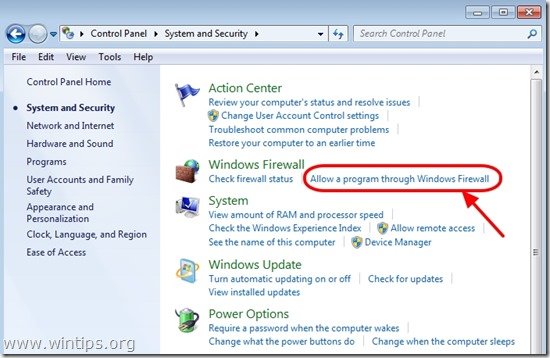
2. On “Windows Firewall” section, press the “Allow a program through Windows Firewall” option.
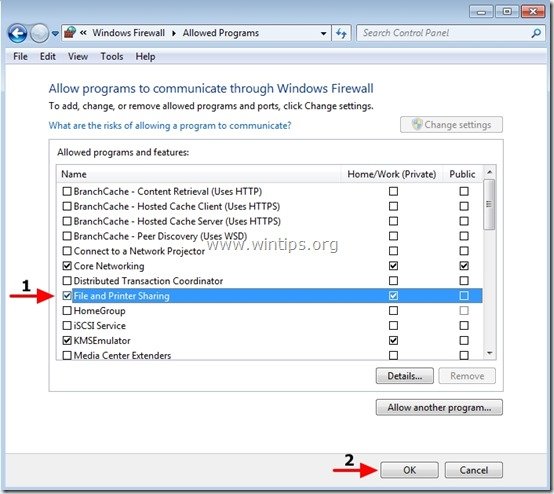
3. In”Allowed programs and features” list, check to enable the “File and Printer Sharing” feature and press “OK”.
4. Restart your computer (Optionally).
Step 4. Check if you can access the admin shares from another computer.
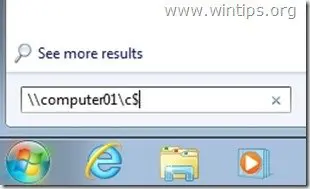
1. From another computer press the “Start” buton and in the search box type the following command:
“\\<ComputerName>\<DiskVolumeName>$” (without the quotes) and hit “Enter”.
Note: As “<ComputerName>” put the name of the computer with the Admin Shares enabled on it (e.g. “Computer01”) and as “<DiskVolumeName>” put the name of the volume that you want to access, (e.g. “C$” = Disk Volume C:\ , “D$” = Disk Volume D:\, etc.)
2. Now type the username & the password to access the remote computer’s admin shares (as specified in Step 1) & hit “Enter”.

3. If you follow the above steps as described, then you can access the remote computer’s admin shares without any problems.
Step 5: Modify registry settings on the computer with the Admin Shares Enabled(Optional)
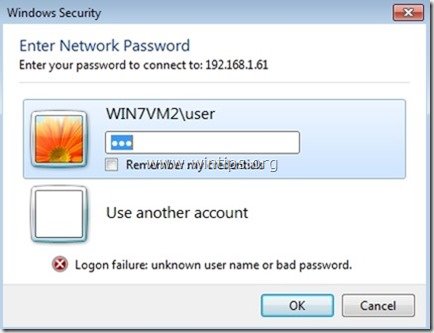
Note: Perform this step ONLY if you face problems/errors when you try to access Admin Shares (e.g.logon failure).
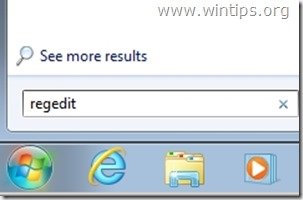
1. Go to the remote computer (with the Admin Shares enabled on it) and open Registry Editor. To do that, press “Start” button and in the search box type “regedit” and hit “Enter”.
2. In registry editor navigate to the following path:
“HKEY_LOCAL_MACHINE\SOFTWARE\Microsoft\Windows\CurrentVersion\Policies\System”
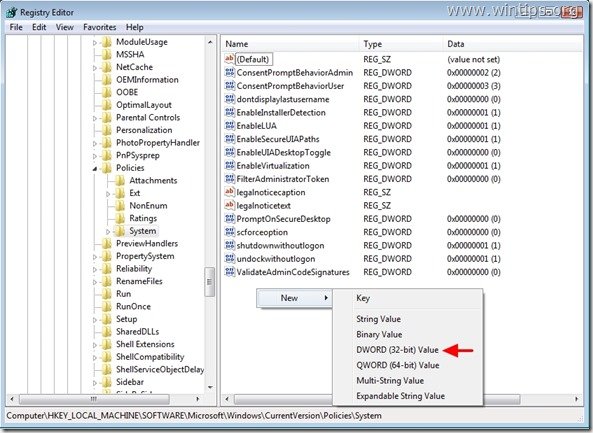
3. Right-click on the right pane and choose “New” > “DWORD (32-bit) Value”.
4. Type the “LocalAccountTokenFilterPolicy” for value name and press “Enter”.
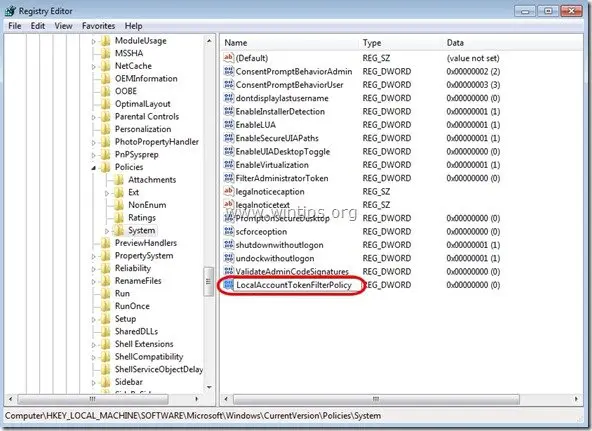
5. Double click on “LocalAccountTokenFilterPolicy” value to modify the “Value Data” from “0” to “1” and press “OK”
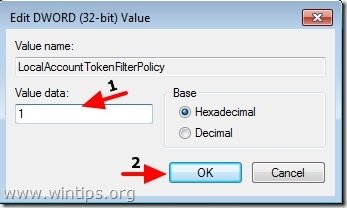
6. Exit Registry Editor and try again to access administrative shares on the remote computer.
How to enable $Admin Shares in Windows 7的更多相关文章
- Connecting to Shares And Common Shares
Now that you have these shares, how do people use them? Assuming that you have a share called Apps o ...
- 将windows下的PLSQL转移到Ubuntu上
1,首先下载安装wine,安装不成功的更新下源即可. 2,Ctal+Alt+T 打开控制台: cd ~/.wine/drive_c mkdir -p oracle/bin mkdir -p oracl ...
- Windows突破远程连接最大数去掉限制登录
当对方设置最大连接数 超过限制时 可以用这个命令 win+r 输入 mstsc /v:192.168.18.131:3389 /console windows server 2003 sp2 以 ...
- Windows Server体验之管理
安装了只有命令行界面的Windows Server之后怎么去管理,对于传统的Windows管理员来说确实是比较棘手的.因为没有了图形化的管理界面,需要更多的去依赖Powershell或者cmd命令去做 ...
- Total Commander 8.52 Beta 1
Total Commander 8.52 Beta 1http://www.ghisler.com/852_b1.php 10.08.15 Release Total Commander 8.52 b ...
- smb.conf - Samba组件的配置文件
总览 SYNOPSIS smb.conf是Samba组件的配置文件,包含Samba程序运行时的配置信息.smb.conf被设计成可由swat (8)程序来配置和管理.本文件包含了关于smb.conf的 ...
- BlackArch-Tools
BlackArch-Tools 简介 安装在ArchLinux之上添加存储库从blackarch存储库安装工具替代安装方法BlackArch Linux Complete Tools List 简介 ...
- PTH的几种食用姿势
PTH PTH(pass the hash)也叫做hash传递.在内网渗透中是一种很经典的攻击方式,原理就是攻击者可以直接通过NTLM Hash(mimikatz或其他手段抓取到的密码hash)访问远 ...
- oracle 学习
一.数据库语言部分1. SQL语言:关系数据库的标准语言2. PL/SQL:过程化语言Procedural Language3. SQL*Plus:简单的报表,操作系统接口 4. Oracle 8.0 ...
随机推荐
- 【转】来自《轻松scrum之旅》的敏捷开发总结
敏捷开发的核心价值观是,软件开发最重要的是给用户提供有价值的.可以工作的软件.如何保证提供有价值的软件,是通过反馈机制来完成的.这一点,我们体会很深.自从采用敏捷开发以后,我们比以前更有意识地希望得到 ...
- BZOJ 1028: [JSOI2007]麻将 暴力
1028: [JSOI2007]麻将 Time Limit: 1 Sec Memory Limit: 256 MB 题目连接 http://www.lydsy.com/JudgeOnline/prob ...
- 【Java】推断文件的后缀名
这本来不是一个问题,利用框架本来有的方法.或者File类的getPath()方法,取出要推断文件路径.或者getName()方法取出文件路径,成为一个String字符串如果为fileName之后,再对 ...
- Android中定时器的3种实现方法
原文:http://blog.csdn.net/wulianghuan/article/details/8507221 在Android开发中,定时器一般有以下3种实现方法: 一.采用Handler与 ...
- wcf-1
1.WCF是什么? WindowsCommunication Foundation(WCF)是由微软发展的一组数据通信的应用程序开发接口,它是.NET框架的一部分,由.NET Framework 3. ...
- C 双向链表
单链表的结点都只有一个指向下一个结点的指针 单链表的数据元素无法直接访问其前驱元素 逆序访问单链表中的元素是极其耗时的操作! len = LinkList_Length(list); for (i=l ...
- [C++知识点]2015.4.18
1.“static_cast/强制转换”后普通函数.虚函数的表现 A基类 B子类 实例aPtr:将B实例强制抓换得到的A实例 实例bPtr:将A实例强制转换得到的B实例 总结: (1) aPtr因为是 ...
- 0x800a1391-Microsoft Jscript "JSON未定义"
本人在进行调试代码是遇到以下问题: 在运行到var result = JSON.parse(data);这句时,报错:JSON未定义.如下图:
- javascript数据结构和算法[转]
字符串表示的数组 join() 和 toString() 函数返回数组的字符串表示.这两个函数通过将数组中的元素用逗号分隔符分割,返回字符串数组表示. 这里有个例子: var names = [&qu ...
- [未完成]关于枚举(Enum)
今天总结一下枚举相关的知识.先附一段关于枚举的代码: package org.talend.core.model.param; import org.talend.core.i18n.Messages ...
