使用jQuery.FileUpload插件和服Backload组件自定义上传文件夹
在零配置情况下,文件的上传文件夹是根目录下的Files文件夹,如何自定义文件的上传文件夹呢?
□ 在web.config中配置
1: <configuration>
2: <configSections>
3: ...
4: <section name="backload" type="Backload.Configuration.BackloadSection, Backload, Version=1.9.3.1, Culture=neutral, PublicKeyToken=02eaf42ab375d363" requirePermission="false" />
5: </configSections>
6:
7: <backload xmlns:xsi="http://www.w3.org/2001/XMLSchema-instance" xmlns:name="urn:fileupload-schema" xsi:noNamespaceSchemaLocation="Web.FileUpload.xsd">
8: <fileSystem filesRoot="~/Uploads" />
9: </backload>
10:
11: </configuration>
Version可以通过右键程序集属性中查到。
PublicKeyToken可以通过反编译器,比如Reflector查到。
□ 注销BackloadDemoController的Index方法
1: using System.Web.Mvc;
2:
3: namespace MvcApplication6.Controllers
4: {
5: public class BackloadDemoController : Controller
6: {
7: // GET: /BackupDemo/
8: //public ActionResult Index()
9: //{
10: // return View();
11: //}
12: }
13: }
14:
□ 让BaseController继承BackloadDemoController,并注销Index方法
1: using System.Web.Mvc;
2:
3: namespace MvcApplication6.Controllers
4: {
5: public class BaseController : BackloadDemoController
6: {
7: //public ActionResult Index()
8: //{
9: // return View();
10: //}
11: }
12: }
□ 让HomeController继承BaseController
1: using System.Web.Mvc;
2:
3: namespace MvcApplication6.Controllers
4: {
5: public class HomeController : BaseController
6: {
7: public ActionResult Index()
8: {
9: return View();
10: }
11: }
12: }
13:
□ _Layout.cshtml视图
1: <!DOCTYPE html>
2: <html>
3: <head>
4: <meta charset="utf-8" />
5: <meta name="viewport" content="width=device-width" />
6: <title>@ViewBag.Title</title>
7: @Styles.Render("~/Content/css")
8: @Styles.Render("~/Content/themes/base/css")
9: @Styles.Render("~/bundles/fileupload/bootstrap/BasicPlusUI/css")
10: @Scripts.Render("~/bundles/modernizr")
11:
12: </head>
13: <body>
14: @RenderBody()
15:
16: @Scripts.Render("~/bundles/jquery")
17: @Scripts.Render("~/bundles/jqueryui")
18: @Scripts.Render("~/bundles/fileupload/bootstrap/BasicPlusUI/js")
19: @RenderSection("scripts", required: false)
20: </body>
21: </html>
22:
□ Home/Index.cshtml视图

@{
ViewBag.Title = "Index";
Layout = "~/Views/Shared/_Layout.cshtml";
}
<div>
<!-- The file upload form used as target for the file upload widget -->
<form id="fileupload" action="/Backload/UploadHandler" method="POST" enctype="multipart/form-data">
<!-- Redirect browsers with JavaScript disabled to the origin page -->
<noscript><input type="hidden" name="redirect" value="/"></noscript>
<!-- The fileupload-buttonbar contains buttons to add/delete files and start/cancel the upload -->
<div class="row fileupload-buttonbar">
<div class="span7">
<!-- The fileinput-button span is used to style the file input field as button -->
<span class="btn btn-success fileinput-button">
<i class="icon-plus icon-white"></i>
<span>添加文件...</span>
<input type="file" name="files[]" multiple>
</span>
<button type="submit" class="btn btn-primary start">
<i class="icon-upload icon-white"></i>
<span>开始上传</span>
</button>
<button type="reset" class="btn btn-warning cancel">
<i class="icon-ban-circle icon-white"></i>
<span>取消上传</span>
</button>
<button type="button" class="btn btn-danger delete">
<i class="icon-trash icon-white"></i>
<span>删除</span>
</button>
<input type="checkbox" class="toggle">
<!-- The loading indicator is shown during file processing -->
<span class="fileupload-loading"></span>
</div>
<!-- The global progress information -->
<div class="span5 fileupload-progress fade">
<!-- The global progress bar -->
<div class="progress progress-success progress-striped active" role="progressbar" aria-valuemin="0" aria-valuemax="100">
<div class="bar" style="width:0%;"></div>
</div>
<!-- The extended global progress information -->
<div class="progress-extended"> </div>
</div>
</div>
<!-- The table listing the files available for upload/download -->
<table role="presentation" class="table table-striped"><tbody class="files" data-toggle="modal-gallery" data-target="#modal-gallery"></tbody></table>
</form>
<!-- The template to display files available for upload -->
<script id="template-upload" type="text/x-tmpl">
{% for (var i=0, file; file=o.files[i]; i++) { %}
<tr class="template-upload fade">
<td>
<span class="preview"></span>
</td>
<td>
<p class="name">{%=file.name%}</p>
{% if (file.error) { %}
<div><span class="label label-important">Error</span> {%=file.error%}</div>
{% } %}
</td>
<td>
<p class="size">{%=o.formatFileSize(file.size)%}</p>
{% if (!o.files.error) { %}
<div class="progress progress-success progress-striped active" role="progressbar" aria-valuemin="0" aria-valuemax="100" aria-valuenow="0"><div class="bar" style="width:0%;"></div></div>
{% } %}
</td>
<td>
{% if (!o.files.error && !i && !o.options.autoUpload) { %}
<button class="btn btn-primary start">
<i class="icon-upload icon-white"></i>
<span>Start</span>
</button>
{% } %}
{% if (!i) { %}
<button class="btn btn-warning cancel">
<i class="icon-ban-circle icon-white"></i>
<span>Cancel</span>
</button>
{% } %}
</td>
</tr>
{% } %}
</script>
<!-- The template to display files available for download -->
<script id="template-download" type="text/x-tmpl">
{% for (var i=0, file; file=o.files[i]; i++) { %}
<tr class="template-download fade">
<td>
<span class="preview">
{% if (file.thumbnail_url) { %}
<a href="{%=file.url%}" title="{%=file.name%}" data-gallery="gallery" download="{%=file.name%}"><img src="{%=file.thumbnail_url%}"></a>
{% } %}
</span>
</td>
<td>
<p class="name">
<a href="{%=file.url%}" title="{%=file.name%}" data-gallery="{%=file.thumbnail_url&&'gallery'%}" download="{%=file.name%}">{%=file.name%}</a>
</p>
{% if (file.error) { %}
<div><span class="label label-important">Error</span> {%=file.error%}</div>
{% } %}
</td>
<td>
<span class="size">{%=o.formatFileSize(file.size)%}</span>
</td>
<td>
<button class="btn btn-danger delete" data-type="{%=file.delete_type%}" data-url="{%=file.delete_url%}"{% if (file.delete_with_credentials) { %} data-xhr-fields='{"withCredentials":true}'{% } %}>
<i class="icon-trash icon-white"></i>
<span>Delete</span>
</button>
<input type="checkbox" name="delete" value="1" class="toggle">
</td>
</tr>
{% } %}
</script>
</div>
@section scripts
{
<script src="~/Scripts/FileUpload/backload.demo.js"></script>
}
□ 结果:
上传2个文件: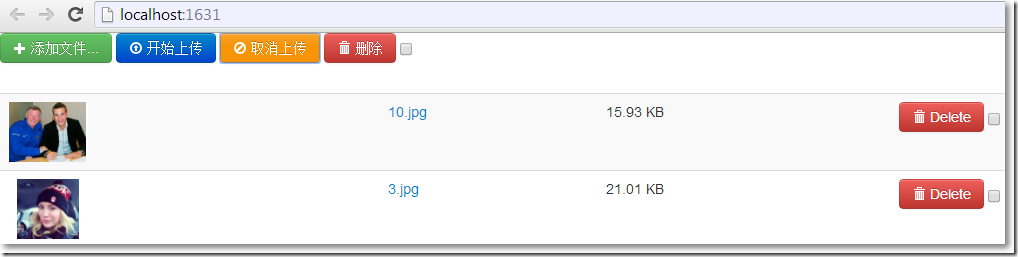
这次,图片上传到了Uploads文件夹: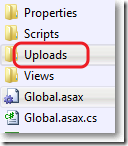
Uploads文件夹有刚上传的2个文件:
□ 如果想让web.config配置文件相对“干净”,可以把与Backload相关的配置放到单独的一个配置文件
web.config中可以这样:
1: <configuration>
2: <configSections>
3: ...
4: <section name="backload" type="Backload.Configuration.BackloadSection, Backload, Version=1.9.3.1, Culture=neutral, PublicKeyToken=02eaf42ab375d363" requirePermission="false" />
5: </configSections>
6:
7: <backload configSource="Web.Backload.config" />
8: </configuration>
根目录下的Web.Backload.config可以这样:
1: <?xml version="1.0"?>
2: <backload storageContext="Filesystem" xsi:noNamespaceSchemaLocation="Web.Backload.xsd" xmlns:name="urn:backload-schema" xmlns:xsi="http://www.w3.org/2001/XMLSchema-instance">
3: <fileSystem filesRoot="~/Uploads" />
4: </backload>
使用jQuery.FileUpload插件和服Backload组件自定义上传文件夹的更多相关文章
- MVC文件上传05-使用客户端jQuery-File-Upload插件和服务端Backload组件自定义上传文件夹
在零配置情况下,文件的上传文件夹是根目录下的Files文件夹,如何自定义文件的上传文件夹呢? MVC文件上传相关兄弟篇: MVC文件上传01-使用jquery异步上传并客户端验证类型和大小 MVC文 ...
- 使用jQuery.FileUpload插件和Backload组件裁剪上传图片
□ 思路 1.自定义控制器继承Backload的默认控制器BackloadController2.自定义一个jQuery File Upload初始化js文件,使用自定义控制器的方法3.在视图页面调用 ...
- jquery.fileupload插件 ie9下不支持上传
根据https://github.com/blueimp/jQuery-File-Upload/wiki/Browser-support The following browsers support ...
- el-upload自定义上传文件,并携带其余参数,且action不报错
用el-upload组件自定义上传按钮,并携带其余参数,且必传参数action 不报错 <template> <el-col :span="6" :mode=&q ...
- asp.net FileUpload上传文件夹并检测所有子文件
1.在FileUpload控件添加一个属性 webkitdirectory=""就可以上传文件夹了 <asp:FileUpload ID="FileUpload1& ...
- UI组件--element-ui--Upload多组件自定义上传
需求: 提交详细信息的表单, 并上传对应图片(如下图), 后台接口要求表单数据和图片需要一次上传完成.. 分析: 实际上, 每个element-ui Upload组件都应发送一次请求, 很明显不符合我 ...
- [k]自定义上传文件按钮样式
<!DOCTYPE HTML> <html> <head> <meta charset="UTF-8"> <title> ...
- php版本CKFinder3.4.4自定义上传文件位置
1.修改文件上传路径: 编辑ckfinder目录下config.php,70行设置为: 'baseUrl' => '/uploads/'.date('Ymd').'/'; 这样上 ...
- jQuery Ajax 上传文件夹及文件
我们先来看一下文件夹结构 这是上传处理的: 看一下系统日志: 升级 HTML5文件实现拖拽上传提示效果改进(支持三种状态提示) 拖拽过程详解: 1:文件未拖出文件选择框的时候提示:将要上传的文件或文件 ...
随机推荐
- hdu2594 Simpsons’ Hidden Talents kmp
Simpsons’ Hidden Talents Time Limit: 2000/1000 MS (Java/Others) Memory Limit: 32768/32768 K (Java/Ot ...
- Android设计模式(1)----单例模式
在非常多设计模式中.我相信大多数程序员最早接触的设计模式就是单例模式啦,当然了我也不例外. 单例模式应用起来应该是全部设计模式中最简单的.单例模式尽管简单,可是假设你去深深探究单例模式,会涉及到非常多 ...
- php递归无限极分类
递归无限级分类有几种形式,我这里仅仅举例比較经常使用的三种: 第一种:返回有排序的数组: <?php $data = array( 1 => array( 'id' => 1, 'p ...
- Asp.Net转换Html加号显示为空格的字符!(自已备用)
Asp.Net转换Html显示为空格的字符!(自已备用) 显示+(加号),须要替换一下!
- JavaScript(20)jQuery HTML 加入和删除元素
jQuery - 加入元素 通过 jQuery,能够非常easy地加入新元素/内容. 加入新的 HTML 内容的四个 jQuery 方法: append() - 在被选元素的结尾插入内容 prepen ...
- eclipse启动不了报错java was started but returned exit code=13
http://zhidao.baidu.com/question/1367307106041927459.html http://zhidao.baidu.com/question/570567914 ...
- Vmware中为Mac Os安装vmtools
成功方法: 1. 在VMWare中点击edit this virtual machine 2. 添加CD/DVD,使用iso,找到那个darwin.iso 3. 在setting里面,点击CD/DVD ...
- How-to Dump Keys from Memcache--reference
Submitted by Lars Windolf on 19. October 2012 - 21:53 http://lzone.de/dump%20memcache%20keys You spe ...
- Unit Testing a zend-mvc application
Unit Testing a zend-mvc application A solid unit test suite is essential for ongoing development in ...
- IOS中如何显示带有html标签的富文本
NSString *strHTML = @"<p>你好</p><p> 这是一个例子,请显示</p><p>外加一个ta ...