RabbitMQ消息队列(十)RPC应用2
基于RabbitMQ RPC实现的主机异步管理
地址原文:http://blog.51cto.com/baiying/2065436,作者大大,我把原文贴出来了啊。不要告我
root@ansible:~/workspace# tree ManageHost/

ManageHost/

├── environment

│   ├── base_dir.py

│   ├── base_dir.pyc

│   └── __init__.py

├── README.md

├── RPC_Client

│   ├── bin

│   │   ├── __init__.py

│   │   └── start.py

│   ├── conf

│   │   ├── __init__.py

│   │   ├── __init__.pyc

│   │   ├── settings.py

│   │   └── settings.pyc

│   ├── core

│   │   ├── __init__.py

│   │   ├── __init__.pyc

│   │   ├── main.py

│   │   └── main.pyc

│   ├── __init__.py

│   ├── __init__.pyc

│   └── modules

│       ├── client.py

│       ├── client.pyc

│       ├── __init__.py

│       └── __init__.pyc

└── RPC_Server

    ├── conf

    │   ├── __init__.py

    │   ├── __init__.pyc

    │   ├── settings.py

    │   └── settings.pyc

    ├── __init__.py

    ├── __init__.pyc

    └── server.py
来个README.md
root@ansible:~/workspace/ManageHost# cat README.md

1、需求

- [ ] 利用RibbitMQ进行数据交互

- [ ] 可以对多台服务器进行批量操作

- [ ] 执行命令后不等待命令的执行结果,而是直接让输入下一条命令,结果出来后自动打印

- [ ] 实现异步操作

 备注

- [ ] RabbitMQ队列:

                    ①执行命令时,队列名为“rpc_queue2”

                    ②查询数据时,用的是回调时随机生成的callback_queue名

                    ③conf/settings——Rabbitmq地址“192.168.17.102”,端口:5672,用户名:admin,密码:admin

- [ ] SSH:

                RPC_Server/server.py——paramiko操作连接的测试Linux默认端口22,用户名:root,密码:123456

- [ ] threading多线程:

                    实现命令执行后不等待执行结果,依然可以输入新的指令

- [ ] 执行命令格式:

                 -->>run ifconfig host 192.168.20.22 192.168.20.23

                        dir     server端要执行的命令

                        host    host后可跟一个或多个可以通过rabbitMQ的服务器地址

- [ ] 查看后台所有的TASK_ID信息:

                 -->>check_task

     显示结果样式:TASK_ID【76786】    HOST【192.168.20.22】    COMMAND【dir】

                  TASK_ID【10307】    HOST【192.168.20.23】    COMMAND【dir】

- [ ] 查看TASK_ID对应的执行结果:

                 -->>get_task 10307

程序目录结构:

├── README.md

├── RPC_Client

│   ├── bin

│   │   ├── __init__.py

│   │   └── start.py  #客户端启动程序

│   ├── conf

│   │   ├── __init__.py

│   │   ├── __pycache__

│   │   │   ├── __init__.cpython-36.pyc

│   │   │   └── settings.cpython-36.pyc

│   │   └── settings.py

│   ├── core

│   │   ├── __init__.py

│   │   ├── main.py

│   │   └── __pycache__

│   │       ├── __init__.cpython-36.pyc

│   │       └── main.cpython-36.pyc

│   └── modules

│       ├── client.py

│       ├── __init__.py

│       └── __pycache__

│           ├── client.cpython-36.pyc

│           └── __init__.cpython-36.pyc

└── RPC_Server

    ├── conf

    │   ├── __pycache__

    │   │   └── settings.cpython-36.pyc

    │   └── settings.py

    └── server.py #server端启动程序

程序启动:

    客户端启动:RPC_Client/bin/start.py

    服务端启动:RPC_Server/server.py
1)先来看看client代码
这个是入口
root@ansible:~/workspace/ManageHost/RPC_Client/bin# cat start.py

#!/usr/bin/env python

# coding:utf-8

import os

import sys

import platform

if platform.system() == 'Windows':

    BASE_DIR = '\\'.join(os.path.abspath(os.path.dirname(__file__)).split('\\')[:-1])

else:

    BASE_DIR = '/'.join(os.path.abspath(os.path.dirname(__file__)).split('/')[:-1])

sys.path.append(BASE_DIR)

from core import main

if __name__ == '__main__':

    handle = main.Handle()

    handle.start()
可以看到最终执行会在main中,看看main中的代码
root@ansible:~/workspace/ManageHost/RPC_Client/core# cat main.py

#!/usr/bin/env python

# coding:utf-8

import pika

import random

import threading

from modules import client

from conf import settings

class Handle(object):

    def __init__(self):

        self.connection = pika.BlockingConnection(pika.ConnectionParameters(

            host=settings.RabbitmqHost,credentials=settings.credentials,

        ))

        self.channel = self.connection.channel()

    def run_cmd(self,cmd,host):

        rpc_client = client.Client(self.connection,self.channel)

        task_id = str(random.randint(1000,9999))

        response = rpc_client.call(cmd,host)

        self.corr_id = response[1]

        print "Task_id" ,task_id

        print "callback_queue:%s, corr_id: %s" %(response[0],response[1])

        self.info[task_id] = [self.corr_id,host,cmd,response[0],response[1]]

    def start(self):

        self.info = {}

        help = """

        命令格式:

            执行系统命令: run command host eg: run ls 172.20.6.184

            查看所有执行任务: check_task

            查看指定任务结果: get_task id eg: get_task 6723

        """

        print(help)

        while True:

            msg = raw_input('>>').strip()

            if msg.startswith('run') and len(msg.split()) >= 3:

                cmd = msg.split()[1]

                # 多线程运行

                th_join = []

                for host in msg.split()[2:]:

                    th = threading.Thread(target=self.run_cmd,args=(cmd,host,),)

                    th.start()

                    th_join.append(th)

                for t in th_join:

                    t.join()

            elif msg == 'check_task':

                if not self.info:

                    print "没有任务队列"

                    continue

                else:

                    for taskid,task in self.info.items():

                        print "TaskID [%s]  Host [%s]  COMMAND [%s]" %(taskid,task[1],task[2])

            elif msg.startswith('get_task'):

                rpc_client = client.Client(self.connection, self.channel)

                if msg.split()[1] in self.info:

                    task_id = msg.split()[1]

                    callback_queue = self.info[task_id][3]

                    correlation_id = self.info[task_id][4]

                    print callback_queue,correlation_id

                    task_result = rpc_client.get_task(callback_queue,correlation_id)

                    del self.info[task_id]

                    print "小行星",task_result.decode().strip()

                else:

                    print "输入的task ID 不存在!"

                    continue

            elif not msg:

                continue

            else:

                print "输入错误,请重新输入!"

                continue
看到了,start()方法是入口,会检测你的输入,如果是以run开头的,解析你输入的参数,如果以check_task开头会怎样...
root@ansible:~/workspace/ManageHost/RPC_Client/modules# cat client.py

#!/usr/bin/env python

# coding:utf-8

import pika

import random

import uuid

class Client(object):

    def __init__(self,connection,channel):

        self.connection = connection

        self.channel = channel

    # 对回调队列中的响应进行处理的函数

    def on_response(self,channel,method,props,body):

        print self.correlation_id,props.correlation_id

        if self.correlation_id == props.correlation_id:

            self.response = body

            return self.response

        channel.basic_ack(delivery_tag=method.delivery_tag)

    def get_task(self,callback_queue,correlation_id):

        self.response = None

        self.correlation_id = correlation_id

        print "=====callback_queue:%s,-------correlation_id:%s" %(callback_queue,correlation_id)

        # 客户端订阅回调队列,当回调队列中有响应时,调用on_response方法对响应进行处理

        self.channel.basic_consume(self.on_response,queue=callback_queue)

        while self.response is None:

            self.connection.process_data_events()

        return self.response

    def call(self,cmd,host):

        # 声明回调队列,再次声明的原因是客户端和服务器端不知道谁先被启动,该声明是幂等的

        # 多次声明,只生效一次

        result = self.channel.queue_declare(exclusive=True)

        self.callback_queue = result.method.queue

        msg = cmd + ' ' + ''.join(host)

        print msg

        self.corr_id = str(uuid.uuid4())

        # 发送RPC请求内容到RPC请求队列rpc_queue中,同时发送的还有reply_to ,correlation_id

        self.channel.basic_publish(exchange='',routing_key='rpc_queue2',

                                   properties=pika.BasicProperties(

                                       reply_to=self.callback_queue,

                                       correlation_id=self.corr_id,

                                   ),

                                   body=msg)

        print "callback_queue:%s, corr_id:%s" %(self.callback_queue,self.corr_id)

        return self.callback_queue,self.corr_id
看看配置文件吧
root@ansible:~/workspace/ManageHost/RPC_Client/conf# cat settings.py

#!/usr/bin/env python

# coding:utf-8

import pika

import os

import sys

import platform

if platform.system() == 'Windows':

    BASE_DIR = '\\'.join(os.path.abspath(os.path.dirname(__file__)).split('\\')[:-1])

else:

    BASE_DIR = '/'.join(os.path.abspath(os.path.dirname(__file__)).split('/')[:-1])

sys.path.append(BASE_DIR)

RabbitmqHost = '172.20.6.184'

RabbitmqUser = 'admin'

RabbitmqPwd = 'admin'

credentials = pika.PlainCredentials(RabbitmqUser,RabbitmqPwd)
2)看看server端的代码吧
root@ansible:~/workspace/ManageHost/RPC_Server# cat server.py

#!/usr/bin/env python

# coding:utf-8

import pika

import paramiko

import os

import sys

import platform

if platform.system() == 'Windows':

    BASE_DIR = '\\'.join(os.path.abspath(os.path.dirname(__file__)).split('\\')[:-1])

else:

    BASE_DIR = '/'.join(os.path.abspath(os.path.dirname(__file__)).split('/')[:-1])

sys.path.append(BASE_DIR)

from RPC_Server.conf import settings

connection = pika.BlockingConnection(pika.ConnectionParameters(

    host=settings.RabbitmqHost, credentials=settings.credentials,

))

channel = connection.channel()

channel.queue_declare(queue='rpc_queue2')

# 数据处理方法

def exec_cmd(cmd,host):

    ssh = paramiko.SSHClient()

    ssh.set_missing_host_key_policy(paramiko.AutoAddPolicy())

    ssh.connect(hostname=host,port=22,username='root',password='root1234',timeout=10)

    strin,stdout,stderr = ssh.exec_command(cmd)

    stdout_result = stdout.read()

    stderr_result = stderr.read()

    result = stdout_result if stdout_result else stderr_result

    return result.decode()

    ssh.close()

# 对RPC请求队列中的请求进行处理

def on_request(ch, method, props, body):

    cmd = body.split()[0]

    print body

    host = body.split()[1]

    host = '%s'%host

    # 调用数据处理方法

    response = exec_cmd(cmd,host)

    # 将处理结果(响应)发送到回调队列

    ch.basic_publish(exchange='',

                     routing_key=props.reply_to,

                     properties=pika.BasicProperties(correlation_id = props.correlation_id),

                     body=str(response))

    print "callback_queue: %s, corr_id: %s" %(props.reply_to,props.correlation_id)

    ch.basic_ack(delivery_tag=method.delivery_tag)

channel.basic_consume(on_request, queue='rpc_queue2')

print(" [x] Awaiting RPC requests")

channel.start_consuming()
配置文件:
root@ansible:~/workspace/ManageHost/RPC_Server# cat conf/settings.py

#!/usr/bin/env python

# coding:utf-8

import pika

import os

import sys

import platform

if platform.system() == 'Windows':

    BASE_DIR = '\\'.join(os.path.abspath(os.path.dirname(__file__)).split('\\')[:-1])

else:

    BASE_DIR = '/'.join(os.path.abspath(os.path.dirname(__file__)).split('/')[:-1])

sys.path.append(BASE_DIR)

RabbitmqHost = '172.20.6.184'

RabbitmqUser = 'admin'

RabbitmqPwd = 'admin'

credentials = pika.PlainCredentials(RabbitmqUser,RabbitmqPwd)
能不能解释解释:
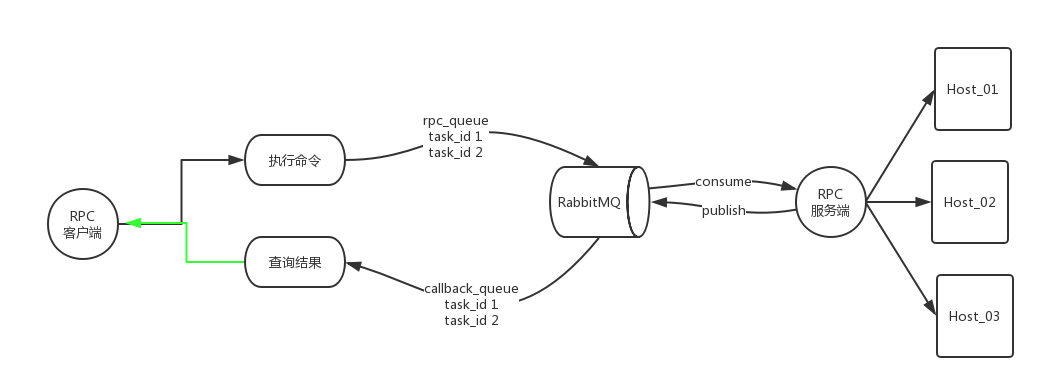
1、run命令过程解析
为什么说这个作者写的是一个异步的主机管理呢,实际上,当你在执行
1)run ls 172.20.6.184的时候,start()方法会检测到是以run开头的,然后会解析cmd和hosts参数,然后使用多线程执行run_cmd()方法
2)run_cmd()方法会调用client模块中的类,初始化一个rpc_client对象,这个对象只会建立一个channel,接着使用random生成一个task_id任务id,然后调用rpc_client对象中的call()方法
3)call()方法,首先创建要给callback_queue的临时队列,得到ls 172.20.6.184作为msg发送到rpc_queue2的队列中,并指定接收消息的队列为callback_queue,server端订阅了rpc_queue2的队列,然后触发on_request()方法,这个方法,会解析msg的内容并得到cmd和hosts,然后执行exec_cmd()方法,exec_cmd()这个方法,使用paramiko这个模块,处理结果,on_request()方法把结果发送到callback_queue的队列中。
4)我们需要注意的是,这里仅仅只是把结果发送到callback_queue的队列中,run这个并没有接收这个消息,call()只是得到了callback_queue和corr_id,然后把结果存入了info这个字典中。然后完成。
2、check_task都做些了啥?
这个更简单了,查了一下info字典,然后把task_id等信息输出给你看。
3、get_task呢?
1)这个是真正干活的了?会接收callback_queue的server端发送过来的处理的结果。具体get_task()方法,这个方法,订阅了callback_queue的消息队列,然后通过response把结果返回
2)然后删除这个task_id,并打印出结果。
思考:所以当我们执行run ls 172.20.6.184的时候,仅仅只是把要执行的内容发送给server端,然后server端返回处理过的数据给callback_queue队列。但是run 不接收结果
真正接收结果的是get_task,所以看起来像是异步吧。
RabbitMQ消息队列(十)RPC应用2的更多相关文章
- RabbitMQ 消息队列 实现RPC 远程过程调用交互
#!/usr/bin/env python # Author:Zhangmingda import pika,time import uuid class FibonacciRpcClient(obj ...
- (转)RabbitMQ消息队列(七):适用于云计算集群的远程调用(RPC)
在云计算环境中,很多时候需要用它其他机器的计算资源,我们有可能会在接收到Message进行处理时,会把一部分计算任务分配到其他节点来完成.那么,RabbitMQ如何使用RPC呢?在本篇文章中,我们将会 ...
- RabbitMQ消息队列(七):适用于云计算集群的远程调用(RPC)
在云计算环境中,很多时候需要用它其他机器的计算资源,我们有可能会在接收到Message进行处理时,会把一部分计算任务分配到其他节点来完成.那么,RabbitMQ如何使用RPC呢?在本篇 ...
- (十四)RabbitMQ消息队列-启用SSL安全通讯
原文:(十四)RabbitMQ消息队列-启用SSL安全通讯 如果RabbitMQ服务在内网中,只有内网的应用连接,我们认为这些连接都是安全的,但是个别情况我们需要让RabbitMQ对外提供服务.这种情 ...
- (十)RabbitMQ消息队列-高可用集群部署实战
原文:(十)RabbitMQ消息队列-高可用集群部署实战 前几章讲到RabbitMQ单主机模式的搭建和使用,我们在实际生产环境中出于对性能还有可用性的考虑会采用集群的模式来部署RabbitMQ. Ra ...
- (十二)RabbitMQ消息队列-性能测试
原文:(十二)RabbitMQ消息队列-性能测试 硬件配置 宿主机用的联想3850X6的服务器四颗E7-4850v3的处理器,DDR4内存,两块1.25TB的pcie固态.在宿主机上使用的事esxi5 ...
- RabbitMQ消息队列1: Detailed Introduction 详细介绍
1. 历史 RabbitMQ是一个由erlang开发的AMQP(Advanced Message Queue )的开源实现.AMQP 的出现其实也是应了广大人民群众的需求,虽然在同步消息通讯的世界里有 ...
- (转)RabbitMQ消息队列(九):Publisher的消息确认机制
在前面的文章中提到了queue和consumer之间的消息确认机制:通过设置ack.那么Publisher能不到知道他post的Message有没有到达queue,甚至更近一步,是否被某个Consum ...
- RabbitMQ消息队列(九):Publisher的消息确认机制
在前面的文章中提到了queue和consumer之间的消息确认机制:通过设置ack.那么Publisher能不到知道他post的Message有没有到达queue,甚至更近一步,是否被某个Consum ...
- 使用EasyNetQ组件操作RabbitMQ消息队列服务
RabbitMQ是一个由erlang开发的AMQP(Advanved Message Queue)的开源实现,是实现消息队列应用的一个中间件,消息队列中间件是分布式系统中重要的组件,主要解决应用耦合, ...
随机推荐
- spl_autoload_register(转载 http://blog.csdn.net/panpan639944806/article/details/23192267)
在了解这个函数之前先来看另一个函数:__autoload. 一.__autoload 这是一个自动加载函数,在PHP5中,当我们实例化一个未定义的类时,就会触发此函数.看下面例子: printit.c ...
- 『NiFi 学习之路』简介
『NiFi 学习之路』简介 『NiFi 学习之路』入门 -- 下载.安装与简单使用 『NiFi 学习之路』资源 -- 资料汇总 『NiFi 学习之路』把握 -- 架构及主要组件 『NiFi 学习之路』 ...
- iClap专访:颠覆传统办公方式,规范化产品管理系统
背景:DevStore是成立于2014年的移动互联网企业运营解决方案整合平台,线上资源涉及产品研发,设计,推广运维各个阶段,致力于为互联网从业者提供帮助.iClap是DevStore的全新产品,于20 ...
- Salesforce中通过SOAP API和Metadata API开发java的web server服务
1.下载Salesforce平台中WSDL文件 在Salesforce中创建了自己需要用到的对象后,我们想要在别的应用中读写纪录到对象中,首先需要的是自己Salesforce平台的权限通过.登陆自己的 ...
- Java命令:Jstack
jstack是java虚拟机自带的一种堆栈跟踪工具. 功能 jstack用于生成java虚拟机当前时刻的线程快照.线程快照是当前java虚拟机内每一条线程正在执行的方法堆栈的集合,生成线程快照的主要目 ...
- vue package.json 解析
vue package.json 中可以看到这个包的来源位置 在repository对象中的url中可以看到 所以当你要封装自己包的时候就可以改变这个地址去加载这个包(把你封装的包发到某个gi ...
- Cisco 路由交换 常用查询语句
基本信息查询语句 #查看全配置信息 #show running-configure #查看vlan信息 #show vlan brief #查看物理直连信息 #show cdp neighbors d ...
- Python高级语法之:一篇文章了解yield与Generator生成器
Python高级语法中,由一个yield关键词生成的generator生成器,是精髓中的精髓.它虽然比装饰器.魔法方法更难懂,但是它强大到我们难以想象的地步:小到简单的for loop循环,大到代替多 ...
- swoole 异步队列简明教程
安装步骤如下(推荐把安装文件下载到 /usr/local/src 目录下): step 1: wget --no-check-certificate https://github.com/swoole ...
- Spring容器基础xmlbeanfactory(一起看源码)
在spring中,如果你想创建容器少不了使用常见的xmlbeanfactory,ClassPathXmlApplicationContext,FileSystemXmlApplicationConte ...