Java EE学习笔记(二)
Spring中的Bean
1、Bean的配置:
a)、Bean的本质就是Java中的类,而Spring中的Bean其实就是对实体类的引用,来生产Java类对象,从而实现生产和管理Bean 。
b)、Spring容器支持两种格式的配置文件:Properties文件和XML文件。在实际开发中,最常使用的是XML文件格式的配置方式,这种配置方式是通过XML文件来注册并管理Bean之间的依赖关系。
c)、XML配置文件的根元素是<beans>,<beans>中包含了多个<bean>子元素,每一个<bean>子元素定义了一个Bean,并描述了该Bean如何被装配到Spring容器中。
d)、关于<beans>元素的常用属性如下表所示:
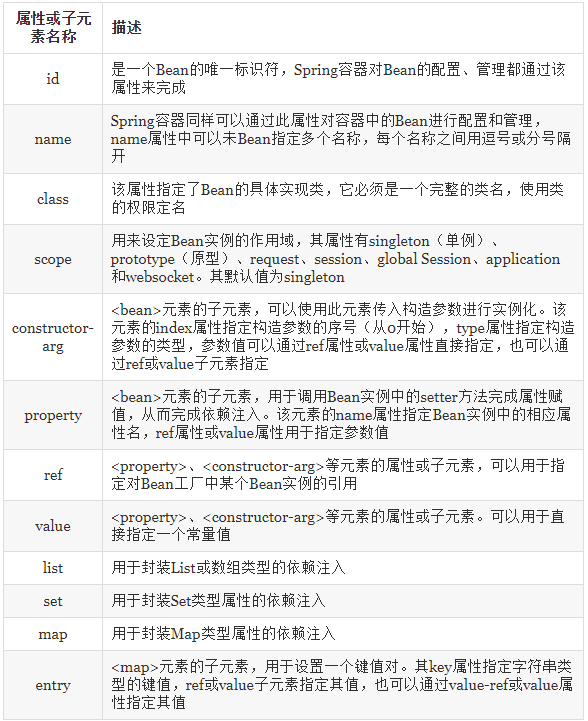
e)、如果在Bean中未指定id和name,则Spring会将class值当作id使用。
2、Bean的实例化
实例化Bean有三种方式,分别为构造器实例化、静态工厂方式实例化和实例工厂方式实例化(其中最常用的是构造器实例化)。
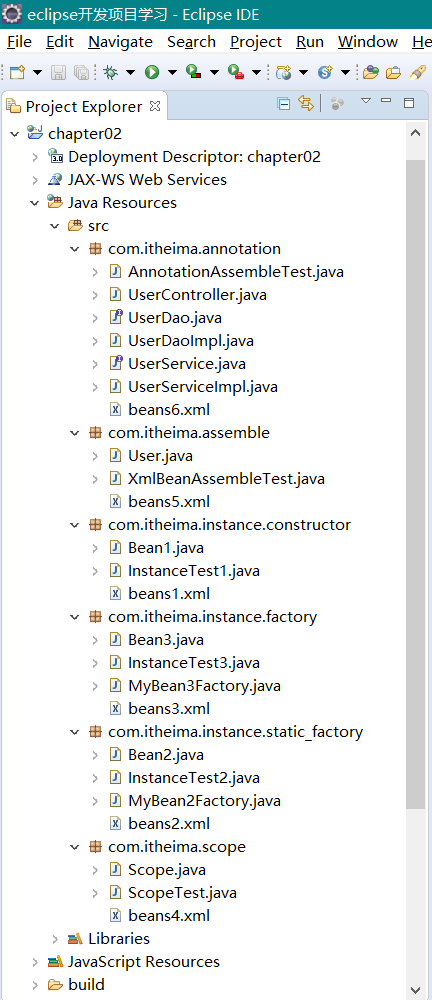
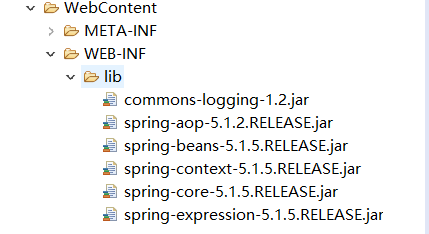
1)、构造器实例化:指Spring容器通过Bean对应的类中默认的构造函数来实例化Bean。
src->com.itheima.instance.constructor
①Bean1.java
 package com.itheima.instance.constructor;

 public class Bean1 { // 实例化Bean1的对象时调用其无参构造方法

 }
②beans1.xml
 <?xml version="1.0" encoding="UTF-8"?>

 <beans xmlns="http://www.springframework.org/schema/beans"

    xmlns:xsi="http://www.w3.org/2001/XMLSchema-instance"

 xsi:schemaLocation="http://www.springframework.org/schema/beans

                       http://www.springframework.org/schema/beans/spring-beans-4.3.xsd">

    <bean id="bean1" class="com.itheima.instance.constructor.Bean1" />

 </beans>
③测试类:InstanceTest1.java
 package com.itheima.instance.constructor;

 import org.springframework.context.ApplicationContext;

 import org.springframework.context.support.ClassPathXmlApplicationContext;

 //构造器实例化Bean

 public class InstanceTest1 {

     public static void main(String[] args) {

         // 1、定义配置文件路径

         String xmlPath = "com/itheima/instance/constructor/beans1.xml";

         // 2、ApplicationContext在加载配置文件时,对Bean进行实例化(Spring容器会通过id为bean1ID的实现类Bean1中默认的无参构造方法对Bean进行实例化)

         ApplicationContext applicationContext = new ClassPathXmlApplicationContext(xmlPath);

         // 3、通过容器获取Bean1的实例

         Bean1 bean = (Bean1) applicationContext.getBean("bean1ID");

         System.out.println(bean);

     }

 }
④运行结果:

2)、静态工厂:要求自己创建一个静态工厂的方法来创建Bean的实例。
src->com.itheima.instance.static_factory
①Bean2.java
 package com.itheima.instance.static_factory;

 public class Bean2 {

     //无需添加任何方法

 }
②MyBean2Factory.java
 package com.itheima.instance.static_factory;

 public class MyBean2Factory { // 创建工厂类MyBean2Factory

     // 使用自己的工厂创建Bean2实例(使用静态方法创建Bean2实例)

     public static Bean2 createBean() {

         return new Bean2();

     }

 }
③beans2.xml
 <?xml version="1.0" encoding="UTF-8"?>

 <beans xmlns="http://www.springframework.org/schema/beans"

    xmlns:xsi="http://www.w3.org/2001/XMLSchema-instance"

 xsi:schemaLocation="http://www.springframework.org/schema/beans

                       http://www.springframework.org/schema/beans/spring-beans-4.3.xsd">

      <bean id="bean2ID" class="com.itheima.instance.static_factory.MyBean2Factory"

     factory-method="createBean" />

     <!-- 由于使用的是静态工厂方法,所以需要通过class属性指定其对应的工厂实现类为MyBean2Factory

         factory-method属性来告诉Spring容器,需要createBean这个工厂方法

     -->

 </beans>
④测试类:InstanceTest2.java
 package com.itheima.instance.static_factory;

 import org.springframework.context.ApplicationContext;

 import org.springframework.context.support.ClassPathXmlApplicationContext;

 // 静态工厂实例化Bean

 public class InstanceTest2 {

     public static void main(String[] args) {

         String xmlPath = "com/itheima/instance/static_factory/beans2.xml";

         ApplicationContext applicationContext = new ClassPathXmlApplicationContext(xmlPath);

         System.out.println(applicationContext.getBean("bean2ID"));

     }

 }
⑤运行结果:

3)、实例工厂:采用直接创建Bean实例的方式,在配置文件中,通过factory-bean属性配置一个实例工厂,然后使用factory-method属性确定使用工厂中的哪个方法。
src->com.itheima.instance.factory
①Bean3.java
 package com.itheima.instance.factory;

 public class Bean3 {

     //无需添加任何方法

 }
②MyBean3Factory.java
 package com.itheima.instance.factory;

 public class MyBean3Factory { // 创建工厂类MyBean3Factory

     public MyBean3Factory() { // 默认使用无参构造方法输出语句

         System.out.println("bean3工厂实例化中");

     }

     // 创建Bean3实例的方法

     public Bean3 createBean() {

         return new Bean3();

     }

 }
③beans3.xml
 <?xml version="1.0" encoding="UTF-8"?>

 <beans xmlns="http://www.springframework.org/schema/beans"

    xmlns:xsi="http://www.w3.org/2001/XMLSchema-instance"

 xsi:schemaLocation="http://www.springframework.org/schema/beans

                       http://www.springframework.org/schema/beans/spring-beans-4.3.xsd">

     <!-- 配置工厂 -->

       <bean id="myBean3FactoryID" class="com.itheima.instance.factory.MyBean3Factory" />

      <!-- 使用factory-bean属性指向配置的实例工厂 (myBean3FactoryID),该属性值就是工厂Bean的id。

          使用factory-method属性确定使用工厂中的哪个方法 (createBean)

      -->

      <bean id="bean3ID" factory-bean="myBean3FactoryID" factory-method="createBean" />

 </beans>
④测试类:InstanceTest3.java
 package com.itheima.instance.factory;

 import org.springframework.context.ApplicationContext;

 import org.springframework.context.support.ClassPathXmlApplicationContext;

 public class InstanceTest3 {

     public static void main(String[] args) {

         String xmlPath = "com/itheima/instance/factory/beans3.xml";

         ApplicationContext applicationContext = new ClassPathXmlApplicationContext(xmlPath);

         System.out.println(applicationContext.getBean("bean3ID"));

     }

 }
⑤运行结果:

3、Bean的作用域:
1)、作用域的种类
Spring 4.3中为Bean的实例定义了7种作用域,如下表所示:
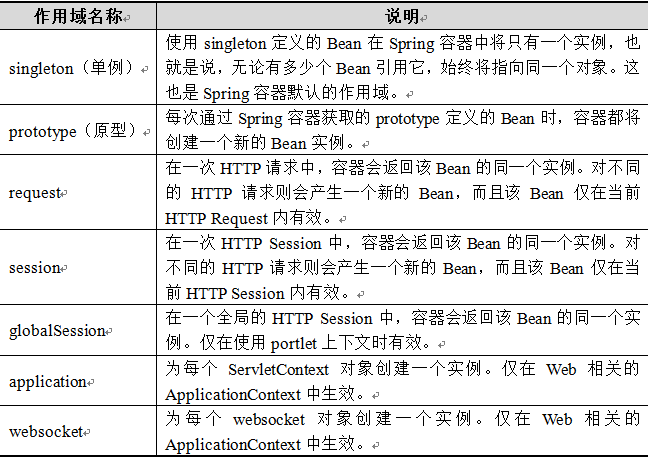
在上表7种作用域中,singleton和prototype是最常用的两种作用域。
2)、singleton作用域
a)、singleton是Spring容器默认的作用域,当Bean的作用域为singleton时,Spring容器就只会存在一个共享的Bean实例。singleton作用域对于无会话状态的Bean(如Dao 组件、Service组件)来说,是最理想的选择。
b)、在Spring配置文件中,可以使用<bean>元素的scope属性,将Bean的作用域定义成singleton。例如:
<bean id="scope" class="com.itheima.scope.Scope" scope="singleton"/>
c)、src->com.itheima.scope
①Scope.java
 package com.itheima.scope;

 public class Scope {

     //无需写任何方法

 }
②beans4.xml
 <?xml version="1.0" encoding="UTF-8"?>

 <beans xmlns="http://www.springframework.org/schema/beans"

    xmlns:xsi="http://www.w3.org/2001/XMLSchema-instance"

 xsi:schemaLocation="http://www.springframework.org/schema/beans

                       http://www.springframework.org/schema/beans/spring-beans-4.3.xsd">

     <bean id="scopeID" class="com.itheima.scope.Scope" scope="singleton"/>

 </beans>
③测试类:ScopeTest.java
 package com.itheima.scope;

 import org.springframework.context.ApplicationContext;

 import org.springframework.context.support.ClassPathXmlApplicationContext;

 public class ScopeTest {

     public static void main(String[] args) {

         String xmlPath = "com/itheima/scope/beans4.xml";

         ApplicationContext applicationContext = new ClassPathXmlApplicationContext(xmlPath);

         // 输出获得实例

         System.out.println(applicationContext.getBean("scopeID"));

         System.out.println(applicationContext.getBean("scopeID"));

         // 两次输出结果相同,这说明Spring容器只创建了一个Scope类的实例

     }

 }
④运行结果:

3)、prototype作用域
a)、对需要保持会话状态的Bean(如Struts 2的Action类)应该使用prototype作用域。在使用prototype作用域时,Spring容器会为每个对该Bean的请求都创建一个新的实例。
b)、在Spring配置文件中,同样使用<bean>元素的scope属性,将Bean的作用域定义成prototype 。例如:
<bean id="scope" class="com.itheima.scope.Scope" scope=" prototype "/>
c)、src->com.itheima.scope
①beans4.xml
 <?xml version="1.0" encoding="UTF-8"?>

 <beans xmlns="http://www.springframework.org/schema/beans"

    xmlns:xsi="http://www.w3.org/2001/XMLSchema-instance"

 xsi:schemaLocation="http://www.springframework.org/schema/beans

                       http://www.springframework.org/schema/beans/spring-beans-4.3.xsd">

     <!--<bean id="scopeID" class="com.itheima.scope.Scope" scope="singleton"/> -->

       <bean id="scopeID" class="com.itheima.scope.Scope" scope="prototype"/>

       <!-- 在singleton作用域下,只创建一个Bean实例,而在prototype作用域下,每次创建不同的Bean实例 -->

 </beans>
②运行结果:

4、Bean的生命周期
1)、Spring容器可以管理Bean部分作用域的生命周期。
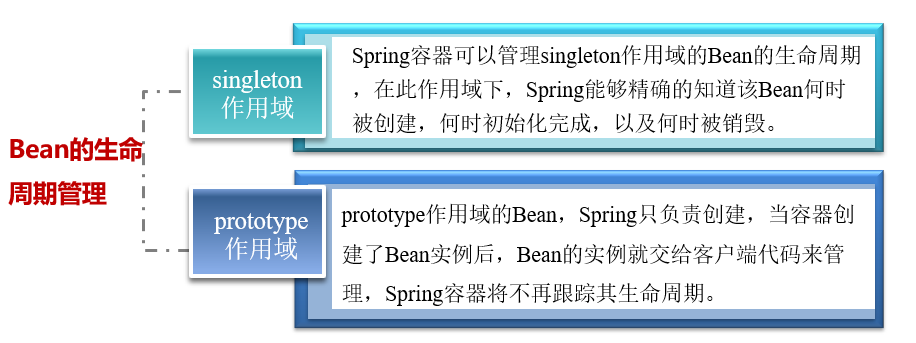
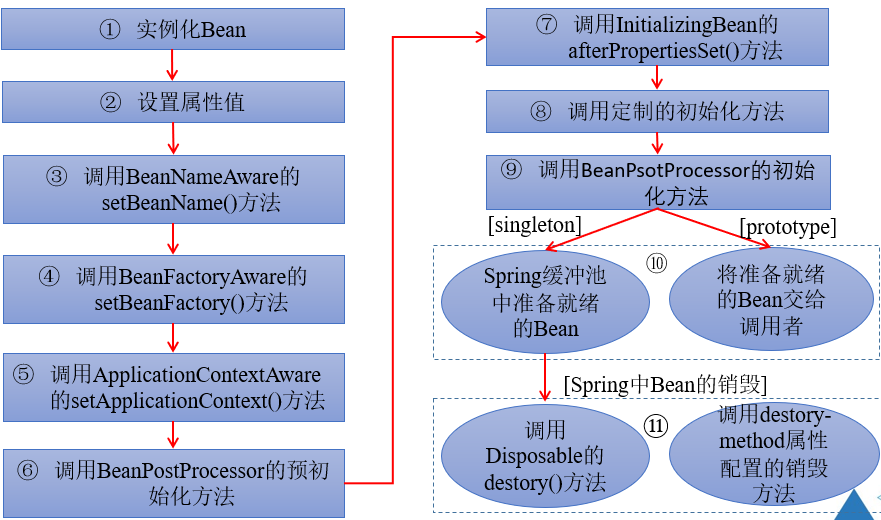
2)、Spring容器中Bean的生命周期流程如下图所示:
5、Bean的装配方式
Bean的装配可以理解为依赖关系注入,Bean的装配方式即Bean依赖注入的方式。Spring容器支持多种形式的Bean的装配方式,如基于XML的装配、基于注解(Annotation)的装配和自动装配(其中最常用的是基于注解的装配)。
1)、基于XML的装配
a)、2种方式:设值注入(Setter Injection)和构造注入(Constructor Injection)。
b)、设值注入要求一个bean必须满足2点要求:Bean类必须有一个默认的无参构造方法、Bean类必须为需要注入的属性提供对应的setter方法。
c)、使用设值注入时,在Spring配置文件中,需要使用<bean>元素的子元素<property>来为每个属性注入值;
d)、构造注入要求Bean类必须提供有参构造方法,配置文件中,需要使用<bean>元素的子元素<constructor-arg>来定义构造方法的参数,可以使用value属性(或子元素)来设置该参数的值。
src->com.itheima.assemble
①User.java
 package com.itheima.assemble;

 import java.util.List;

 import javax.swing.plaf.basic.BasicInternalFrameTitlePane.SystemMenuBar;

 public class User {

     private String username;

     private Integer password;

     private List<String> list;

     /*

      * 1、使用构造注入

      * 1.1、提供带所有参数的有参构造方法

      */

     public User (String username, Integer passward, List<String> list) { // 有参构造方法

         super(); // 调用父类的无参构造方法,可以不写

         this.username = username;

         this.password = passward;

         this.list = list;

     }

     /*

      * 2、使用设值注入

      * 2.1、提供默认无参构造方法

      * 2.2、为所有属性提供setter方法

      */

     public User() { // 无参构造方法

         super(); // 调用父类Object的无参构造方法,可以不写

     }

     public void setUsername(String username) {

         this.username = username;

     }

     public void setPassword(Integer password) {

         this.password = password;

     }

     public void setList(List<String> list) {

         this.list = list;

     }

     @Override

     public String toString() { // 重写父类的Object的toString方法

         return "User [username=" + username + ", password=" + password + ", list=" + list + "]";

     }

 }
②beans5.xml
 <?xml version="1.0" encoding="UTF-8"?>

 <beans xmlns="http://www.springframework.org/schema/beans"

    xmlns:xsi="http://www.w3.org/2001/XMLSchema-instance"

 xsi:schemaLocation="http://www.springframework.org/schema/beans

                       http://www.springframework.org/schema/beans/spring-beans-4.3.xsd">

     <!-- 1、使用构造注入方式装配User实例 -->

       <bean id = "user1ID" class = "com.itheima.assemble.User">

       <!--

         <constructor-arg> 元素用于定义构造方法的参数,

         其index表示其索引(从0开始),value属性用于设置注入的值,

           其子元素<list>来为User类中对应的list集合属性注入值。

       -->

       <constructor-arg index = "0" value = "tom" />

       <constructor-arg index = "1" value = "123456" />

       <constructor-arg index = "2" >

              <list>

                  <value>"constructorvalue1"</value>

                  <value>"constructorvalue2"</value>

           </list>

       </constructor-arg>

       </bean>

       <!-- 使用设值注入方式装配User实例 -->

     <bean id = "user2ID" class = "com.itheima.assemble.User">

     <!--

           <property>元素用于调用Bean实例中的setter方法完成属性的赋值,从而完成依赖注入,

           而其子元素<list>同样是为User类中对应的list集合属性注入值。

     -->

         <property name="username" value = "张三"></property>

           <property name="password" value = "654321"></property>

           <!-- 注入list集合 -->

           <property name="list">

                <list>

                    <value>"setlistvalue1"</value>

                    <value>"setlistvalue2"</value>

                   </list>

           </property>

       </bean>

 </beans>
③测试类:XmlBeanAssembleTest.java
 package com.itheima.assemble;

 import org.springframework.context.ApplicationContext;

 import org.springframework.context.support.ClassPathXmlApplicationContext;

 public class XmlBeanAssembleTest {

     public static void main(String[] args) {

         String xmlPath = "com/itheima/assemble/beans5.xml";

         ApplicationContext applicationContext = new ClassPathXmlApplicationContext(xmlPath);

         System.out.println(applicationContext.getBean("user1ID"));

         System.out.println(applicationContext.getBean("user2ID"));

     }

 }
④运行结果:

2)、基于Annotation的装配
a)、基于XML的装配可能会导致XML配置文件过于臃肿,给后续的维护和升级带来一定的困难。为此,Spring提供了对Annotation(注解)技术的全面支持。
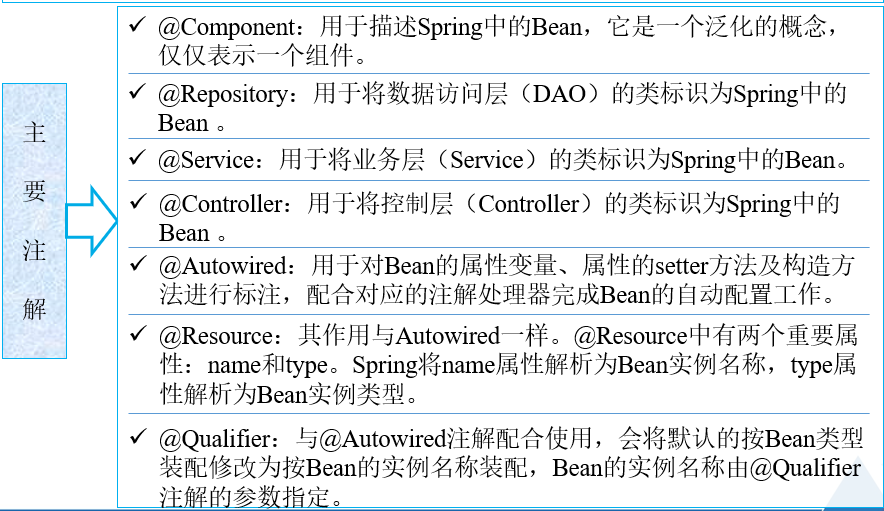
b)、src->com.itheima.annotation
①UserDao.java
 package com.itheima.annotation;

 public interface UserDao {

     public void save();

 }
②UserDaoImpl.java
 package com.itheima.annotation;

 import org.springframework.stereotype.Repository;

 @Repository("userDaoID")

 // @Repository注解将UserDaoImpl(数据访问层DAO层)的类标识为Spring中的Bean,其写法相当于配置文件中

 // <bean id = "userDaoID" class = "com.itheima.annotation.UserDaoImpl" />的编写

 public class UserDaoImpl implements UserDao{

     public void save() {

         System.out.println("userdaoID...save...");

     }

 }
③UserService.java
 package com.itheima.annotation;

 public interface UserService {

     public void save();

 }
④UserServiceImpl.java
 package com.itheima.annotation;

 import javax.annotation.Resource;

 import org.springframework.stereotype.Service;

 @Service("userServiceID")

 // @Service注解将(业务层的)UserServiceImpl类标识为Spring中的Bean,相当于配置文件中

 // <bean id = "userServiceID" class = "com.itheima.annotation.UserServiceImpl" />的编写

 public class UserServiceImpl implements UserService{

     @Resource(name = "userDaoID")

     /*

      * @Resource注解标注在UserDao的Bean的实例上,相当于配置文件中

      * <property name = "userDao" ref = "userDaoID" />的编写

      * @Resource默认按照Bean实例名称进行装配,2个属性:name属性解析为Bean实例名称;type属性解析为Bean实例类型

      * 如果都不指定,匹配过程为实例名称->实例类型,若都不匹配,则抛出NoSuchBeanDefinitionException异常

     */

     private UserDao userDao;

     public void save() {

         // 调用成员对象userDao中的save方法

         this.userDao.save();

         System.out.println("userServiceID...save...");

     }

 }
⑤UserController.java
 package com.itheima.annotation;

 import javax.annotation.Resource;

 import org.springframework.stereotype.Controller;

 @Controller("userControllerID")

 //@Controller注解标注了UserController类,这相当于配置文件中

 //<bean id = "userControllerID" class = "com.itheima.annotation.UserController" />的编写

 public class UserController {

     @Resource(name = "userServiceID")

     // @Resource注解标注在UserService的Bean的实例上,相当于配置文件中

     // <property name = "userService" ref = "userServiceID" />的编写

     private UserService userService;

     public void save() {

         this.userService.save();

         System.out.println("userControllerID...save...");

     }

 }
⑥beans6.xml
 <?xml version="1.0" encoding="UTF-8"?>

 <beans xmlns="http://www.springframework.org/schema/beans"

    xmlns:xsi="http://www.w3.org/2001/XMLSchema-instance"

 xmlns:context="http://www.springframework.org/schema/context"

 xsi:schemaLocation="http://www.springframework.org/schema/beans

                     http://www.springframework.org/schema/beans/spring-beans-4.3.xsd

                     http://www.springframework.org/schema/context

                     http://www.springframework.org/schema/context/spring-context-4.3.xsd">

      <!-- 以上补充context的约束信息,使用 context 命名空间 ,

          通过配置<context:annotation-config />来开启注解处理器 -->

      <!--分别定义3个Bean实例,这里不再需要配置子元素<property>完成setter方法依赖注入  -->

          <context:annotation-config />

          <bean id="userDaoID" class="com.itheima.annotation.UserDaoImpl" />

          <bean id="userServiceID" class="com.itheima.annotation.UserServiceImpl" />

          <bean id="userControllerID" class="com.itheima.annotation.UserController" />

 </beans>
⑦AnnotationAssembleTest.java
 package com.itheima.annotation;

 import org.springframework.context.ApplicationContext;

 import org.springframework.context.support.ClassPathXmlApplicationContext;

 //基于Annotation(注解)的装配

 public class AnnotationAssembleTest {

     public static void main(String[] args) {

         String xmlPath = "com/itheima/annotation/beans6.xml";

         ApplicationContext applicationContext = new ClassPathXmlApplicationContext(xmlPath);

         // 获取UserController的Bean实例userControllerID

         UserController userController = (UserController) applicationContext.getBean("userControllerID");

         userController.save();

     }

 }
⑧运行结果:

c)、除了可以像示例中通过<bean>元素来配置Bean外,还可以通过包扫描的形式来配置一个包下的所有Bean:
<context:component-scan base-package="Bean所在的包路径" />
d)、将beans6.xml文件中的13~16行代码替换成下面这个,运行效果一样。
<!-- Spring注解提供了另外一种高效的注解配置方式,(对包路径下的所有Bean文件进行扫描) -->

    <!--使用 context 命名空间 ,通知Spring扫描指定包下所有Bean类,进行注解解析 -->

        <context:component-scan base-package="com.itheima.annotation" />
3)、自动装配
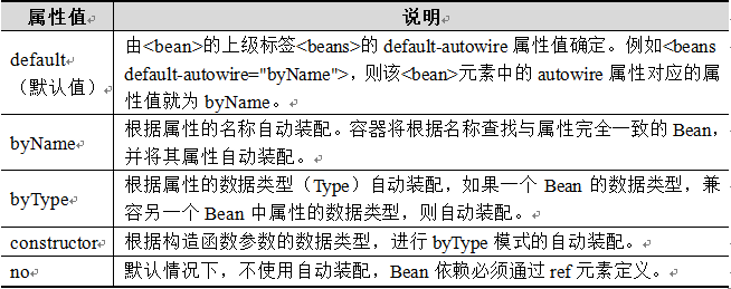
a)、所谓自动装配就是将一个Bean自动的注入到到其他Bean的Property中(也就是类成员变量赋值)。 Spring的<bean>元素中包含一个autowire属性,我们可以通过设置autowire的属性值来自动装配Bean。
b)、autowire属性有5个值,其值及说明下表所示:
c)、修改UserServiceImple.java和UserController.java,分别增加类属性的setter方法;修改Spring配置文件,使用autowire属性配置Bean;其他文件不用修改。
①UserServiceImple.java
 package com.itheima.annotation;

 import javax.annotation.Resource;

 import org.springframework.stereotype.Service;

 @Service("userServiceID")

 // @Service注解将(业务层的)UserServiceImpl类标识为Spring中的Bean,相当于配置文件中

 // <bean id = "userServiceID" class = "com.itheima.annotation.UserServiceImpl" />的编写

 public class UserServiceImpl implements UserService{

     @Resource(name = "userDaoID")

     /*

      * @Resource注解标注在UserDao的Bean的实例上,相当于配置文件中

      * <property name = "userDao" ref = "userDaoID" />的编写

      * @Resource默认按照Bean实例名称进行装配,2个属性:name属性解析为Bean实例名称;type属性解析为Bean实例类型

      * 如果都不指定,匹配过程为实例名称->实例类型,若都不匹配,则抛出NoSuchBeanDefinitionException异常

     */

     private UserDao userDao;

     // 添加类属性UserDao的setter方法

     public void setUserDao(UserDao userDao) {

         this.userDao = userDao;

     }

     public void save() {

         // 调用成员对象userDao中的save方法

         this.userDao.save();

         System.out.println("userServiceID...save...");

     }

 }
②UserController.java
 package com.itheima.annotation;

 import javax.annotation.Resource;

 import org.springframework.stereotype.Controller;

 @Controller("userControllerID")

 //@Controller注解标注了UserController类,这相当于配置文件中

 //<bean id = "userControllerID" class = "com.itheima.annotation.UserController" />的编写

 public class UserController {

     @Resource(name = "userServiceID")

     // @Resource注解标注在UserService的Bean的实例上,相当于配置文件中

     // <property name = "userService" ref = "userServiceID" />的编写

     private UserService userService;

     // 添加类属性UserService的setter方法

     public void setUserService(UserService userService) {

         this.userService = userService;

     }

     public void save() {

         this.userService.save();

         System.out.println("userControllerID...save...");

     }

 }
③beans6.xml
 <?xml version="1.0" encoding="UTF-8"?>

 <beans xmlns="http://www.springframework.org/schema/beans"

    xmlns:xsi="http://www.w3.org/2001/XMLSchema-instance"

 xmlns:context="http://www.springframework.org/schema/context"

 xsi:schemaLocation="http://www.springframework.org/schema/beans

                     http://www.springframework.org/schema/beans/spring-beans-4.3.xsd

                     http://www.springframework.org/schema/context

                     http://www.springframework.org/schema/context/spring-context-4.3.xsd">

     <!-- 使用bean元素的autowire属性完成自动装配,所谓自动装配,就是将一个Bean自动地注入到其他Bean的Property中 -->

     <!-- 注意:这里的id(除了最后一个)名称应对应setter方法中的参数(实例化对象),即设置了autowire之后,

         Spring会自动寻找userService Bean中的属性,并将属性名称与配置文件中定义的Bean做匹配,

         否则会报java.lang.NullPointerException异常。

      -->

     <bean id="userDao" class="com.itheima.annotation.UserDaoImpl" />

     <bean id="userService" class="com.itheima.annotation.UserServiceImpl" autowire="byName" />

     <bean id="userControllerID" class="com.itheima.annotation.UserController" autowire="byName"/>

 </beans>
④运行结果:

Java EE学习笔记(二)的更多相关文章
- Java IO学习笔记二
Java IO学习笔记二 流的概念 在程序中所有的数据都是以流的方式进行传输或保存的,程序需要数据的时候要使用输入流读取数据,而当程序需要将一些数据保存起来的时候,就要使用输出流完成. 程序中的输入输 ...
- Java IO学习笔记二:DirectByteBuffer与HeapByteBuffer
作者:Grey 原文地址:Java IO学习笔记二:DirectByteBuffer与HeapByteBuffer ByteBuffer.allocate()与ByteBuffer.allocateD ...
- java jvm学习笔记二(类装载器的体系结构)
欢迎装载请说明出处:http://blog.csdn.net/yfqnihao 在了解java虚拟机的类装载器之前,有一个概念我们是必须先知道的,就是java的沙箱,什 ...
- Java设计模式学习笔记(二) 简单工厂模式
前言 本篇是设计模式学习笔记的其中一篇文章,如对其他模式有兴趣,可从该地址查找设计模式学习笔记汇总地址 正文开始... 1. 简介 简单工厂模式不属于GoF23中设计模式之一,但在软件开发中应用也较为 ...
- Java基础学习笔记二十一 多线程
多线程介绍 学习多线程之前,我们先要了解几个关于多线程有关的概念.进程:进程指正在运行的程序.确切的来说,当一个程序进入内存运行,即变成一个进程,进程是处于运行过程中的程序,并且具有一定独立功能. 线 ...
- Java基础学习笔记二十六 JDBC
什么是JDBC JDBC(Java DataBase Connectivity)就是Java数据库连接,说白了就是用Java语言来操作数据库.原来我们操作数据库是在控制台使用SQL语句来操作数据库,J ...
- Java基础学习笔记二十八 管家婆综合项目
本项目为JAVA基础综合项目,主要包括: 熟练View层.Service层.Dao层之间的方法相互调用操作.熟练dbutils操作数据库表完成增删改查. 项目功能分析 查询账务 多条件组合查询账务 添 ...
- 《Thinking in Java》学习笔记(二)
1.Java方法的重载 如果几个方法都有相同的名字,区分它们就需要重载来完成. 构成重载的种类: 1)形参的个数不同 2) 形参的类型不同 3) 形参的顺序不同 注意,返回值.抛出的异常和修饰符的不 ...
- Java基础学习笔记二十二 网络编程
络通信协议 通过计算机网络可以使多台计算机实现连接,位于同一个网络中的计算机在进行连接和通信时需要遵守一定的规则,这就好比在道路中行驶的汽车一定要遵守交通规则一样.在计算机网络中,这些连接和通信的规则 ...
随机推荐
- sdut oj 排队买饭
数据结构实验之队列一:排队买饭 Time Limit: 1000MS Memory limit: 65536K 题目描述 中午买饭的人特多,食堂真是太拥挤了,买个饭费劲,理工大的小孩还是很聪明的,直接 ...
- PHP 中$_SERVER的用法
php编程中经常需要用到一些服务器的一些资料,我把常用的用高亮的方式贴出来,其余的放在后面.方便以后查阅$_SERVER['HTTP_ACCEPT_LANGUAGE']//浏览器语言 $_SERVER ...
- 对服务器上所有Word文件做全文检索的解决方案-Java
一.背景介绍 Word文档与日常办公密不可分,在实际应用中,当某一文档服务器中有很多Word文档,假如有成千上万个文档时,用户查找打开包含某些指定关键字的文档就变得很困难,目前这一问题没有好的解 ...
- Fast RCNN中RoI的映射关系
写在前面:下面讨论中Kernel Size为奇数,因为这样才能方便一致的确认Kernel中心. 在Fast RCNN中,为了大大减少计算量,没有进行2k次运算前向运算,而是进行了1次运算,然后在从po ...
- [C++]变量存储类别,指针和引用,类与对象,继承与派生的一些摘要
C++中共有四种存储类别标识符:auto/static/register/extern 1.auto 函数或分程序内定义的变量(包括形参)可以定义为auto(自动变量).如果不指定存储类别,则隐式定义 ...
- SPOJ:Red John is Back(DP)
Red John has committed another murder. But this time, he doesn't leave a red smiley behind. What he ...
- BZOJ_5416_[Noi2018]冒泡排序_DP+组合数+树状数组
BZOJ_5416_[Noi2018]冒泡排序_DP+组合数+树状数组 Description www.lydsy.com/JudgeOnline/upload/noi2018day1.pdf 好题. ...
- JAVA 需要理解的重点 二
1.常用设计模式 单例模式:懒汉式.饿汉式.双重校验锁.静态加载,内部类加载.枚举类加载.保证一个类仅有一个实例,并提供一个访问它的全局访问点. 代理模式:动态代理和静态代理,什么时候使用动态代理. ...
- npm安装cnpm淘宝镜像
npm set registry https://registry.npm.taobao.org # 注册模块镜像 npm set disturl https://npm.taobao.org/d ...
- CCF 201509-3 模板生成系统 (STL+模拟)
问题描述 成成最近在搭建一个网站,其中一些页面的部分内容来自数据库中不同的数据记录,但是页面的基本结构是相同的.例如,对于展示用户信息的页面,当用户为 Tom 时,网页的源代码是 而当用户为 Jerr ...
