UIButton 图片文字位置
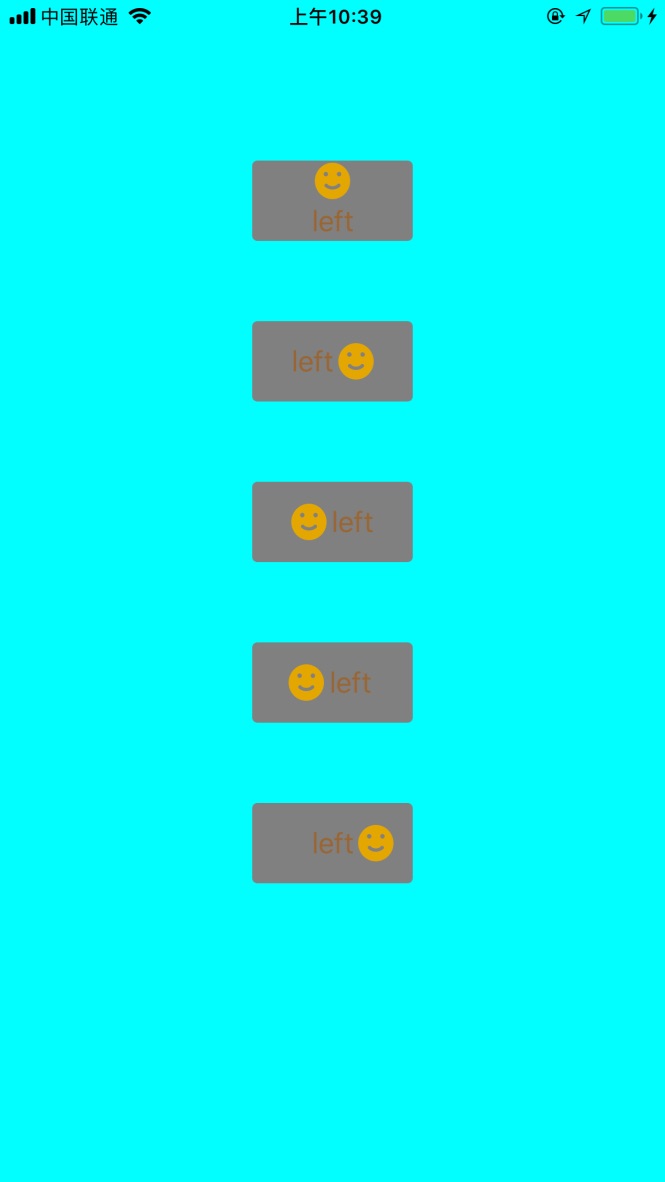
在实际开发过程中经常在按钮上添加文字和图片,位置和图片的位置根据需求放置也是不一样的。下面实现了各种显示方式,如下图:

UIButton+LSAdditions.h
//

//  UIButton+LSAdditions.h

//  ZLBiPhone

//

//  Created by xujinzhong on 18/3/14.

//  Copyright (c) 2018年 xujinzhong. All rights reserved.

//

#import <UIKit/UIKit.h>

@interface UIButton (LSAdditions)

//设置背景颜色

- (void)setBackgroundColor:(UIColor *)backgroundColor forState:(UIControlState)state;

#pragma mark 按钮图片标题显示位置

//上下居中,图片在上,文字在下

- (void)verticalCenterImageAndTitle:(CGFloat)spacing;

- (void)verticalCenterImageAndTitle; //默认6.0

//左右居中,文字在左,图片在右

- (void)horizontalCenterTitleAndImage:(CGFloat)spacing;

- (void)horizontalCenterTitleAndImage; //默认6.0

//左右居中,图片在左,文字在右

- (void)horizontalCenterImageAndTitle:(CGFloat)spacing;

- (void)horizontalCenterImageAndTitle; //默认6.0

//文字居中,图片在左边

- (void)horizontalCenterTitleAndImageLeft:(CGFloat)spacing;

- (void)horizontalCenterTitleAndImageLeft; //默认6.0

//文字居中,图片在右边

- (void)horizontalCenterTitleAndImageRight:(CGFloat)spacing;

- (void)horizontalCenterTitleAndImageRight; //默认6.0

@end
UIButton+LSAdditions.m
//

//  UIButton+LSAdditions.m

//  ZLBiPhone

//

//  Created by xujinzhong on 18/6/14.

//  Copyright (c) 2018年 xujinzhong. All rights reserved.

//

#import "UIButton+LSAdditions.h"

@implementation UIButton (LSAddtions)

/**

 *  添加按钮的背景颜色

 *

 *  @return

 */

- (void)setBackgroundColor:(UIColor *)backgroundColor forState:(UIControlState)state {

    [self setBackgroundImage:[UIButton imageWithColor:backgroundColor] forState:state];

}

+ (UIImage *)imageWithColor:(UIColor *)color {

    CGRect rect = CGRectMake(0.0f, 0.0f, 1.0f, 1.0f);

    UIGraphicsBeginImageContext(rect.size);

    CGContextRef context = UIGraphicsGetCurrentContext();

    CGContextSetFillColorWithColor(context, [color CGColor]);

    CGContextFillRect(context, rect);

    UIImage *image = UIGraphicsGetImageFromCurrentImageContext();

    UIGraphicsEndImageContext();

    return image;

}

/**

 *  判断按钮是否按下

 *

 *  @return

 */

-(BOOL)isExclusiveTouch

{

    return YES;

}

#pragma mark 按钮图片标题显示位置

- (void)verticalCenterImageAndTitle:(CGFloat)spacing

{

    CGSize imageSize = self.imageView.frame.size;

    CGSize titleSize = self.titleLabel.frame.size;

    self.titleEdgeInsets = UIEdgeInsetsMake(0.0, - imageSize.width, - (imageSize.height + spacing/), 0.0);

    titleSize = self.titleLabel.frame.size;

    self.imageEdgeInsets = UIEdgeInsetsMake(- (titleSize.height + spacing/), 0.0, 0.0, - titleSize.width);

}

- (void)verticalCenterImageAndTitle

{

    const int DEFAULT_SPACING = 6.0f;

    [self verticalCenterImageAndTitle:DEFAULT_SPACING];

}

- (void)horizontalCenterTitleAndImage:(CGFloat)spacing

{

    CGSize imageSize = self.imageView.frame.size;

    CGSize titleSize = self.titleLabel.frame.size;

    self.titleEdgeInsets = UIEdgeInsetsMake(0.0, - imageSize.width, 0.0, imageSize.width + spacing/);

    titleSize = self.titleLabel.frame.size;

    self.imageEdgeInsets = UIEdgeInsetsMake(0.0, titleSize.width + spacing/, 0.0, - titleSize.width);

}

- (void)horizontalCenterTitleAndImage

{

    const int DEFAULT_SPACING = 6.0f;

    [self horizontalCenterTitleAndImage:DEFAULT_SPACING];

}

- (void)horizontalCenterImageAndTitle:(CGFloat)spacing;

{

    self.titleEdgeInsets = UIEdgeInsetsMake(0.0,  0.0, 0.0,  - spacing/);

    self.imageEdgeInsets = UIEdgeInsetsMake(0.0, - spacing/, 0.0, 0.0);

}

- (void)horizontalCenterImageAndTitle;

{

    const int DEFAULT_SPACING = 6.0f;

    [self horizontalCenterImageAndTitle:DEFAULT_SPACING];

}

- (void)horizontalCenterTitleAndImageLeft:(CGFloat)spacing

{

    self.imageEdgeInsets = UIEdgeInsetsMake(0.0, - spacing, 0.0, 0.0);

}

- (void)horizontalCenterTitleAndImageLeft

{

    const int DEFAULT_SPACING = 6.0f;

    [self horizontalCenterTitleAndImageLeft:DEFAULT_SPACING];

}

- (void)horizontalCenterTitleAndImageRight:(CGFloat)spacing

{

    CGSize imageSize = self.imageView.frame.size;

    CGSize titleSize = self.titleLabel.frame.size;

    self.titleEdgeInsets = UIEdgeInsetsMake(0.0, - imageSize.width, 0.0, 0.0);

    titleSize = self.titleLabel.frame.size;

    self.imageEdgeInsets = UIEdgeInsetsMake(0.0, titleSize.width + imageSize.width + spacing, 0.0, - titleSize.width);

}

- (void)horizontalCenterTitleAndImageRight

{

    const int DEFAULT_SPACING = 6.0f;

    [self horizontalCenterTitleAndImageRight:DEFAULT_SPACING];

}

@end
现在测试代码如下:
#define ktopDistance 50

#define kwidth  90

#define kheight 50
@interface ViewController ()

@property (nonatomic, strong) UIButton *btnOne;

@property (nonatomic, strong) UIButton *btnTwo;

@property (nonatomic, strong) UIButton *btnThree;

@property (nonatomic, strong) UIButton *btnFour;

@property (nonatomic, strong) UIButton *btnFive;

@end

@implementation ViewController

- (void)viewDidLoad {

    [super viewDidLoad];

    self.view.backgroundColor = [UIColor cyanColor];

    CGFloat spacing = .f;

    //上下居中,图片在上,文字在下

    [self.btnOne verticalCenterImageAndTitle:spacing];

    [self.btnOne verticalCenterImageAndTitle]; //默认6.0

    //左右居中,文字在左,图片在右

    [self.btnTwo horizontalCenterTitleAndImage:spacing];

    [self.btnTwo horizontalCenterTitleAndImage]; //默认6.0

    //左右居中,图片在左,文字在右

    [self.btnThree horizontalCenterImageAndTitle:spacing];

    [self.btnThree horizontalCenterImageAndTitle]; //默认6.0

    //文字居中,图片在左边

    [self.btnFour horizontalCenterTitleAndImageLeft:spacing];

    [self.btnFour horizontalCenterTitleAndImageLeft]; //默认6.0

    //文字居中,图片在右边

    [self.btnFive horizontalCenterTitleAndImageRight:spacing];

    [self.btnFive horizontalCenterTitleAndImageRight]; //默认6.0

}

-(UIButton *)btnOne{

    if (!_btnOne) {

        _btnOne = [UIButton new];

        _btnOne.backgroundColor = [UIColor grayColor];

        _btnOne.layer.cornerRadius = .f;

        _btnOne.layer.masksToBounds = YES;

        [_btnOne setTitle:@"left" forState:UIControlStateNormal];

        [_btnOne setImage:[UIImage imageNamed:@"success"] forState:UIControlStateNormal];

        [_btnOne setTitleColor:[UIColor brownColor] forState:UIControlStateNormal];

        [self.view addSubview:_btnOne];

        [_btnOne mas_makeConstraints:^(MASConstraintMaker *make) {

            make.top.offset();

            make.centerX.equalTo(self.view);

            make.width.offset(kwidth);

            make.height.offset(kheight);

        }];

    }

    return _btnOne;

}

-(UIButton *)btnTwo{

    if (!_btnTwo) {

        _btnTwo = [UIButton new];

        _btnTwo.backgroundColor = [UIColor grayColor];

        _btnTwo.layer.cornerRadius = .f;

        _btnTwo.layer.masksToBounds = YES;

        [_btnTwo setTitle:@"left" forState:UIControlStateNormal];

        [_btnTwo setImage:[UIImage imageNamed:@"success"] forState:UIControlStateNormal];

        [_btnTwo setTitleColor:[UIColor brownColor] forState:UIControlStateNormal];

        [self.view addSubview:_btnTwo];

        [_btnTwo mas_makeConstraints:^(MASConstraintMaker *make) {

            make.top.equalTo(self.btnOne.mas_bottom).offset(ktopDistance);

            make.centerX.equalTo(self.view);

            make.width.offset(kwidth);

            make.height.offset(kheight);

        }];

    }

    return _btnTwo;

}

-(UIButton *)btnThree{

    if (!_btnThree) {

        _btnThree = [UIButton new];

        _btnThree.backgroundColor = [UIColor grayColor];

        _btnThree.layer.cornerRadius = .f;

        _btnThree.layer.masksToBounds = YES;

        [_btnThree setTitle:@"left" forState:UIControlStateNormal];

        [_btnThree setImage:[UIImage imageNamed:@"success"] forState:UIControlStateNormal];

        [_btnThree setTitleColor:[UIColor brownColor] forState:UIControlStateNormal];

        [self.view addSubview:_btnThree];

        [_btnThree mas_makeConstraints:^(MASConstraintMaker *make) {

            make.top.equalTo(self.btnTwo.mas_bottom).offset(ktopDistance);

            make.centerX.equalTo(self.view);

            make.width.offset(kwidth);

            make.height.offset(kheight);

        }];

    }

    return _btnThree;

}

-(UIButton *)btnFour{

    if (!_btnFour) {

        _btnFour = [UIButton new];

        _btnFour.backgroundColor = [UIColor grayColor];

        _btnFour.layer.cornerRadius = .f;

        _btnFour.layer.masksToBounds = YES;

        [_btnFour setTitle:@"left" forState:UIControlStateNormal];

        [_btnFour setImage:[UIImage imageNamed:@"success"] forState:UIControlStateNormal];

        [_btnFour setTitleColor:[UIColor brownColor] forState:UIControlStateNormal];

        [self.view addSubview:_btnFour];

        [_btnFour mas_makeConstraints:^(MASConstraintMaker *make) {

            make.top.equalTo(self.btnThree.mas_bottom).offset(ktopDistance);

            make.centerX.equalTo(self.view);

            make.width.offset(kwidth);

            make.height.offset(kheight);

        }];

    }

    return _btnFour;

}

-(UIButton *)btnFive{

    if (!_btnFive) {

        _btnFive = [UIButton new];

        _btnFive.backgroundColor = [UIColor grayColor];

        _btnFive.layer.cornerRadius = .f;

        _btnFive.layer.masksToBounds = YES;

        [_btnFive setTitle:@"left" forState:UIControlStateNormal];

        [_btnFive setImage:[UIImage imageNamed:@"success"] forState:UIControlStateNormal];

        [_btnFive setTitleColor:[UIColor brownColor] forState:UIControlStateNormal];

        [self.view addSubview:_btnFive];

        [_btnFive mas_makeConstraints:^(MASConstraintMaker *make) {

            make.top.equalTo(self.btnFour.mas_bottom).offset(ktopDistance);

            make.centerX.equalTo(self.view);

            make.width.offset(kwidth);

            make.height.offset(kheight);

        }];

    }

    return _btnFive;

}

@end
UIButton 图片文字位置的更多相关文章
- UIButton图片文字位置的四种情况
我们在做项目的过程中经常会遇到各定制UIButton 1.左边图片,右边文字 2.左边文字,右边图片 3.上边图片,下边文字 4.上边文字,下边图片 针对这四种情况 使用UIButton的catego ...
- UIButton图片文字控件位置自定义(图片居右文字居左、图片居中文字居中、图片居左文字消失等)
在开发中经常会碰到需要对按钮中的图片文字位置做调整的需求.第一种方式是通过设置按钮中图片文字的偏移量.通过方法setTitleEdgeInsets和setImageEdgeInsets实现 代码如下: ...
- iOS UIButton 图片文字上下垂直布局 解决方案
实现如图所示效果: 这是一个UIButton,需要改变image和title相对位置. 解决如下: //设置文字偏移:向下偏移图片高度+向左偏移图片宽度 (偏移量是根据[图片]大小来的,这点是关键)b ...
- iOS UIButton 图片文字左右互移 位置对调 解决方案
实现类似效果: 代码实现: btnGrade.titleEdgeInsets = UIEdgeInsetsMake(, -(btnGrade.imageView?.bounds.width)!, , ...
- UIButton和UINavigationItem设置图片和文字位置
1.UIButton设置文字位置 有些时候我们想让UIButton的title居左对齐,我们设置 btn.textLabel.textAlignment = UITextAlignmentLeft 是 ...
- iOS·UIButton如何文字在下图片在上
创建子类继承自UIButton,在layoutSubviews方法中改变文字和图片的位置就可以了,同理,稍作改变,可以写出文字在上图片在下.本文只给出文字在下图片在上的代码 -(void)layout ...
- swift 第四课 随意 设置button 图片和文字 位置
项目中经常遇到按钮改变文字和图片位置的情况,所以尝试写一个 button 的分类: 参照连接 http://blog.csdn.net/dfqin/article/details/37813591 i ...
- UIButton的titleEdgeInsets属性和imageEdgeInsets属性实现图片文字按要求排列
button可以设置 titleEdgeInsets属性和 imageEdgeInsets属性来调整其image和label相对位置,具体参考http://stackoverflow.com/ques ...
- UIButton 设置图片文字垂直居中排列
#pragma mark 按钮图片文字垂直居中排列 -(void)setButtonContentCenter:(UIButton *)button { CGSize imgViewSize,titl ...
随机推荐
- fabric添加多主机ssh互信
最近折腾fabric,把服务器ssh互信用fabric写了一遍,单向互信,master可以无密码访问client,具体如下: 执行:fab -f ./copyrsa.py allsshkey 即可, ...
- AR/VR-AR:AR
ylbtech-AR/VR-AR:AR 增强现实技术(Augmented Reality,简称 AR),是一种实时地计算摄影机影像的位置及角度并加上相应图像.视频.3D模型的技术,这种技术的目标是在屏 ...
- [bzoj2154]Crash的数字表格(mobius反演)
题意:$\sum\limits_{i = 1}^n {\sum\limits_{j = 1}^m {lcm(i,j)} } $ 解题关键: $\sum\limits_{i = 1}^n {\sum\l ...
- Hash表的实现
#include "stdafx.h" #include <iostream> #include <exception> using namespace s ...
- 常用的Elasticseaerch检索技巧汇总
本篇博客是对前期工作中遇到ES坑的一些小结,顺手记录下,方便日后查阅. 0.前言 为了讲解不同类型ES检索,我们将要对包含以下类型的文档集合进行检索: . title 标题: . authors 作者 ...
- Spring Boot实现学生信息增删改查
上一篇博客写了如何初始化一个简单的Spring Boot项目,这次详细记录一下如何连接数据库并实现增删改查基本操作. 我使用的是MySQL 5.5+Navicat,MySQL量级比较轻,当然微软的SQ ...
- python3 Flask安装
虚拟环境 建议在开发环境和生产环境下都使用虚拟环境来管理项目的依赖. 为什么要使用虚拟环境?随着你的 Python 项目越来越多,你会发现不同的项目会需要 不同的版本的 Python 库.同一个 Py ...
- 3dmax视频
http://wenku.baidu.com/course/list/514?tagID=177
- jzoj6003. 【THUWC2019模拟2019.1.16】Square (乱搞)
题面 题解 不难发现,如果一行最后被染色,那么这行的颜色肯定一样,如果倒数第二个被染色,那么除了被最后一个染色的覆盖的那一部分剩下的颜色肯定一样 于是题目可以转化为每一次删去一行或一列颜色相同的,问最 ...
- Nginx在Linux里安装 以及nginx实现负载均衡
Nginx 一.在Linux里安装软件 1. rpm命令 rpm: redhat package manager,红帽软件包管理套件 常用命令: 安装:rpm -ivh 软件包 i :安装模式 v : ...
