Nginx四层负载均衡
Nginx四层负载均衡概述
什么是四层负载均衡
四层负载均衡是基于传输层协议包来封装的(如:TCP/IP),那我们前面使用到的七层是指的应用层,他的组装在四层的基础之上,无论四层还是七层都是指的OSI网络模型。
四层负载均衡应用场景
1、四层+七层来做负载均衡,四层可以保证七层的负载均衡的高可用性;如:nginx就无法保证自己的服务高可用,需要依赖LVS或者keepalive。
2、如:tcp协议的负载均衡,有些请求是TCP协议的(mysql、ssh),或者说这些请求只需要使用四层进行端口的转发就可以了,所以使用四层负载均衡。
四层 + 七层构建大规模集群架构使用场景
 

四层负载均衡总结
1、四层负载均衡仅能转发TCP/IP协议、UDP协议、通常用来转发端口,如:tcp/22、udp/53;
2、四层负载均衡可以用来解决七层负载均衡端口限制问题;(七层负载均衡最大使用65535个端口号)
3、四层负载均衡可以解决七层负载均衡高可用问题;(多台后端七层负载均衡能同事的使用)
4、四层的转发效率比七层的高得多,但仅支持tcp/ip协议,不支持http和https协议;
5、通常大并发场景通常会选择使用在七层负载前面增加四层负载均衡。
nginx四层负载均衡场景实践
Nginx如何配置四层负载均衡
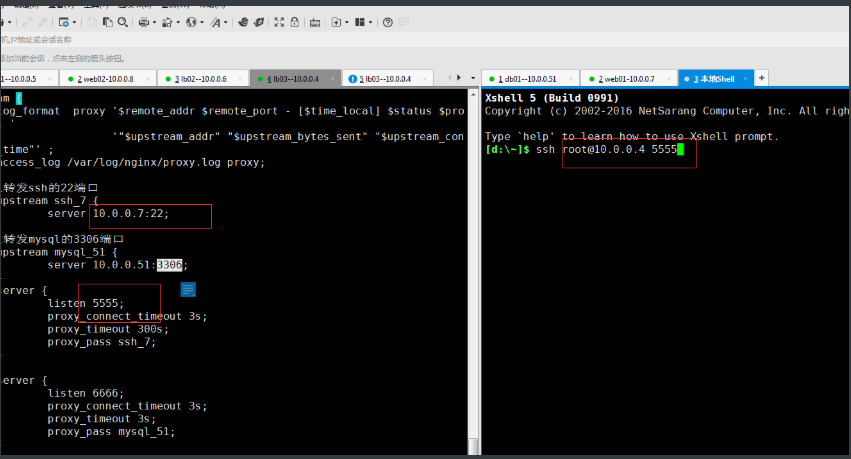
1、通过访问负载均衡的5555端口,实际是后端的web01的22端口在提供服务;
2、通过访问负载均衡的6666端口,实际是后端的mysql的3306端口在提供服务。
先配置两台lb负载均衡
[root@lb02 ~]# cat /etc/yum.repos.d/nginx.repo[nginx-stable]name=nginx stable repobaseurl=http://nginx.org/packages/centos/7/$basearch/gpgcheck=0enabled=1gpgkey=https://nginx.org/keys/nginx_signing.key#在lb02上安装nginx[root@lb02 yum.repos.d]# yum install -y nginx#在lb02上同步lb01的所有nginx相关配置[root@lb02 ~]# scp -r root@172.16.1.5:/etc/nginx /etc/#启动nginx[root@lb02 conf.d]# nginx -tnginx: the configuration file /etc/nginx/nginx.conf syntax is oknginx: configuration file /etc/nginx/nginx.conf test is successful[root@lb02 conf.d]# systemctl enable nginxCreated symlink from /etc/systemd/system/multi-user.target.wants/nginx.service to /usr/lib/systemd/system/nginx.service.[root@lb02 conf.d]# nginx
1.创建存放四层负载均衡配置文件的目录
[root@lb03 ~]# vim /etc/nginx/nginx.confevents {....}include /etc/nginx/conf.c/*.conf;http {.....}[root@lb03 ~]# mkdir /etc/nginx/conf.c
2.配置四层负载均衡
[root@lb03 conf.c]# cat lb_domain.confstream {upstream lb {server 172.16.1.5:80 weight=5 max_fails=3 fail_timeout=30s;server 172.16.1.6:80 weight=5 max_fails=3 fail_timeout=30s;}server {listen 80;proxy_connect_timeout 3s;proxy_timeout 3s;proxy_pass lb;}}[root@lb03 conf.c]# nginx -tnginx: the configuration file /etc/nginx/nginx.conf syntax is oknginx: configuration file /etc/nginx/nginx.conf test is successful[root@lb03 conf.c]# nginx -s reload#配置本机hosts解析后浏览器访问并查看nginx日志
3.四层负载均衡开启日志
#四层负载均衡是没有access的日志的,因为在nginx.conf的配置中,access的日志格式是配置在http下的,而四层复杂均衡配置实在http以外的;#如果需要日志则需要配置在stream下面[root@web03 conf.c]# cat lb_domain.confstream {log_format proxy '$remote_addr $remote_port - [$time_local] $status $protocol ''"$upstream_addr" "$upstream_bytes_sent" "$upstream_connect_time"' ;access_log /var/log/nginx/proxy.log proxy;upstream lb {server 172.16.1.5:80 weight=5 max_fails=3 fail_timeout=30s;server 172.16.1.6:80 weight=5 max_fails=3 fail_timeout=30s;}server {listen 80;proxy_connect_timeout 3s;proxy_timeout 3s;proxy_pass lb;}}
域名解析到lb03上,再次登录
查看日志:
[root@lb03 ~]# tail -f /var/log/nginx/proxy.log541055 - lb03 - TCP - 10.0.0.1 - 1656 - 80 - 75.856 - 200 - 28/Aug/2019:03:22:50 +0800344557 - lb03 - TCP - 10.0.0.1 - 1658 - 80 - 75.850 - 200 - 28/Aug/2019:03:22:50 +0800284545 - lb03 - TCP - 10.0.0.1 - 1654 - 80 - 75.957 - 200 - 28/Aug/2019:03:22:50 +0800225560 - lb03 - TCP - 10.0.0.1 - 1659 - 80 - 75.858 - 200 - 28/Aug/2019:03:22:50 +0800
使用nginx四层负载均衡实现tcp的转发
请求负载均衡 5555 ---> 172.16.1.7:22;请求负载均衡 6666 ---> 172.16.1.51:3306;
配置nginx四层负载均衡实现tcp的转发
[root@lb4-01 ~]# cat /etc/nginx/conf.c/lb_domain.confstream {log_format proxy '$remote_addr $remote_port - [$time_local] $status $protocol ''"$upstream_addr" "$upstream_bytes_sent" "$upstream_connect_time"' ;access_log /var/log/nginx/proxy.log proxy;#定义转发ssh的22端口upstream ssh_7 {server 10.0.0.7:22;}#定义转发mysql的3306端口upstream mysql_51 {server 10.0.0.51:3306;}server {listen 5555;proxy_connect_timeout 3s;proxy_timeout 300s;proxy_pass ssh_7;}server {listen 6666;proxy_connect_timeout 3s;proxy_timeout 3s;proxy_pass mysql_51;}}
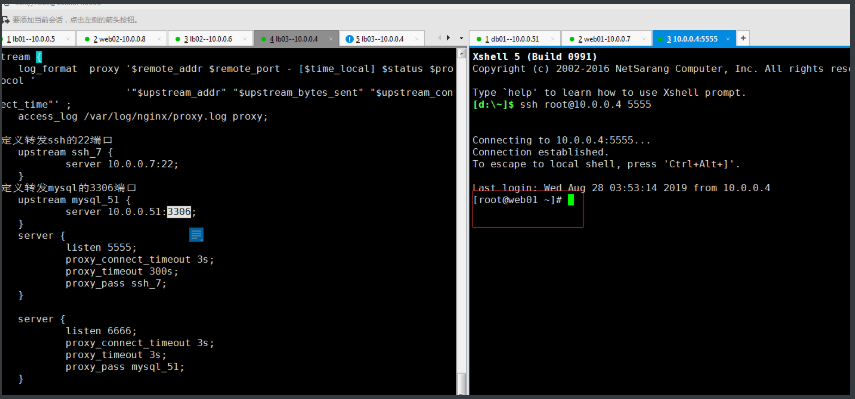
使用本地连接
ssh root@10.0.0.4 5555会自动跳转到端口所指定的服务器上
输入密码

自动连接到5555端口指定的服务器,跳转到web01
Nginx四层负载均衡的更多相关文章
- nginx四层负载均衡配置
nginx四层负载均衡配置代理Mysql集群 环境如下: ip 192.168.6.203 Nginx ip 192.168.6.*(多台) Mysql 步骤一 查看Nginx是否安装stream模块 ...
- Nginx四层负载均衡概述
目录 Nginx四层负载均衡概述 什么是负载均衡 负载均衡应用场景 四层,七层集群架构 四层负载均衡总结 Nginx如何配置四层负载均衡 nginx四层负载均衡端口转发 Nginx四层负载均衡概述 什 ...
- 14、Nginx四层负载均衡
1.Nginx四层负载均衡基本概述 1.1.什么是四层负载均衡 四层负载均衡基于传输层协议包来封装的(如:TCP/IP),那我们前面使用到的七层是指的应用层,它的组装在四层基础之上,无论四层还是七层都 ...
- 安装Nginx四层负载均衡
Nginx1.9开始支持tcp层的转发,通过stream实现的,而socket也是基于tcp通信. stream模块默认不安装的,需要手动添加参数:–with-stream,官方下载地址:downlo ...
- 14.Nginx四层负载均衡
1.七层负载均衡: 根据url 调度不同的集群 url.cheng.com 10.0.0.5 10.0.0.7 /pass 10.0.0.8 /user 1.web01和web02配置 (只不过代码不 ...
- Nginx 四层负载均衡
目录 四层负载均衡概述 配置七层负载均衡 配置四层负载均衡 四层负载均衡概述 四层负载均衡是基于IP+端口的负载均衡,七层负载均衡是基于URL或主机名等应用层信息的负载均衡. 其他层负载均衡(转载): ...
- linux+asp.net core+nginx四层负载均衡
Linux Disibutaion:Ubuntu 16.04.1 LTS Web Server:Nginx.Kestrel 关于如何在linux中部署asp.net core我这里不再详细介绍,可以参 ...
- 配置Nginx四层负载均衡
nginx 支持TCP转发和负载均衡的支持 实现下面的架构: 看配置: #user nobody; worker_processes 1; #error_log logs/error.log; #er ...
- Nginx四层负载均衡1
1.Nginx负载均衡Redis 服务器 IP地址 作用 系统版本 Nginx代理服务器 10.0.0.38 负载均衡服务器 Rocky8.6 Redis服务器1 10.0.0.18 Redis服务器 ...
随机推荐
- Opacity函数-transparentize()、 fade-out()函数
transparentize() 和 fade-out() 函数所起作用刚好与 opacify() 和 fade-in() 函数相反,让颜色更加的透明.这两个函数会让透明值做减法运算,当计算出来的结果 ...
- IBM和DoE推出世界上最快的超级计算机
IBM和美国能源部的橡树岭国家实验室今天发布了该部门最新的超级计算机Summit.IBM声称峰会目前是世界上“最强大,最聪明的科学超级计算机”,其峰值性能每秒高达20万亿次.当新的榜单在本月晚些时候发 ...
- JavaSE---锁
1.概述 java中提供了种类丰富的锁, 每种锁因其特性不同,在合适的场景下发挥非常高的效率:
- spring boot 热部署devtools实现(成功,主要是添加依赖后配置setting)
1.devtools spring为开发者提供了一个名为spring-boot-devtools的模块来使Spring Boot应用支持热部署,提高开发者的开发效率,无需手动重启Spring Boot ...
- 【leetcode】44. Wildcard Matching
题目如下: 解题思路:本题和[leetcode]97. Interleaving String非常相似,同样可以采用动态规划的方法.记dp[i][j] = 1或者0 表示pattern[0:i]是否匹 ...
- boost heap
1. using boost::heap::priority_queue #include <boost/heap/priority_queue.hpp> #include <ios ...
- 英语单词deprecated
deprecated 来源——fdisk /dev/sdb [root@centos65 ~]# fdisk /dev/sdb WARNING: DOS-compatible mode is depr ...
- Ext js-02 -官方API文档使用
官方API文档地址: http://docs.sencha.com/extjs/6.5.3/classic/Ext.html 打开网页如下: 1.选择所使用的Ext js版本,后面offline do ...
- hdu 5120 Intersection (圆环面积相交->圆面积相交)
Problem Description Matt is a big fan of logo design. Recently he falls in love with logo made up by ...
- 【HDOJ6600】Just Skip The Problem(签到)
题意:询问n!模1e6+7的结果 n<=1e9 思路: #include<bits/stdc++.h> using namespace std; typedef long long ...