ZYThumbnailTableView类似于小型阅读器
Demo github地址: https://github.com/liuzhiyi1992/ZYThumbnailTableView
原文地址:http://zyden.vicp.cc/zythumbnailtableview/
欢迎转载,请注明出处,谢谢
可展开型预览TableView,开放接口,完全自由定制
虽然最近很忙,天天被html+css虐待,但是在许多朋友的压力下,最近还是抽空完成了一个新轮子ZYThumbnailTableView。以下严格按照小学语文老师教的方式排版:
Summary:
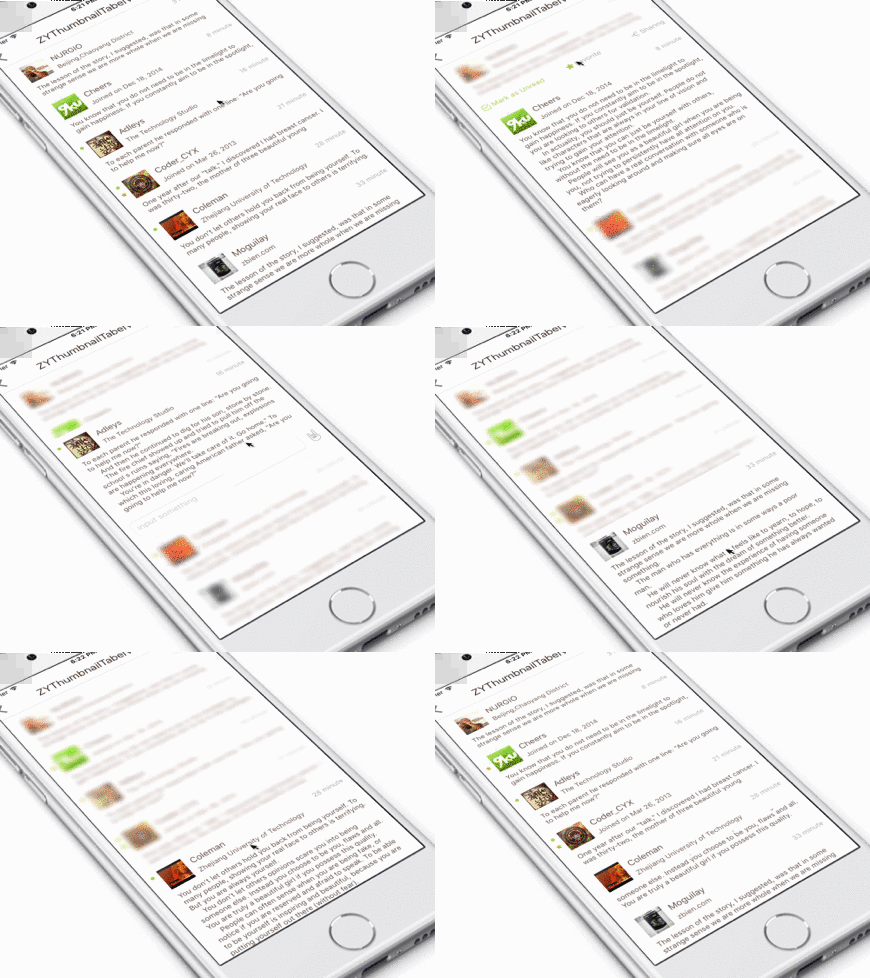
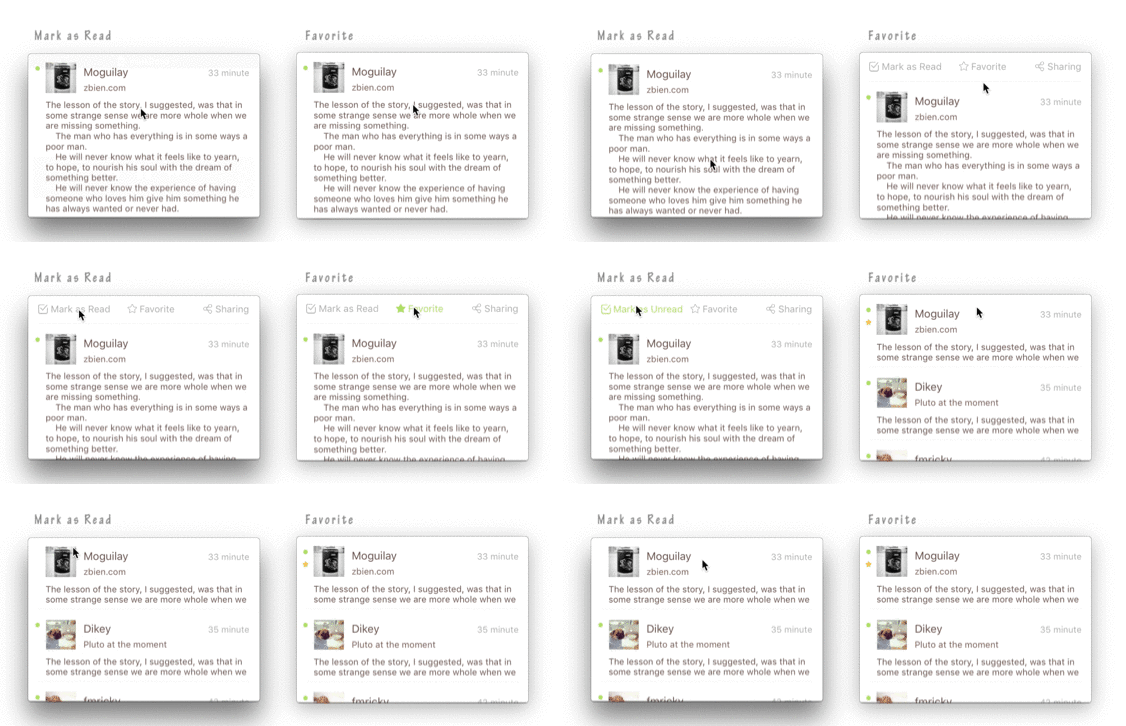
tableView的皮肤,类似一个小型app的强大交互心脏,四肢高度解耦高度自由定制,每个cell其实都是一个业务的缩略view,原谅我语文不太好不懂表达,这样的缩略view下文就叫做thumbnailView,可以根据上下手势展开更多的功能视图块,这些视图块已经开放了接口,支持使用者自己diy提供创建,同时接口中带的参数基本满足使用者需要的交互,当然tableviewCell也是完全自由diy的,规矩,先上效果图。

工作特点:tableViewCell充当一个缩略内容的容器,初始内容展示局限于cellHeight,当cell被点击后,根据缩略view内容重新计算出完整的高度,装入另外一个容器中完整展示出来,并且可以上下拖拽扩展出上下功能视图。
自由定制:看见的除了功能以外,全部视图都开放接口灵活Diy,tableViewCell,头部扩展视图(topView),底部扩展视图(bottomView)都是自己提供。
使用简单:只需要把自己的tableViewCell,topView,bottomView配置给ZYThumbnailTableViewController对象。
profile(可略过):
Block:
- ConfigureTableViewCellBlock = () -> UITableViewCell?
- UpdateTableViewCellBlock = (cell: UITableViewCell, -indexPath: NSIndexPath) -> Void
- CreateTopExpansionViewBlock = (indexPath: NSIndexPath) -> UIView
- CreateBottomExpansionViewBlock = () -> UIView
Define:
- NOTIFY_NAME_DISMISS_PREVIEW
通知名(让展现出来的thumbnailView消失)
- MARGIN_KEYBOARD_ADAPTATION
自动处理键盘遮挡输入控件后,键盘与输入控件保持的间距(自动处理键盘遮挡事件使用ZYKeyboardUtil实现
- TYPE_EXPANSION_VIEW_TOP
处理展开抖动事件时,顶部扩展控件的标识
- TYPE_EXPANSION_VIEW_BOTTOM
处理展开抖动事件时,底部扩展控件的标识
Property:
开放:
- tableViewCellHeight
- tableViewDataList
- tableViewCellReuseId
- tableViewBackgroudColor
- keyboardAdaptiveView 你自定义控件里如果有希望不被键盘遮挡的输入控件,赋值给他,会帮你==自动处理遮盖事件==
私有:
- mainTableView
- clickIndexPathRow 记录被点击cell的indexPath row
- spreadCellHeight 存储thumbnailCell展开后的真实高度
- cellDictionary 存储所有存活中的cell
- thumbnailView 缩略view
- thumbnailViewCanPan 控制缩略view展开(扩展topView&buttomView)手势是否工作
- animator UI物理引擎控制者
- expandAmplitude view展开时抖动动作的振幅
- keyboardUtil 自动处理键盘遮挡事件工具对象ZYKeyboardUtil
Delegate func:
- optional func zyTableViewDidSelectRow(tableView: UITableView, indexPath: NSIndexPath)
对外会用到的func:
- dismissPreview()
让thumbnailView消失,在TopView,BottomView等没有zyThumbnailTableView对象的地方可以使用通知NOTIFY_NAME_DISMISS_PREVIEW
- reloadMainTableView()
重新加载tableView
Usage:
——结合Demo介绍使用方法:
创建ZYThumbnailTableViewController对象:
<code class="language-swift hljs fix has-numbering" style="display: block; padding: 0px; color: inherit; box-sizing: border-box; font-family: 'Source Code Pro', monospace;font-size:undefined; white-space: pre; border-radius: 0px; word-wrap: normal; background: transparent;"><span class="hljs-attribute" style="box-sizing: border-box;">zyThumbnailTableVC </span>=<span class="hljs-string" style="color: rgb(0, 136, 0); box-sizing: border-box;"> ZYThumbnailTableViewController()</span></code><ul class="pre-numbering" style="box-sizing: border-box; position: absolute; width: 50px; top: 0px; left: 0px; margin: 0px; padding: 6px 0px 40px; border-right-width: 1px; border-right-style: solid; border-right-color: rgb(221, 221, 221); list-style: none; text-align: right; background-color: rgb(238, 238, 238);"><li style="box-sizing: border-box; padding: 0px 5px;">1</li></ul>
配置tableViewCell必须的参数:cell高,cell的重用标志符,tableView的数据源等
<code class="language-swift hljs avrasm has-numbering" style="display: block; padding: 0px; color: inherit; box-sizing: border-box; font-family: 'Source Code Pro', monospace;font-size:undefined; white-space: pre; border-radius: 0px; word-wrap: normal; background: transparent;">zyThumbnailTableVC<span class="hljs-preprocessor" style="color: rgb(68, 68, 68); box-sizing: border-box;">.tableViewCellReuseId</span> = <span class="hljs-string" style="color: rgb(0, 136, 0); box-sizing: border-box;">"DIYTableViewCell"</span>
zyThumbnailTableVC<span class="hljs-preprocessor" style="color: rgb(68, 68, 68); box-sizing: border-box;">.tableViewCellHeight</span> = <span class="hljs-number" style="color: rgb(0, 102, 102); box-sizing: border-box;">100.0</span>
//当然cell高可以在任何时候动态配置
zyThumbnailTableVC<span class="hljs-preprocessor" style="color: rgb(68, 68, 68); box-sizing: border-box;">.tableViewDataList</span> = dataList
zyThumbnailTableVC<span class="hljs-preprocessor" style="color: rgb(68, 68, 68); box-sizing: border-box;">.tableViewBackgroudColor</span> = UIColor<span class="hljs-preprocessor" style="color: rgb(68, 68, 68); box-sizing: border-box;">.whiteColor</span>()
//背景颜色可不设置,默认为白色</code><ul class="pre-numbering" style="box-sizing: border-box; position: absolute; width: 50px; top: 0px; left: 0px; margin: 0px; padding: 6px 0px 40px; border-right-width: 1px; border-right-style: solid; border-right-color: rgb(221, 221, 221); list-style: none; text-align: right; background-color: rgb(238, 238, 238);"><li style="box-sizing: border-box; padding: 0px 5px;">1</li><li style="box-sizing: border-box; padding: 0px 5px;">2</li><li style="box-sizing: border-box; padding: 0px 5px;">3</li><li style="box-sizing: border-box; padding: 0px 5px;">4</li><li style="box-sizing: border-box; padding: 0px 5px;">5</li><li style="box-sizing: border-box; padding: 0px 5px;">6</li></ul>
接下来给ZYTableView配置你自己的tableViewCell,当然除了createCell外还可以在里面进行其他额外的操作,不过这个Block只会在需要生成cell的时候被调用,而重用cell并不会
<code class="language-swift hljs cs has-numbering" style="display: block; padding: 0px; color: inherit; box-sizing: border-box; font-family: 'Source Code Pro', monospace;font-size:undefined; white-space: pre; border-radius: 0px; word-wrap: normal; background: transparent;"><span class="hljs-comment" style="color: rgb(136, 0, 0); box-sizing: border-box;">//--------insert your diy tableview cell</span>
zyThumbnailTableVC.configureTableViewCellBlock = {
    <span class="hljs-keyword" style="color: rgb(0, 0, 136); box-sizing: border-box;">return</span> DIYTableViewCell.createCell()
}</code><ul class="pre-numbering" style="box-sizing: border-box; position: absolute; width: 50px; top: 0px; left: 0px; margin: 0px; padding: 6px 0px 40px; border-right-width: 1px; border-right-style: solid; border-right-color: rgb(221, 221, 221); list-style: none; text-align: right; background-color: rgb(238, 238, 238);"><li style="box-sizing: border-box; padding: 0px 5px;">1</li><li style="box-sizing: border-box; padding: 0px 5px;">2</li><li style="box-sizing: border-box; padding: 0px 5px;">3</li><li style="box-sizing: border-box; padding: 0px 5px;">4</li></ul>
配置cell的update方法,tableView配置每个cell必经之处,除了updateCell可以添加额外的操作。这里要注意updateCell的时候建议尽量使用zyThumbnailTableVC对象里的数据源datalist,同时要注意时刻保证VC对象里的数据源为最新,接口回调更改数据源时不要忘了对zyThumbnailTableVC.tableViewDataList的更新。
<code class="language-swift hljs markdown has-numbering" style="display: block; padding: 0px; color: inherit; box-sizing: border-box; font-family: 'Source Code Pro', monospace;font-size:undefined; white-space: pre; border-radius: 0px; word-wrap: normal; background: transparent;">zyThumbnailTableVC.updateTableViewCellBlock =  { [<span class="hljs-link_label" style="box-sizing: border-box;">weak self</span>](<span class="hljs-link_url" style="box-sizing: border-box;">cell: UITableViewCell, indexPath: NSIndexPath</span>) -> Void in
<span class="hljs-code" style="box-sizing: border-box;">    let myCell = cell as? DIYTableViewCell</span>
<span class="hljs-code" style="box-sizing: border-box;">    //Post是我的数据model</span>
<span class="hljs-code" style="box-sizing: border-box;">    guard let dataSource = self?.zyThumbnailTableVC.tableViewDataList[indexPath.row] as? Post else {</span>
<span class="hljs-code" style="box-sizing: border-box;">        print("ERROR: illegal tableview dataSource")</span>
<span class="hljs-code" style="box-sizing: border-box;">        return</span>
<span class="hljs-code" style="box-sizing: border-box;">    }</span>
<span class="hljs-code" style="box-sizing: border-box;">    myCell?.updateCell(dataSource)</span>
}</code><ul class="pre-numbering" style="box-sizing: border-box; position: absolute; width: 50px; top: 0px; left: 0px; margin: 0px; padding: 6px 0px 40px; border-right-width: 1px; border-right-style: solid; border-right-color: rgb(221, 221, 221); list-style: none; text-align: right; background-color: rgb(238, 238, 238);"><li style="box-sizing: border-box; padding: 0px 5px;">1</li><li style="box-sizing: border-box; padding: 0px 5px;">2</li><li style="box-sizing: border-box; padding: 0px 5px;">3</li><li style="box-sizing: border-box; padding: 0px 5px;">4</li><li style="box-sizing: border-box; padding: 0px 5px;">5</li><li style="box-sizing: border-box; padding: 0px 5px;">6</li><li style="box-sizing: border-box; padding: 0px 5px;">7</li><li style="box-sizing: border-box; padding: 0px 5px;">8</li><li style="box-sizing: border-box; padding: 0px 5px;">9</li></ul>
配置你自己的顶部扩展视图 & 底部扩展视图(expansionView)
- 两个Block均提供indexPath参数,只是因为我的BottomView的业务暂时不需要识别对应的是哪个cell,所以使用时把参数省略掉了。
- 这里还有一个对zyThumbnailTableVC.keyboardAdaptiveView的赋值,是因为我的BottomView中包含有TextField,正如上文所说,ZYKeyboardUtil会自动帮我处理键盘遮挡事件。(==注意==:赋值给keyboardAdaptiveView的和我往Block里送的是同一个对象)
<code class="language-swift hljs cs has-numbering" style="display: block; padding: 0px; color: inherit; box-sizing: border-box; font-family: 'Source Code Pro', monospace;font-size:undefined; white-space: pre; border-radius: 0px; word-wrap: normal; background: transparent;"><span class="hljs-comment" style="color: rgb(136, 0, 0); box-sizing: border-box;">//--------insert your diy TopView</span>
zyThumbnailTableVC.createTopExpansionViewBlock = { [weak self](indexPath: NSIndexPath) -> UIView <span class="hljs-keyword" style="color: rgb(0, 0, 136); box-sizing: border-box;">in</span>
    <span class="hljs-comment" style="color: rgb(136, 0, 0); box-sizing: border-box;">//Post是我的数据model</span>
    <span class="hljs-keyword" style="color: rgb(0, 0, 136); box-sizing: border-box;">let</span> post = self?.zyThumbnailTableVC.tableViewDataList[indexPath.row] <span class="hljs-keyword" style="color: rgb(0, 0, 136); box-sizing: border-box;">as</span>! Post
    <span class="hljs-keyword" style="color: rgb(0, 0, 136); box-sizing: border-box;">let</span> topView = TopView.createView(indexPath, post: post)!
    topView.<span class="hljs-keyword" style="color: rgb(0, 0, 136); box-sizing: border-box;">delegate</span> = self;
    <span class="hljs-keyword" style="color: rgb(0, 0, 136); box-sizing: border-box;">return</span> topView
}

<span class="hljs-keyword" style="color: rgb(0, 0, 136); box-sizing: border-box;">let</span> diyBottomView = BottomView.createView()!
<span class="hljs-comment" style="color: rgb(136, 0, 0); box-sizing: border-box;">//--------let your inputView component not cover by keyboard automatically (animated) (ZYKeyboardUtil)</span>
zyThumbnailTableVC.keyboardAdaptiveView = diyBottomView.inputTextField;
<span class="hljs-comment" style="color: rgb(136, 0, 0); box-sizing: border-box;">//--------insert your diy BottomView</span>
zyThumbnailTableVC.createBottomExpansionViewBlock = { _ <span class="hljs-keyword" style="color: rgb(0, 0, 136); box-sizing: border-box;">in</span>
    <span class="hljs-keyword" style="color: rgb(0, 0, 136); box-sizing: border-box;">return</span> diyBottomView
}</code><ul class="pre-numbering" style="box-sizing: border-box; position: absolute; width: 50px; top: 0px; left: 0px; margin: 0px; padding: 6px 0px 40px; border-right-width: 1px; border-right-style: solid; border-right-color: rgb(221, 221, 221); list-style: none; text-align: right; background-color: rgb(238, 238, 238);"><li style="box-sizing: border-box; padding: 0px 5px;">1</li><li style="box-sizing: border-box; padding: 0px 5px;">2</li><li style="box-sizing: border-box; padding: 0px 5px;">3</li><li style="box-sizing: border-box; padding: 0px 5px;">4</li><li style="box-sizing: border-box; padding: 0px 5px;">5</li><li style="box-sizing: border-box; padding: 0px 5px;">6</li><li style="box-sizing: border-box; padding: 0px 5px;">7</li><li style="box-sizing: border-box; padding: 0px 5px;">8</li><li style="box-sizing: border-box; padding: 0px 5px;">9</li><li style="box-sizing: border-box; padding: 0px 5px;">10</li><li style="box-sizing: border-box; padding: 0px 5px;">11</li><li style="box-sizing: border-box; padding: 0px 5px;">12</li><li style="box-sizing: border-box; padding: 0px 5px;">13</li><li style="box-sizing: border-box; padding: 0px 5px;">14</li><li style="box-sizing: border-box; padding: 0px 5px;">15</li><li style="box-sizing: border-box; padding: 0px 5px;">16</li></ul>
结合ZYKeyboardUtil工作的效果:

就这样,属于你自己的thumbnailtableView就完成了。展开,关闭,基本功能上都能使用,但是如果在topView,bottomView中有什么交互功能之类的,就要在自己的头部尾部扩展控件和自定义的tableViewCell里面完成了,ZYThumbnailTableView提供cell的indexPath贯通三者通讯交流。
回看下Demo中的交互是怎样利用indexPath的:

- 标记为已读后,小圆点会消失
- 标识为喜欢后,会在对应的cell旁边出现一个星星
createView的时候我将从createTopExpansionViewBlock参数中得到的indexPath储存在我的topView对象中,当favorite按钮被点击时就可以indexPath为凭据利用代理改变对应数据源里的对应状态,同时在下次createView时根据indexPath取得对应的数据源来显示。如果这些交互会更新一些与cell相关的数据,还可以在代理方法中调用zyThumbnailTableVC.reloadMainTableView()让tableView重新加载一遍。
<code class="language-swift hljs haskell has-numbering" style="display: block; padding: 0px; color: inherit; box-sizing: border-box; font-family: 'Source Code Pro', monospace;font-size:undefined; white-space: pre; border-radius: 0px; word-wrap: normal; background: transparent;">//<span class="hljs-type" style="box-sizing: border-box; color: rgb(102, 0, 102);">TopView</span><span class="hljs-comment" style="color: rgb(136, 0, 0); box-sizing: border-box;">---------------------------------------------</span>
<span class="hljs-class" style="box-sizing: border-box;"><span class="hljs-keyword" style="color: rgb(0, 0, 136); box-sizing: border-box;">class</span> func createView<span class="hljs-container" style="box-sizing: border-box;">(<span class="hljs-title" style="box-sizing: border-box; color: rgb(102, 0, 102);">indexPath</span>: <span class="hljs-type" style="box-sizing: border-box; color: rgb(102, 0, 102);">NSIndexPath</span>, <span class="hljs-title" style="box-sizing: border-box; color: rgb(102, 0, 102);">post</span>: <span class="hljs-type" style="box-sizing: border-box; color: rgb(102, 0, 102);">Post</span>)</span> -> <span class="hljs-type" style="box-sizing: border-box; color: rgb(102, 0, 102);">TopView</span>? {
    //<span class="hljs-comment" style="color: rgb(136, 0, 0); box-sizing: border-box;">--------do something</span>
    view.indexPath = indexPath
    return view
}

//touch up inside<span class="hljs-comment" style="color: rgb(136, 0, 0); box-sizing: border-box;">---------------------------------------------</span>
@<span class="hljs-type" style="box-sizing: border-box; color: rgb(102, 0, 102);">IBAction</span> func clickFavoriteButton<span class="hljs-container" style="box-sizing: border-box;">(<span class="hljs-title" style="box-sizing: border-box; color: rgb(102, 0, 102);">sender</span>: <span class="hljs-type" style="box-sizing: border-box; color: rgb(102, 0, 102);">UIButton</span>)</span> {
    //<span class="hljs-comment" style="color: rgb(136, 0, 0); box-sizing: border-box;">--------do something</span>
    delegate.topViewDidClickFavoriteBtn?<span class="hljs-container" style="box-sizing: border-box;">(<span class="hljs-title" style="box-sizing: border-box; color: rgb(102, 0, 102);">self</span>)</span>
}

//代理方法<span class="hljs-comment" style="color: rgb(136, 0, 0); box-sizing: border-box;">---------------------------------------------</span>
func topViewDidClickFavoriteBtn<span class="hljs-container" style="box-sizing: border-box;">(<span class="hljs-title" style="box-sizing: border-box; color: rgb(102, 0, 102);">topView</span>: <span class="hljs-type" style="box-sizing: border-box; color: rgb(102, 0, 102);">TopView</span>)</span> {
    let indexPath = topView.indexPath
    //<span class="hljs-type" style="box-sizing: border-box; color: rgb(102, 0, 102);">Post</span>是我的数据model
    let post = zyThumbnailTableVC.tableViewDataList[indexPath.row] as! <span class="hljs-type" style="box-sizing: border-box; color: rgb(102, 0, 102);">Post</span>
    post.favorite = !post.favorite
    zyThumbnailTableVC.reloadMainTableView<span class="hljs-container" style="box-sizing: border-box;">()</span>
}</span></code><ul class="pre-numbering" style="box-sizing: border-box; position: absolute; width: 50px; top: 0px; left: 0px; margin: 0px; padding: 6px 0px 40px; border-right-width: 1px; border-right-style: solid; border-right-color: rgb(221, 221, 221); list-style: none; text-align: right; background-color: rgb(238, 238, 238);"><li style="box-sizing: border-box; padding: 0px 5px;">1</li><li style="box-sizing: border-box; padding: 0px 5px;">2</li><li style="box-sizing: border-box; padding: 0px 5px;">3</li><li style="box-sizing: border-box; padding: 0px 5px;">4</li><li style="box-sizing: border-box; padding: 0px 5px;">5</li><li style="box-sizing: border-box; padding: 0px 5px;">6</li><li style="box-sizing: border-box; padding: 0px 5px;">7</li><li style="box-sizing: border-box; padding: 0px 5px;">8</li><li style="box-sizing: border-box; padding: 0px 5px;">9</li><li style="box-sizing: border-box; padding: 0px 5px;">10</li><li style="box-sizing: border-box; padding: 0px 5px;">11</li><li style="box-sizing: border-box; padding: 0px 5px;">12</li><li style="box-sizing: border-box; padding: 0px 5px;">13</li><li style="box-sizing: border-box; padding: 0px 5px;">14</li><li style="box-sizing: border-box; padding: 0px 5px;">15</li><li style="box-sizing: border-box; padding: 0px 5px;">16</li><li style="box-sizing: border-box; padding: 0px 5px;">17</li><li style="box-sizing: border-box; padding: 0px 5px;">18</li><li style="box-sizing: border-box; padding: 0px 5px;">19</li><li style="box-sizing: border-box; padding: 0px 5px;">20</li><li style="box-sizing: border-box; padding: 0px 5px;">21</li></ul>
还有对于导航条样式处理的话,Demo中直接在外面对zyThumbnailTableView对象的navigationItem做处理,亦或者可以在我的源代码中让ZYThumbnailTabelViewController继承你封装过导航栏样式的父类。
<code class="language-swift hljs avrasm has-numbering" style="display: block; padding: 0px; color: inherit; box-sizing: border-box; font-family: 'Source Code Pro', monospace;font-size:undefined; white-space: pre; border-radius: 0px; word-wrap: normal; background: transparent;">func configureZYTableViewNav() {
        let titleView = UILabel(frame: CGRectMake(<span class="hljs-number" style="color: rgb(0, 102, 102); box-sizing: border-box;">0</span>, <span class="hljs-number" style="color: rgb(0, 102, 102); box-sizing: border-box;">0</span>, <span class="hljs-number" style="color: rgb(0, 102, 102); box-sizing: border-box;">200</span>, <span class="hljs-number" style="color: rgb(0, 102, 102); box-sizing: border-box;">44</span>))
        titleView<span class="hljs-preprocessor" style="color: rgb(68, 68, 68); box-sizing: border-box;">.text</span> = <span class="hljs-string" style="color: rgb(0, 136, 0); box-sizing: border-box;">"ZYThumbnailTabelView"</span>
        titleView<span class="hljs-preprocessor" style="color: rgb(68, 68, 68); box-sizing: border-box;">.textAlignment</span> = <span class="hljs-preprocessor" style="color: rgb(68, 68, 68); box-sizing: border-box;">.Center</span>
        titleView<span class="hljs-preprocessor" style="color: rgb(68, 68, 68); box-sizing: border-box;">.font</span> = UIFont<span class="hljs-preprocessor" style="color: rgb(68, 68, 68); box-sizing: border-box;">.systemFontOfSize</span>(<span class="hljs-number" style="color: rgb(0, 102, 102); box-sizing: border-box;">20.0</span>)<span class="hljs-comment" style="color: rgb(136, 0, 0); box-sizing: border-box;">;</span>
        //<span class="hljs-number" style="color: rgb(0, 102, 102); box-sizing: border-box;">503</span>f39
        titleView<span class="hljs-preprocessor" style="color: rgb(68, 68, 68); box-sizing: border-box;">.textColor</span> = UIColor(red: <span class="hljs-number" style="color: rgb(0, 102, 102); box-sizing: border-box;">63</span>/<span class="hljs-number" style="color: rgb(0, 102, 102); box-sizing: border-box;">255.0</span>, green: <span class="hljs-number" style="color: rgb(0, 102, 102); box-sizing: border-box;">47</span>/<span class="hljs-number" style="color: rgb(0, 102, 102); box-sizing: border-box;">255.0</span>, blue: <span class="hljs-number" style="color: rgb(0, 102, 102); box-sizing: border-box;">41</span>/<span class="hljs-number" style="color: rgb(0, 102, 102); box-sizing: border-box;">255.0</span>, alpha: <span class="hljs-number" style="color: rgb(0, 102, 102); box-sizing: border-box;">1.0</span>)
        zyThumbnailTableVC<span class="hljs-preprocessor" style="color: rgb(68, 68, 68); box-sizing: border-box;">.navigationItem</span><span class="hljs-preprocessor" style="color: rgb(68, 68, 68); box-sizing: border-box;">.titleView</span> = titleView
    }</code><ul class="pre-numbering" style="box-sizing: border-box; position: absolute; width: 50px; top: 0px; left: 0px; margin: 0px; padding: 6px 0px 40px; border-right-width: 1px; border-right-style: solid; border-right-color: rgb(221, 221, 221); list-style: none; text-align: right; background-color: rgb(238, 238, 238);"><li style="box-sizing: border-box; padding: 0px 5px;">1</li><li style="box-sizing: border-box; padding: 0px 5px;">2</li><li style="box-sizing: border-box; padding: 0px 5px;">3</li><li style="box-sizing: border-box; padding: 0px 5px;">4</li><li style="box-sizing: border-box; padding: 0px 5px;">5</li><li style="box-sizing: border-box; padding: 0px 5px;">6</li><li style="box-sizing: border-box; padding: 0px 5px;">7</li><li style="box-sizing: border-box; padding: 0px 5px;">8</li><li style="box-sizing: border-box; padding: 0px 5px;">9</li></ul>
==今天一次跟那么Block接触,还是那一句,注意循环引用问题。==
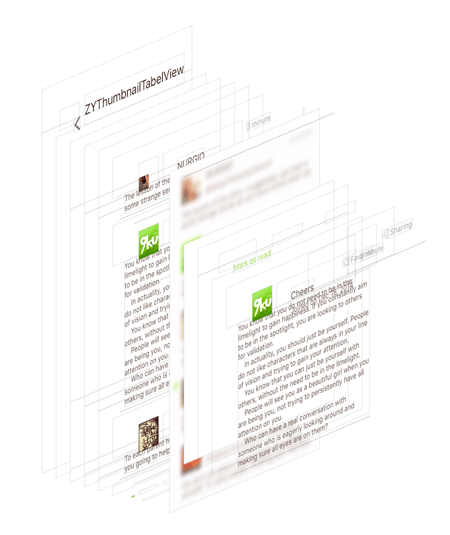
附上一张层级示意图:

感谢我们公司的UI朋友,设计上的强迫症要赶上我代码上的强迫症了。
CocoaPods:
<code class="hljs bash has-numbering" style="display: block; padding: 0px; color: inherit; box-sizing: border-box; font-family: 'Source Code Pro', monospace;font-size:undefined; white-space: pre; border-radius: 0px; word-wrap: normal; background: transparent;">pod <span class="hljs-string" style="color: rgb(0, 136, 0); box-sizing: border-box;">'ZYThumbnailTableView'</span>, <span class="hljs-string" style="color: rgb(0, 136, 0); box-sizing: border-box;">'~> 0.2.1'</span></code><ul class="pre-numbering" style="box-sizing: border-box; position: absolute; width: 50px; top: 0px; left: 0px; margin: 0px; padding: 6px 0px 40px; border-right-width: 1px; border-right-style: solid; border-right-color: rgb(221, 221, 221); list-style: none; text-align: right; background-color: rgb(238, 238, 238);"><li style="box-sizing: border-box; padding: 0px 5px;">1</li></ul>
Relation:
@liuzhiyi1992 on Github
License:
ZYThumbnailTableView is released under the MIT license. See LICENSE for details.
ZYThumbnailTableView类似于小型阅读器的更多相关文章
- RSS阅读器python实现概述
这边简单说一下最近倒腾的RSS阅读器的小东东,RSS阅读器估计很多人用过或者自己动手实现过.首先wudagang0123多年前提供的一个示例:http://bbs.chinaunix.net/foru ...
- ubuntu下安装CAJ阅读器
目录 1.ubuntu下wine的基本介绍 (1)wine的介绍 (2)wine的安装 (3)exe文件的安装 (4)exe程序的卸载 (6)wine的基本使用 2.CAJ阅读器的安装 (1)首先放上 ...
- javascript实现移动端网页版阅读器
现在手机上的文本阅读app已经非常丰富,良好的阅读体验与海量的书库常常令我感到无比兴奋. 我想到8年前用一点几寸屏幕的mp3看电子书的情景,顿生一种淡淡的温馨.再久远一些,小的时候,我也经常和小伙伴们 ...
- Atitit rss没落以及替代品在线阅读器
Atitit rss没落以及替代品在线阅读器 1.1. 对RSS的疯狂追逐,在2005年达到了一个高峰.1 1.2. Rss的问题,支持支rss,不支持url1 1.3. ,博客受到社交网络的冲击.s ...
- RSS阅读器
RSS阅读器(Really Simple Syndication)是一种软件/程序,实质都是为了方便地读取RSS和Atom文档.大概就是实现了订阅式阅读,推送用户感兴趣的新闻,博客等(比如等某位博主更 ...
- CozyRSS开发记录0-RSS阅读器开坑
CozyRSS开发记录0-RSS阅读器开坑 1.RSS RSS,全名是Really Simple Syndication,简易信息聚合. 关于RSS相关的介绍,网上可以很容易的找到.RSS阅读器是我几 ...
- Ubuntu 14.04 安装pdf阅读器
1. 个人推荐 okular. 关于安装okular的原因,可以很好的做到护眼功能. Ubuntu 14.04 自带的阅读器,因为白色太刺眼,长时间使用对眼睛不好. 对于,长时间编程的朋友们习惯夜间模 ...
- Silverlight类百度文库在线文档阅读器
百度文库阅读器是基于Flash的,用Silverlight其实也可以做. 我实现的在线阅读器可以应用于内网文档发布,在线阅览审批等.没有过多的堆积功能,专注于核心功能.主要有以下特性: 1. 基于XP ...
- Java网络编程之流——流、过滤器、阅读器和书写器
Java的I/O建立于流(Stream)之上.输入流读取数据:输出流写入数据.所有的输出流都有相同的基本方法来写入数据,所有输入流也使用相同的基本方法来读取数据.在创建流之后,你通常可以忽略在读写时的 ...
随机推荐
- ubuntu和mac OS X下另一种使用QQ的方法
在ubuntu可以到pidgin官网下载http://www.pidgin.im,然后再安装插件 pidgin-lwqq即可,步骤为: sudo add-apt-repository ppa:lain ...
- Android的ViewAnimator及其子类ViewSwitcher-android学习之旅(三十三)
ViewAnimator继承了FrameLayout,多个组件重合在一起,可以加入多个组件,然后切换的时候会有动画. ViewAnimator及其子类的继承关系 ViewAnimator常用属性 Vi ...
- JDBC编程学习笔记之数据库连接池的实现
在JDBC编程的时候,获取到一个数据库连接资源是很宝贵的,倘若数据库访问量超大,而数据库连接资源又没能得到及时的释放,就会导致系统的崩溃甚至宕机.造成的损失将会是巨大的.再看有了数据库连接池的JDBC ...
- mxgraph进阶(三)Web绘图——mxGraph项目实战(精华篇)
Web绘图--mxGraph项目实战(精华篇) 声明 本文部分内容所属论文现已发表,请慎重对待. 需求 由于小论文实验需求,需要实现根据用户日志提取出行为序列,然后根据行为序列生成有向图的形式 ...
- Android support library支持包常用控件介绍(二)
谷歌官方推出Material Design 设计理念已经有段时间了,为支持更方便的实现 Material Design设计效果,官方给出了Android support design library ...
- lk中内联调用的dsb()
lk中内联调用的dsb() 比如lk的uart_dm_init()函数就调用了dsb() /* Configure the uart clock */ clock_config_uart_dm(id) ...
- C#中的泛型化方法的实现
在一个基本数据类型的方法中求解最大值或者最小值是一件很方便,同时也是很简单的事.但是如果你想复用这个方法,我们就需要使用到泛型编程的概念了.这就好比是C++中的模板函数,或者java中的泛型操作.相比 ...
- Java中常用的正则表达式
常用的正则表达式 匹配中文字符的正则表达式: [\u4e00-\u9fa5] 匹配双字节字符(包括汉字在内):[^\x00-\xff] 匹配空行的正则表达式:\n[\s| ]*\r 匹配HTML标记的 ...
- SQL Server扫盲系列——镜像篇
为方便查看,并以专题形式展示,所以我会把一些文章整合起来.本部分为SQL Server镜像系列: 本文出处:http://blog.csdn.net/dba_huangzj/article/detai ...
- C++ Primer 有感(标准库pair)
与关联容器相关的模板类型,包含两个数据成员,在utility头文件中定义. pair类型提供的操作: pair<T1,T2> p1; pair<T1,T2> p1(v1,v2) ...
