Hive安装与配置详解
既然是详解,那么我们就不能只知道怎么安装hive了,下面从hive的基本说起,如果你了解了,那么请直接移步安装与配置
hive是什么
hive安装和配置
hive的测试
hive
这里简单说明一下,好对大家配置hive有点帮助。hive是建立在hadoop上的,当然,你如果只搭建hive也没用什么错。说简单一点,hadoop中的mapreduce调用如果面向DBA的时候,那么问题也就显现了,因为不是每个DBA都能明白mapreduce的工作原理,如果为了管理数据而需要学习一门新的技术,从现实生活中来说,公司又需要花钱请更有技术的人来了。
开个玩笑,hadoop是为了存储数据和计算而推广的技术,而和数据挂钩的也就属于数据库的领域了,所以hadoop和DBA挂钩也就是情理之中的事情,在这个基础之上,我们就需要为了DBA创作适合的技术。
hive正是实现了这个,hive是要类SQL语句(HiveQL)来实现对hadoop下的数据管理。hive属于数据仓库的范畴,那么,数据库和数据仓库到底有什么区别了,这里简单说明一下:数据库侧重于OLTP(在线事务处理),数据仓库侧重OLAP(在线分析处理);也就是说,例如mysql类的数据库更侧重于短时间内的数据处理,反之。
无hive:使用者.....->mapreduce...->hadoop数据(可能需要会mapreduce)
有hive:使用者...->HQL(SQL)->hive...->mapreduce...->hadoop数据(只需要会SQL语句)
hive安装和配置
安装
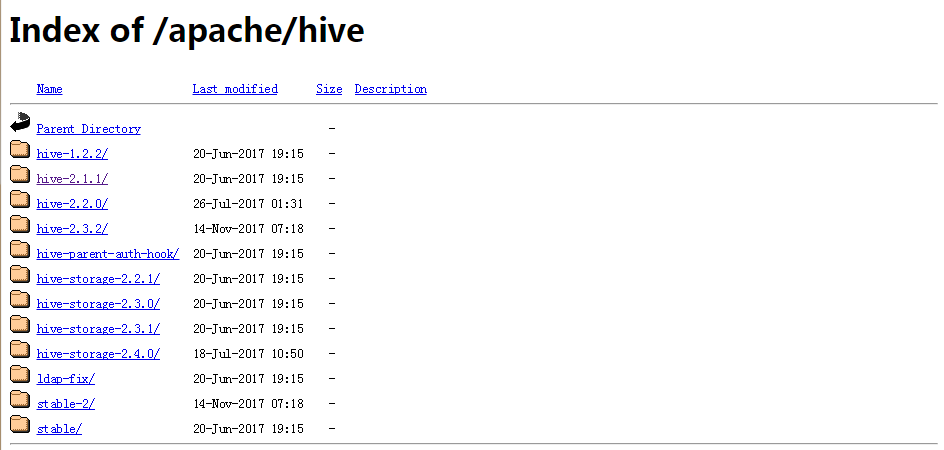
一:下载hive——地址:http://mirror.bit.edu.cn/apache/hive/

这里以hive-2.1.1为例子,如图:

将hive解压到/usr/local下:
- [root@s100 local]# tar -zxvf apache-hive-2.1.1-bin.tar.gz -C /usr/local/

将文件重命名为hive文件:
- [root@s100 local]# mv apache-hive-2.1.1-bin hive

修改环境变量/etc/profile:
- [root@s100 local]# vim /etc/profile
- #hive
- export HIVE_HOME=/usr/local/hive
- export PATH=$PATH:$HIVE_HOME/bin

执行source /etc.profile:
执行hive --version
- [root@s100 local]# hive --version
有hive的版本显现,安装成功!
配置
- [root@s100 conf]# cd /usr/local/hive/conf/
修改hive-site.xml:

这里没有,我们就以模板复制一个:
- [root@s100 conf]# cp hive-default.xml.template hive-site.xml
- [root@s100 conf]# vim hive-site.xml
1.配置hive-site.xml(第5点的后面有一个单独的hive-site.xml配置文件,这个如果有疑问可以用后面的配置文件,更容易明白)
主要是mysql的连接信息(在文本的最开始位置)
- <?xml version="1.0" encoding="UTF-8" standalone="no"?>
- <?xml-stylesheet type="text/xsl" href="configuration.xsl"?><!--
- Licensed to the Apache Software Foundation (ASF) under one or more
- contributor license agreements. See the NOTICE file distributed with
- this work for additional information regarding copyright ownership.
- The ASF licenses this file to You under the Apache License, Version 2.0
- (the "License"); you may not use this file except in compliance with
- the License. You may obtain a copy of the License at
- http://www.apache.org/licenses/LICENSE-2.0
- Unless required by applicable law or agreed to in writing, software
- distributed under the License is distributed on an "AS IS" BASIS,
- WITHOUT WARRANTIES OR CONDITIONS OF ANY KIND, either express or implied.
- See the License for the specific language governing permissions and
- limitations under the License.
- --><configuration>
- <!-- WARNING!!! This file is auto generated for documentation purposes ONLY! -->
- <!-- WARNING!!! Any changes you make to this file will be ignored by Hive. -->
- <!-- WARNING!!! You must make your changes in hive-site.xml instead. -->
- <!-- Hive Execution Parameters -->
- <!-- 插入一下代码 -->
- <property>
- <name>javax.jdo.option.ConnectionUserName</name>用户名(这4是新添加的,记住删除配置文件原有的哦!)
- <value>root</value>
- </property>
- <property>
- <name>javax.jdo.option.ConnectionPassword</name>密码
- <value>123456</value>
- </property>
- <property>
- <name>javax.jdo.option.ConnectionURL</name>mysql
- <value>jdbc:mysql://192.168.1.68:3306/hive</value>
- </property>
- <property>
- <name>javax.jdo.option.ConnectionDriverName</name>mysql驱动程序
- <value>com.mysql.jdbc.Driver</value>
- </property>
- <!-- 到此结束代码 -->
- <property>
- <name>hive.exec.script.wrapper</name>
- <value/>
- <description/>
- </property>

2.复制mysql的驱动程序到hive/lib下面(这里已经拷贝好了)
- [root@s100 lib]# ll mysql-connector-java-5.1.18-bin.jar
- -rw-r--r-- 1 root root 789885 1月 4 01:43 mysql-connector-java-5.1.18-bin.jar
3.在mysql中hive的schema(在此之前需要创建mysql下的hive数据库)
- [root@s100 bin]# pwd
- /usr/local/hive/bin
- [root@s100 bin]# schematool -dbType mysql -initSchema
4.执行hive命令
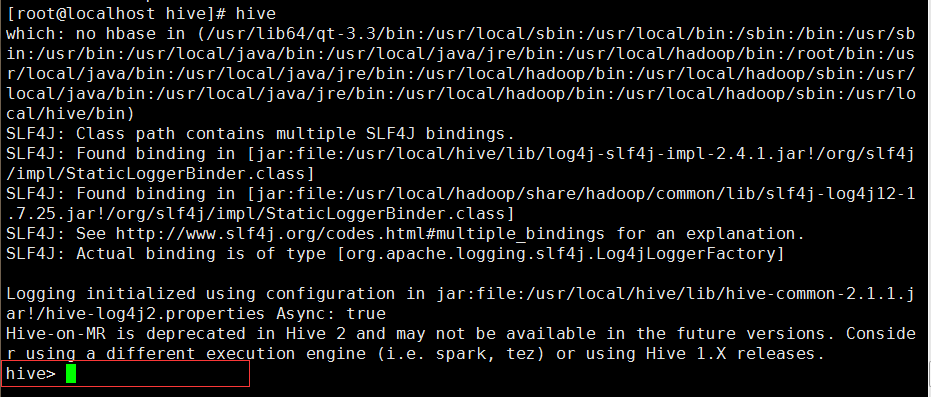
- [root@localhost hive]# hive

成功进入hive界面,hive配置完成
5.查询mysql(hive这个库是在 schematool -dbType mysql -initSchema 之前创建的!)
- [root@localhost ~]# mysql -uroot -p123456
- Welcome to the MySQL monitor. Commands end with ; or \g.
- Your MySQL connection id is 10
- Server version: 5.1.73 Source distribution
- Copyright (c) 2000, 2013, Oracle and/or its affiliates. All rights reserved.
- Oracle is a registered trademark of Oracle Corporation and/or its
- affiliates. Other names may be trademarks of their respective
- owners.
- Type 'help;' or '\h' for help. Type '\c' to clear the current input statement.
- mysql> use hive
- Reading table information for completion of table and column names
- You can turn off this feature to get a quicker startup with -A
- Database changed
- mysql> show tables;
- +---------------------------+
- | Tables_in_hive |
- +---------------------------+
- | AUX_TABLE |
- | BUCKETING_COLS |
- | CDS |
- | COLUMNS_V2 |
- | COMPACTION_QUEUE |
- | COMPLETED_COMPACTIONS |
备注 (这里不计入正文不要重复配置hive-site.xml)
配置文件hive-site.xml
这里不得不说一下,如果你的 schematool -dbType mysql -initSchema 并没有执行成功怎么办,小博主昨天在这卡了一天,最后根据伟大的百度和hive官方文档,直接写了一个hive-site.xml配置文本:
- <?xml version="1.0" encoding="UTF-8" standalone="no"?>
- <?xml-stylesheet type="text/xsl" href="configuration.xsl"?>
- <configuration>
- <property>
- <name>javax.jdo.option.ConnectionURL</name>
- <value>jdbc:mysql://localhost:3306/hahive</value>(mysql地址localhost)
- </property>
- <property>
- <name>javax.jdo.option.ConnectionDriverName</name>(mysql的驱动)
- <value>com.mysql.jdbc.Driver</value>
- </property>
- <property>
- <name>javax.jdo.option.ConnectionUserName</name>(用户名)
- <value>root</value>
- </property>
- <property>
- <name>javax.jdo.option.ConnectionPassword</name>(密码)
- <value>123456</value>
- </property>
- <property>
- <name>hive.metastore.schema.verification</name>
- <value>false</value>
- </property>
- </configuration>
那我们做这些事干什么的呢,下面小段测试大家感受一下
hive测试:
备注:这里是第二个配置文件的演示:所以数据库名称是hahive数据库!
1.需要知道现在的hadoop中的HDFS存了什么
- [root@localhost conf]# hadoop fs -lsr /

2.进入hive并创建一个测试库和测试表
- [root@localhost conf]# hive
创建库:
- hive> create database hive_1;
- OK
- Time taken: 1.432 seconds
显示库:
- hive> show databases;
- OK
- default
- hive_1
- Time taken: 1.25 seconds, Fetched: 2 row(s)
创建库成功!
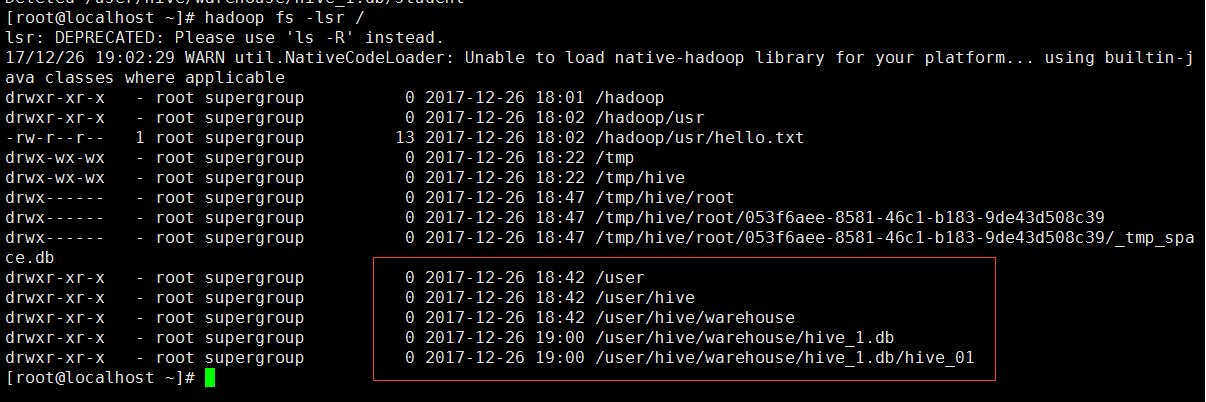
3.查询一下HDFS有什么变化

多了一个库hive_1
娜莫喔们的mysql下的hahive库有什么变化
- mysql> use hahive;
- mysql> select * from DBS;
- +-------+-----------------------+------------------------------------------------+---------+------------+------------+
- | DB_ID | DESC | DB_LOCATION_URI | NAME | OWNER_NAME | OWNER_TYPE |
- +-------+-----------------------+------------------------------------------------+---------+------------+------------+
- | 1 | Default Hive database | hdfs://localhost/user/hive/warehouse | default | public | ROLE |
- | 6 | NULL | hdfs://localhost/user/hive/warehouse/hive_1.db | hive_1 | root | USER |
- +-------+-----------------------+------------------------------------------------+---------+------------+------------+
- 2 rows in set (0.00 sec)

4.在hive_1下创建一个表hive_01
- hive> use hive_1;
- OK
- Time taken: 0.754 seconds
- hive> create table hive_01 (id int,name string);
- OK
- Time taken: 2.447 seconds
- hive> show tables;
- OK
- hive_01 (表创建成功)
- Time taken: 0.31 seconds, Fetched: 2 row(s)
- hive>
HDFS下的情况:

mysql下:
- mysql> select * from TBLS;
- +--------+-------------+-------+------------------+-------+-----------+-------+----------+---------------+--------------------+--------------------+
- | TBL_ID | CREATE_TIME | DB_ID | LAST_ACCESS_TIME | OWNER | RETENTION | SD_ID | TBL_NAME | TBL_TYPE | VIEW_EXPANDED_TEXT | VIEW_ORIGINAL_TEXT |
- +--------+-------------+-------+------------------+-------+-----------+-------+----------+---------------+--------------------+--------------------+
- | 6 | 1514286051 | 6 | 0 | root | 0 | 6 | hive_01 | MANAGED_TABLE | NULL | NULL |
- +--------+-------------+-------+------------------+-------+-----------+-------+----------+---------------+--------------------+--------------------+
- 2 rows in set (0.00 sec)
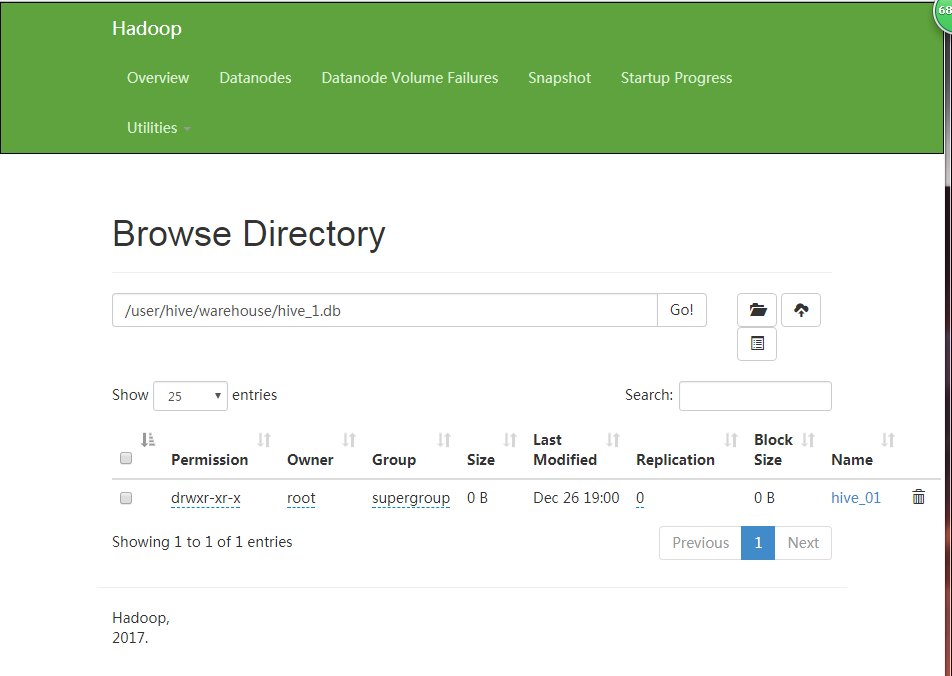
娜莫在web端是什么样子的呢!

总的来说,hive其实就和mysql差不多呢!那么后面就不说了
最后,浏览别人博客的时候都会有版权声明,感觉好6的样子,小博主以后也写一段╭(╯^╰)╮
版权声明:
本文作者:魁·帝小仙
博文地址:http://www.cnblogs.com/dxxblog/p/8193967.html
欢迎对小博主的博文内容批评指点,如果问题,可评论或邮件联系(2335228250@qq.com)
欢迎转载,转载请在文章页面明显位置给出原文链接,谢谢
Hive安装与配置详解的更多相关文章
- libCURL开源库在VS2010环境下编译安装,配置详解
libCURL开源库在VS2010环境下编译安装,配置详解 转自:http://my.oschina.net/u/1420791/blog/198247 http://blog.csdn.net/su ...
- Nginx安装及配置详解【转】
nginx概述 nginx是一款自由的.开源的.高性能的HTTP服务器和反向代理服务器:同时也是一个IMAP.POP3.SMTP代理服务器:nginx可以作为一个HTTP服务器进行网站的发布处理,另外 ...
- [转帖]Nginx安装及配置详解 From https://www.cnblogs.com/zhouxinfei/p/7862285.html
Nginx安装及配置详解 nginx概述 nginx是一款自由的.开源的.高性能的HTTP服务器和反向代理服务器:同时也是一个IMAP.POP3.SMTP代理服务器:nginx可以作为一个HTTP ...
- nginx在linux上的安装与配置详解(一)
Nginx的安装与配置详解 (1)nginx简介 nginx概念: Nginx是一款轻量级的Web 服务器/反向代理服务器及电子邮件(IMAP/POP3)代理服务器,并在一个BSD-like ...
- Linux中Nginx安装与配置详解
转载自:http://www.linuxidc.com/Linux/2016-08/134110.htm Linux中Nginx安装与配置详解(CentOS-6.5:nginx-1.5.0). 1 N ...
- Tomcat安装及配置详解
Tomcat安装及配置详解 一,Tomcat简介 Tomcat 服务器是一个免费的开放源代码的Web 应用服务器,Tomcat是Apache 软件基金会(Apache Software Found ...
- OpenVPN CentOS7 安装部署配置详解
一 .概念相关 1.vpn 介绍 vpn 虚拟专用网络,是依靠isp和其他的nsp,在公共网络中建立专用的数据通信网络的技术.在vpn中任意两点之间的链接并没有传统的专网所需的端到端的物理链路,而是利 ...
- Linux NFS服务器的安装与配置详解
一.NFS服务简介 NFS是Network File System(网络文件系统).主要功能是通过网络让不同的服务器之间可以共享文件或者目录.NFS客户端一般是应用服务器(比如web,负载均衡等),可 ...
- CentOS 7下Samba服务安装与配置详解
1. Samba简介 Samba是在Linux和UNIX系统上实现SMB协议的一个免费软件,由服务器及客户端程序构成.SMB(Server Messages Block,信息服务块)是一种在局域网上共 ...
随机推荐
- 逐步搭建Lamp环境之Linux的运行模式
首先先来看几个概念,分别是:单用户.单任务.多用户.多任务 单用户: 是指操作系统一般只能由一个人同时进行登录 单任务: 是指操作系统只能同时处理一个任务 多用户: 是指操作系统可以允许由多个用户同时 ...
- hdu1181 变形课(vector容器+dfs)
变形课 Time Limit: 2000/1000 MS (Java/Others) Memory Limit: 131072/65536 K (Java/Others) Total Submi ...
- android UI布局
一.设置反复背景 在drawable目录下建一个mybackground.xml文件 在文件里写入: <?xml version="1.0" encoding="u ...
- hdu 1233 还是畅通project(kruskal求最小生成树)
还是畅通project Time Limit: 4000/2000 MS (Java/Others) Memory Limit: 65536/32768 K (Java/Others) Tota ...
- 自己手写WEB程序框架并执行
1.新建目录,起名MyWeb 2.目录下,新建两个目录 WEB-INF, META-INF,,还能够新建一些jsp,html文件 ,如 index.html 3在WEB-INF中必须存在一个文件WEB ...
- Configuring WS-Security UsernameToken and WS-SecureConversation (Symmetric Connection Creation)
Context This procedure provides a detailed process of all necessary steps to secure Web Services wit ...
- [NOIP复习]第三章:动态规划
一.背包问题 最基础的一类动规问题.相似之处在于给n个物品或无穷多物品或不同种类的物品,每种物品仅仅有一个或若干个,给一个背包装入这些物品,要求在不超出背包容量的范围内,使得获得的价值或占用体积尽可能 ...
- 配置Meld为git的默认比较工具
1. 安装 meld sudo apt-get install meld 2. 创建 git_meld.sh 脚本 cd /bin vim git-meld.sh #!/bin/sh meld $2 ...
- NPOI:创建Workbook和Sheet
NPOI官方网站:http://npoi.codeplex.com/ 创建Workbook说白了就是创建一个Excel文件,当然在NPOI中更准确的表示是在内存中创建一个Workbook对象流.在看了 ...
- iKcamp出品微信小程序教学共5章16小节汇总(含视频)
