[js高手之路]封装运动框架实战左右与上下滑动的焦点轮播图
在这篇文章[js高手之路]打造通用的匀速运动框架中,封装了一个匀速运动框架,我们在这个框架的基础之上,加上缓冲运动效果,然后用运动框架来做幻灯片(上下,左右),效果如下:【选择器用的是html5的,你的浏览器需要支持html5新选择器,才能看见效果额】


- 1
- 2
- 3
- 4
- 5
缓冲运动通常有两种常见的表现:比如让一个div从0运动到500,一种是事件触发的时候,速度很快, 一种是事件触发的时候慢,然后慢慢加快.我们来实现先块后慢的,常见的就是开车,比如刚从高速路上下来的车,就是120km/小时,然后进入匝道,变成40km/时. 或者40km/小时进入小区,最后停车,变成0km/小时. 从120km/小时->40km/小时, 或者40km->0km/小时,都是速度先块后慢,这种运动怎么用程序来表示呢?
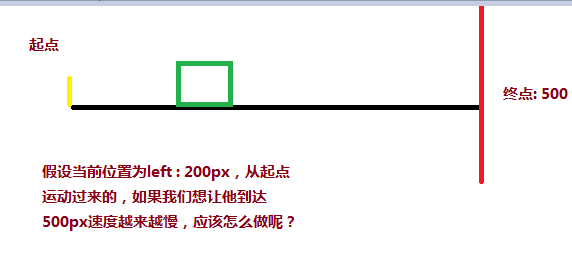
可以用目标距离( 500 ) - 当前距离( 200 ) / 一个系数( 比如12 ),就能达到速度由块而慢的变化,当前距离在起点,分子(500 - 0 )最大,所以速度最大,如果当前距离快要接近500,分子最小,除完之后的速度也是最小。
     <style>

         div{

             width: 200px;

             height: 200px;

             background:red;

             position: absolute;

             left: 0px;

         }

     </style>

     <script>

         window.onload = function(){

             var oBtn = document.querySelector( "input" ),

                 oBox = document.querySelector( '#box' ),

                 speed = 0, timer = null;

             oBtn.onclick = function(){

                 timer = setInterval( function(){

                     speed = ( 500 - oBox.offsetLeft ) / 8;

                     oBox.style.left = oBox.offsetLeft + speed + 'px';

                 }, 30 );

             }

         }

     </script>

 </head>

 <body>

     <input type="button" value="动起来">

     <div id="box"></div>

 </body>
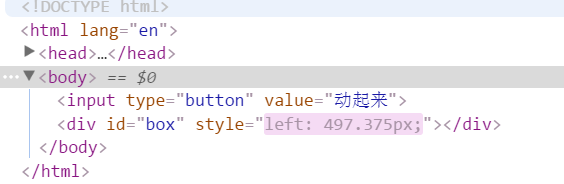

你会发现,速度永远都在0.375这里停着,获取到的当前的距离停在497px? 这里有个问题,我们的div不是停在497.375px吗,怎么获取到的没有了后面的小数0.375呢?计算机在处理浮点数会有精度损失。我们可以单独做一个小测试:
 <div id="box" style="position:absolute;left:30.2px;width:200px;height:300px;background:red;"></div>

     <script>

         var oBox = document.querySelector( '#box' );

         alert( oBox.offsetLeft );

     </script>
你会发现这段代码获取到左偏移是30px而不是行间样式中写的30.2px。因为在获取当前位置的时候,会舍去小数,所以速度永远停在0.375px, 位置也是永远停在497,所以,为了到达目标,我们就得把速度变成1,对速度向上取整( Math.ceil ),我们就能把速度变成1,div也能到达500
 oBtn.onclick = function(){

     timer = setInterval( function(){

         speed = ( 500 - oBox.offsetLeft ) / 8;

         if( speed > 0 ) {

             speed = Math.ceil( speed );

         }

         console.log( speed, oBox.offsetLeft );

         oBox.style.left = oBox.offsetLeft + speed + 'px';

     }, 30 );

 }
第二个问题,如果div的位置是在900,也就是说从900运动到500,有没有这样的需求呢? 肯定有啊,轮播图,从右到左就是这样的啊。
     <style>

         #box{

             width: 200px;

             height: 200px;

             background:red;

             position: absolute;

             left: 900px;

         }

     </style>

     <script>// <![CDATA[

         window.onload = function(){

             var oBtn = document.querySelector( "input" ),

                 oBox = document.querySelector( '#box' ),

                 speed = 0, timer = null;

             oBtn.onclick = function(){

                 timer = setInterval( function(){

                     speed = ( 500 - oBox.offsetLeft ) / 8;

                     if( speed > 0 ) {

                         speed = Math.ceil( speed );

                     }

                     oBox.style.left = oBox.offsetLeft + speed + 'px';

                 }, 30 );

             }

         }

     // ]]></script>

 </head>

 <body>

     <input type="button" value="动起来">

     <div id="box"></div>

 </body>

 oBtn.onclick = function(){

     timer = setInterval( function(){

         speed = ( 500 - oBox.offsetLeft ) / 8;

         if( speed > 0 ) {

             speed = Math.ceil( speed );

         }else {

             speed = Math.floor( speed );

         }

         console.log( speed, oBox.offsetLeft );

         oBox.style.left = oBox.offsetLeft + speed + 'px';

     }, 30 );

 }
然后我们把这个缓冲运动整合到匀速运动框架,就变成:
 function css(obj, attr, value) {

     if (arguments.length == 3) {

         obj.style[attr] = value;

     } else {

         if (obj.currentStyle) {

             return obj.currentStyle[attr];

         } else {

             return getComputedStyle(obj, false)[attr];

         }

     }

 }

 function animate(obj, attr, fn) {

     clearInterval(obj.timer);

     var cur = 0;

     var target = 0;

     var speed = 0;

     obj.timer = setInterval(function () {

         var bFlag = true;

         for (var key in attr) {

             if (key == 'opacity ') {

                 cur = css(obj, 'opacity') * 100;

             } else {

                 cur = parseInt(css(obj, key));

             }

             target = attr[key];

             speed = ( target - cur ) / 8;

             speed = speed > 0 ? Math.ceil(speed) : Math.floor(speed);

             if (cur != target) {

                 bFlag = false;

                 if (key == 'opacity') {

                     obj.style.opacity = ( cur + speed ) / 100;

                     obj.style.filter = "alpha(opacity:" + ( cur + speed ) + ")";

                 } else {

                     obj.style[key] = cur + speed + "px";

                 }

             }

         }

         if (bFlag) {

             clearInterval(obj.timer);

             fn && fn.call(obj);

         }

     }, 30 );

 }
有了这匀速运动框架,我们就来做幻灯片:
上下幻灯片的html样式文件:
 <!DOCTYPE html>

 <html lang="en">

 <head>

     <meta charset="UTF-8">

     <title>slide - by ghostwu</title>

     <link rel="stylesheet" href="css/slide3.css">

     <script src="js/animate.js"></script>

     <script src="js/slide.js"></script>

 </head>

 <body>

 <div id="slide">

     <div id="slide-img">

         <div id="img-container">

             <img src="./img/1.jpg" alt="" style="opacity:1;">

             <img src="./img/2.jpg" alt="">

             <img src="./img/3.jpg" alt="">

             <img src="./img/4.jpg" alt="">

             <img src="./img/5.jpg" alt="">

         </div>

     </div>

     <div id="slide-nums">

         <ul>

             <li class="active"></li>

             <li></li>

             <li></li>

             <li></li>

             <li></li>

         </ul>

     </div>

 </div>

 </body>

 </html>
slide3.css文件:
 * {

     margin:;

     padding:;

 }

 li {

     list-style-type: none;

 }

 #slide {

     width: 800px;

     height: 450px;

     position: relative;

     margin:20px auto;

 }

 #slide-img {

     position: relative;

     width: 800px;

     height: 450px;

     overflow: hidden;

 }

 #img-container {

     position: absolute;

     left: 0px;

     top: 0px;

     height: 2250px;

     /*font-size:0px;*/

 }

 #img-container img {

     display: block;

     float: left;

 }

 #slide-nums {

     position: absolute;

     right:10px;

     bottom:10px;

 }

 #slide-nums li {

     float: left;

     margin:0px 10px;

     background: white;

     width: 20px;

     height: 20px;

     text-align: center;

     line-height: 20px;

     border-radius:10px;

     text-indent:-999px;

     opacity:0.6;

     filter:alpha(opacity:60);

     cursor:pointer;

 }

 #slide-nums li.active {

     background: red;

 }
animate.js文件:
 function css(obj, attr, value) {

     if (arguments.length == 3) {

         obj.style[attr] = value;

     } else {

         if (obj.currentStyle) {

             return obj.currentStyle[attr];

         } else {

             return getComputedStyle(obj, false)[attr];

         }

     }

 }

 function animate(obj, attr, fn) {

     clearInterval(obj.timer);

     var cur = 0;

     var target = 0;

     var speed = 0;

     obj.timer = setInterval(function () {

         var bFlag = true;

         for (var key in attr) {

             if (key == 'opacity ') {

                 cur = css(obj, 'opacity') * 100;

             } else {

                 cur = parseInt(css(obj, key));

             }

             target = attr[key];

             speed = ( target - cur ) / 8;

             speed = speed > 0 ? Math.ceil(speed) : Math.floor(speed);

             if (cur != target) {

                 bFlag = false;

                 if (key == 'opacity') {

                     obj.style.opacity = ( cur + speed ) / 100;

                     obj.style.filter = "alpha(opacity:" + ( cur + speed ) + ")";

                 } else {

                     obj.style[key] = cur + speed + "px";

                 }

             }

         }

         if (bFlag) {

             clearInterval(obj.timer);

             fn && fn.call(obj);

         }

     }, 30 );

 }
slide.js文件:
 window.onload = function () {

     function Slide() {

         this.oImgContainer = document.getElementById("img-container");

         this.aLi = document.getElementsByTagName("li");

         this.index = 0;

     }

     Slide.prototype.bind = function () {

         var that = this;

         for (var i = 0; i < this.aLi.length; i++) {

             this.aLi[i].index = i;

             this.aLi[i].onmouseover = function () {

                 that.moveTop( this.index );

             }

         }

     }

     Slide.prototype.moveTop = function (i) {

         this.index = i;

         for( var j = 0; j < this.aLi.length; j++ ){

            this.aLi[j].className = '';

         }

         this.aLi[this.index].className = 'active';

         animate( this.oImgContainer, {

             "top" : -this.index * 450,

             "left" : 0

         });

     }

     var oSlide = new Slide();

     oSlide.bind();

 }
 * {

     margin:;

     padding:;

 }

 li {

     list-style-type: none;

 }

 #slide {

     width: 800px;

     height: 450px;

     position: relative;

     margin:20px auto;

 }

 #slide-img {

     position: relative;

     width: 800px;

     height: 450px;

     overflow: hidden;

 }

 #img-container {

     position: absolute;

     left: 0px;

     top: 0px;

     width: 4000px;

 }

 #img-container img {

     display: block;

     float: left;

 }

 #slide-nums {

     position: absolute;

     right:10px;

     bottom:10px;

 }

 #slide-nums li {

     float: left;

     margin:0px 10px;

     background: white;

     width: 20px;

     height: 20px;

     text-align: center;

     line-height: 20px;

     border-radius:10px;

     text-indent:-999px;

     opacity:0.6;

     filter:alpha(opacity:60);

     cursor:pointer;

 }

 #slide-nums li.active {

     background: red;

 }
js调用文件:
 window.onload = function () {

     function Slide() {

         this.oImgContainer = document.getElementById("img-container");

         this.aLi = document.getElementsByTagName("li");

         this.index = 0;

     }

     Slide.prototype.bind = function () {

         var that = this;

         for (var i = 0; i < this.aLi.length; i++) {

             this.aLi[i].index = i;

             this.aLi[i].onmouseover = function () {

                 that.moveLeft( this.index );

             }

         }

     }

     Slide.prototype.moveLeft = function (i) {

         this.index = i;

         for( var j = 0; j < this.aLi.length; j++ ){

            this.aLi[j].className = '';

         }

         this.aLi[this.index].className = 'active';

         animate( this.oImgContainer, {

             "left" : -this.index * 800

         });

     }

     var oSlide = new Slide();

     oSlide.bind();

 }
[js高手之路]封装运动框架实战左右与上下滑动的焦点轮播图的更多相关文章
- 原生js焦点轮播图
原生js焦点轮播图主要注意这几点: 1.前后按钮实现切换,同时注意辅助图2.中间的button随着前后按钮对应切换,同时按button也能跳转到相应的index3.间隔调用与无限轮播.4.注意在动画时 ...
- js焦点轮播图
汇集网上焦点轮播图的实现方式,自己试了下,不过鼠标悬浮停止动画和鼠标离开动画播放好像没生效,不太明白,最后两行代码中,为什么可以直接写stop和play.不用加括号调用函数么?求懂的大神指点! 所用知 ...
- 封装一个简单的原生js焦点轮播图插件
轮播图实现的效果为,鼠标移入左右箭头会出现,可以点击切换图片,下面的小圆点会跟随,可以循环播放(为了方便理解,没有补2张图做无缝轮播).本篇文章的主要目的是分享封装插件的思路. 轮播图我一开始是写成非 ...
- Flask实战第54天:cms删除轮播图功能完成
后台逻辑 编辑cms.views.py @bp.route('/dbanner/',methods=['POST']) @login_required def dbanner(): banner_id ...
- Flask实战第53天:cms编辑轮播图功能完成
后端逻辑 表单验证, 这里编辑就是和添加的内容一样,所以可以直接继承添加轮播图的表单验证,然后多加一个轮播图的id即可 编辑cmd.forms.py class UpdateBannerForm(Ad ...
- Flask实战第52天:cms添加轮播图前端代码逻辑完成
首页我们在模态框中的保存按钮加一个id,这样方便我们选取这个按钮 <button type="button" class="btn btn-primary" ...
- JS+css3焦点轮播图PC端
<!DOCTYPE html> <html lang="en"> <head> <meta charset="UTF-8&quo ...
- 原生js焦点轮播图的实现
继续学习打卡,武汉加油,逆战必胜!今日咱们主要探讨一下原生js写轮播图的问题, 简单解析一下思路: 1,首先写好css样式问题 2,考虑全局变量:自动播放的定时器,以及记录图片位置的角标Index 2 ...
- [js高手之路]匀速运动与实例实战(侧边栏,淡入淡出)
javascript中,如何让一个元素(比如div)运动起来呢? 设置基本的样式,一定要让div有定位( 当然用margin的变化也可以让元素产生运动效果 ); <style> div { ...
随机推荐
- 交换机端口呈现err-disable的原因
导致交换机端口呈现err-disable状态的原因有很多,为方便大家查询,特归纳如下: 1. duplex mismatch (A is correct) 2. port-channel misc ...
- 微信小程序wx.navigateTo层叠5次限制,特殊情况的建议
小程序页面的实例使用栈的数据结构存储,栈内元素最多5个(换一种方式说,就是用户最多能点击5次返回),微信小程序能在栈中相对高层某个页面调用其他相对低层的页面实例的方法. 小程序三种页面跳转API 的区 ...
- 【Alpha】 第七次Daily Scrum Meeting
一.本次会议为第七次meeting会议 二.时间:9:37AM-9:50AM 地点:禹州三楼 三.会议站立式照片 四.今日任务 成员 昨日任务 今日任务 林清青 学习并了解微信程序相关方面知识,为小组 ...
- 201521123076 《Java程序设计》第6周学习总结
1.本周学习总结 1.1 面向对象学习暂告一段落,请使用思维导图,以封装.继承.多态为核心概念画一张思维导图,对面向对象思想进行一个总结. 注1:关键词与内容不求多,但概念之间的联系要清晰,内容覆盖面 ...
- 201521123078 《java》第五周学习总结
1. 本周学习总结 1.1 尝试使用思维导图总结有关多态与接口的知识点. 2. 书面作业 代码阅读:Child压缩包内源代码 1.1 com.parent包中Child.java文件能否编译通过?哪句 ...
- 201521123006 《java程序设计》 第12周学习总结
1. 本周学习总结 1.1 以你喜欢的方式(思维导图或其他)归纳总结多流与文件相关内容. 2. 书面作业 将Student对象(属性:int id, String name,int age,doubl ...
- 201521123004 《Java程序设计》第13周学习总结
1. 本周学习总结 以你喜欢的方式(思维导图.OneNote或其他)归纳总结多网络相关内容. 协议.IP.域名.端口号 协议:网络中为了进行数据交换(通信)而建立的规则.标准或约定(=语义+语法+规则 ...
- vim基础详解
目录: 什么是vim Vim能做什么 如何学习vim 如何用vim打开一个文件 Vim的三种模式 插入模式 命令模式 扩展命令模式 光标移动 在命令模式下 删除,复制,粘贴 扩展命令模式 可视化模式 ...
- Java内部类的总结
内部类是指在一个外部类的内部再定义一个类.类名不需要和文件夹相同. 内部类分为: 成员内部类.局部内部类.静态嵌套类.匿名内部类 . 1.成员内部类 成员内部类是最普通的内部类,它的定义为位于另一个类 ...
- 《MySQL必知必会》[03] 表数据的增删改
1.增:插入数据 INSERT关键字可以插入新的行到数据库表中: 插入完整的行 插入行的一部分 插入多行 插入某些查询的结果 基本的INSERT语句是: INSERT INTO R(A1, A2, . ...