pthread_cond_wait学习笔记
pthread_cond_wait学习笔记
近期学习了线程等待和激活的相关知识。
先介绍几个api:
pthread_cond_t表示多线程的条件变量,用于控制线程等待和就绪的条件。
一:条件变量的初始化:
条件变量和互斥锁一样,都有静态动态两种创建方式,
静态方式使用PTHREAD_COND_INITIALIZER常量初始化。
pthread_cond_t cond = PTHREAD_COND_INITIALIZER;
动态方式初始化:
1 首先要new或者malloc一个pthread_cond_t类型变量,
用完后记得delete或者free掉。
2
使用pthread_cond_wait方式如下:
pthread _mutex_lock(&mutex)
while或if(线程执行的条件是否成立)
pthread_cond_wait(&cond, &mutex);
线程执行
pthread_mutex_unlock(&mutex);
对于这点apue给出的解释:The mutex passed to pthread_cond_wait protects the condition.The caller passes it locked to
the function, which then atomically places the calling thread on the list of threads waiting for the condition and unlocks
the mutex. This closes the window between the time that the condition is checked and the time that the
thread goes to sleep waiting for the condition to change, so that the thread doesn't miss a change in the condition.
When pthread_cond_wait returns, the mutex is again locked.
1,线程放在等待队列上,解锁
2,等待 pthread_cond_signal或者pthread_cond_broadcast信号之后去竞争锁
3,若竞争到互斥索则加锁。
使用流程
等待线程:
pthread_mutex_lock(&mutex);
if(条件不满足)
pthread_cond_wait(&cond, &mutex);
//处理共享资源
pthread_mutex_unlock(&mutex);
激活线程:
pthread_mutex_lock(&mutex);
pthread_cond_signal(&cond);
pthread_mutex_unlock(&mutex);
下面写了一个例子

#include <pthread.h>
#include <unistd.h>
#include <stdio.h>
#include <stdlib.h>
#include <sys/types.h>
#include <iostream>
using namespace std;

int count = 0;
pthread_mutex_t mutex = PTHREAD_MUTEX_INITIALIZER;
pthread_cond_t cond = PTHREAD_COND_INITIALIZER;
//该函数增加count数值
void * creator(void * arg)
{
    cout << "creator add lock" << endl;
    pthread_mutex_lock(&mutex);

    count ++;

    cout << "in creator count is : " << count << endl;
    //条件满足时发送信号
    if(count > 0)
    {

        pthread_cond_signal(&cond);
    }

    cout << "creator release lock" << endl;

    pthread_mutex_unlock(&mutex);

    return NULL;

}

//该函数减少count数值
void * consumer(void * arg)
{
    cout << "consumer add lock" << endl;

    pthread_mutex_lock(&mutex);
    //当条件不满足时等待
    if(count <= 0)
    {
        cout << "begin wait" << endl;
        pthread_cond_wait(&cond,&mutex);
        cout << "end wait" << endl;
    }

    count --;

    cout << "in consumer count is " << count << endl;

    pthread_mutex_unlock(&mutex);

    cout << "consumer release lock" << endl;

    return NULL;

}

int main()
{
    //两个线程,一个生产者线程一个消费者线程
    pthread_t createthread,consumethread;

     pthread_create(&consumethread, NULL, consumer, NULL);   sleep(2);
    pthread_create(&createthread, NULL, creator, NULL);

    //主进程等待两个线程结束
    pthread_join(createthread, NULL);
    pthread_join(consumethread, NULL);
    return 0;
}
void * creator(void * arg)
{
    int i = 0;
    while(i<300)
    {

        i++;
        cout << "creator add lock" << endl;
        pthread_mutex_lock(&mutex);

        count ++;

        cout << "in creator count is : " << count << endl;

        if(count > 0)
        {

            pthread_cond_signal(&cond);
        }

        cout << "creator release lock" << endl;

        pthread_mutex_unlock(&mutex);

    }

    return NULL;

}

void * consumer(void * arg)
{
    int i = 0;
    while(i < 100)
    {

        i++;
        cout << "consumer add lock" << endl;

        pthread_mutex_lock(&mutex);

        if(count <= 0)
        {
            cout << "begin wait" << endl;
            pthread_cond_wait(&cond,&mutex);
            cout << "end wait" << endl;
        }

        count --;

        cout << "in consumer count is " << count << endl;

        pthread_mutex_unlock(&mutex);

        cout << "consumer release lock" << endl;
    }

    return NULL;

}

int main()
{
     pthread_t createthread[2],consumethread[3];

     for(int i = 0; i < 3; i++)
     {
        pthread_create(&consumethread[i], NULL, consumer, NULL);
     }

     for(int i = 0; i < 2; i++)
     {
        pthread_create(&createthread[i], NULL, creator, NULL);
         }

     for(int i = 0; i < 2; i++)
      {
        pthread_join(createthread[i], NULL);
         }

     for(int i = 0; i < 3; i++)
     {
         pthread_join(consumethread[i], NULL);
     }

    return 0;

}
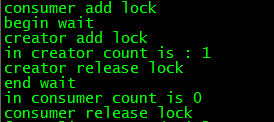
截取一部分结果截图,可以看出数字是连续变动的,而且
加锁解锁内数字才变动,说明我们对锁和条件变量使用合理
pthread_cond_wait学习笔记的更多相关文章
- js学习笔记:webpack基础入门(一)
之前听说过webpack,今天想正式的接触一下,先跟着webpack的官方用户指南走: 在这里有: 如何安装webpack 如何使用webpack 如何使用loader 如何使用webpack的开发者 ...
- PHP-自定义模板-学习笔记
1. 开始 这几天,看了李炎恢老师的<PHP第二季度视频>中的“章节7:创建TPL自定义模板”,做一个学习笔记,通过绘制架构图.UML类图和思维导图,来对加深理解. 2. 整体架构图 ...
- PHP-会员登录与注册例子解析-学习笔记
1.开始 最近开始学习李炎恢老师的<PHP第二季度视频>中的“章节5:使用OOP注册会员”,做一个学习笔记,通过绘制基本页面流程和UML类图,来对加深理解. 2.基本页面流程 3.通过UM ...
- 2014年暑假c#学习笔记目录
2014年暑假c#学习笔记 一.C#编程基础 1. c#编程基础之枚举 2. c#编程基础之函数可变参数 3. c#编程基础之字符串基础 4. c#编程基础之字符串函数 5.c#编程基础之ref.ou ...
- JAVA GUI编程学习笔记目录
2014年暑假JAVA GUI编程学习笔记目录 1.JAVA之GUI编程概述 2.JAVA之GUI编程布局 3.JAVA之GUI编程Frame窗口 4.JAVA之GUI编程事件监听机制 5.JAVA之 ...
- seaJs学习笔记2 – seaJs组建库的使用
原文地址:seaJs学习笔记2 – seaJs组建库的使用 我觉得学习新东西并不是会使用它就够了的,会使用仅仅代表你看懂了,理解了,二不代表你深入了,彻悟了它的精髓. 所以不断的学习将是源源不断. 最 ...
- CSS学习笔记
CSS学习笔记 2016年12月15日整理 CSS基础 Chapter1 在console输入escape("宋体") ENTER 就会出现unicode编码 显示"%u ...
- HTML学习笔记
HTML学习笔记 2016年12月15日整理 Chapter1 URL(scheme://host.domain:port/path/filename) scheme: 定义因特网服务的类型,常见的为 ...
- DirectX Graphics Infrastructure(DXGI):最佳范例 学习笔记
今天要学习的这篇文章写的算是比较早的了,大概在DX11时代就写好了,当时龙书11版看得很潦草,并没有注意这篇文章,现在看12,觉得是跳不过去的一篇文章,地址如下: https://msdn.micro ...
随机推荐
- HDFS副本放置策略
1.第一个副本放置在上传文件的DataNode上,如果是集群外提交,则随机挑选一个磁盘不太满,CPU不太忙的节点. 2.第二个副本放置在与第一个副本不同的机架上. 3.第三个副本放置在与第二个副本同机 ...
- c/c++ linux 进程间通信系列4,使用共享内存
linux 进程间通信系列4,使用共享内存 1,创建共享内存,用到的函数shmget, shmat, shmdt 函数名 功能描述 shmget 创建共享内存,返回pic key shmat 第一次创 ...
- 目录命令(dir)
DIR 命令: // 描述: (Directory) 显示目录的文件和子目录的列表. // 语法: dir [<Drive>:][<Path>][<FileName> ...
- Python Docker 查看私有仓库镜像【转】
文章来源:python Docker 查看私有仓库镜像 pip 安装: # 首先安装epel扩展源: yum -y install epel-release # 更新完成之后,就可安装pip: yum ...
- Docker: Harbor一些小知识
镜像文件上传到私有仓库harbor后,镜像的物理存储位置在哪里? 这些信息记录在docker-compose.yml里,通过观察发现 镜像存储在了宿主机的 volumes: - /data/regis ...
- vue 首页问题
(现在其实处于不知道自己不知道状态,前端其实很多东东,不信弄个微博试试,还有那些概念的to thi tha) 1.压缩 一般 vue-cli已经压缩了 比如js 的,一般4M多压缩到 1M,还有css ...
- 深入理解 path-to-regexp.js 及源码分析
阅读目录 一:path-to-regexp.js 源码分析如下: 二:pathToRegexp 的方法使用 回到顶部 一:path-to-regexp.js 源码分析如下: 我们在vue-router ...
- Logstash filter 插件之 grok
本文简单介绍一下 Logstash 的过滤插件 grok. Grok 的主要功能 Grok 是 Logstash 最重要的插件.它可以解析任意文本并把它结构化.因此 Grok 是将非结构化的日志数据解 ...
- 循环语句--do...while
do...while循环 格式: 执行流程 执行顺序:①③④>②③④>②③④…②不满足为止. ①负责完成循环变量初始化. ②负责判断是否满足循环条件,不满足则跳出循环. ③具体执行的语句 ...
- 【学习总结】Git学习-本地仓库覆盖式更新对于Git仓库的影响以及pull/push到GitHub
< 许久不用Git之后的探索 > 准备日常更新自己的GitHub了.但是编写的文件平时不放在Git仓库路径下. 故测试覆盖式更新对于仓库是否有影响 直接说结论: 通过对已有库的测试发现覆盖 ...