Flume篇---Flume安装配置与相关使用
一.前述
Copy过来一段介绍Apache Flume 是一个从可以收集例如日志,事件等数据资源,并将这些数量庞大的数据从各项数据资源中集中起来存储的工具/服务,或者数集中机制。flume具有高可用,分布式,配置工具,其设计的原理也是基于将数据流,如日志数据从各种网站服务器上汇集起来存储到HDFS,HBase等集中存储器中。官网:http://flume.apache.org/FlumeUserGuide.html
二.架构
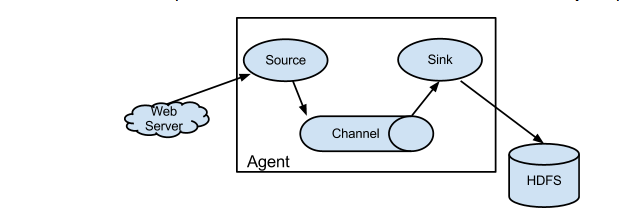
1.基本架构

介绍:
Source:(相当于一个来源)
从数据发生器接收数据,并将接收的数据以Flume的event格式传递给一个或者多个通道channal,Flume提供多种数据接收的方式,比如Avro,Thrift,twitter1%等
Channel:(相当于一个中转)
channal是一种短暂的存储容器,它将从source处接收到的event格式的数据缓存起来,直到它们被sinks消费掉,它在source和sink间起着一共桥梁的作用,channal是一个完整的事务,这一点保证了数据在收发的时候的一致性. 并且它可以和任意数量的source和sink链接. 支持的类型有: JDBC channel , File System channel , Memort channel等.
sink:(相当于最后的写出)
sink将数据存储到集中存储器比如Hbase和HDFS,它从channals消费数据(events)并将其传递给目标地. 目标地可能是另一个sink,也可能HDFS,HBase.
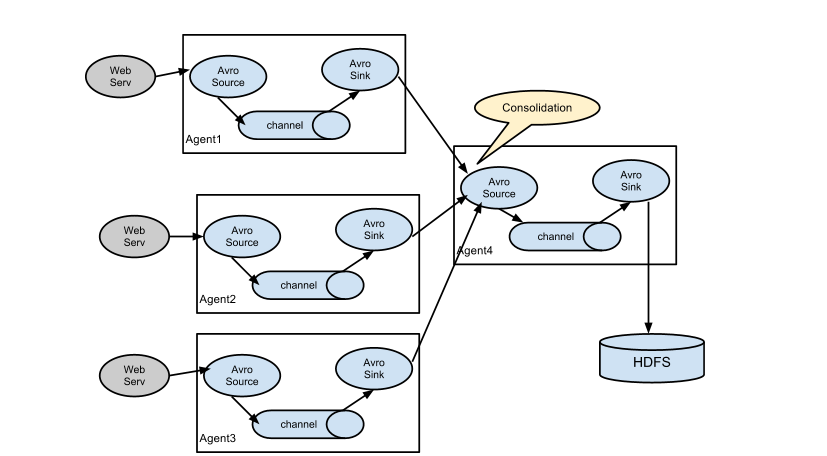
2.延伸架构
2.1利用AVRO中转

2.2一般多个来源时可以配置这样

ps:
1、上传
2、解压
3、修改conf/flume-env.sh 文件中的JDK目录
注意:JAVA_OPTS 配置 如果我们传输文件过大 报内存溢出时 需要修改这个配置项
4、验证安装是否成功 ./flume-ng version
5、配置环境变量
export FLUME_HOME=/home/apache-flume-1.6.0-bin
3.2 Source、Channel、Sink有哪些类型
Flume Source
Source类型 | 说明
Avro Source | 支持Avro协议(实际上是Avro RPC),内置支持
Thrift Source | 支持Thrift协议,内置支持
Exec Source | 基于Unix的command在标准输出上生产数据
JMS Source | 从JMS系统(消息、主题)中读取数据
Spooling Directory Source | 监控指定目录内数据变更
Twitter 1% firehose Source| 通过API持续下载Twitter数据,试验性质
Netcat Source | 监控某个端口,将流经端口的每一个文本行数据作为Event输入
Sequence Generator Source | 序列生成器数据源,生产序列数据
Syslog Sources | 读取syslog数据,产生Event,支持UDP和TCP两种协议
HTTP Source | 基于HTTP POST或GET方式的数据源,支持JSON、BLOB表示形式
Legacy Sources | 兼容老的Flume OG中Source(0.9.x版本)
Flume Channel
Channel类型 说明
Memory Channel | Event数据存储在内存中
JDBC Channel | Event数据存储在持久化存储中,当前Flume Channel内置支持Derby
File Channel | Event数据存储在磁盘文件中
Spillable Memory Channel | Event数据存储在内存中和磁盘上,当内存队列满了,会持久化到磁盘文件
Pseudo Transaction Channel | 测试用途
Custom Channel | 自定义Channel实现
Flume Sink
Sink类型 说明
HDFS Sink | 数据写入HDFS
Logger Sink | 数据写入日志文件
Avro Sink | 数据被转换成Avro Event,然后发送到配置的RPC端口上
Thrift Sink | 数据被转换成Thrift Event,然后发送到配置的RPC端口上
IRC Sink | 数据在IRC上进行回放
File Roll Sink | 存储数据到本地文件系统
Null Sink | 丢弃到所有数据
HBase Sink | 数据写入HBase数据库
Morphline Solr Sink | 数据发送到Solr搜索服务器(集群)
ElasticSearch Sink | 数据发送到Elastic Search搜索服务器(集群)
Kite Dataset Sink | 写数据到Kite Dataset,试验性质的
Custom Sink | 自定义Sink实现
案例1、 A simple example
http://flume.apache.org/FlumeUserGuide.html#a-simple-example
配置文件
############################################################
# Name the components on this agent
a1.sources = r1
a1.sinks = k1
a1.channels = c1
# Describe/configure the source
a1.sources.r1.type = netcat
a1.sources.r1.bind = localhost
a1.sources.r1.port = 44444
# Describe the sink
a1.sinks.k1.type = logger
# Use a channel which buffers events in memory
a1.channels.c1.type = memory
a1.channels.c1.capacity = 1000
a1.channels.c1.transactionCapacity = 100
# Bind the source and sink to the channel
a1.sources.r1.channels = c1
a1.sinks.k1.channel = c1
############################################################
启动flume
flume-ng agent -n a1 -c conf -f simple.conf -Dflume.root.logger=INFO,console 指定配置目录
安装telnet
yum install telnet
退出 ctrl+] quit
Memory Chanel 配置
capacity:默认该通道中最大的可以存储的event数量是100,
trasactionCapacity:每次最大可以source中拿到或者送到sink中的event数量也是100
keep-alive:event添加到通道中或者移出的允许时间
byte**:即event的字节量的限制,只包括eventbody
案例2、两个flume做集群(第一个agent的sink作为第二个agent的source)
node01服务器中,配置文件
############################################################
# Name the components on this agent
a1.sources = r1
a1.sinks = k1
a1.channels = c1
# Describe/configure the source
a1.sources.r1.type = netcat
a1.sources.r1.bind = node1
a1.sources.r1.port = 44444
# Describe the sink
# a1.sinks.k1.type = logger
a1.sinks.k1.type = avro
a1.sinks.k1.hostname = node2
a1.sinks.k1.port = 60000
# Use a channel which buffers events in memory
a1.channels.c1.type = memory
a1.channels.c1.capacity = 1000
a1.channels.c1.transactionCapacity = 100
# Bind the source and sink to the channel
a1.sources.r1.channels = c1
a1.sinks.k1.channel = c1
############################################################
node02服务器中,安装Flume(步骤略)
配置文件
############################################################
# Name the components on this agent
a1.sources = r1
a1.sinks = k1
a1.channels = c1
# Describe/configure the source
a1.sources.r1.type = avro
a1.sources.r1.bind = node2
a1.sources.r1.port = 60000
# Describe the sink
a1.sinks.k1.type = logger
# Use a channel which buffers events in memory
a1.channels.c1.type = memory
a1.channels.c1.capacity = 1000
a1.channels.c1.transactionCapacity = 100
# Bind the source and sink to the channel
a1.sources.r1.channels = c1
a1.sinks.k1.channel = c1
############################################################
先启动node02的Flume
flume-ng agent -n a1 -c conf -f avro.conf -Dflume.root.logger=INFO,console
再启动node01的Flume
flume-ng agent -n a1 -c conf -f simple.conf2 -Dflume.root.logger=INFO,console
打开telnet 测试 node02控制台输出结果
案例3、Exec Source(监听一个文件)
http://flume.apache.org/FlumeUserGuide.html#exec-source
配置文件
############################################################
a1.sources = r1
a1.sinks = k1
a1.channels = c1
# Describe/configure the source
a1.sources.r1.type = exec
a1.sources.r1.command = tail -F /home/flume.exec.log
# Describe the sink
a1.sinks.k1.type = logger
# Use a channel which buffers events in memory
a1.channels.c1.type = memory
a1.channels.c1.capacity = 1000
a1.channels.c1.transactionCapacity = 100
# Bind the source and sink to the channel
a1.sources.r1.channels = c1
a1.sinks.k1.channel = c1
############################################################
启动Flume
flume-ng agent -n a1 -c conf -f exec.conf -Dflume.root.logger=INFO,console
创建空文件演示 touch flume.exec.log
循环添加数据
for i in {1..50}; do echo "$i hi flume" >> flume.exec.log ; sleep 0.1; done
案例4、Spooling Directory Source(监听一个目录)
http://flume.apache.org/FlumeUserGuide.html#spooling-directory-source
配置文件
############################################################
a1.sources = r1
a1.sinks = k1
a1.channels = c1
# Describe/configure the source
a1.sources.r1.type = spooldir
a1.sources.r1.spoolDir = /home/logs
a1.sources.r1.fileHeader = true
# Describe the sink
a1.sinks.k1.type = logger
# Use a channel which buffers events in memory
a1.channels.c1.type = memory
a1.channels.c1.capacity = 1000
a1.channels.c1.transactionCapacity = 100
# Bind the source and sink to the channel
a1.sources.r1.channels = c1
a1.sinks.k1.channel = c1
############################################################
启动Flume
flume-ng agent -n a1 -c conf -f spool.conf -Dflume.root.logger=INFO,console
拷贝文件演示
mkdir logs
cp flume.exec.log logs/
案例5、hdfs sink
http://flume.apache.org/FlumeUserGuide.html#hdfs-sink
配置文件
############################################################
a1.sources = r1
a1.sinks = k1
a1.channels = c1
# Describe/configure the source
a1.sources.r1.type = spooldir
a1.sources.r1.spoolDir = /home/logs
a1.sources.r1.fileHeader = true
# Describe the sink
***只修改上一个spool sink的配置代码块 a1.sinks.k1.type = logger
a1.sinks.k1.type=hdfs
a1.sinks.k1.hdfs.path=hdfs://sxt/flume/%Y-%m-%d/%H%M
##每隔60s或者文件大小超过10M的时候产生新文件
# hdfs有多少条消息时新建文件,0不基于消息个数
a1.sinks.k1.hdfs.rollCount=0
# hdfs创建多长时间新建文件,0不基于时间
a1.sinks.k1.hdfs.rollInterval=60
# hdfs多大时新建文件,0不基于文件大小
a1.sinks.k1.hdfs.rollSize=10240
# 当目前被打开的临时文件在该参数指定的时间(秒)内,没有任何数据写入,则将该临时文件关闭并重命名成目标文件
a1.sinks.k1.hdfs.idleTimeout=3
a1.sinks.k1.hdfs.fileType=DataStream
a1.sinks.k1.hdfs.useLocalTimeStamp=true
## 每五分钟生成一个目录:
# 是否启用时间上的”舍弃”,这里的”舍弃”,类似于”四舍五入”,后面再介绍。如果启用,则会影响除了%t的其他所有时间表达式
a1.sinks.k1.hdfs.round=true
# 时间上进行“舍弃”的值;
a1.sinks.k1.hdfs.roundValue=5
# 时间上进行”舍弃”的单位,包含:second,minute,hour
a1.sinks.k1.hdfs.roundUnit=minute
# Use a channel which buffers events in memory
a1.channels.c1.type = memory
a1.channels.c1.capacity = 1000
a1.channels.c1.transactionCapacity = 100
# Bind the source and sink to the channel
a1.sources.r1.channels = c1
a1.sinks.k1.channel = c1(将source,channel,sink关联)
############################################################
创建HDFS目录
hadoop fs -mkdir /flume
启动Flume
flume-ng agent -n a1 -c conf -f hdfs.conf -Dflume.root.logger=INFO,console
查看hdfs文件
hadoop fs -ls /flume/...
hadoop fs -get /flume/...
http://flume.apache.org/
安装
1、上传
2、解压
3、修改conf/flume-env.sh 文件中的JDK目录
注意:JAVA_OPTS 配置 如果我们传输文件过大 报内存溢出时 需要修改这个配置项
4、验证安装是否成功 ./flume-ng version
5、配置环境变量
export FLUME_HOME=/home/apache-flume-1.6.0-bin
Source、Channel、Sink有哪些类型
Flume Source
Source类型 | 说明
Avro Source | 支持Avro协议(实际上是Avro RPC),内置支持
Thrift Source | 支持Thrift协议,内置支持
Exec Source | 基于Unix的command在标准输出上生产数据
JMS Source | 从JMS系统(消息、主题)中读取数据
Spooling Directory Source | 监控指定目录内数据变更
Twitter 1% firehose Source| 通过API持续下载Twitter数据,试验性质
Netcat Source | 监控某个端口,将流经端口的每一个文本行数据作为Event输入
Sequence Generator Source | 序列生成器数据源,生产序列数据
Syslog Sources | 读取syslog数据,产生Event,支持UDP和TCP两种协议
HTTP Source | 基于HTTP POST或GET方式的数据源,支持JSON、BLOB表示形式
Legacy Sources | 兼容老的Flume OG中Source(0.9.x版本)
Flume Channel
Channel类型 说明
Memory Channel | Event数据存储在内存中
JDBC Channel | Event数据存储在持久化存储中,当前Flume Channel内置支持Derby
File Channel | Event数据存储在磁盘文件中
Spillable Memory Channel | Event数据存储在内存中和磁盘上,当内存队列满了,会持久化到磁盘文件
Pseudo Transaction Channel | 测试用途
Custom Channel | 自定义Channel实现
Flume Sink
Sink类型 说明
HDFS Sink | 数据写入HDFS
Logger Sink | 数据写入日志文件
Avro Sink | 数据被转换成Avro Event,然后发送到配置的RPC端口上
Thrift Sink | 数据被转换成Thrift Event,然后发送到配置的RPC端口上
IRC Sink | 数据在IRC上进行回放
File Roll Sink | 存储数据到本地文件系统
Null Sink | 丢弃到所有数据
HBase Sink | 数据写入HBase数据库
Morphline Solr Sink | 数据发送到Solr搜索服务器(集群)
ElasticSearch Sink | 数据发送到Elastic Search搜索服务器(集群)
Kite Dataset Sink | 写数据到Kite Dataset,试验性质的
Custom Sink | 自定义Sink实现
案例1、 A simple example
http://flume.apache.org/FlumeUserGuide.html#a-simple-example
配置文件
############################################################
# Name the components on this agent
a1.sources = r1
a1.sinks = k1
a1.channels = c1
# Describe/configure the source
a1.sources.r1.type = netcat
a1.sources.r1.bind = localhost
a1.sources.r1.port = 44444
# Describe the sink
a1.sinks.k1.type = logger
# Use a channel which buffers events in memory
a1.channels.c1.type = memory
a1.channels.c1.capacity = 1000
a1.channels.c1.transactionCapacity = 100
# Bind the source and sink to the channel
a1.sources.r1.channels = c1
a1.sinks.k1.channel = c1
############################################################
启动flume
flume-ng agent -n a1 -c conf -f simple.conf -Dflume.root.logger=INFO,console
安装telnet
yum install telnet
退出 ctrl+] quit
Memory Chanel 配置
capacity:默认该通道中最大的可以存储的event数量是100,
trasactionCapacity:每次最大可以source中拿到或者送到sink中的event数量也是100
keep-alive:event添加到通道中或者移出的允许时间
byte**:即event的字节量的限制,只包括eventbody
案例2、两个flume做集群
node01服务器中,配置文件
############################################################
# Name the components on this agent
a1.sources = r1
a1.sinks = k1
a1.channels = c1
# Describe/configure the source
a1.sources.r1.type = netcat
a1.sources.r1.bind = node1
a1.sources.r1.port = 44444
# Describe the sink
# a1.sinks.k1.type = logger
a1.sinks.k1.type = avro
a1.sinks.k1.hostname = node2
a1.sinks.k1.port = 60000
# Use a channel which buffers events in memory
a1.channels.c1.type = memory
a1.channels.c1.capacity = 1000
a1.channels.c1.transactionCapacity = 100
# Bind the source and sink to the channel
a1.sources.r1.channels = c1
a1.sinks.k1.channel = c1
############################################################
node02服务器中,安装Flume(步骤略)
配置文件
############################################################
# Name the components on this agent
a1.sources = r1
a1.sinks = k1
a1.channels = c1
# Describe/configure the source
a1.sources.r1.type = avro
a1.sources.r1.bind = node2
a1.sources.r1.port = 60000
# Describe the sink
a1.sinks.k1.type = logger
# Use a channel which buffers events in memory
a1.channels.c1.type = memory
a1.channels.c1.capacity = 1000
a1.channels.c1.transactionCapacity = 100
# Bind the source and sink to the channel
a1.sources.r1.channels = c1
a1.sinks.k1.channel = c1
############################################################
先启动node02的Flume
flume-ng agent -n a1 -c conf -f avro.conf -Dflume.root.logger=INFO,console
再启动node01的Flume
flume-ng agent -n a1 -c conf -f simple.conf2 -Dflume.root.logger=INFO,console
打开telnet 测试 node02控制台输出结果
案例3、Exec Source
http://flume.apache.org/FlumeUserGuide.html#exec-source
配置文件
############################################################
a1.sources = r1
a1.sinks = k1
a1.channels = c1
# Describe/configure the source
a1.sources.r1.type = exec
a1.sources.r1.command = tail -F /home/flume.exec.log
# Describe the sink
a1.sinks.k1.type = logger
# Use a channel which buffers events in memory
a1.channels.c1.type = memory
a1.channels.c1.capacity = 1000
a1.channels.c1.transactionCapacity = 100
# Bind the source and sink to the channel
a1.sources.r1.channels = c1
a1.sinks.k1.channel = c1
############################################################
启动Flume
flume-ng agent -n a1 -c conf -f exec.conf -Dflume.root.logger=INFO,console
创建空文件演示 touch flume.exec.log
循环添加数据
for i in {1..50}; do echo "$i hi flume" >> flume.exec.log ; sleep 0.1; done
案例4、Spooling Directory Source
http://flume.apache.org/FlumeUserGuide.html#spooling-directory-source
配置文件
############################################################
a1.sources = r1
a1.sinks = k1
a1.channels = c1
# Describe/configure the source
a1.sources.r1.type = spooldir
a1.sources.r1.spoolDir = /home/logs
a1.sources.r1.fileHeader = true
# Describe the sink
a1.sinks.k1.type = logger
# Use a channel which buffers events in memory
a1.channels.c1.type = memory
a1.channels.c1.capacity = 1000
a1.channels.c1.transactionCapacity = 100
# Bind the source and sink to the channel
a1.sources.r1.channels = c1
a1.sinks.k1.channel = c1
############################################################
启动Flume
flume-ng agent -n a1 -c conf -f spool.conf -Dflume.root.logger=INFO,console
拷贝文件演示
mkdir logs
cp flume.exec.log logs/
案例5、hdfs sink
http://flume.apache.org/FlumeUserGuide.html#hdfs-sink
配置文件
############################################################
a1.sources = r1
a1.sinks = k1
a1.channels = c1
# Describe/configure the source
a1.sources.r1.type = spooldir
a1.sources.r1.spoolDir = /home/logs
a1.sources.r1.fileHeader = true
# Describe the sink
***只修改上一个spool sink的配置代码块 a1.sinks.k1.type = logger
a1.sinks.k1.type=hdfs
a1.sinks.k1.hdfs.path=hdfs://sxt/flume/%Y-%m-%d/%H%M
##每隔60s或者文件大小超过10M的时候产生新文件
# hdfs有多少条消息时新建文件,0不基于消息个数
a1.sinks.k1.hdfs.rollCount=0
# hdfs创建多长时间新建文件,0不基于时间
a1.sinks.k1.hdfs.rollInterval=60
# hdfs多大时新建文件,0不基于文件大小
a1.sinks.k1.hdfs.rollSize=10240
# 当目前被打开的临时文件在该参数指定的时间(秒)内,没有任何数据写入,则将该临时文件关闭并重命名成目标文件
a1.sinks.k1.hdfs.idleTimeout=3
a1.sinks.k1.hdfs.fileType=DataStream
a1.sinks.k1.hdfs.useLocalTimeStamp=true
## 每五分钟生成一个目录:
# 是否启用时间上的”舍弃”,这里的”舍弃”,类似于”四舍五入”,后面再介绍。如果启用,则会影响除了%t的其他所有时间表达式
a1.sinks.k1.hdfs.round=true
# 时间上进行“舍弃”的值;
a1.sinks.k1.hdfs.roundValue=5
# 时间上进行”舍弃”的单位,包含:second,minute,hour
a1.sinks.k1.hdfs.roundUnit=minute
# Use a channel which buffers events in memory
a1.channels.c1.type = memory
a1.channels.c1.capacity = 1000
a1.channels.c1.transactionCapacity = 100
# Bind the source and sink to the channel
a1.sources.r1.channels = c1
a1.sinks.k1.channel = c1
############################################################
创建HDFS目录
hadoop fs -mkdir /flume
启动Flume
flume-ng agent -n a1 -c conf -f hdfs.conf -Dflume.root.logger=INFO,console
查看hdfs文件
hadoop fs -ls /flume/...
hadoop fs -get /flume/...
作业:
1、flume如何收集java请求数据
2、项目当中如何来做? 日志存放/log/目录下 以yyyyMMdd为子目录 分别存放每天的数据
Flume篇---Flume安装配置与相关使用的更多相关文章
- 具体图解 Flume介绍、安装配置
写在前面一: 本文总结"Hadoop生态系统"中的当中一员--Apache Flume 写在前面二: 所用软件说明: 一.什么是Apache Flume 官网:Flume is a ...
- [转载] 纯手打 第一篇:安装配置gradle
本文转载自: http://www.cnblogs.com/uncle2000/p/4276833.html 一个bug 一个脚印的叫你们用gradle. 1介于网络上的很多资料都是老的 不适用与现在 ...
- gradle教程 [原创](eclipse/ADT下 非插件 非Android Studio/AS)纯手打 第一篇:安装配置gradle
一个bug 一个脚印的叫你们用gradle. 1介于网络上的很多资料都是老的 不适用与现在的新版本gradle 尤其是有些gradle方法改名了老的用不了 2介于网上都是粘贴复制并且零碎我很蛋疼啊,走 ...
- Jboss安装配置以及相关的问题
下载地址:(目前最新版本是jboss-as-7.1.1.Final) http://download.jboss.org/jbossas/7.1/jboss-as-7.1.1.Final/jboss- ...
- 基于WIN8.1:新手篇→tomcat安装配置
一.JDK配置 下载安装JDK和tomcat 打开电脑属性,高级系统设置进行环境变量配置 新建系统变量,变量值为JDK安装路径,并在系统变量path最后加上“%JAVA_HOME%\bin;%JAVA ...
- 基于centOS7:新手篇→tomcat安装配置
1.新环境,还没有安装lrzsz和unzip,先安装 yum -y install lrzsz yum -y install unzip 2.进入tomcat官网下载安装包,使用rz上传到服务器opt ...
- 第一篇 Charles的配置及相关使用
// Charles Proxy License // 适用于Charles任意版本的注册码,谁还会想要使用破解版呢. // Charles 4.2目前是最新版,可用. Registered Na ...
- Linux安装配置VPN服务器
一.实验简介 VPN ,中文翻译为虚拟专有网络,英文全称是 Virtual Private Network .现在 VPN 被普遍定义为通过 一个公用互联网络建立一个临时的.安全的连接,是一条穿过混乱 ...
- 浅入深出Vue:工具准备之WebStorm安装配置
浅入深出Vue之工具准备(一):WebStorm安装配置 工欲善其事必先利其器,让我们先做好准备工作吧 导航篇 WebStorm安装配置 所有工具的下载地址都可以在导航篇中找到,这里我们下载的是最新版 ...
随机推荐
- python-while else
count = 0 while count <= 5 : count += 1 if count == 3:break print("Loop",count) else: p ...
- Run Keyword And Ignore Error,Run Keyword And Return Status,Run Keyword And Continue On Failure,Run Keyword And Expect Error,Wait Until Keyword Succeeds用法
*** Test Cases ***case1 #即使错误也继续执行,也不记录失败,且可以返回执行状态和错误信息 ${Run Keyword And Ignore Error status} ${st ...
- Centos6下使用yum安装MariaDB
1)增加mariaDB的yum源 1 2 3 4 5 6 7 8 9 [root@centos6-test08 ~]# cd /etc/yum.repos.d/ [root@centos6-test0 ...
- Ubuntu server 16.04安装,无网卡驱动解决
因为使用一个软件必须要在ubuntu server 16.04上安装,因此先在裸机上安装ubuntu server 16.04,具体信息: 镜像版本:ubuntu-16.04.6-server-amd ...
- pycharm下虚拟环境建立,django项目建立等情况说明
- 传入两坐标点,利用div+css画线
上样式生成函数代码 lineStyle (x1, y1, x2, y2, lineWidth = 4, color = 'black') { let rectX = x1 < x2 ? x1 : ...
- python爬取网页内容demo
#html文本提取 from bs4 import BeautifulSoup html_sample = '\ <html> \ <body> \ <h1 id = & ...
- JUC笔记
3个售票员,卖30张票 package com.javase.thread; import java.util.concurrent.locks.Lock; import java.uti ...
- 如何在浏览器中输入(myeclipse创建的项目的)地址访问JSP页面
如何在浏览器中输入(myeclipse创建的项目的)地址访问JSP页面 可以在Tomcat项目里面查看你的JSP页面在哪里,具体的路径为: tomcat--work--localhost--项目名称, ...
- xshell登陆服务器步骤
Xshell远程连接服务器 打开xshell后找到左上角第一个“文件”点击,弹出来一个下拉框,选择“新建”点击(或者直接按下快捷键“Alt+n”). 点击“新建”之后就会出现下面这样一 ...
