Spring boot+CXF开发WebService
最近工作中需要用到webservice,而且结合spring boot进行开发,参照了一些网上的资料,配置过程中出现的了一些问题,于是写了这篇博客,记录一下我这次spring boot+cxf开发的webservice的配置过程,仅供参考。
声明:本文版权归作者和博客园共有,欢迎转载,但未经作者同意必须保留此段声明,且在文章页面明显位置给出, 原文地址 如有问题, 可邮件(249780464@qq.com)咨询.
一、本次开发除了用到spring boot基础jar包外,还用到了cxf相关jar包:
 1 <!-- cxf支持 -->

 2         <dependency>

 3             <groupId>org.apache.cxf</groupId>

 4             <artifactId>cxf-rt-frontend-jaxws</artifactId>

 5             <version>3.1.6</version>

 6         </dependency>

 7         <dependency>

 8             <groupId>org.apache.cxf</groupId>

 9             <artifactId>cxf-rt-transports-http</artifactId>

10             <version>3.1.6</version>

11         </dependency>
二、首先我们创建一个实体类,内容是关于用户信息的查询和记录:
 1 import java.io.Serializable;

 2 import java.util.Date;

 3

 4 public class User implements Serializable {

 5

 6     private static final long serialVersionUID = -5939599230753662529L;

 7     private String              userId;

 8     private String            username;

 9     private String            age;

10     private Date              updateTime;

11     //getter setter ......

12     public void setUserId(String userId) {

13         this.userId=userId;

14     }

15     public void setUsername(String username) {

16         this.username=username;

17     }

18     public void setAge(String age) {

19         this.age=age;

20     }

21     public void setUpdateTime(Date updateTime) {

22         this.updateTime=updateTime;

23     }

24

25

26     public String getUserId() {

27         return userId;

28     }

29     public String getUserName() {

30         return username;

31     }

32     public String getAge() {

33         return age;

34     }

35     public Date getUpdateTime() {

36         return updateTime;

37     }

38 }
三、接下来我们创建接口类:
 1 import javax.jws.WebMethod;

 2 import javax.jws.WebParam;

 3 import javax.jws.WebService;

 4

 5 import cn.paybay.demo.entity.User;

 6

 7

 8 @WebService

 9 public interface UserService {

10

11     @WebMethod

12     String getName(@WebParam(name = "userId") String userId);

13     @WebMethod

14     User getUser(String userId);

15 }
四、有了接口类,那么接下来我们对接口进行实现,也就是接口实现类(也就是业务类)代码:
1 package cn.paybay.demo.service.impl;
2
3 import java.util.Date;
4 import java.util.HashMap;
5 import java.util.Map;
6
7
8
9 import javax.jws.WebService;
10
11 import cn.paybay.demo.entity.User;
12 import cn.paybay.demo.service.UserService;
13
14 @WebService(targetNamespace="http://service.demo.paybay.cn/",endpointInterface = "cn.paybay.demo.service.UserService")
15 public class UserServiceImpl implements UserService{
16
17 private Map<String, User> userMap = new HashMap<String, User>();
18 public UserServiceImpl() {
19 System.out.println("向实体类插入数据");
20 User user = new User();
21 user.setUserId("411001");
22 user.setUsername("zhansan");
23 user.setAge("20");
24 user.setUpdateTime(new Date());
25 userMap.put(user.getUserId(), user);
26
27 user = new User();
28 user.setUserId("411002");
29 user.setUsername("lisi");
30 user.setAge("30");
31 user.setUpdateTime(new Date());
32 userMap.put(user.getUserId(), user);
33
34 user = new User();
35 user.setUserId("411003");
36 user.setUsername("wangwu");
37 user.setAge("40");
38 user.setUpdateTime(new Date());
39 userMap.put(user.getUserId(), user);
40 }
41 @Override
42 public String getName(String userId) {
43 return "liyd-" + userId;
44 }
45 @Override
46 public User getUser(String userId) {
47 System.out.println("userMap是:"+userMap);
48 return userMap.get(userId);
49 }
50
51 }
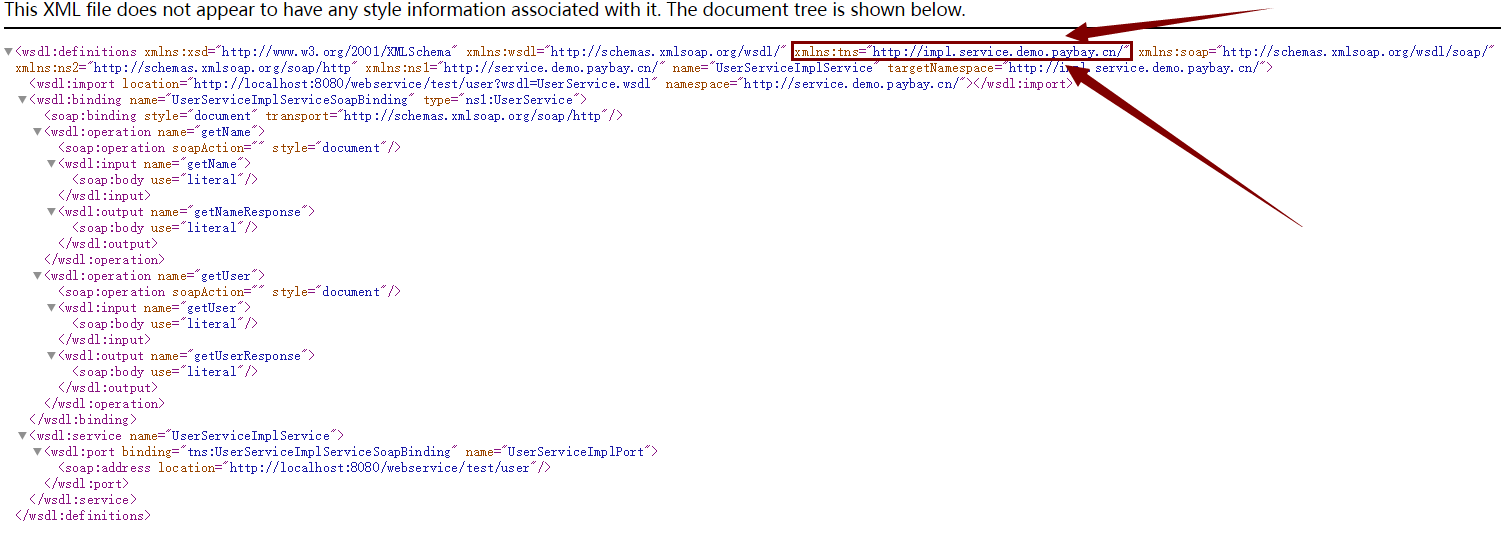
注释(PS):在发布服务之前,我们要在这里对业务实现类进行一下说明,请大家看下图箭头指向的方框部分
(图一)
下面我来解释一下加上图方框箭头所指代码的目的:
http://impl.service.demo.paybay.cn/:这是我的业务类所在路径;
http://service.demo.paybay.cn/:这是我的接口类所在路径;
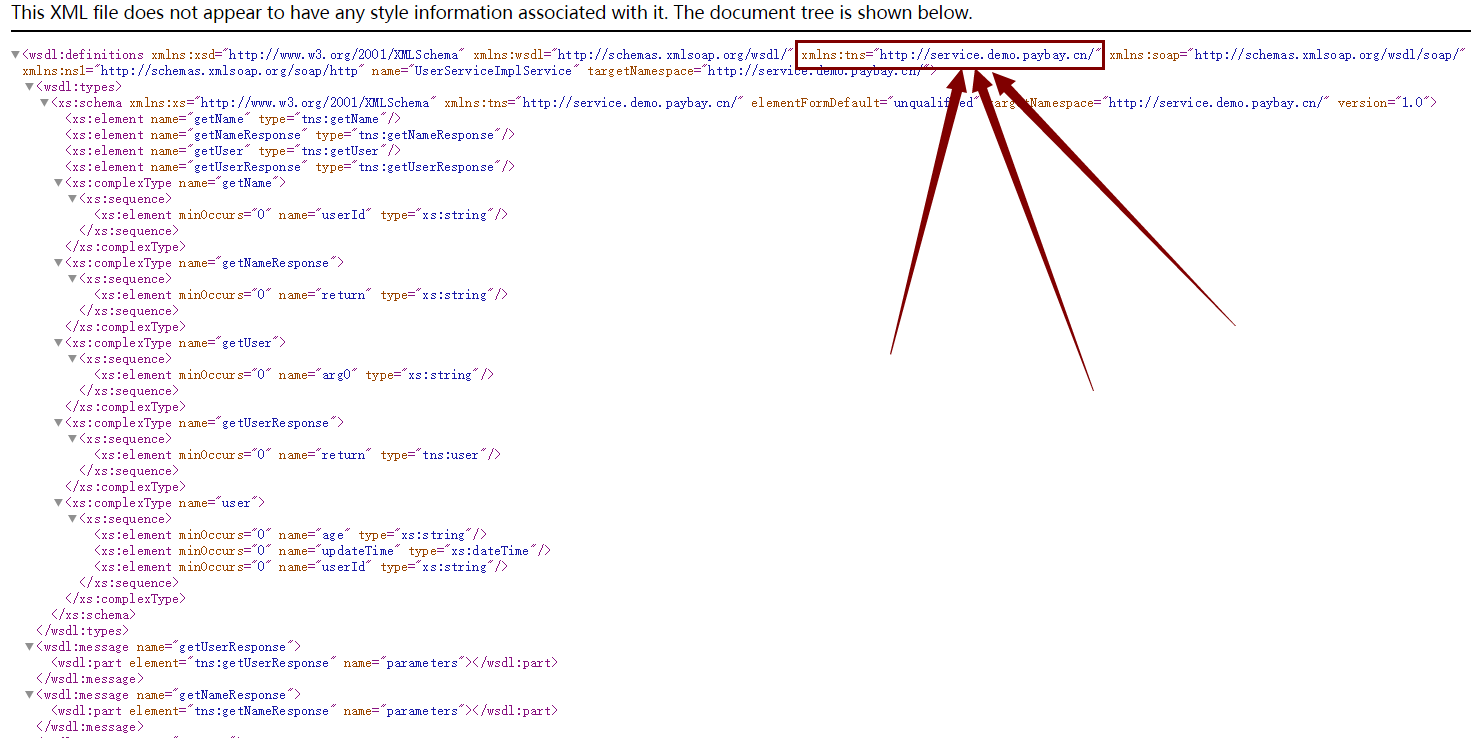
在不加上图方框箭头所指代码的情况下,你最后发服务的结果是这样的(如下图):
(图二)

并且会在你进行客户端调用的时候回报错:No operation was found with the name {http://impl.service.demo.paybay.cn/}getUser.
那么原因就是:在CXF发布服务的时候,发布的是业务类(UserServiceImpl.java),那么默认的命名空间就会是业务类所在包(路径),而对外界暴露的则是接口类(UserService.java),那么对于客户端调用的时侯,需要按照接口类所在路径进行命名空间的定义。
所以在发布之前我们要在业务类(UserServiceImpl.java)上增加注解,指定命名空间,然后再进行发布,
那么我们最终在加上(图一)方框箭头所指代码情况下,发布服务的结果为下图(请看图三):
(图三)
五、(发布服务)接口类,业务类代码都已经准备好,那么我接下来我就要对webservice服务进行发布:
代码如下:
 1  2

 3 import javax.xml.ws.Endpoint;

 4

 5 import org.apache.cxf.Bus;

 6 import org.apache.cxf.bus.spring.SpringBus;

 7 import org.apache.cxf.jaxws.EndpointImpl;

 8 import org.apache.cxf.transport.servlet.CXFServlet;

 9 import org.springframework.boot.web.servlet.ServletRegistrationBean;

10 import org.springframework.context.annotation.Bean;

11 import org.springframework.context.annotation.Configuration;

12

13 import cn.paybay.demo.service.UserService;

14 import cn.paybay.demo.service.impl.UserServiceImpl;

15

16

17 @Configuration

18 public class TestConfig {

19

20          @Bean

21         public ServletRegistrationBean dispatcherServlet() {

22             return new ServletRegistrationBean(new CXFServlet(), "/test/*");

23         }

24         @Bean(name = Bus.DEFAULT_BUS_ID)

25         public SpringBus springBus() {

26             return new SpringBus();

27         }

28         @Bean

29         public UserService userService() {

30             return new UserServiceImpl();

31         }

32         @Bean

33         public Endpoint endpoint() {

34             EndpointImpl endpoint = new EndpointImpl(springBus(), userService());

35             endpoint.publish("/user");

36             return endpoint;

37         }

38

39 }

那么到这里呢,我们的所有的步骤基本完成了,启动spring boot 然后再浏览器中输入url:http://localhost:8080/webservice/test/user?wsdl
可以看到有相关的wsdl描述信息输出了,说明服务已经发布了。
那么这里我又要增加注释了,请大家注意,我在最初查询资料,配置demo的时候,启动以后,发布时候总是报404,网上有很多关于什么端口冲突等说法,我试过后,根本不是那一回事,然后我无意中尝试了一下,在url地址处加入工程名,结果,问题解决了。
因此请大家注意:在测试发布服务的时候,你在浏览器中输入的url地址应该是:http://localhost:8080/你的工程名/test/user?wsdl;
然后就是发布结果如下图(见图四):
(图四)

到此为止,我们的服务发布成功了。
六、调用服务
 1  2

 3

 4

 5

 6 import org.apache.cxf.jaxws.endpoint.dynamic.JaxWsDynamicClientFactory;

 7

 8

 9 public class Client {

10

12     public static void main(String args[]) throws Exception{

13

14         JaxWsDynamicClientFactory dcf =JaxWsDynamicClientFactory.newInstance();

15         org.apache.cxf.endpoint.Client client =dcf.createClient("http://localhost:8080/webservice/test/user?wsdl");

16         //getUser 为接口中定义的方法名称  张三为传递的参数   返回一个Object数组

17         Object[] objects=client.invoke("getUser","411001");

18         //输出调用结果

19         System.out.println("*****"+objects[0].toString());

20     }

21

22 }
七、最后附上我的工程结构图(见图五):
(图五)

写这篇博客,参照了一些大神的贴子,学习到很多知识,总结出来的,仅供参考,如有错误,请各位指导!
Spring boot+CXF开发WebService的更多相关文章
- Spring boot+CXF开发WebService Demo
最近工作中需要用到webservice,而且结合spring boot进行开发,参照了一些网上的资料,配置过程中出现的了一些问题,于是写了这篇博客,记录一下我这次spring boot+cxf开发的w ...
- Spring Boot+CXF搭建WebService(转)
概述 最近项目用到在Spring boot下搭建WebService服务,对Java语言下的WebService了解甚少,而今抽个时间查阅资料整理下Spring Boot结合CXF打架WebServi ...
- struts1+spring+myeclipse +cxf 开发webservice以及普通java应用调用webservice的实例
Cxf + Spring+ myeclipse+ cxf 进行 Webservice服务端开发 使用Cxf开发webservice的服务端项目结构 Spring配置文件applicationCont ...
- Spring Boot+CXF搭建WebService
Spring Boot WebService开发 需要依赖Maven的Pom清单 <?xml version="1.0" encoding="UTF-8" ...
- Spring Boot+CXF搭建WebService服务参考资料
pom.xml文件引入包: <!--WerbService CXF依赖--> <dependency> <groupId>org.apache.cxf</gr ...
- 使用cxf开发webservice应用时抛出异常
在使用cxf开发webservice应用时,报出了类似下面的错误 JAXB: [javax.xml.bind.UnmarshalException: unexpected element (uri:& ...
- Spring集成XFire开发WebService
Spring是眼下最流行的JavaEE Framework,可是使用Spring的Spring-WS开发WebService却十分繁琐.XFire是一个简化WebService开发的开源项目.通过Sp ...
- spring boot + Thymeleaf开发web项目
"Spring boot非常适合Web应用程序开发.您可以轻松创建自包含的HTTP应用.web服务器采用嵌入式Tomcat,或者Jetty等.大多数情况下Web应用程序将使用 spring- ...
- Spring Boot让开发如此简单
从html到asp后一直专注.net开发,从.net诞生到如今,从winform到webform,从asp.net到.net mcv,从.net mvc到.net core,从ado.net到linq ...
随机推荐
- Sublime Text 最佳插件列表
http://blog.jobbole.com/79326/ 推荐!Sublime Text 最佳插件列表 2014/07/25 · 工具与资源 · 26.1K 阅读 · 2 评论 · Sublime ...
- Apache的安装
Apache的安装: 注:本例只截取需要注意的截图,其它默认则不显示. 1. 服务器信息可以按照默认配置,如果服务器的80端口没被其他服务器程序占据.可选“for All Users,on ...
- 无法加载shockwave flash
热心网友 360浏览器的话,浏览器——工具——选项(非Internet选项)——高级设置——FLASH, 默认使用PPAPI Flash(需要重启浏览器) 默认使用NPAPI Flash(需要重启浏览 ...
- RasterBandClass Class
Product Availability Available with ArcGIS Engine, ArcGIS Desktop, and ArcGIS Server. Description Th ...
- offsetXXX和scollXXX的一些操作
<!doctype html><html><head><meta charset="utf-8"><title>offs ...
- javascript中的正则匹配函数exec(),test(),match()
test() var str = "cat";var reStr = /cat/;alert(reStr.test(str)); 输出为:true 它的返回值为true or fa ...
- createSQLQuery的addEntity跟setResultTransformer方法
createSQLQuery的addEntity和setResultTransformer方法 1. 使用SQLQuery对原生SQL查询执行的控制是通过SQLQuery接口进行的,通过执行Sessi ...
- ural1147 Shaping Regions
Shaping Regions Time limit: 0.5 secondMemory limit: 64 MB N opaque rectangles (1 ≤ N ≤ 1000) of vari ...
- webView进度条
self.progress = [[NJKWebViewProgress alloc] init]; self.webView.delegate = self.progress; __weak typ ...
- C语言实现按位循环左移和循环右移
ror eax,cl ==> eax=(eax>>cl)+(eax<<(sizeof(eax)-cl)); rol eax,cl ==> eax=(eax<& ...