Android之View绘制流程开胃菜---setContentView(...)详细分析
版权声明:本文出自汪磊的博客,转载请务必注明出处。
1 为什么要分析setContentView方法
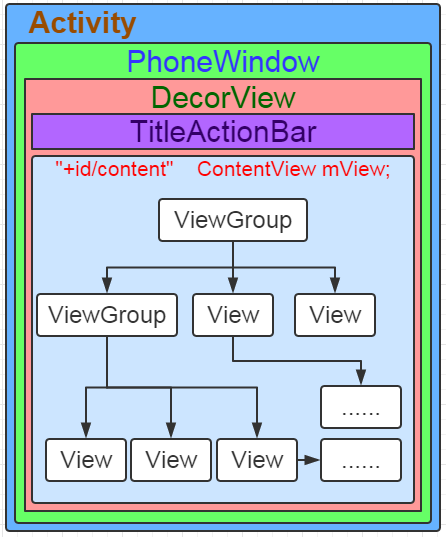
作为安卓开发者相信大部分都有意或者无意看过如下图示:PhoneWindow,DecorView这些究竟都是些神马玩意?图示的层级关系是怎么来的?我们自己所写的布局是怎么加载到窗体上的?以及在上一篇《Android事件传递机制详解及最新源码分析——Activity篇》中提到过我们在调用setContentView设置布局的时候其实都是被放置在id为content的FrameLayout 布局中的,这里又是什么鬼?带着这些问题我们一起探讨下setContentView方法究竟做了些什么。
2 分析setContentView方法(API23)
我们平时调用setContentView,例如:setContentView(R.layout.xxx);点进源码都是先调用Activity中的setContentView方法,我们就从Activity中的setContentView方法开始分析。
Activity的源码中有三个重载的setContentView方法,如下:
 public void setContentView(@LayoutRes int layoutResID) {

         getWindow().setContentView(layoutResID);

         initWindowDecorActionBar();

     }

 public void setContentView(View view) {

         getWindow().setContentView(view);

         initWindowDecorActionBar();

     }

 public void setContentView(View view, ViewGroup.LayoutParams params) {

         getWindow().setContentView(view, params);

         initWindowDecorActionBar();

     }
可以看到三个方法都是又调用了getWindow().setContentView(...);在上一篇文章中分析过getWindow()返回mWindow对象,mWindow定义是Windo类型,实际初始化的时候初始化为PhoneWindow,源码如下:
private Window mWindow;

mWindow = new PhoneWindow(this);
这里说明一下:Window 是抽象类,主要提供一些绘制窗口的一些公用方法,PhoneWindow是Window的具体继承实现类。
我们看看Window类中setContentView方法,源码如下:
public abstract void setContentView(@LayoutRes int layoutResID);

public abstract void setContentView(View view);

public abstract void setContentView(View view, ViewGroup.LayoutParams params);
看到了吧,这里只是三个抽象方法而已,具体逻辑需要子类自己去实现。
接下来,我们就就去PhoneWindow中找一下吧,源码如下:
    @Override

    public void setContentView(int layoutResID) {

        // Note: FEATURE_CONTENT_TRANSITIONS may be set in the process of installing the window

        // decor, when theme attributes and the like are crystalized. Do not check the feature

        // before this happens.

        if (mContentParent == null) {

            installDecor();

        } else if (!hasFeature(FEATURE_CONTENT_TRANSITIONS)) {

            mContentParent.removeAllViews();

        }

        if (hasFeature(FEATURE_CONTENT_TRANSITIONS)) {

            final Scene newScene = Scene.getSceneForLayout(mContentParent, layoutResID,

                    getContext());

            transitionTo(newScene);

        } else {

            mLayoutInflater.inflate(layoutResID, mContentParent);

        }

        mContentParent.requestApplyInsets();

        final Callback cb = getCallback();

        if (cb != null && !isDestroyed()) {

            cb.onContentChanged();

        }

    }

    @Override

    public void setContentView(View view) {

        setContentView(view, new ViewGroup.LayoutParams(MATCH_PARENT, MATCH_PARENT));

    }

    @Override

    public void setContentView(View view, ViewGroup.LayoutParams params) {

        // Note: FEATURE_CONTENT_TRANSITIONS may be set in the process of installing the window

        // decor, when theme attributes and the like are crystalized. Do not check the feature

        // before this happens.

        if (mContentParent == null) {

            installDecor();

        } else if (!hasFeature(FEATURE_CONTENT_TRANSITIONS)) {

            mContentParent.removeAllViews();

        }

        if (hasFeature(FEATURE_CONTENT_TRANSITIONS)) {

            view.setLayoutParams(params);

            final Scene newScene = new Scene(mContentParent, view);

            transitionTo(newScene);

        } else {

            mContentParent.addView(view, params);

        }

        mContentParent.requestApplyInsets();

        final Callback cb = getCallback();

        if (cb != null && !isDestroyed()) {

            cb.onContentChanged();

        }

    }
看到了吧,在子类PhoneWindow中有具体实现,并且setContentView(View view)实际上也是调用的setContentView(View view, ViewGroup.LayoutParams params),只不过params参数默认传入为MATCH_PARENT。并且setContentView(int layoutResID)与setContentView(View view, ViewGroup.LayoutParams params)方法代码逻辑是一样的,这里我们选取setContentView(int layoutResID)方法加以分析即可。
到这里我们明白平时调用的setContentView(R.layout.xxx)方法实际上调用的是PhoneWindow中的setContentView(int layoutResID)方法,接下来我们着重分析此方法。
3 分析PhoneWindow中的setContentView(int layoutResID)方法(API23)
源码如下:
  @Override

     public void setContentView(int layoutResID) {

         // Note: FEATURE_CONTENT_TRANSITIONS may be set in the process of installing the window

         // decor, when theme attributes and the like are crystalized. Do not check the feature

         // before this happens.

         if (mContentParent == null) {

             installDecor();

         } else if (!hasFeature(FEATURE_CONTENT_TRANSITIONS)) {

             mContentParent.removeAllViews();

         }

         if (hasFeature(FEATURE_CONTENT_TRANSITIONS)) {

             final Scene newScene = Scene.getSceneForLayout(mContentParent, layoutResID,

                     getContext());

             transitionTo(newScene);

         } else {

             mLayoutInflater.inflate(layoutResID, mContentParent);

         }

         mContentParent.requestApplyInsets();

         final Callback cb = getCallback();

         if (cb != null && !isDestroyed()) {

             cb.onContentChanged();

         }

     }
第6行代码判断mContentParent 是否为空,mContentParent 是PhoneWindow中定义的一个ViewGroup类型实例。第一次运行的时候mContentParent 为null,则进入判断执行第7行代码
installDecor(),我们看看installDecor()方法都做了什么源码如下:这里只列出主要代码
 private void installDecor() {

         if (mDecor == null) {

             mDecor = generateDecor();

             ...

         }

         if (mContentParent == null) {

             mContentParent = generateLayout(mDecor);

             ...

         }

         ....

 }
第2行代码判断mDecor是否为null,为null则执行generateDecor()代码并对mDecor赋值,mDecor是DecorView的一个实例,DecorView是PhoneWindow的内部类,定义如下:
private final class DecorView extends FrameLayout implements RootViewSurfaceTaker
看到了吧,DecorView其实就是FrameLayout 的子类,对FrameLayout 进行装饰,增强其某些功能。
我们继续看generateDecor()源码:
    protected DecorView generateDecor() {

         return new DecorView(getContext(), -1);

     }
很简单吧就是生成DecorView对象并且返回,这里没什么要多说的。
返回installDecor()方法我们继续向下分析。
第6行代码又是判断mContentParent 是否为null,是则执行generateLayout(mDecor)方法并将返回值赋值给mContentParent 。
那我们就继续看generateLayout(mDecor)源码:
 protected ViewGroup generateLayout(DecorView decor) {

         // Apply data from current theme.

         TypedArray a = getWindowStyle();

         if (false) {

             System.out.println("From style:");

             String s = "Attrs:";

             for (int i = 0; i < R.styleable.Window.length; i++) {

                 s = s + " " + Integer.toHexString(R.styleable.Window[i]) + "="

                         + a.getString(i);

             }

             System.out.println(s);

         }

         mIsFloating = a.getBoolean(R.styleable.Window_windowIsFloating, false);

         int flagsToUpdate = (FLAG_LAYOUT_IN_SCREEN|FLAG_LAYOUT_INSET_DECOR)

                 & (~getForcedWindowFlags());

         if (mIsFloating) {

             setLayout(WRAP_CONTENT, WRAP_CONTENT);

             setFlags(0, flagsToUpdate);

         } else {

             setFlags(FLAG_LAYOUT_IN_SCREEN|FLAG_LAYOUT_INSET_DECOR, flagsToUpdate);

         }

         if (a.getBoolean(R.styleable.Window_windowNoTitle, false)) {

             requestFeature(FEATURE_NO_TITLE);

         } else if (a.getBoolean(R.styleable.Window_windowActionBar, false)) {

             // Don't allow an action bar if there is no title.

             requestFeature(FEATURE_ACTION_BAR);

         }

         if (a.getBoolean(R.styleable.Window_windowActionBarOverlay, false)) {

             requestFeature(FEATURE_ACTION_BAR_OVERLAY);

         }

         if (a.getBoolean(R.styleable.Window_windowActionModeOverlay, false)) {

             requestFeature(FEATURE_ACTION_MODE_OVERLAY);

         }

         if (a.getBoolean(R.styleable.Window_windowSwipeToDismiss, false)) {

             requestFeature(FEATURE_SWIPE_TO_DISMISS);

         }

         if (a.getBoolean(R.styleable.Window_windowFullscreen, false)) {

             setFlags(FLAG_FULLSCREEN, FLAG_FULLSCREEN & (~getForcedWindowFlags()));

         }

         if (a.getBoolean(R.styleable.Window_windowTranslucentStatus,

                 false)) {

             setFlags(FLAG_TRANSLUCENT_STATUS, FLAG_TRANSLUCENT_STATUS

                     & (~getForcedWindowFlags()));

         }

         if (a.getBoolean(R.styleable.Window_windowTranslucentNavigation,

                 false)) {

             setFlags(FLAG_TRANSLUCENT_NAVIGATION, FLAG_TRANSLUCENT_NAVIGATION

                     & (~getForcedWindowFlags()));

         }

         if (a.getBoolean(R.styleable.Window_windowOverscan, false)) {

             setFlags(FLAG_LAYOUT_IN_OVERSCAN, FLAG_LAYOUT_IN_OVERSCAN&(~getForcedWindowFlags()));

         }

         if (a.getBoolean(R.styleable.Window_windowShowWallpaper, false)) {

             setFlags(FLAG_SHOW_WALLPAPER, FLAG_SHOW_WALLPAPER&(~getForcedWindowFlags()));

         }

         if (a.getBoolean(R.styleable.Window_windowEnableSplitTouch,

                 getContext().getApplicationInfo().targetSdkVersion

                         >= android.os.Build.VERSION_CODES.HONEYCOMB)) {

             setFlags(FLAG_SPLIT_TOUCH, FLAG_SPLIT_TOUCH&(~getForcedWindowFlags()));

         }

         a.getValue(R.styleable.Window_windowMinWidthMajor, mMinWidthMajor);

         a.getValue(R.styleable.Window_windowMinWidthMinor, mMinWidthMinor);

         if (a.hasValue(R.styleable.Window_windowFixedWidthMajor)) {

             if (mFixedWidthMajor == null) mFixedWidthMajor = new TypedValue();

             a.getValue(R.styleable.Window_windowFixedWidthMajor,

                     mFixedWidthMajor);

         }

         if (a.hasValue(R.styleable.Window_windowFixedWidthMinor)) {

             if (mFixedWidthMinor == null) mFixedWidthMinor = new TypedValue();

             a.getValue(R.styleable.Window_windowFixedWidthMinor,

                     mFixedWidthMinor);

         }

         if (a.hasValue(R.styleable.Window_windowFixedHeightMajor)) {

             if (mFixedHeightMajor == null) mFixedHeightMajor = new TypedValue();

             a.getValue(R.styleable.Window_windowFixedHeightMajor,

                     mFixedHeightMajor);

         }

         if (a.hasValue(R.styleable.Window_windowFixedHeightMinor)) {

             if (mFixedHeightMinor == null) mFixedHeightMinor = new TypedValue();

             a.getValue(R.styleable.Window_windowFixedHeightMinor,

                     mFixedHeightMinor);

         }

         if (a.getBoolean(R.styleable.Window_windowContentTransitions, false)) {

             requestFeature(FEATURE_CONTENT_TRANSITIONS);

         }

         if (a.getBoolean(R.styleable.Window_windowActivityTransitions, false)) {

             requestFeature(FEATURE_ACTIVITY_TRANSITIONS);

         }

         final Context context = getContext();

         final int targetSdk = context.getApplicationInfo().targetSdkVersion;

         final boolean targetPreHoneycomb = targetSdk < android.os.Build.VERSION_CODES.HONEYCOMB;

         final boolean targetPreIcs = targetSdk < android.os.Build.VERSION_CODES.ICE_CREAM_SANDWICH;

         final boolean targetPreL = targetSdk < android.os.Build.VERSION_CODES.LOLLIPOP;

         final boolean targetHcNeedsOptions = context.getResources().getBoolean(

                 R.bool.target_honeycomb_needs_options_menu);

         final boolean noActionBar = !hasFeature(FEATURE_ACTION_BAR) || hasFeature(FEATURE_NO_TITLE);

         if (targetPreHoneycomb || (targetPreIcs && targetHcNeedsOptions && noActionBar)) {

             setNeedsMenuKey(WindowManager.LayoutParams.NEEDS_MENU_SET_TRUE);

         } else {

             setNeedsMenuKey(WindowManager.LayoutParams.NEEDS_MENU_SET_FALSE);

         }

         // Non-floating windows on high end devices must put up decor beneath the system bars and

         // therefore must know about visibility changes of those.

         if (!mIsFloating && ActivityManager.isHighEndGfx()) {

             if (!targetPreL && a.getBoolean(

                     R.styleable.Window_windowDrawsSystemBarBackgrounds,

                     false)) {

                 setFlags(FLAG_DRAWS_SYSTEM_BAR_BACKGROUNDS,

                         FLAG_DRAWS_SYSTEM_BAR_BACKGROUNDS & ~getForcedWindowFlags());

             }

         }

         if (!mForcedStatusBarColor) {

             mStatusBarColor = a.getColor(R.styleable.Window_statusBarColor, 0xFF000000);

         }

         if (!mForcedNavigationBarColor) {

             mNavigationBarColor = a.getColor(R.styleable.Window_navigationBarColor, 0xFF000000);

         }

         if (a.getBoolean(R.styleable.Window_windowLightStatusBar, false)) {

             decor.setSystemUiVisibility(

                     decor.getSystemUiVisibility() | View.SYSTEM_UI_FLAG_LIGHT_STATUS_BAR);

         }

         if (mAlwaysReadCloseOnTouchAttr || getContext().getApplicationInfo().targetSdkVersion

                 >= android.os.Build.VERSION_CODES.HONEYCOMB) {

             if (a.getBoolean(

                     R.styleable.Window_windowCloseOnTouchOutside,

                     false)) {

                 setCloseOnTouchOutsideIfNotSet(true);

             }

         }

         WindowManager.LayoutParams params = getAttributes();

         if (!hasSoftInputMode()) {

             params.softInputMode = a.getInt(

                     R.styleable.Window_windowSoftInputMode,

                     params.softInputMode);

         }

         if (a.getBoolean(R.styleable.Window_backgroundDimEnabled,

                 mIsFloating)) {

             /* All dialogs should have the window dimmed */

             if ((getForcedWindowFlags()&WindowManager.LayoutParams.FLAG_DIM_BEHIND) == 0) {

                 params.flags |= WindowManager.LayoutParams.FLAG_DIM_BEHIND;

             }

             if (!haveDimAmount()) {

                 params.dimAmount = a.getFloat(

                         android.R.styleable.Window_backgroundDimAmount, 0.5f);

             }

         }

         if (params.windowAnimations == 0) {

             params.windowAnimations = a.getResourceId(

                     R.styleable.Window_windowAnimationStyle, 0);

         }

         // The rest are only done if this window is not embedded; otherwise,

         // the values are inherited from our container.

         if (getContainer() == null) {

             if (mBackgroundDrawable == null) {

                 if (mBackgroundResource == 0) {

                     mBackgroundResource = a.getResourceId(

                             R.styleable.Window_windowBackground, 0);

                 }

                 if (mFrameResource == 0) {

                     mFrameResource = a.getResourceId(R.styleable.Window_windowFrame, 0);

                 }

                 mBackgroundFallbackResource = a.getResourceId(

                         R.styleable.Window_windowBackgroundFallback, 0);

                 if (false) {

                     System.out.println("Background: "

                             + Integer.toHexString(mBackgroundResource) + " Frame: "

                             + Integer.toHexString(mFrameResource));

                 }

             }

             mElevation = a.getDimension(R.styleable.Window_windowElevation, 0);

             mClipToOutline = a.getBoolean(R.styleable.Window_windowClipToOutline, false);

             mTextColor = a.getColor(R.styleable.Window_textColor, Color.TRANSPARENT);

         }

         // Inflate the window decor.

         int layoutResource;

         int features = getLocalFeatures();

         // System.out.println("Features: 0x" + Integer.toHexString(features));

         if ((features & (1 << FEATURE_SWIPE_TO_DISMISS)) != 0) {

             layoutResource = R.layout.screen_swipe_dismiss;

         } else if ((features & ((1 << FEATURE_LEFT_ICON) | (1 << FEATURE_RIGHT_ICON))) != 0) {

             if (mIsFloating) {

                 TypedValue res = new TypedValue();

                 getContext().getTheme().resolveAttribute(

                         R.attr.dialogTitleIconsDecorLayout, res, true);

                 layoutResource = res.resourceId;

             } else {

                 layoutResource = R.layout.screen_title_icons;

             }

             // XXX Remove this once action bar supports these features.

             removeFeature(FEATURE_ACTION_BAR);

             // System.out.println("Title Icons!");

         } else if ((features & ((1 << FEATURE_PROGRESS) | (1 << FEATURE_INDETERMINATE_PROGRESS))) != 0

                 && (features & (1 << FEATURE_ACTION_BAR)) == 0) {

             // Special case for a window with only a progress bar (and title).

             // XXX Need to have a no-title version of embedded windows.

             layoutResource = R.layout.screen_progress;

             // System.out.println("Progress!");

         } else if ((features & (1 << FEATURE_CUSTOM_TITLE)) != 0) {

             // Special case for a window with a custom title.

             // If the window is floating, we need a dialog layout

             if (mIsFloating) {

                 TypedValue res = new TypedValue();

                 getContext().getTheme().resolveAttribute(

                         R.attr.dialogCustomTitleDecorLayout, res, true);

                 layoutResource = res.resourceId;

             } else {

                 layoutResource = R.layout.screen_custom_title;

             }

             // XXX Remove this once action bar supports these features.

             removeFeature(FEATURE_ACTION_BAR);

         } else if ((features & (1 << FEATURE_NO_TITLE)) == 0) {

             // If no other features and not embedded, only need a title.

             // If the window is floating, we need a dialog layout

             if (mIsFloating) {

                 TypedValue res = new TypedValue();

                 getContext().getTheme().resolveAttribute(

                         R.attr.dialogTitleDecorLayout, res, true);

                 layoutResource = res.resourceId;

             } else if ((features & (1 << FEATURE_ACTION_BAR)) != 0) {

                 layoutResource = a.getResourceId(

                         R.styleable.Window_windowActionBarFullscreenDecorLayout,

                         R.layout.screen_action_bar);

             } else {

                 layoutResource = R.layout.screen_title;

             }

             // System.out.println("Title!");

         } else if ((features & (1 << FEATURE_ACTION_MODE_OVERLAY)) != 0) {

             layoutResource = R.layout.screen_simple_overlay_action_mode;

         } else {

             // Embedded, so no decoration is needed.

             layoutResource = R.layout.screen_simple;

             // System.out.println("Simple!");

         }

         mDecor.startChanging();

         View in = mLayoutInflater.inflate(layoutResource, null);

         decor.addView(in, new ViewGroup.LayoutParams(MATCH_PARENT, MATCH_PARENT));

         mContentRoot = (ViewGroup) in;

         ViewGroup contentParent = (ViewGroup)findViewById(ID_ANDROID_CONTENT);

         if (contentParent == null) {

             throw new RuntimeException("Window couldn't find content container view");

         }

         if ((features & (1 << FEATURE_INDETERMINATE_PROGRESS)) != 0) {

             ProgressBar progress = getCircularProgressBar(false);

             if (progress != null) {

                 progress.setIndeterminate(true);

             }

         }

         if ((features & (1 << FEATURE_SWIPE_TO_DISMISS)) != 0) {

             registerSwipeCallbacks();

         }

         // Remaining setup -- of background and title -- that only applies

         // to top-level windows.

         if (getContainer() == null) {

             final Drawable background;

             if (mBackgroundResource != 0) {

                 background = getContext().getDrawable(mBackgroundResource);

             } else {

                 background = mBackgroundDrawable;

             }

             mDecor.setWindowBackground(background);

             final Drawable frame;

             if (mFrameResource != 0) {

                 frame = getContext().getDrawable(mFrameResource);

             } else {

                 frame = null;

             }

             mDecor.setWindowFrame(frame);

             mDecor.setElevation(mElevation);

             mDecor.setClipToOutline(mClipToOutline);

             if (mTitle != null) {

                 setTitle(mTitle);

             }

             if (mTitleColor == 0) {

                 mTitleColor = mTextColor;

             }

             setTitleColor(mTitleColor);

         }

         mDecor.finishChanging();

         return contentParent;

     }
我勒个去,这方法太挺长,不过别担心,总体逻辑不复杂。
第4行代码getWindowStyle()是什么鬼呢?这里就直接说了,我们在manifest文件配置的Activity的时候有时会指定theme,如:android:theme="@style/AppTheme",getWindowStyle()就是获取我们配置的theme信息。
接着6-199行代码都是根据我们通过getWindowStyle()获取的theme配置信息进行相应设置。
200行代码,定义layoutResource变量。
201调用getLocalFeatures()方法又是干什么呢?我们有时会通过代码对Activity设置一些Feature,如:requestWindowFeature(Window.FEATURE_NO_TITLE);这里getLocalFeatures()方法就是获取通过requestWindowFeature设置的一些值。
202-258根据获取的features不同对layoutResource进行不同的赋值,layoutResource主要纪录不同的布局文件。如果什么也没设置,也就是说Activity没有任何修饰,那么就赋值为
R.layout.screen_simple,我们看一下R.layout.screen_simple布局源码:
 <?xml version="1.0" encoding="utf-8"?>

 <LinearLayout xmlns:android="http://schemas.android.com/apk/res/android"

     android:layout_width="match_parent"

     android:layout_height="match_parent"

     android:fitsSystemWindows="true"

     android:orientation="vertical">

     <ViewStub android:id="@+id/action_mode_bar_stub"

               android:inflatedId="@+id/action_mode_bar"

               android:layout="@layout/action_mode_bar"

               android:layout_width="match_parent"

               android:layout_height="wrap_content"

               android:theme="?attr/actionBarTheme" />

     <FrameLayout

          android:id="@android:id/content"

          android:layout_width="match_parent"

          android:layout_height="match_parent"

          android:foregroundInsidePadding="false"

          android:foregroundGravity="fill_horizontal|top"

          android:foreground="?android:attr/windowContentOverlay" />

 </LinearLayout>
看到了吧,很简单,就包括一个actiob_Bar,还有一个id为content的FrameLayout,并且action_Bar部分使用了布局优化ViewStub 。
继续向下分析262行将layoutResource记录的布局转化为View。
263行代码将262行生成的view添加到decor中,这个decor就是我们上面分析过的mDecor。
264行将262行生成的View赋值给mContentRoot,用以纪录。
接下来266行通过findViewById找到ID为ID_ANDROID_CONTENT的View,这个ID_ANDROID_CONTENT又是什么鬼?通过查找最终在父类Window中找到,源码如下:
public static final int ID_ANDROID_CONTENT = com.android.internal.R.id.content;
看到了吧,就是id为content的View,以R.layout.screen_simple布局为例,最终找的就是id为content的FrameLayout。赋值给名为contentParent的ViewGroup。
最终在316行将contentParent作为generateLayout方法的返回值返回。到此generateLayout想要探讨的就都探讨完了。
我们马上回看上面分析的installDecor()方法第7行。将generateLayout方法返回值赋值给mContentParent,到这里,你应该知道mContentParent就是DecorView中布局为content的部分。
我们在回看一开始分析的setContentView方法,之前分析到第7行,继续向下看直到第17行,调用mLayoutInflater.inflate(layoutResID, mContentParent),至于inflate方法内部逻辑这里就不分析了,不是本文重点,直接说结论:mLayoutInflater.inflate(layoutResID, mContentParent)就是将layoutResID布局转化为View添加到mContentParent中。还记得mContentParent吗?它就是DecorView中id为content的View。到这里就知道了原来我们自己定义的布局最终都是加载到这里了。
4总结
经过上面分析相信你已经有了一些眉目,我们赶紧总结一下。
我们平时在Activity中调用的setContentView方法其实都是调用的PhoneWindow中的setContentView方法,其首先会判断mContentParent是否为null,如果为null,则执行installDecor()方法,在installDecor()方法中会对mDecor进行判断是否为null,为null则进行初始化,mDecor为DecorView类型,DecorView继承自FrameLayout。接下来继续判断mContentParent是否为null,为null则执行generateLayout方法,在generateLayout方法中最重要的逻辑就是根据我们设置的不同feature找到对应布局文件,并且inflate为View,通过addView方法加入到mDecor中,然后找到布局文件中ID为content的View作为generateLayout方法最终返回值返回。接下来回到installDecor方法将generateLayout返回值赋值给mContentParent,最后回到setContentView,将我们自己的布局文件layoutResID加载到mContentParent中。
相信经过上述分析你应该对本文一开始的那张图会有更深刻的认识。
Android之View绘制流程开胃菜---setContentView(...)详细分析的更多相关文章
- Android中View绘制流程以及invalidate()等相关方法分析
[原文]http://blog.csdn.net/qinjuning 整个View树的绘图流程是在ViewRoot.java类的performTraversals()函数展开的,该函数做的执行过程可简 ...
- Android中View绘制流程以及invalidate()等相关方法分析(转载的文章,出处在正文已表明)
转载请注明出处:http://blog.csdn.net/qinjuning 前言: 本文是我读<Android内核剖析>第13章----View工作原理总结而成的,在此膜拜下作者 .同时 ...
- Android中View绘制流程以及invalidate()等相关方法分析(转)
转自:http://blog.csdn.net/qinjuning 前言: 本文是我读<Android内核剖析>第13章----View工作原理总结而成的,在此膜拜下作者 .同时真挚地向渴 ...
- Android应用层View绘制流程与源码分析
1 背景 还记得前面<Android应用setContentView与LayoutInflater加载解析机制源码分析>这篇文章吗?我们有分析到Activity中界面加载显示的基本流程原 ...
- 【转载】Android 中 View 绘制流程分析
创建Window 在Activity的attach方法中通过调用PolicyManager.makeNewWindo创建Window,将一个View add到WindowManager时,Window ...
- Android面试,View绘制流程以及invalidate()等相关方法分析
整个View树的绘图流程是在ViewRoot.java类的performTraversals()函数展开的,该函数做的执行过程可简单概况为 根据之前设置的状态,判断是否需要重新计算视图大小(measu ...
- Android之View绘制流程源码分析
版权声明:本文出自汪磊的博客,转载请务必注明出处. 对于稍有自定义View经验的安卓开发者来说,onMeasure,onLayout,onDraw这三个方法都不会陌生,起码多少都有所接触吧. 在安卓中 ...
- 【朝花夕拾】Android自定义View篇之(一)View绘制流程
前言 转载请申明转自[https://www.cnblogs.com/andy-songwei/p/10955062.html]谢谢! 自定义View.多线程.网络,被认为是Android开发者必须牢 ...
- 【view绘制流程】理解
一.概述 View的绘制是从上往下一层层迭代下来的.DecorView-->ViewGroup(--->ViewGroup)-->View ,按照这个流程从上往下,依次measure ...
随机推荐
- 菜鸟的Xamarin.Forms前行之路——按钮的按下抬起事件的监控(可扩展至其他事件)
提问:监控按钮的点击事件,可以通过按钮的Click事件,或者Command绑定,那么如何监控按钮的按下与抬起,或者移动,长按,双击等事件? 解决方法:各个平台自定义渲染依赖注入. 共享项目PCL: 1 ...
- Myeclipse和windows调节成护眼色
作为程序员,对着电脑屏幕久了,眼睛难免疲劳,下面相信对我们每个 人都很有帮助. windows xp:桌面空白处右键,属性,外观-高级,然后在项目那栏选窗口,再点颜色-其它,然后把色调设为85(默认是 ...
- spring boot 登录注册 demo (三) -- 前后端传递
前端页面通过thymeleaf渲染 <dependency> <groupId>org.springframework.boot</groupId> <art ...
- 【踩坑】activiti工作流的svg-xml解析报错
1.问题记录 工作流配置画模板的时候保存成功但是部署报错. IE下 activiti工作流解析xml报错 type "path" must be followed by eithe ...
- Volley源码学习笔记
标签(空格分隔): Volley 创建RequestQueue 使用Volley的时候,我们首先需要创建一个RequestQueue对象,用于添加各种请求,创建的方法是Volley.newReques ...
- 读书笔记--C陷阱与缺陷(二)
第二章 1. 理解函数声明 书中分析了复杂的类型声明方式,也说明了使用typedef声明会更好理解,推荐大家使用typedef进行函数声明. 书中类型分析一层一层挖掘,让读者可以理解多层嵌套的类型含义 ...
- TensorFlow框架(5)之机器学习实践
1. Iris data set Iris数据集是常用的分类实验数据集,由Fisher, 1936收集整理.Iris也称鸢尾花卉数据集,是一类多重变量分析的数据集.数据集包含150个数据集,分为3类, ...
- jquery的2.0.3版本源码系列(4):285-348行,extend方法详解
目录 1 . jquery extend的基本使用 通过285行的源码 jQuery.extend = jQuery.fn.extend = function() { ,extend方法要么是直接挂在 ...
- python的multiprocessing模块进程创建、资源回收-Process,Pool
python的multiprocessing有两种创建进程的方式,每种创建方式和进程资源的回收都不太相同,下面分别针对Process,Pool及系统自带的fork三种进程分析. 1.方式一:fork( ...
- [2012-04-25]shell大括号参数扩展(Parameter Expansion)
参考了shell十三问 以及http://hi.baidu.com/leejun_2005/blog/item/ebfee11a4177ddc1ac6e751d.html 提炼下记忆方式: {% ca ...