[libGDX游戏开发教程]使用Libgdx进行游戏开发(5)-关卡加载
在上一章我们介绍了如何管理和利用素材,但是我们注意到,这些素材都是零散的,比如岩石的左部等,这一章,我们将利用这些零件拼合成完整的游戏对象。
回顾最开始的设计类图,注意Level类和所有Level中的Object,看看它们的继承关系。
首先第一步就是创建所有对象的基类AbstractGameObject.
它应该包含所有公共的属性和功能。
package com.packtpub.libgdx.canyonbunny.game.objects;

import com.badlogic.gdx.graphics.g2d.SpriteBatch;

import com.badlogic.gdx.math.Vector2;

public abstract class AbstractGameObject {

    public Vector2 position;

    public Vector2 dimension;

    public Vector2 origin;

    public Vector2 scale;

    public float rotation;

    public AbstractGameObject() {

        position = new Vector2();

        dimension = new Vector2(1, 1);

        origin = new Vector2();

        scale = new Vector2(1, 1);

        rotation = 0;

    }

    public void update(float deltaTime) {

    }

    public abstract void render(SpriteBatch batch);

}
这个抽象类包含很多基本的属性,update和render。update更新自己,render画自己。很多人虽然知道OOP,但是并没有在思维中形成OO的观念。对象的划分以及对象的行为(或者说对象的权责)是否分明,都能看出你编程的功力。
render是abstract的,这就限定了所有的子类需要自己去实现它。
我们先看Rock,Rock是由3个部分组成的,左中右,中间的部分是能够重复的。像这样

那么它的实现类似于:
package com.packtpub.libgdx.canyonbunny.game.objects;

import com.badlogic.gdx.graphics.g2d.SpriteBatch;

import com.badlogic.gdx.graphics.g2d.TextureRegion;

import com.packtpub.libgdx.canyonbunny.game.Assets;

public class Rock extends AbstractGameObject {

    private TextureRegion regEdge;

    private TextureRegion regMiddle;

    private int length;

    public Rock() {

        init();

    }

    private void init() {

        dimension.set(1, 1.5f);

        regEdge = Assets.instance.rock.edge;

        regMiddle = Assets.instance.rock.middle;

        // Start length of this rock

        setLength(1);

    }

    public void setLength(int length) {

        this.length = length;

    }

    public void increaseLength(int amount) {

        setLength(length + amount);

    }

    @Override

    public void render(SpriteBatch batch) {

        TextureRegion reg = null;

        float relX = 0;

        float relY = 0;

        // Draw left edge

        reg = regEdge;

        relX -= dimension.x / 4;

        batch.draw(reg.getTexture(), position.x + relX, position.y + relY,

                origin.x, origin.y, dimension.x / 4, dimension.y, scale.x,

                scale.y, rotation, reg.getRegionX(), reg.getRegionY(),

                reg.getRegionWidth(), reg.getRegionHeight(), false, false);

        // Draw middle

        relX = 0;

        reg = regMiddle;

        for (int i = 0; i < length; i++) {

            batch.draw(reg.getTexture(), position.x + relX, position.y + relY,

                    origin.x, origin.y, dimension.x, dimension.y, scale.x,

                    scale.y, rotation, reg.getRegionX(), reg.getRegionY(),

                    reg.getRegionWidth(), reg.getRegionHeight(), false, false);

            relX += dimension.x;

        }

        // Draw right edge

        reg = regEdge;

        batch.draw(reg.getTexture(), position.x + relX, position.y + relY,

                origin.x + dimension.x / 8, origin.y, dimension.x / 4,

                dimension.y, scale.x, scale.y, rotation, reg.getRegionX(),

                reg.getRegionY(), reg.getRegionWidth(), reg.getRegionHeight(),

                true, false);

    }

}
我们使用了一个length来表示rock的长度,就是中间可以重复的部分。
接下来是山,有人可能会奇怪,为什么用白色的山呢?用白色是为了方便着色的。Mountains类似于:
package com.packtpub.libgdx.canyonbunny.game.objects;

import com.badlogic.gdx.graphics.g2d.SpriteBatch;

import com.badlogic.gdx.graphics.g2d.TextureRegion;

import com.badlogic.gdx.math.MathUtils;

import com.packtpub.libgdx.canyonbunny.game.Assets;

public class Mountains extends AbstractGameObject {

    private TextureRegion regMountainLeft;

    private TextureRegion regMountainRight;

    private int length;

    public Mountains(int length) {

        this.length = length;

        init();

    }

    private void init() {

        dimension.set(10, 2);

        regMountainLeft = Assets.instance.levelDecoration.mountainLeft;

        regMountainRight = Assets.instance.levelDecoration.mountainRight;

        // shift mountain and extend length

        origin.x = -dimension.x * 2;

        length += dimension.x * 2;

    }

    private void drawMountain(SpriteBatch batch, float offsetX, float offsetY,

            float tintColor) {

        TextureRegion reg = null;

        batch.setColor(tintColor, tintColor, tintColor, 1);

        float xRel = dimension.x * offsetX;

        float yRel = dimension.y * offsetY;

        // mountains span the whole level

        int mountainLength = 0;

        mountainLength += MathUtils.ceil(length / (2 * dimension.x));

        mountainLength += MathUtils.ceil(0.5f + offsetX);

        for (int i = 0; i < mountainLength; i++) {

            // mountain left

            reg = regMountainLeft;

            batch.draw(reg.getTexture(), origin.x + xRel, position.y + origin.y

                    + yRel, origin.x, origin.y, dimension.x, dimension.y,

                    scale.x, scale.y, rotation, reg.getRegionX(),

                    reg.getRegionY(), reg.getRegionWidth(),

                    reg.getRegionHeight(), false, false);

            xRel += dimension.x;

            // mountain right

            reg = regMountainRight;

            batch.draw(reg.getTexture(), origin.x + xRel, position.y + origin.y

                    + yRel, origin.x, origin.y, dimension.x, dimension.y,

                    scale.x, scale.y, rotation, reg.getRegionX(),

                    reg.getRegionY(), reg.getRegionWidth(),

                    reg.getRegionHeight(), false, false);

            xRel += dimension.x;

        }

        // reset color to white

        batch.setColor(1, 1, 1, 1);

    }

    @Override

    public void render(SpriteBatch batch) {

        // distant mountains (dark gray)

        drawMountain(batch, 0.5f, 0.5f, 0.5f);

        // distant mountains (gray)

        drawMountain(batch, 0.25f, 0.25f, 0.7f);

        // distant mountains (light gray)

        drawMountain(batch, 0.0f, 0.0f, 0.9f);

    }

}
这个跟Rock很像,也用了一个length来存储需要重复的次数。在render里调用了3个不同的drawMountain,这样大大的简化了画3层山的代码。
接下来是水面,这个类要比前面的简单多了,它只需要沿着x轴拉伸造成一直存在的假象就行了。(还有很多其他的方法可以达到这个目的:比如用一个摄像机视口一样宽的图片,跟着摄像机一起移动。不过这样你需要小心摄像机可能垂直移动)
package com.packtpub.libgdx.canyonbunny.game.objects;

import com.badlogic.gdx.graphics.g2d.SpriteBatch;

import com.badlogic.gdx.graphics.g2d.TextureRegion;

import com.packtpub.libgdx.canyonbunny.game.Assets;

public class WaterOverlay extends AbstractGameObject {

    private TextureRegion regWaterOverlay;

    private float length;

    public WaterOverlay(float length) {

        this.length = length;

        init();

    }

    private void init() {

        dimension.set(length * 10, 3);

        regWaterOverlay = Assets.instance.levelDecoration.waterOverlay;

        origin.x = -dimension.x / 2;

    }

    @Override

    public void render(SpriteBatch batch) {

        TextureRegion reg = null;

        reg = regWaterOverlay;

        batch.draw(reg.getTexture(), position.x + origin.x, position.y

                + origin.y, origin.x, origin.y, dimension.x, dimension.y,

                scale.x, scale.y, rotation, reg.getRegionX(), reg.getRegionY(),

                reg.getRegionWidth(), reg.getRegionHeight(), false, false);

    }

}
接下来是云彩,云彩的分布由长度和间距两个参数决定。
package com.packtpub.libgdx.canyonbunny.game.objects;

import com.badlogic.gdx.graphics.g2d.SpriteBatch;

import com.badlogic.gdx.graphics.g2d.TextureRegion;

import com.badlogic.gdx.math.MathUtils;

import com.badlogic.gdx.math.Vector2;

import com.badlogic.gdx.utils.Array;

import com.packtpub.libgdx.canyonbunny.game.Assets;

public class Clouds extends AbstractGameObject {

    private float length;

    private Array<TextureRegion> regClouds;

    private Array<Cloud> clouds;

    private class Cloud extends AbstractGameObject {

        private TextureRegion regCloud;

        public Cloud() {

        }

        public void setRegion(TextureRegion region) {

            regCloud = region;

        }

        @Override

        public void render(SpriteBatch batch) {

            TextureRegion reg = regCloud;

            batch.draw(reg.getTexture(), position.x + origin.x, position.y

                    + origin.y, origin.x, origin.y, dimension.x, dimension.y,

                    scale.x, scale.y, rotation, reg.getRegionX(),

                    reg.getRegionY(), reg.getRegionWidth(),

                    reg.getRegionHeight(), false, false);

        }

    }

    public Clouds(float length) {

        this.length = length;

        init();

    }

    private void init() {

        dimension.set(3.0f, 1.5f);

        regClouds = new Array<TextureRegion>();

        regClouds.add(Assets.instance.levelDecoration.cloud01);

        regClouds.add(Assets.instance.levelDecoration.cloud02);

        regClouds.add(Assets.instance.levelDecoration.cloud03);

        int distFac = 5;

        int numClouds = (int) (length / distFac);

        clouds = new Array<Cloud>(2 * numClouds);

        for (int i = 0; i < numClouds; i++) {

            Cloud cloud = spawnCloud();

            cloud.position.x = i * distFac;

            clouds.add(cloud);

        }

    }

    private Cloud spawnCloud() {

        Cloud cloud = new Cloud();

        cloud.dimension.set(dimension);

        // select random cloud image

        cloud.setRegion(regClouds.random());

        // position

        Vector2 pos = new Vector2();

        pos.x = length + 10; // position after end of level

        pos.y += 1.75; // base position

        // random additional position

        pos.y += MathUtils.random(0.0f, 0.2f)

                * (MathUtils.randomBoolean() ? 1 : -1);

        cloud.position.set(pos);

        return cloud;

    }

    @Override

    public void render(SpriteBatch batch) {

        for (Cloud cloud : clouds)

            cloud.render(batch);

    }

}
显示代码
Clouds定义了内部类Cloud,Clouds是包含云彩的容器。
关卡加载
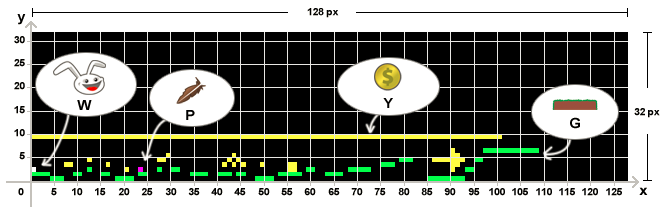
我们使用png图片来保存关卡数据:1像素代表1个对象,每一种不同的对象都有一种唯一的RGBA颜色值。我们使用纯色,不用透明色,那么一个RGBA就是32位,就是4字节。刚好java的int也是32位,用来存颜色刚刚好。
我们需要读取并解析它们:
package com.packtpub.libgdx.canyonbunny.game;

import com.badlogic.gdx.Gdx;

import com.badlogic.gdx.graphics.Pixmap;

import com.badlogic.gdx.graphics.g2d.SpriteBatch;

import com.badlogic.gdx.utils.Array;

import com.packtpub.libgdx.canyonbunny.game.objects.AbstractGameObject;

import com.packtpub.libgdx.canyonbunny.game.objects.Clouds;

import com.packtpub.libgdx.canyonbunny.game.objects.Mountains;

import com.packtpub.libgdx.canyonbunny.game.objects.Rock;

import com.packtpub.libgdx.canyonbunny.game.objects.WaterOverlay;

public class Level {

    public static final String TAG = Level.class.getName();

    public enum BLOCK_TYPE {

        EMPTY(0, 0, 0), // black

        ROCK(0, 255, 0), // green

        PLAYER_SPAWNPOINT(255, 255, 255), // white

        ITEM_FEATHER(255, 0, 255), // purple

        ITEM_GOLD_COIN(255, 255, 0); // yellow

        private int color;

        private BLOCK_TYPE(int r, int g, int b) {

            color = r << 24 | g << 16 | b << 8 | 0xff;

        }

        public boolean sameColor(int color) {

            return this.color == color;

        }

        public int getColor() {

            return color;

        }

    }

    // objects

    public Array<Rock> rocks;

    // decoration

    public Clouds clouds;

    public Mountains mountains;

    public WaterOverlay waterOverlay;

    public Level(String filename) {

        init(filename);

    }

    private void init(String filename) {

    }

    public void render(SpriteBatch batch) {

    }

}
在init中加入代码 读地图,然后解析:(使用tilemap也是一样的过程)
private void init(String filename) {

        // objects

        rocks = new Array<Rock>();

        // load image file that represents the level data

        Pixmap pixmap = new Pixmap(Gdx.files.internal(filename));

        // scan pixels from top-left to bottom-right

        int lastPixel = -1;

        for (int pixelY = 0; pixelY < pixmap.getHeight(); pixelY++) {

            for (int pixelX = 0; pixelX < pixmap.getWidth(); pixelX++) {

                AbstractGameObject obj = null;

                float offsetHeight = 0;

                // height grows from bottom to top

                float baseHeight = pixmap.getHeight() - pixelY;

                // get color of current pixel as 32-bit RGBA value

                int currentPixel = pixmap.getPixel(pixelX, pixelY);

                // find matching color value to identify block type at (x,y)

                // point and create the corresponding game object if there is

                // a match

                // empty space

                if (BLOCK_TYPE.EMPTY.sameColor(currentPixel)) {

                    // do nothing

                }

                // rock

                else if (BLOCK_TYPE.ROCK.sameColor(currentPixel)) {

                    if (lastPixel != currentPixel) {

                        obj = new Rock();

                        float heightIncreaseFactor = 0.25f;

                        offsetHeight = -2.5f;

                        obj.position.set(pixelX, baseHeight * obj.dimension.y

                                * heightIncreaseFactor + offsetHeight);

                        rocks.add((Rock) obj);

                    } else {

                        rocks.get(rocks.size - 1).increaseLength(1);

                    }

                }

                // player spawn point

                else if (BLOCK_TYPE.PLAYER_SPAWNPOINT.sameColor(currentPixel)) {

                }

                // feather

                else if (BLOCK_TYPE.ITEM_FEATHER.sameColor(currentPixel)) {

                }

                // gold coin

                else if (BLOCK_TYPE.ITEM_GOLD_COIN.sameColor(currentPixel)) {

                }

                // unknown object/pixel color

                else {

                    int r = 0xff & (currentPixel >>> 24); // red color channel

                    int g = 0xff & (currentPixel >>> 16); // green color channel

                    int b = 0xff & (currentPixel >>> 8); // blue color channel

                    int a = 0xff & currentPixel; // alpha channel

                    Gdx.app.error(TAG, "Unknown object at x<" + pixelX + "> y<"

                            + pixelY + ">: r<" + r + "> g<" + g + "> b<" + b

                            + "> a<" + a + ">");

                }

                lastPixel = currentPixel;

            }

        }

        // decoration

        clouds = new Clouds(pixmap.getWidth());

        clouds.position.set(0, 2);

        mountains = new Mountains(pixmap.getWidth());

        mountains.position.set(-1, -1);

        waterOverlay = new WaterOverlay(pixmap.getWidth());

        waterOverlay.position.set(0, -3.75f);

        // free memory

        pixmap.dispose();

        Gdx.app.debug(TAG, "level '" + filename + "' loaded");

    }
以此遍历渲染:
public void render(SpriteBatch batch) {

        // Draw Mountains

        mountains.render(batch);

        // Draw Rocks

        for (Rock rock : rocks)

            rock.render(batch);

        // Draw Water Overlay

        waterOverlay.render(batch);

        // Draw Clouds

        clouds.render(batch);

    }
渲染的次序决定了相互覆盖的效果。你可以想象它们是不同的层(当然实际上它们没有分层画,这个跟Unity不是一样的,但你可以这么以为),从45°角来看是这样的。
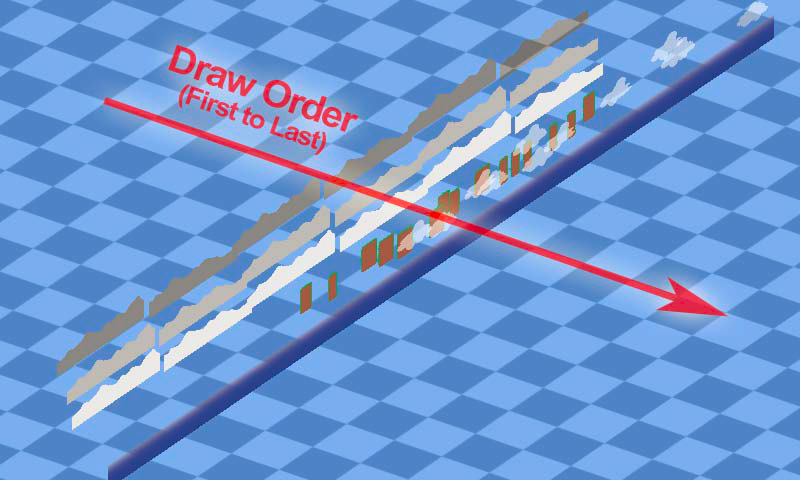
first to last,越后画的越显示在前边。
接下来,开始整合:
在Constants里加上一些游戏常量
public class Constants {

    // Visible game world is 5 meters wide

    public static final float VIEWPORT_WIDTH = 5.0f;

    // Visible game world is 5 meters tall

    public static final float VIEWPORT_HEIGHT = 5.0f;

    // GUI Width

    public static final float VIEWPORT_GUI_WIDTH = 800.0f;

    // GUI Height

    public static final float VIEWPORT_GUI_HEIGHT = 480.0f;

    // Location of description file for texture atlas

    public static final String TEXTURE_ATLAS_OBJECTS = "images/canyonbunny.pack";

    // Location of image file for level 01

    public static final String LEVEL_01 = "levels/level-01.png";

    // Amount of extra lives at level start

    public static final int LIVES_START = 3;

}
移除controller里的testSprites和selectedSprite;当然也要移除那些相应的方法initTestObjects(),updateTestObjects(),moveSelectedSprite()。
删除handleDebugInput()里WSAD的控制。KeyUp只保留R键。
package com.packtpub.libgdx.canyonbunny.game;

import com.badlogic.gdx.Application.ApplicationType;

import com.badlogic.gdx.Gdx;

import com.badlogic.gdx.Input.Keys;

import com.badlogic.gdx.InputAdapter;

import com.badlogic.gdx.graphics.Pixmap;

import com.badlogic.gdx.graphics.Pixmap.Format;

import com.badlogic.gdx.graphics.g2d.Sprite;

import com.badlogic.gdx.graphics.g2d.TextureAtlas;

import com.badlogic.gdx.graphics.g2d.TextureRegion;

import com.badlogic.gdx.math.MathUtils;

import com.badlogic.gdx.utils.Array;

import com.packtpub.libgdx.canyonbunny.util.CameraHelper;

import com.packtpub.libgdx.canyonbunny.util.Constants;

public class WorldController extends InputAdapter {

    private static final String TAG = WorldController.class.getName();

    public CameraHelper cameraHelper;

    public Level level;

    public int lives;

    public int score;

    private void initLevel() {

        score = 0;

        level = new Level(Constants.LEVEL_01);

    }

    public WorldController() {

        Gdx.input.setInputProcessor(this);

        init();

    }

    private void handleDebugInput(float deltaTime) {

        if (Gdx.app.getType() != ApplicationType.Desktop)

            return;

        // Camera Controls (move)

        float camMoveSpeed = 5 * deltaTime;

        float camMoveSpeedAccelerationFactor = 5;

        if (Gdx.input.isKeyPressed(Keys.SHIFT_LEFT))

            camMoveSpeed *= camMoveSpeedAccelerationFactor;

        if (Gdx.input.isKeyPressed(Keys.LEFT))

            moveCamera(-camMoveSpeed, 0);

        if (Gdx.input.isKeyPressed(Keys.RIGHT))

            moveCamera(camMoveSpeed, 0);

        if (Gdx.input.isKeyPressed(Keys.UP))

            moveCamera(0, camMoveSpeed);

        if (Gdx.input.isKeyPressed(Keys.DOWN))

            moveCamera(0, -camMoveSpeed);

        if (Gdx.input.isKeyPressed(Keys.BACKSPACE))

            cameraHelper.setPosition(0, 0);

        // Camera Controls (zoom)

        float camZoomSpeed = 1 * deltaTime;

        float camZoomSpeedAccelerationFactor = 5;

        if (Gdx.input.isKeyPressed(Keys.SHIFT_LEFT))

            camZoomSpeed *= camZoomSpeedAccelerationFactor;

        if (Gdx.input.isKeyPressed(Keys.COMMA))

            cameraHelper.addZoom(camZoomSpeed);

        if (Gdx.input.isKeyPressed(Keys.PERIOD))

            cameraHelper.addZoom(-camZoomSpeed);

        if (Gdx.input.isKeyPressed(Keys.SLASH))

            cameraHelper.setZoom(1);

    }

    private void moveCamera(float x, float y) {

        x += cameraHelper.getPosition().x;

        y += cameraHelper.getPosition().y;

        cameraHelper.setPosition(x, y);

    }

    @Override

    public boolean keyUp(int keycode) {

        if (keycode == Keys.R) {

            init();

            Gdx.app.debug(TAG, "Game World Resetted!");

        }

        return false;

    }

    public void init() {

        Gdx.input.setInputProcessor(this);

        cameraHelper = new CameraHelper();

        lives = Constants.LIVES_START;

        initLevel();

    }

    private Pixmap createProceduralPixmap(int width, int height) {

        Pixmap pixmap = new Pixmap(width, height, Format.RGBA8888);

        // Fill square with red color at 50% opacity

        pixmap.setColor(1, 0, 0, 0.5f);

        pixmap.fill();

        // Draw a yellow-colored X shape on square

        pixmap.setColor(1, 1, 0, 1);

        pixmap.drawLine(0, 0, width, height);

        pixmap.drawLine(width, 0, 0, height);

        // Draw a cyan-colored border around square

        pixmap.setColor(0, 1, 1, 1);

        pixmap.drawRectangle(0, 0, width, height);

        return pixmap;

    }

    public void update(float deltaTime) {

        handleDebugInput(deltaTime);

        cameraHelper.update(deltaTime);

    }

}
修改CameraHelper:(主要是将target的类型由Sprite改为AbstractGameObject)
package com.packtpub.libgdx.canyonbunny.util;

import com.badlogic.gdx.graphics.OrthographicCamera;

import com.badlogic.gdx.graphics.g2d.Sprite;

import com.badlogic.gdx.math.MathUtils;

import com.badlogic.gdx.math.Vector2;

import com.packtpub.libgdx.canyonbunny.game.objects.AbstractGameObject;

public class CameraHelper {

    private static final String TAG = CameraHelper.class.getName();

    private final float MAX_ZOOM_IN = 0.25f;

    private final float MAX_ZOOM_OUT = 10.0f;

    private Vector2 position;

    private float zoom;

    private AbstractGameObject target;

    public CameraHelper() {

        position = new Vector2();

        zoom = 1.0f;

    }

    public void update(float deltaTime) {

        if (!hasTarget())

            return;

        position.x = target.position.x + target.origin.x;

        position.y = target.position.y + target.origin.y;

    }

    public void setPosition(float x, float y) {

        this.position.set(x, y);

    }

    public Vector2 getPosition() {

        return position;

    }

    public void addZoom(float amount) {

        setZoom(zoom + amount);

    }

    public void setZoom(float zoom) {

        this.zoom = MathUtils.clamp(zoom, MAX_ZOOM_IN, MAX_ZOOM_OUT);

    }

    public float getZoom() {

        return zoom;

    }

    public void setTarget(AbstractGameObject target) {

        this.target = target;

    }

    public AbstractGameObject getTarget() {

        return target;

    }

    public boolean hasTarget() {

        return target != null;

    }

    public boolean hasTarget(AbstractGameObject target) {

        return hasTarget() && this.target.equals(target);

    }

    public void applyTo(OrthographicCamera camera) {

        camera.position.x = position.x;

        camera.position.y = position.y;

        camera.zoom = zoom;

        camera.update();

    }

}
修改WorldRender的render():
public void render(){

        renderWorld(batch);

    }

    private void renderWorld (SpriteBatch batch) {

        worldController.cameraHelper.applyTo(camera);

        batch.setProjectionMatrix(camera.combined);

        batch.begin();

        worldController.level.render(batch);

        batch.end();

    }
实现GUI:
Libgdx提供了默认的bitmap字体文件,arial-15.fnt和arial-15.png。用的时候可以把它们copy到images下。
我们把要用的字体(内部类)加到Assets中:
    public class AssetFonts {

        public final BitmapFont defaultSmall;

        public final BitmapFont defaultNormal;

        public final BitmapFont defaultBig;

        public AssetFonts() {

            // create three fonts using Libgdx's 15px bitmap font

            defaultSmall = new BitmapFont(

                    Gdx.files.internal("images/arial-15.fnt"), true);

            defaultNormal = new BitmapFont(

                    Gdx.files.internal("images/arial-15.fnt"), true);

            defaultBig = new BitmapFont(

                    Gdx.files.internal("images/arial-15.fnt"), true);

            // set font sizes

            defaultSmall.setScale(0.75f);

            defaultNormal.setScale(1.0f);

            defaultBig.setScale(2.0f);

            // enable linear texture filtering for smooth fonts

            defaultSmall.getRegion().getTexture()

                    .setFilter(TextureFilter.Linear, TextureFilter.Linear);

            defaultNormal.getRegion().getTexture()

                    .setFilter(TextureFilter.Linear, TextureFilter.Linear);

            defaultBig.getRegion().getTexture()

                    .setFilter(TextureFilter.Linear, TextureFilter.Linear);

        }

    }
在init里加上字体的初始化:fonts = new AssetFonts();
在dispose里释放:fonts.defaultSmall.dispose();fonts.defaultNormal.dispose();fonts.defaultBig.dispose();
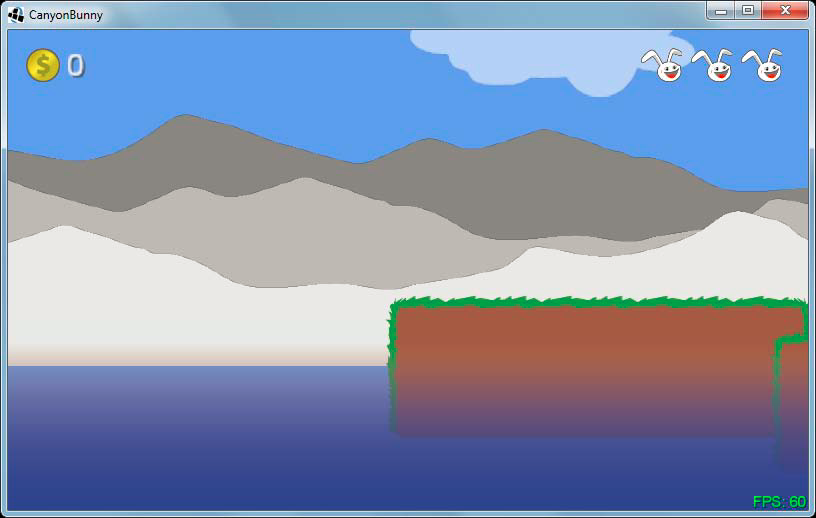
准备就绪了,我们需要先构想我们将要做的GUI图:(金币分数,兔子的额外性命,FPS)
接下来,我们在WorldRenderer中增加下面的代码:
    private OrthographicCamera cameraGUI;

    private void init() {

        batch = new SpriteBatch();

        camera = new OrthographicCamera(Constants.VIEWPORT_WIDTH,

                Constants.VIEWPORT_HEIGHT);

        camera.position.set(0, 0, 0);

        camera.update();

        cameraGUI = new OrthographicCamera(Constants.VIEWPORT_GUI_WIDTH,

                Constants.VIEWPORT_GUI_HEIGHT);

        cameraGUI.position.set(0, 0, 0);

        cameraGUI.setToOrtho(true); // flip y-axis

        cameraGUI.update();

    }

    public void resize(int width, int height) {

        camera.viewportWidth = (Constants.VIEWPORT_HEIGHT / height) * width;

        camera.update();

        cameraGUI.viewportHeight = Constants.VIEWPORT_GUI_HEIGHT;

        cameraGUI.viewportWidth = (Constants.VIEWPORT_GUI_HEIGHT/ (float)height) * (float)width;

        cameraGUI.position.set(cameraGUI.viewportWidth / 2,

        cameraGUI.viewportHeight / 2, 0);

        cameraGUI.update();

    }
第二个摄像机是专门用来做GUI投影渲染的。下面是每个GUI元素的具体实现方法:
private void renderGuiScore(SpriteBatch batch) {

        float x = -15;

        float y = -15;

        batch.draw(Assets.instance.goldCoin.goldCoin, x, y, 50, 50, 100, 100,

                0.35f, -0.35f, 0);

        Assets.instance.fonts.defaultBig.draw(batch,

                "" + worldController.score, x + 75, y + 37);

    }

    private void renderGuiExtraLive(SpriteBatch batch) {

        float x = cameraGUI.viewportWidth - 50 - Constants.LIVES_START * 50;

        float y = -15;

        for (int i = 0; i < Constants.LIVES_START; i++) {

            if (worldController.lives <= i)

                batch.setColor(0.5f, 0.5f, 0.5f, 0.5f);

            batch.draw(Assets.instance.bunny.head, x + i * 50, y, 50, 50, 120,

                    100, 0.35f, -0.35f, 0);

            batch.setColor(1, 1, 1, 1);

        }

    }

    private void renderGuiFpsCounter(SpriteBatch batch) {

        float x = cameraGUI.viewportWidth - 55;

        float y = cameraGUI.viewportHeight - 15;

        int fps = Gdx.graphics.getFramesPerSecond();

        BitmapFont fpsFont = Assets.instance.fonts.defaultNormal;

        if (fps >= 45) {

            // 45 or more FPS show up in green

            fpsFont.setColor(0, 1, 0, 1);

        } else if (fps >= 30) {

            // 30 or more FPS show up in yellow

            fpsFont.setColor(1, 1, 0, 1);

        } else {

            // less than 30 FPS show up in red

            fpsFont.setColor(1, 0, 0, 1);

        }

        fpsFont.draw(batch, "FPS: " + fps, x, y);

        fpsFont.setColor(1, 1, 1, 1); // white

    }
整合到WorldRenderer:
    public void render() {

        renderWorld(batch);

        renderGui(batch);

    }

    private void renderGui(SpriteBatch batch) {

        batch.setProjectionMatrix(cameraGUI.combined);

        batch.begin();

        // draw collected gold coins icon + text

        // (anchored to top left edge)

        renderGuiScore(batch);

        // draw extra lives icon + text (anchored to top right edge)

        renderGuiExtraLive(batch);

        // draw FPS text (anchored to bottom right edge)

        renderGuiFpsCounter(batch);

        batch.end();

    }
下一章我们继续完成一个完整的游戏需要的东东。
比如增加上主角(兔子头),关卡道具(羽毛,金币),控制主角移动,基本的碰撞检测(几乎所有的游戏都需要有的)等等。
本章素材:http://files.cnblogs.com/mignet/assets.zip
[libGDX游戏开发教程]使用Libgdx进行游戏开发(5)-关卡加载的更多相关文章
- [libGDX游戏开发教程]使用libGDX进行游戏开发(12)-Action动画
前文章节列表: 使用libGDX进行游戏开发(11)-高级编程技巧 使用libGDX进行游戏开发(10)-音乐音效不求人,程序员也可以DIY 使用libGDX进行游戏开发(9)-场景过渡 ...
- [libGDX游戏开发教程]使用libGDX进行游戏开发(1)-游戏设计
声明:<使用Libgdx进行游戏开发>是一个系列,文章的原文是<Learning Libgdx Game Development>,大家请周知.后续的文章连接在这里 使用Lib ...
- 使用Html5+C#+微信 开发移动端游戏详细教程: (四)游戏中层的概念与设计
众所周知,网站的前端页面结构一般是由div组成,父div包涵子div,子div包涵各种标签和项, 同理,游戏中我们也将若干游戏模块拆分成层,在后续的代码维护和游戏程序逻辑中将更加清晰和便于控制. We ...
- 使用Html5+C#+微信 开发移动端游戏详细教程 :(五)游戏图像的加载与操作
当我们进入游戏时,是不可能看到所有的图像的,很多图像都是随着游戏功能的打开而出现, 比如只有我打开了"宝石"菜单才会显示宝石的图像,如果是需要显示的时候才加载, 会对用户体验大打折 ...
- 微信小程序开发教程 #043 - 在小程序开发中使用 npm
本文介绍了如何在微信小程序开发中使用 npm 中包的功能,大大提高微信小程序的开发效率,同时也是微信小程序系列教程的视频版更新. 微信小程序在发布之初没有对 npm 的支持功能,这也是目前很多前端开发 ...
- PythonWeb开发教程(一),开发之前需要准备什么
什么是web开发呢,其实就是开发一个网站了.那开发网站需要用到哪些知识呢 1.python基础,因为用python开发的,所以python指定要会,最起码你也得会条件判断,循环,函数,类这些知识: 2 ...
- [libgdx游戏开发教程]使用Libgdx进行游戏开发(11)-高级编程技巧 Box2d和Shader
高级编程技巧只是相对的,其实主要是讲物理模拟和着色器程序的使用. 本章主要讲解利用Box2D并用它来实现萝卜雨,然后是使用单色着色器shader让画面呈现单色状态:http://files.cnblo ...
- [libgdx游戏开发教程]使用Libgdx进行游戏开发(10)-音乐和音效
本章音效文件都来自于公共许可: http://files.cnblogs.com/mignet/sounds.zip 在游戏中,播放背景音乐和音效是基本的功能. Libgdx提供了跨平台的声音播放功能 ...
- [libgdx游戏开发教程]使用Libgdx进行游戏开发(2)-游戏框架搭建
让我们抛开理论开始code吧. 入口类CanyonBunnyMain的代码: package com.packtpub.libgdx.canyonbunny; import com.badlogic. ...
随机推荐
- PhoneGap & HTML5 学习资料网址
PhoneGap 与 Application Cache应用缓存 http://www.html5cn.org/forum.php?mod=viewthread&tid=40272 加速We ...
- 用AngularJS操作DOM
在angular中使用第三方插件时最好都封装到指令(directives)中去,DOM操作也最好都解构到指令中. <!DOCTYPE html> <html lang="e ...
- Boosting&Bagging
Boosting&Bagging 集成学习方法不是单独的一个机器学习算法,而是通过构建多个机器学习算法来达到一个强学习器.集成学习可以用来进行分类,回归,特征选取和异常点检测等.随机森林算法就 ...
- vector 搜索
http://classfoo.com/ccby/article/cIBahI #include <iostream> #include <algorithm> #includ ...
- POJ3020:Antenna Placement(二分图匹配)
Antnna Placement Time Limit: 1000MS Memory Limit: 65536K Total Submissions: 11093 Accepted: 5459 ...
- URAL - 1486 Equal Squares 二维哈希+二分
During a discussion of problems at the Petrozavodsk Training Camp, Vova and Sasha argued about who o ...
- com.mongodb.MongoException$CursorNotFound: cursor not found on server异常处理
java链接MongoDB处理大量数据时经常碰到cursor not found 的异常,其实是超时所致 Exception in thread "main" com.mongod ...
- eclipse 主题文件配置
eclipse市场搜索 Eclipse Color Theme ----用于控制文本域主题 Eclipse 4 Chrome Theme chrome风格的主题 最新的:Jeeeyul's Them ...
- 程序员的那些问题---转载自veryCD
展望未来,总结过去10年的程序员生涯,给程序员小弟弟小妹妹们的一些总结性忠告 走过的路,回忆起来是那么曲折,把自己的一些心得体会分享给程序员兄弟姐妹们,虽然时代在变化,但是很可能你也会走我已经做过 ...
- Win7/8 绿色软件开机启动
在查找番茄工作法PC端软件时,发现了淡高的文章win8绿色软件开机启动,试用了一下wintabs,的确好用! 另外,office软件中有一款 OFFICE tabs的插件,标签式的管理,非常方便快捷, ...