iOS 数据持久化(扩展知识:模糊背景效果和密码保护功能)
本篇随笔除了介绍 iOS 数据持久化知识之外,还贯穿了以下内容:
(1)自定义 TableView,结合 block 从 ViewController 中分离出 View,轻 ViewController 的实现,提高 TableView 的复用性
(2)Model「实体层」+View「视图层」+ViewController「视图控制器层」+Service「服务层」+Database「数据库层」,MVC 多层架构的实现
(3)TableView 单元格滑动手势控制显示实用按钮,实用按钮为「修改」和「删除」
(4)模糊背景效果
(5)密码保护功能
现在,让我们脚踏实地一步一个脚印地 get 技能吧!
在 iOS 开发中,数据持久化是很重要的一块内容,有必要多加了解并合理地使用他。什么是数据持久化呢?
数据持久化就是将数据保存到移动设备本地存储内,使得 App 或移动设备重启后可以继续访问之前保存的数据。
实现数据持久化的方法有如下几种:
(1)plist 文件「属性列表」
(2)preference「偏好设置」
(3)NSKeyedArchiver「归档」
(4)Keychain Services「钥匙串服务」
(5)SQLite
(6)CoreData
(7)FMDB
工程结构:

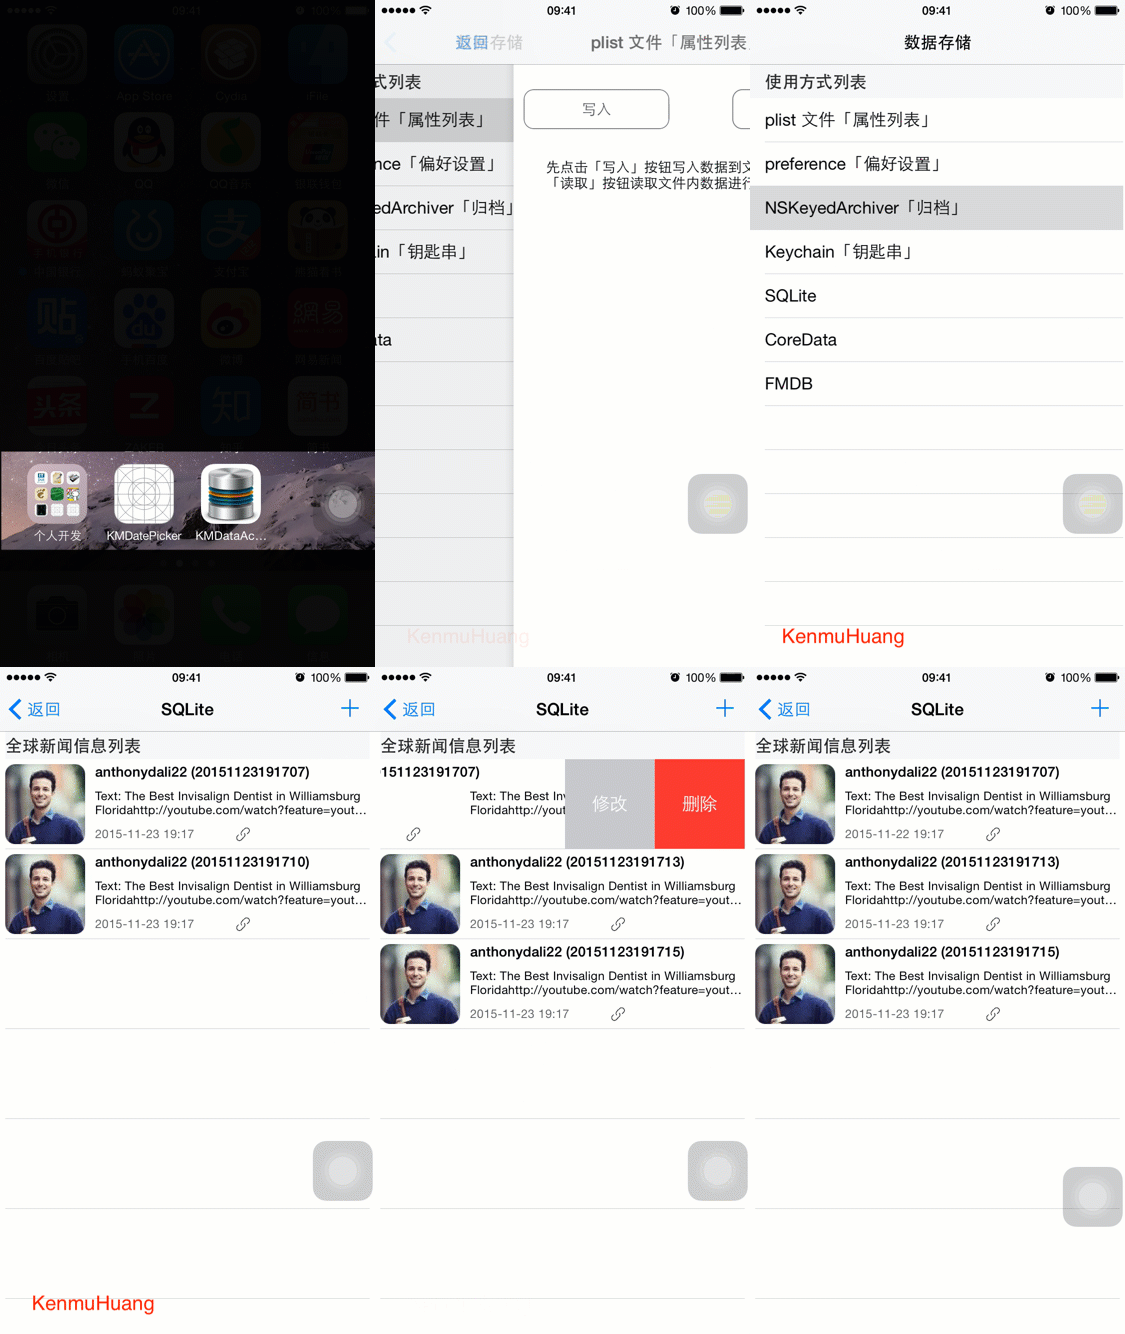
效果如下:
1. 沙盒
在了解各种实现数据持久化的方法前,我们先了解什么是 App 的沙盒机制。App 在默认情况下只能访问自己的目录,这个目录就被称为「沙盒」,意思就是隔离的空间范围只有 App 有访问权。Apple 之所以这样设计,主要是为了安全性和管理方面考虑。
1.1 目录结构

1.2 目录特性
沙盒目录下的不同目录有各自的特性,了解他们的特性,我们才能更合理地选择存储数据的目录。
(1)Bundle Path「App 包」:虽然他不属于沙盒目录,但也是有必要了解下的。存放的是编译后的源文件,包括资源文件和可执行文件。
使用场景比如:以不缓存的形式读取项目图片资源文件。
(2)Home「App 沙盒根目录」
(3)Home > Documents「文档目录」:最常用的目录,iTunes 同步该 App 时会同步此目录中的内容,适合存储重要数据。
使用场景比如:存储 SQLite 生成的数据库文件。
(4)Home > Library「库目录」
(5)Home > Library > Caches「缓存目录」:iTunes 同步该 App 时不会同步此目录中的内容,适合存储体积大、不需要备份的非重要数据。
使用场景比如:读取网络图片时,使用 AFNetworking 的 UIImageView+AFNetworking 或者 SDWebImage 的 UIImageView+WebCache 缓存图片文件。
(6)Home > Library > Preferences「偏好设置目录」:iTunes 同步该 App 时会同步此目录中的内容,通常保存 App 的偏好设置信息。
使用场景比如:记录已登录的 App 用户的信息,非敏感信息,比如已登录状态。
(7)Home > tmp「临时目录」:iTunes 同步该 App 时不会同步此目录中的内容,系统可能在 App 没运行的某个时机就删除该目录的文件,适合存储临时性的数据,用完就删除。
使用场景比如:读取网络图片时,一般会先把图片作为临时文件下载存储到此目录,然后再拷贝临时文件到 Caches「缓存目录」下,拷贝完成后再删除此临时文件。这样做的目的是保证数据的原子性,我们常用的保存数据到文件的方法:writeToFile: ,常常设置 atomically 参数值为 YES 也是这样的目的。
1.3 那么如何获取这些目录呢?
 /// Bundle Path

 NSString *bundlePath = [[NSBundle mainBundle] bundlePath];

 // 「/private/var/mobile/Containers/Bundle/Application/5DED9788-D62A-4AF7-9DF8-688119007D90/KMDataAccess.app」

 NSLog(@"%@", bundlePath);

 /// Home

 NSString *homeDir = NSHomeDirectory();

 // 「/var/mobile/Containers/Data/Application/B6C462E3-D532-43B4-883A-E98350261999」

 NSLog(@"%@", homeDir);

 /// Home > Documents

 NSString *documentsDir = [NSSearchPathForDirectoriesInDomains(NSDocumentDirectory, NSUserDomainMask, YES) firstObject];

 // 「/var/mobile/Containers/Data/Application/B6C462E3-D532-43B4-883A-E98350261999/Documents」

 NSLog(@"%@", documentsDir);

 /// Home > Library

 NSString *libraryDir = [NSSearchPathForDirectoriesInDomains(NSLibraryDirectory, NSUserDomainMask, YES) firstObject];

 // 「/var/mobile/Containers/Data/Application/B6C462E3-D532-43B4-883A-E98350261999/Library」

 NSLog(@"%@", libraryDir);

 /// Home > Library > Caches

 NSString *cachesDir = [NSSearchPathForDirectoriesInDomains(NSCachesDirectory, NSUserDomainMask, YES) firstObject];

 // 「/var/mobile/Containers/Data/Application/B6C462E3-D532-43B4-883A-E98350261999/Library/Caches」

 NSLog(@"%@", cachesDir);

 /// Home > tmp

 NSString *tmpDir = NSTemporaryDirectory();

 // 「/var/mobile/Containers/Data/Application/B6C462E3-D532-43B4-883A-E98350261999/tmp/」

 NSLog(@"%@", tmpDir);
PS:Preferences 没有相对应的取目录方法,因为该目录主要存储用户「偏好设置」信息,可以直接通过键值对进行读写访问,因此也不需要获取目录。
2. 数据持久化的方法
2.1 plist 文件「属性列表」
序列化操作:可以直接进行文件存取的类型有「NSArray」「NSDictionary」「NSString」「NSData」。
1、plist 文件「属性列表」内容是以 XML 格式存储的,在写入文件操作中,「NSArray」和「NSDictionary」可以正常识别,而对于「NSString」有中文的情况由于进行编码操作所以无法正常识别,最终「NSString」和「NSData」一样只能作为普通文件存储。无论普通文件还是 plist 文件,他们都是可以进行存取操作的。
2、plist 文件中,「NSArray」和「NSDictionary」的元素可以是 NSArray、NSDictionary、NSString、NSDate、NSNumber,所以一般常见的都是以「NSArray」和「NSDictionary」来作为文件存取的类型。
3、由于他存取都是整个文件覆盖操作,所以他只适合小数据量的存取。
如何使用:
 #pragma mark - 序列化操作:可以直接进行文件存取的类型有「NSArray」「NSDictionary」「NSString」「NSData」

 - (void)NSArrayWriteTo:(NSString *)filePath {

     NSArray *arrCustom = @[

                            @"KenmuHuang 的博客:\nhttp://www.cnblogs.com/huangjianwu/",

                            [DateHelper localeDate],

                            @

                            ];

     [arrCustom writeToFile:filePath atomically:YES];

 }

 - (NSArray *)NSArrayReadFrom:(NSString *)filePath {

     return [NSArray arrayWithContentsOfFile:filePath];

 }

 - (void)NSDictionaryWriteTo:(NSString *)filePath {

     NSDictionary *dicCustom = @{

                                 @"Name" : @"KenmuHuang",

                                 @"Technology" : @"iOS",

                                 @"ModifiedTime" : [DateHelper localeDate],

                                 @"iPhone" : @ // @6 语法糖等价于 [NSNumber numberWithInteger:6]

                                 };

     [dicCustom writeToFile:filePath atomically:YES];

 }

 - (NSDictionary *)NSDictionaryReadFrom:(NSString *)filePath {

     return [NSDictionary dictionaryWithContentsOfFile:filePath];

 }

 - (BOOL)NSStringWriteTo:(NSString *)filePath {

     NSString *strCustom = @"KenmuHuang 的博客:\nhttp://www.cnblogs.com/huangjianwu/";

     NSError *error;

     // 当字符串内容有中文时,通过编码操作写入,无法作为正常的 plist 文件打开,只能作为普通文件存储

     [strCustom writeToFile:filePath

                 atomically:YES

                   encoding:NSUTF8StringEncoding

                      error:&error];

     return error != nil;

 }

 - (NSString *)NSStringReadFrom:(NSString *)filePath {

     NSError *error;

     NSString *strCustom = [NSString stringWithContentsOfFile:filePath

                                                     encoding:NSUTF8StringEncoding

                                                        error:&error];

     return error ? @"" : strCustom;

 }

 - (void)NSDataWriteTo:(NSString *)filePath {

     NSURL *URL = [NSURL URLWithString:kBlogImageStr];

     NSData *dataCustom = [[NSData alloc] initWithContentsOfURL:URL];

     // 数据类型写入,无法作为正常的 plist 文件打开,只能作为普通文件存储

     [dataCustom writeToFile:filePath atomically:YES];

     _imgVDetailInfo.hidden = YES;

 }

 - (NSData *)NSDataReadFrom:(NSString *)filePath {

     return [NSData dataWithContentsOfFile:filePath];

 }
2.2 preference「偏好设置」
preference「偏好设置」可以直接进行存取的类型有「NSArray」「NSDictionary」「NSString」「BOOL」「NSInteger」「NSURL」「float」「double」。
1、偏好设置是专门用来保存 App 的配置信息的,一般不要在偏好设置中保存其他数据。使用场景比如:App 引导页的开启控制,以存储的键值对 appVersion「App 更新后的当前版本」为准,开启条件为 appVersion 不存在或者不为当前版本,这样版本更新后,第一次打开 App 也能正常开启引导页。
2、修改完数据,如果没有调用 synchronize 来立刻同步数据到文件内,系统会根据 I/O 情况不定时刻地执行保存。
3、偏好设置实际上也是一个 plist 文件,他保存在沙盒的 Preferences 目录中「Home > Library > Preferences」,文件以 App 包名「Bundle Identifier」来命名,例如本例子就是:com.kenmu.KMDataAccess.plist。
如何使用:
 - (IBAction)btnWriteToPressed:(id)sender {

     NSURL *URL = [NSURL URLWithString:kBlogImageStr];

     NSUserDefaults *userDefaults = [NSUserDefaults standardUserDefaults];

     [userDefaults setObject:@"KenmuHuang" forKey:kNameOfPreference];

     [userDefaults setBool:YES forKey:kIsMaleOfPreference];

     [userDefaults setInteger: forKey:kiPhoneOfPreference];

     [userDefaults setURL:URL forKey:kAvatarURLOfPreference];

     [userDefaults setFloat:6.5 forKey:kFloatValOfPreference];

     [userDefaults setDouble:7.5 forKey:kDoubleValOfPreference];

     NSArray *arrCustom = @[

                            @"KenmuHuang 的博客:\nhttp://www.cnblogs.com/huangjianwu/",

                            [DateHelper localeDate],

                            @

                            ];

     [userDefaults setObject:arrCustom forKey:kMyArrayOfPreference];

     NSDictionary *dicCustom = @{

                                 @"Name" : @"KenmuHuang",

                                 @"Technology" : @"iOS",

                                 @"ModifiedTime" : [DateHelper localeDate],

                                 @"iPhone" : @ // @6 语法糖等价于 [NSNumber numberWithInteger:6]

                                 };

     [userDefaults setObject:dicCustom forKey:kMyDictionaryOfPreference];

     //立刻同步

     [userDefaults synchronize];

     _txtVDetailInfo.text = @"写入成功";

 }

 - (IBAction)btnReadFromPressed:(id)sender {

     NSMutableString *mStrCustom = [NSMutableString new];

     NSUserDefaults *userDefaults = [NSUserDefaults standardUserDefaults];

     [mStrCustom appendFormat:@"%@: %@\n", kNameOfPreference, [userDefaults objectForKey:kNameOfPreference]];

     [mStrCustom appendFormat:@"%@: %@\n", kIsMaleOfPreference, [userDefaults boolForKey:kIsMaleOfPreference] ? @"YES" : @"NO"];

     [mStrCustom appendFormat:@"%@: %ld\n", kiPhoneOfPreference, (long)[userDefaults integerForKey:kiPhoneOfPreference]];

     [mStrCustom appendFormat:@"%@: %@\n", kAvatarURLOfPreference, [userDefaults URLForKey:kAvatarURLOfPreference]];

     [mStrCustom appendFormat:@"%@: %f\n", kFloatValOfPreference, [userDefaults floatForKey:kFloatValOfPreference]];

     [mStrCustom appendFormat:@"%@: %f\n", kDoubleValOfPreference, [userDefaults doubleForKey:kDoubleValOfPreference]];

     [mStrCustom appendFormat:@"%@: (\n", kMyArrayOfPreference];

     for (NSObject *obj in [userDefaults objectForKey:kMyArrayOfPreference]) {

         [mStrCustom appendFormat:@"%@", obj];

         if (![obj isKindOfClass:[NSNumber class]]) {

             [mStrCustom appendString:@",\n"];

         } else {

             [mStrCustom appendString:@"\n)\n"];

         }

     }

     [mStrCustom appendFormat:@"%@: %@\n", kMyDictionaryOfPreference, [userDefaults objectForKey:kMyDictionaryOfPreference]];

     _txtVDetailInfo.text = mStrCustom;

 }
2.3 NSKeyedArchiver「归档」
NSKeyedArchiver「归档」属于序列化操作,遵循并实现 NSCoding 协议的对象都可以通过他实现序列化。绝大多数支持存储数据的 Foundation 和 Cocoa Touch 类都遵循了 NSCoding 协议,因此,对于大多数类来说,归档相对而言还是比较容易实现的。
1、遵循并实现 NSCoding 协议中的归档「encodeWithCoder:」和解档「initWithCoder:」方法。
2、如果需要归档的类是某个自定义类的子类时,就需要在归档和解档之前先实现父类的归档和解档方法。
3、存取的文件扩展名可以任意。
4、跟 plist 文件存取类似,由于他存取都是整个文件覆盖操作,所以他只适合小数据量的存取。
如何使用:
 #import <Foundation/Foundation.h>

 @interface GlobalInfoModel : NSObject <NSCoding>

 @property (strong, nonatomic) NSNumber *ID; ///< ID编号

 @property (copy, nonatomic) NSString *avatarImageStr; ///< 图标图片地址

 @property (copy, nonatomic) NSString *name; ///< 标题名称

 @property (copy, nonatomic) NSString *text; ///< 内容

 @property (copy, nonatomic) NSString *link; ///< 链接地址

 @property (strong, nonatomic) NSDate *createdAt; ///< 创建时间

 @property (assign, nonatomic, getter=isHaveLink) BOOL haveLink; ///< 是否存在链接地址

 ...

 @end
 #import "GlobalInfoModel.h"

 @implementation GlobalInfoModel

 ...

 #pragma mark - NSCoding

 - (void)encodeWithCoder:(NSCoder *)aCoder {

     // 归档

     [aCoder encodeObject:_ID forKey:kID];

     [aCoder encodeObject:_avatarImageStr forKey:kAvatarImageStr];

     [aCoder encodeObject:_name forKey:kName];

     [aCoder encodeObject:_text forKey:kText];

     [aCoder encodeObject:_link forKey:kLink];

     [aCoder encodeObject:_createdAt forKey:kCreatedAt];

     [aCoder encodeBool:_haveLink forKey:kHaveLink];

 }

 - (nullable instancetype)initWithCoder:(NSCoder *)aDecoder {

     self = [super init];

     if (self) {

         // 解档

         _ID = [aDecoder decodeObjectForKey:kID];

         _avatarImageStr = [aDecoder decodeObjectForKey:kAvatarImageStr];

         _name = [aDecoder decodeObjectForKey:kName];

         _text = [aDecoder decodeObjectForKey:kText];

         _link = [aDecoder decodeObjectForKey:kLink];

         _createdAt = [aDecoder decodeObjectForKey:kCreatedAt];

         _haveLink = [aDecoder decodeBoolForKey:kHaveLink];

     }

     return self;

 }

 @end
 - (IBAction)btnWriteToPressed:(id)sender {

     NSDictionary *dicGlobalInfoModel = @{

                                          kID : @,

                                          kAvatarImageStr : kBlogImageStr,

                                          kName : @"KenmuHuang",

                                          kText : @"Say nothing...",

                                          kLink : @"http://www.cnblogs.com/huangjianwu/",

                                          kCreatedAt : [DateHelper localeDate]

                                          };

     GlobalInfoModel *globalInfoModel = [[GlobalInfoModel alloc] initWithDictionary:dicGlobalInfoModel];

     NSString *documentsDir = [NSSearchPathForDirectoriesInDomains(NSDocumentDirectory, NSUserDomainMask, YES) firstObject];

     NSString *filePath = [documentsDir stringByAppendingPathComponent:kNSKeyedArchiverName];

     // 归档

     [NSKeyedArchiver archiveRootObject:globalInfoModel toFile:filePath];

     _txtVDetailInfo.text = @"写入成功";

 }

 - (IBAction)btnReadFromPressed:(id)sender {

     NSString *documentsDir = [NSSearchPathForDirectoriesInDomains(NSDocumentDirectory, NSUserDomainMask, YES) firstObject];

     NSString *filePath = [documentsDir stringByAppendingPathComponent:kNSKeyedArchiverName];

     // 解档

     GlobalInfoModel *globalInfoModel = [NSKeyedUnarchiver unarchiveObjectWithFile:filePath];

     NSMutableString *mStrCustom = [NSMutableString new];

     if (globalInfoModel) {

         [mStrCustom appendFormat:@"%@: %@\n", kID, globalInfoModel.ID];

         [mStrCustom appendFormat:@"%@: %@\n", kAvatarImageStr, globalInfoModel.avatarImageStr];

         [mStrCustom appendFormat:@"%@: %@\n", kName, globalInfoModel.name];

         [mStrCustom appendFormat:@"%@: %@\n", kText, globalInfoModel.text];

         [mStrCustom appendFormat:@"%@: %@\n", kLink, globalInfoModel.link];

         [mStrCustom appendFormat:@"%@: %@\n", kCreatedAt, globalInfoModel.createdAt];

         [mStrCustom appendFormat:@"%@: %@\n", kHaveLink, globalInfoModel.haveLink ? @"YES" : @"NO"];

     }

     _txtVDetailInfo.text = mStrCustom;

 }
另外,可以使用如下第三方库,在数据模型转换中很有帮助:
「Mantle」:https://github.com/Mantle/Mantle
「JSONModel」: https://github.com/icanzilb/JSONModel
「MJExtension」:https://github.com/CoderMJLee/MJExtension,NSObject+MJCoding 对于归档操作的实现原理是:把类对象属性都统一转换为对象类型,使用宏声明好归档「encodeWithCoder:」和解档「initWithCoder:」方法的执行内容,具体实现就是遍历类对象属性进行 encodeObject: 和 decodeObjectForKey: 操作。项目里引用他后,归档操作就很容易了。
在序列化方面,国外的朋友很会玩,他在 2.66GHz Mac Pro 上对10W条简单对象记录进行序列化和反序列化,性能的比较结果如下:
https://github.com/randomsequence/NSSerialisationTests
 NSJSONSerialization         .359547秒

 NSPropertyListSerialization .560538秒

 NSArchiver                  .681572秒

 NSKeyedArchiver             .563317秒
顺便提下,NSJSONSerialization 的序列化方法如下:
 // NSData 数据转为 NSDictionary

 NSError *error;

 NSDictionary *dicJSON = [NSJSONSerialization JSONObjectWithData:myData options:kNilOptions error:&error];

 // NSDictionary 数据转为 NSData

 NSError *error;

 NSData *dataJSON = [NSJSONSerialization dataWithJSONObject:myDictionary options:NSJSONWritingPrettyPrinted error:&error];
2.4 Keychain Services「钥匙串服务」
Keychain Services「钥匙串服务」为一个或多个用户提供安全存储容器,存储内容可以是密码、密钥、证书、备注信息。
使用 Keychain Services 的好处有如下几点:
(1)安全性;存储的为加密后的信息。
(2)持久性;将敏感信息保存在 Keychain 中后,这些信息不会随着 App 的卸载而丢失,他在用户重装 App 后依然有效。然而,在 iPhone 中,Keychain Services「钥匙串服务」权限依赖 provisioning profile「配置文件」来标示对应的 App。所以我们在更新 App 版本时,应该注意使用一致的配置文件;否则会出现钥匙串服务数据丢失的情况。
(3)支持共享;可以实现多个 App 之间共享 Keychain 数据。
使用场景比如:App 用户登录界面提供「记住密码」功能,用户勾选「记住密码」复选框并且登录成功后,存储用户登录信息到 Keychain 里,包括特殊加密后的密码。当用户再次进入用户登录界面时,自动读取已存储到 Keychain 的用户登录信息,此时用户只需要点击「登录」按钮就可以直接登录了。
(官方文档提到的)使用场景比如:
(1)多个用户:邮箱或者计划任务服务器,他需要验证多个用户信息。
(2)多个服务器:银行业务或保险应用程序,他可能需要在多个安全的数据库之间交换数据信息。
(3)需要输入密码的用户:Web 浏览器,他能通过钥匙串服务为多个安全的 Web 站点存储用户密码。
iOS 系统中也使用 Keychain Services 来保存 Wi-Fi 网络密码、VPN 凭证等。Keychain 本身是一个 SQLite 数据库,位于移动设备的「/private/var/Keychains/keychain-2.db」文件中,保存的是加密过的数据。
这里提下,对 SQLite 数据库进行加密的第三方库:
「sqlcipher」:https://github.com/sqlcipher/sqlcipher,他为数据库文件提供了256 位的 AES 加密方式,提高了数据库安全性。
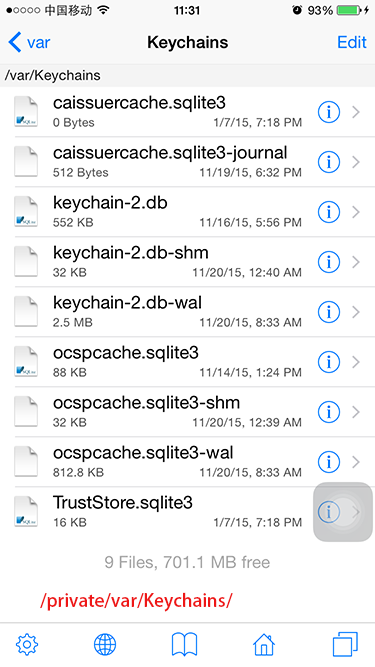
越狱手机用「iFile」工具可以直接看到 Keychain 数据库数据:
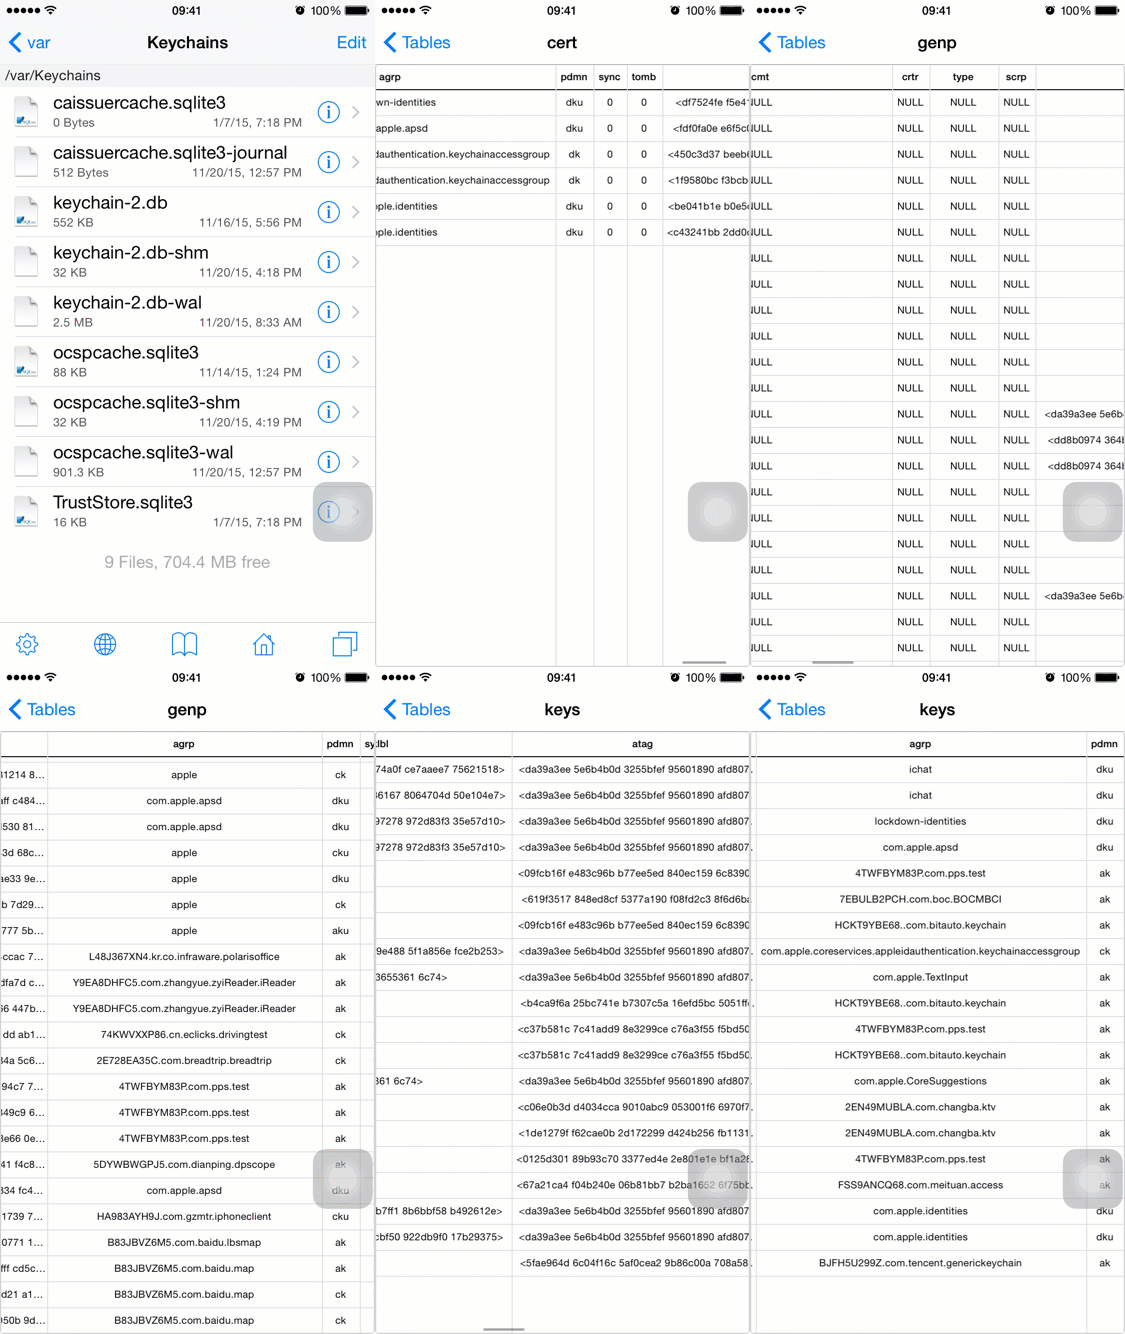
也可以使用「Keychain-Dumper」工具导出 Keychain 数据库数据:
https://github.com/ptoomey3/Keychain-Dumper
Keychain 有两个访问区
(1)私有区:不会存储沙盒目录下,但同沙盒目录一样只允许本身 App 访问。
(2)公共区:通过 Keychain Access Group「钥匙串访问组」配置,实现多个 App 之间共享 Keychain 数据,由于他编译跟证书签名有关,所以一般也只能是同家公司的产品 App 之间共享 Keychain 数据。
如下图片为公共区的通过 Keychain Access Group「钥匙串访问组」配置,关于公共区的详细内容这里不多介绍,接下来我们来关注私有区的用法,因为他更常用。

Keychain Services「钥匙串服务」原始代码是非 ARC 的,在 ARC 的环境下操作,需要通过 bridge 「桥接」方式把 Core Foundation 对象转换为 Objective-C 对象。
Keychain Services 的存储内容类型,常用的是 kSecClassGenericPassword,像 Apple 官网提供的 KeyChainItemWrapper 工程就是使用 kSecClassGenericPassword。
同样,第三方库「SSKeychain」也是使用 kSecClassGenericPassword:
https://github.com/soffes/sskeychain
 extern const CFStringRef kSecClass;

 extern const CFStringRef kSecClassGenericPassword; // 通用密码;「genp」表

 extern const CFStringRef kSecClassInternetPassword; // 互联网密码;「inet」表

 extern const CFStringRef kSecClassCertificate; //证书;「cert」表

 extern const CFStringRef kSecClassKey; //密钥;「keys」表

 extern const CFStringRef kSecClassIdentity; //身份
SSKeychain.h 公开的方法:
 + (NSString *)passwordForService:(NSString *)serviceName account:(NSString *)account;

 + (NSString *)passwordForService:(NSString *)serviceName account:(NSString *)account error:(NSError **)error;

 + (BOOL)deletePasswordForService:(NSString *)serviceName account:(NSString *)account;

 + (BOOL)deletePasswordForService:(NSString *)serviceName account:(NSString *)account error:(NSError **)error;

 + (BOOL)setPassword:(NSString *)password forService:(NSString *)serviceName account:(NSString *)account;

 + (BOOL)setPassword:(NSString *)password forService:(NSString *)serviceName account:(NSString *)account error:(NSError **)error;

 + (NSArray *)allAccounts;

 + (NSArray *)allAccounts:(NSError *__autoreleasing *)error;

 + (NSArray *)accountsForService:(NSString *)serviceName;

 + (NSArray *)accountsForService:(NSString *)serviceName error:(NSError *__autoreleasing *)error;
如何使用:
 #import "KeychainViewController.h"

 #import "SSKeychain.h"

 static NSString *const kService = @"com.kenmu.KMDataAccess"; // 服务名任意;保持存取一致就好

 static NSString *const kAccount1 = @"KenmuHuang";

 static NSString *const kAccount2 = @"Kenmu";

 ...

 - (IBAction)btnWriteToPressed:(id)sender {

     NSError * (^setPasswordBlock)(NSString *) = ^(NSString *account){

         // 创建 UUID 字符串作为密码进行测试;最终还是会被加密存储起来的

         CFUUIDRef UUIDPassword = CFUUIDCreate(NULL);

         CFStringRef UUIDPasswordStrRef = CFUUIDCreateString(NULL, UUIDPassword);

         NSString *UUIDPasswordStr = [NSString stringWithFormat:@"%@", UUIDPasswordStrRef];

         NSLog(@"UUIDPasswordStr: %@", UUIDPasswordStr);

         // 释放资源

         CFRelease(UUIDPasswordStrRef);

         CFRelease(UUIDPassword);

         NSError *error;

         [SSKeychain setPassword:UUIDPasswordStr

                      forService:kService

                         account:account

                           error:&error];

         return error;

     };

     // 存储2个用户密码信息,相当于向「genp」表插入2条记录

     NSError *errorOfAccount1 = setPasswordBlock(kAccount1);

     NSError *errorOfAccount2 = setPasswordBlock(kAccount2);

     NSMutableString *mStrCustom = [NSMutableString new];

     [mStrCustom appendFormat:@"%@ 写入密码%@\n\n", kAccount1, errorOfAccount1 ? @"失败" : @"成功"];

     [mStrCustom appendFormat:@"%@ 写入密码%@\n", kAccount2, errorOfAccount2 ? @"失败" : @"成功"];

     _txtVDetailInfo.text = mStrCustom;

 }

 - (IBAction)btnReadFromPressed:(id)sender {

     NSString * (^getPasswordBlock)(NSString *) = ^(NSString *account){

         NSError *error;

         return [SSKeychain passwordForService:kService

                                       account:account

                                         error:&error];

     };

     NSString *passwordOfAccount1 = getPasswordBlock(kAccount1);

     NSString *passwordOfAccount2 = getPasswordBlock(kAccount2);

     NSMutableString *mStrCustom = [NSMutableString new];

     [mStrCustom appendFormat:@"%@ 读取密码%@: %@\n\n", kAccount1, passwordOfAccount1 ? @"成功" : @"失败", passwordOfAccount1];

     [mStrCustom appendFormat:@"%@ 读取密码%@: %@\n", kAccount2, passwordOfAccount2 ? @"成功" : @"失败", passwordOfAccount2];

     _txtVDetailInfo.text = mStrCustom;

 }
2.5 SQLite
SQLite 顾名思义就是一种数据库,相比之前提到的 plist 文件「属性列表」、preference「偏好设置」、NSKeyedArchiver「归档」存取方式来说,数据库更适合存储大量数据,因为他的增删改查都可以逐条记录进行操作,不需要一次性加载整个数据库文件。同时他还可以处理更加复杂的关系型数据。
当然数据库存取方式的优点不止以上两点,这里就不一一列举了。(深入研究过数据库的朋友都知道,数据库技术也是一门学问)
他有以下几点特点:
(1)基于 C 语言开发的轻型数据库,支持跨平台
(2)在 iOS 中需要使用 C 语言语法进行数据库操作、访问(无法使用 ObjC 直接访问,因为 libsqlite3 框架基于 C 语言编写)
(3)SQLite 中采用的是动态数据类型,即使创建时定义为一种类型,在实际操作时也可以存储为其他类型,但还是推荐建库时使用合适的类型(特别是 App 需要考虑跨平台的情况时)
(4)建立连接后通常不需要关闭连接(尽管可以手动关闭)
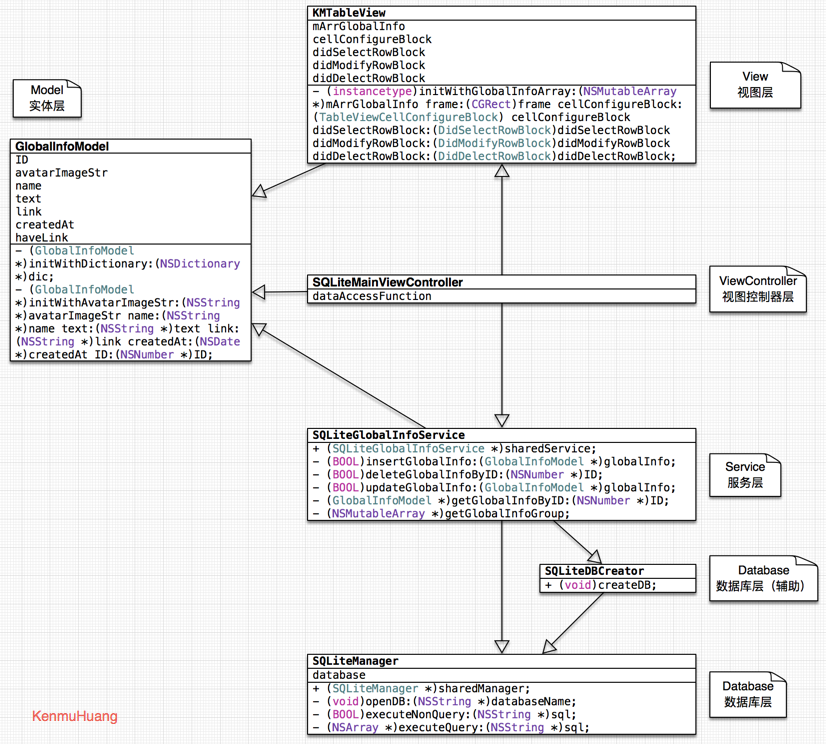
这里我们使用 MVC 多层架构,Model「实体层」+View「视图层」+ViewController「视图控制器层」+Service「服务层」+Database「数据库层」,如下图所示:
如何使用:
GlobalInfoModel.h
 #import <Foundation/Foundation.h>

 @interface GlobalInfoModel : NSObject <NSCoding>

 @property (strong, nonatomic) NSNumber *ID; ///< ID编号

 @property (copy, nonatomic) NSString *avatarImageStr; ///< 图标图片地址

 @property (copy, nonatomic) NSString *name; ///< 标题名称

 @property (copy, nonatomic) NSString *text; ///< 内容

 @property (copy, nonatomic) NSString *link; ///< 链接地址

 @property (strong, nonatomic) NSDate *createdAt; ///< 创建时间

 @property (assign, nonatomic, getter=isHaveLink) BOOL haveLink; ///< 是否存在链接地址

 - (GlobalInfoModel *)initWithDictionary:(NSDictionary *)dic;

 - (GlobalInfoModel *)initWithAvatarImageStr:(NSString *)avatarImageStr name:(NSString *)name text:(NSString *)text link:(NSString *)link createdAt:(NSDate *)createdAt ID:(NSNumber *)ID;

 @end
GlobalInfoModel.m
 #import "GlobalInfoModel.h"

 #import "DateHelper.h"

 @implementation GlobalInfoModel

 - (GlobalInfoModel *)initWithDictionary:(NSDictionary *)dic {

     if (self = [super init]) {

         // 这种方式在有 NSDate 数据类型的属性时,赋值操作的属性值都为字符串类型(不推荐在这种情况下使用),可以根据 NSLog(@"%@", [date class]); 看到是否是正确格式的 NSDate 数据类型

         //[self setValuesForKeysWithDictionary:dic];

         // http://stackoverflow.com/questions/14233153/nsdateformatter-stringfromdate-datefromstring-both-returning-nil

         id createdAt = dic[kCreatedAt];

         if (![createdAt isKindOfClass:[NSDate class]]) {

             createdAt = [DateHelper dateFromString:createdAt

                                         withFormat:@"yyyy-MM-dd HH:mm:ss z"];

         }

         // 推荐使用自己构造的方式

         return [self initWithAvatarImageStr:dic[kAvatarImageStr]

                                        name:dic[kName]

                                        text:dic[kText]

                                        link:dic[kLink]

                                   createdAt:createdAt

                                          ID:dic[kID]];

     }

     return self;

 }

 - (GlobalInfoModel *)initWithAvatarImageStr:(NSString *)avatarImageStr name:(NSString *)name text:(NSString *)text link:(NSString *)link createdAt:(NSDate *)createdAt ID:(NSNumber *)ID {

     if (self = [super init]) {

         _ID = ID;

         _avatarImageStr = avatarImageStr;

         _name = name;

         _text = text;

         _link = link;

         _createdAt = createdAt;

         _haveLink = _link.length > ;

     }

     return self;

 }

 #pragma mark - NSCoding

 - (void)encodeWithCoder:(NSCoder *)aCoder {

     // 归档

     [aCoder encodeObject:_ID forKey:kID];

     [aCoder encodeObject:_avatarImageStr forKey:kAvatarImageStr];

     [aCoder encodeObject:_name forKey:kName];

     [aCoder encodeObject:_text forKey:kText];

     [aCoder encodeObject:_link forKey:kLink];

     [aCoder encodeObject:_createdAt forKey:kCreatedAt];

     [aCoder encodeBool:_haveLink forKey:kHaveLink];

 }

 - (nullable instancetype)initWithCoder:(NSCoder *)aDecoder {

     self = [super init];

     if (self) {

         // 解档

         _ID = [aDecoder decodeObjectForKey:kID];

         _avatarImageStr = [aDecoder decodeObjectForKey:kAvatarImageStr];

         _name = [aDecoder decodeObjectForKey:kName];

         _text = [aDecoder decodeObjectForKey:kText];

         _link = [aDecoder decodeObjectForKey:kLink];

         _createdAt = [aDecoder decodeObjectForKey:kCreatedAt];

         _haveLink = [aDecoder decodeBoolForKey:kHaveLink];

     }

     return self;

 }

 @end
SQLiteManager.h
 #import <Foundation/Foundation.h>

 #import <sqlite3.h>

 @interface SQLiteManager : NSObject

 @property (assign, nonatomic) sqlite3 *database;

 + (SQLiteManager *)sharedManager;

 - (void)openDB:(NSString *)databaseName;

 - (BOOL)executeNonQuery:(NSString *)sql;

 - (NSArray *)executeQuery:(NSString *)sql;

 @end
SQLiteManager.m
 #import "SQLiteManager.h"

 @implementation SQLiteManager

 - (instancetype)init {

     if (self = [super init]) {

         [self openDB:kSQLiteDBName];

     }

     return self;

 }

 + (SQLiteManager *)sharedManager {

     static SQLiteManager *manager;

     static dispatch_once_t onceToken;

     dispatch_once(&onceToken, ^{

         manager = [SQLiteManager new];

     });

     return manager;

 }

 - (void)openDB:(NSString *)databaseName {

     // 获取数据库保存路径,通常保存沙盒 Documents 目录下

     NSString *directory = [NSSearchPathForDirectoriesInDomains(NSDocumentDirectory, NSUserDomainMask, YES) firstObject];

     NSString *filePath = [directory stringByAppendingPathComponent:databaseName];

     // 打开数据库;如果数据库存在就直接打开,否则进行数据库创建并打开(filePath 是 ObjC 语言的字符串,需要转化为 C 语言字符串)

     BOOL isSuccessToOpen = sqlite3_open(filePath.UTF8String, &_database) == SQLITE_OK;

     NSLog(@"数据库打开%@", isSuccessToOpen ? @"成功" : @"失败");

 }

 - (BOOL)executeNonQuery:(NSString *)sql {

     BOOL isSuccess = YES;

     char *error;

     // 单步执行sql语句;用于增删改

     if (sqlite3_exec(_database, sql.UTF8String, NULL, NULL, &error)) {

         isSuccess = NO;

         NSLog(@"执行sql语句过程中出现错误,错误信息:%s", error);

     }

     return isSuccess;

 }

 - (NSArray *)executeQuery:(NSString *)sql {

     NSMutableArray *mArrResult = [NSMutableArray array];

     sqlite3_stmt *stmt;

     // 检查语法正确性

     if (sqlite3_prepare_v2(_database, sql.UTF8String, -, &stmt, NULL) == SQLITE_OK) {

         // 以游标的形式,逐行读取数据

         while (sqlite3_step(stmt) == SQLITE_ROW) {

             NSMutableDictionary *mDicResult = [NSMutableDictionary dictionary];

             for (int i=, columnCount=sqlite3_column_count(stmt); i<columnCount; i++) {

                 // 获取列名

                 const char *columnName = sqlite3_column_name(stmt, i);

                 // 获取列值

                 const char *columnText = (const char *)sqlite3_column_text(stmt, i);

                 mDicResult[[NSString stringWithUTF8String:columnName]] = [NSString stringWithUTF8String:columnText];

             }

             [mArrResult addObject:mDicResult];

         }

     }

     // 释放句柄

     sqlite3_finalize(stmt);

     return mArrResult;

 }

 @end
SQLiteDBCreator.h
 #import <Foundation/Foundation.h>

 @interface SQLiteDBCreator : NSObject

 + (void)createDB;

 @end
SQLiteDBCreator.m
 #import "SQLiteDBCreator.h"

 #import "SQLiteManager.h"

 @implementation SQLiteDBCreator

 #pragma mark - Private Method

 + (void)createTable {

     NSString *sql = [NSString stringWithFormat:@"CREATE TABLE GlobalInfo(ID integer PRIMARY KEY AUTOINCREMENT, %@ text, %@ text, \"%@\" text, %@ text, %@ date)", kAvatarImageStr, kName, kText, kLink, kCreatedAt];

     [[SQLiteManager sharedManager] executeNonQuery:sql];

 }

 #pragma mark - Public Method

 + (void)createDB {

     // 使用偏好设置保存「是否已经初始化数据库表」的键值;避免重复创建

     NSString *const isInitializedTableStr = @"IsInitializedTableForSQLite";

     NSUserDefaults *userDefaults = [NSUserDefaults standardUserDefaults];

     if (![userDefaults boolForKey:isInitializedTableStr]) {

         [self createTable];

         [userDefaults setBool:YES forKey:isInitializedTableStr];

     }

 }

 @end
SQLiteGlobalInfoService.h
 #import <Foundation/Foundation.h>

 #import "GlobalInfoModel.h"

 @interface SQLiteGlobalInfoService : NSObject

 + (SQLiteGlobalInfoService *)sharedService;

 - (BOOL)insertGlobalInfo:(GlobalInfoModel *)globalInfo;

 - (BOOL)deleteGlobalInfoByID:(NSNumber *)ID;

 - (BOOL)updateGlobalInfo:(GlobalInfoModel *)globalInfo;

 - (GlobalInfoModel *)getGlobalInfoByID:(NSNumber *)ID;

 - (NSMutableArray *)getGlobalInfoGroup;

 @end
SQLiteGlobalInfoService.m
 #import "SQLiteGlobalInfoService.h"

 #import "SQLiteManager.h"

 #import "SQLiteDBCreator.h"

 @implementation SQLiteGlobalInfoService

 + (SQLiteGlobalInfoService *)sharedService {

     static SQLiteGlobalInfoService *service;

     static dispatch_once_t onceToken;

     dispatch_once(&onceToken, ^{

         service = [SQLiteGlobalInfoService new];

         [SQLiteDBCreator createDB];

     });

     return service;

 }

 - (BOOL)insertGlobalInfo:(GlobalInfoModel *)globalInfo {

     NSString *sql = [NSString stringWithFormat:@"INSERT INTO GlobalInfo(%@, %@, %@, %@, %@) VALUES('%@','%@','%@','%@','%@')",

                      kAvatarImageStr, kName, kText, kLink, kCreatedAt,

                      globalInfo.avatarImageStr, globalInfo.name, globalInfo.text, globalInfo.link, globalInfo.createdAt];

     return [[SQLiteManager sharedManager] executeNonQuery:sql];

 }

 - (BOOL)deleteGlobalInfoByID:(NSNumber *)ID {

     NSString *sql =

     [NSString stringWithFormat:@"DELETE FROM GlobalInfo WHERE %@='%ld'", kID,

      (long)[ID integerValue]];

     return [[SQLiteManager sharedManager] executeNonQuery:sql];

 }

 - (BOOL)updateGlobalInfo:(GlobalInfoModel *)globalInfo {

     NSString *sql = [NSString stringWithFormat:@"UPDATE GlobalInfo SET %@='%@', %@='%@', %@='%@', %@='%@', %@='%@' WHERE %@='%ld'",

                      kAvatarImageStr, globalInfo.avatarImageStr,

                      kName, globalInfo.name,

                      kText, globalInfo.text,

                      kLink, globalInfo.link,

                      kCreatedAt, globalInfo.createdAt,

                      kID, (long)[globalInfo.ID integerValue]];

     return [[SQLiteManager sharedManager] executeNonQuery:sql];

 }

 - (GlobalInfoModel *)getGlobalInfoByID:(NSNumber *)ID {

     GlobalInfoModel *globalInfo;

     NSString *sql =

     [NSString stringWithFormat:

      @"SELECT %@, %@, %@, %@, %@ FROM GlobalInfo WHERE %@='%ld'",

      kAvatarImageStr, kName, kText, kLink, kCreatedAt, kID,

      (long)[ID integerValue]];

     NSArray *arrResult = [[SQLiteManager sharedManager] executeQuery:sql];

     if (arrResult && arrResult.count > ) {

         globalInfo = [[GlobalInfoModel alloc] initWithDictionary:arrResult[]];

     }

     return globalInfo;

 }

 - (NSMutableArray *)getGlobalInfoGroup {

     NSMutableArray *mArrResult = [[NSMutableArray alloc] initWithCapacity:];

     NSString *sql = [NSString

                      stringWithFormat:@"SELECT %@, %@, %@, %@, %@, %@ FROM GlobalInfo", kID,

                      kAvatarImageStr, kName, kText, kLink, kCreatedAt];

     NSArray *arrResult = [[SQLiteManager sharedManager] executeQuery:sql];

     if (arrResult && arrResult.count > ) {

         for (NSDictionary *dicResult in arrResult) {

             [mArrResult

              addObject:[[GlobalInfoModel alloc] initWithDictionary:dicResult]];

         }

     }

     return mArrResult;

 }

 @end
2.6 CoreData
在各类语言开发中,当牵扯到数据库操作时,通常都会引入 ORM 的概念,ORM 全称为 Object Relational Mapping「对象关系映射」。在面向对象编程语言中,他是一种实现不同类型系统数据转换的技术。
比如在 .NET 中是使用 Entity Framework、Linq、NHibernate,在 Java 中是使用 Hibernate,而在 iOS 中官方推荐的就是 CoreData 了。无论哪种开发平台和技术,ORM 的作用都是一样的,那就是将数据库表(准确的说是实体)转换为程序中的对象,其本质还是对数据库进行操作。
当 CoreData 中数据仓储类型配置为 SQLite ,其本质就是操作 SQLite 数据库。
在前面的 SQLite 介绍中,我们需要创建多层关系方便我们数据存取操作:GlobalInfoModel「实体层」、SQLiteManager「数据库数据访问管理者层」、SQLiteDBCreator「数据库初始化工作创建者层」、SQLiteGlobalInfoService「数据库数据转换为实体操作服务层」。
然而在 CoreData 中,他简化了 SQLite 多层关系创建的过程,他对数据库和其表的创建、数据库数据转换为实体操作进行封装,最终提供类似 SQLiteGlobalInfoService 的服务层用于数据存取,使用更加方便快捷。
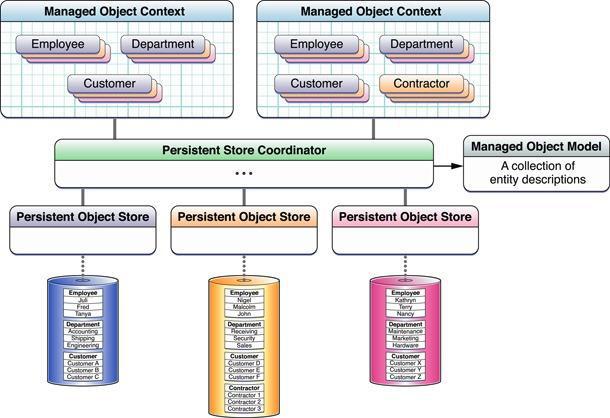
在 CoreData 中,有四大核心类:
「Managed Object Model」:被管理对象模型;对应 Xcode 中创建的 .xcdatamodeld 对象模型文件
「Persistent Store Coordinator」:持久化存储协调器;被管理对象模型和实体类之间的转换协调器,可以为不同的被管理对象模型创建各自的持久化存储协调器,一般情况下会合并多个被管理对象模型,然后创建一个持久化存储协调器统一来管理
「Persistent Store」:持久化存储;可以理解为最终存储数据的数据仓储,CoreData 支持的数据仓储类型为四种,分别为 NSSQLiteStoreType「SQLite 数据库」、NSXMLStoreType「XML 文件」、NSBinaryStoreType「二进制文件」、NSInMemoryStoreType「内存中」,一般使用 NSSQLiteStoreType
「Managed Object Context」:被管理对象上下文;负责实体对象与数据库的数据交互
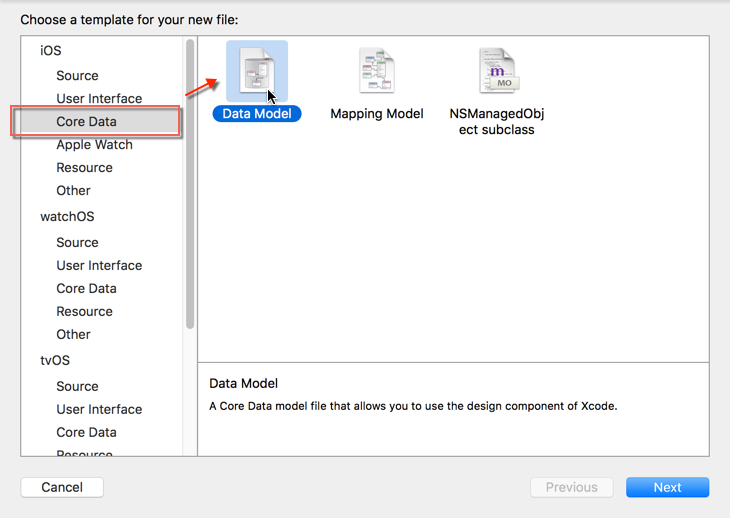
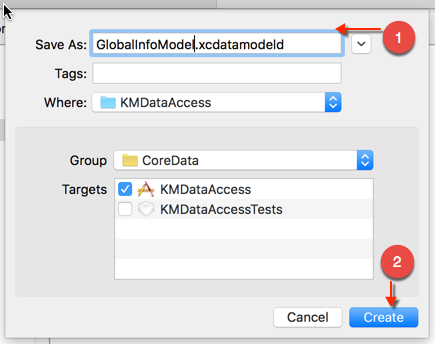
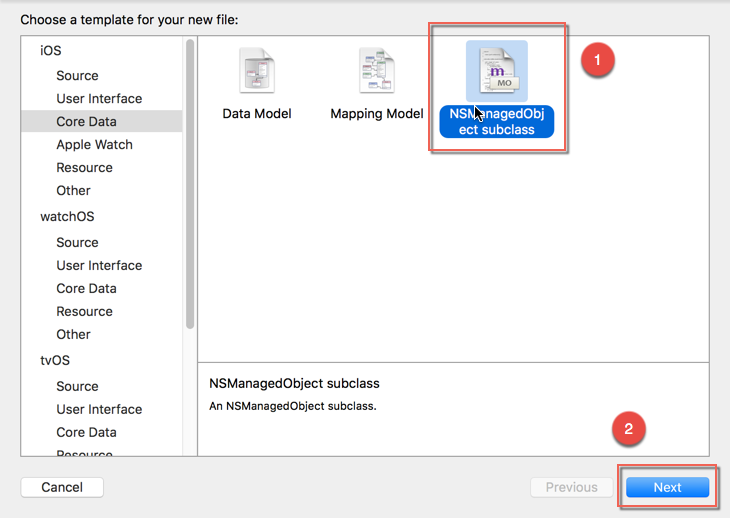
接下来让我们开始实践吧,首先创建被管理对象模型和对应映射实体,关键步骤如下图所示:



在创建完被管理对象模型和对应映射实体后,我们来创建被管理对象上下文,步骤如下:
(1)打开「被管理对象模型」文件,参数为 nil 则打开包中所有模型文件并合并成一个
(2)创建「持久化存储协调器」
(3)为「持久化存储协调器」添加 SQLite 类型的「持久化存储」
(4)创建「被管理对象上下文」,并设置他的「持久化存储协调器」
如何使用:
CoreDataManager.h
 #import <Foundation/Foundation.h>

 #import <CoreData/CoreData.h>

 @interface CoreDataManager : NSObject

 @property (strong, nonatomic) NSManagedObjectContext *context;

 + (CoreDataManager *)sharedManager;

 -(NSManagedObjectContext *)createDBContext:(NSString *)databaseName;

 @end
CoreDataManager.m
 #import "CoreDataManager.h"

 @implementation CoreDataManager

 - (instancetype)init {

     if (self = [super init]) {

         _context = [self createDBContext:kCoreDataDBName];

     }

     return self;

 }

 + (CoreDataManager *)sharedManager {

     static CoreDataManager *manager;

     static dispatch_once_t onceToken;

     dispatch_once(&onceToken, ^{

         manager = [CoreDataManager new];

     });

     return manager;

 }

 -(NSManagedObjectContext *)createDBContext:(NSString *)databaseName {

     // 获取数据库保存路径,通常保存沙盒 Documents 目录下

     NSString *directory = [NSSearchPathForDirectoriesInDomains(NSDocumentDirectory, NSUserDomainMask, YES) firstObject];

     NSString *filePath = [directory stringByAppendingPathComponent:databaseName];

     NSURL *fileURL = [NSURL fileURLWithPath:filePath];

     // 打开「被管理对象模型」文件,参数为 nil 则打开包中所有模型文件并合并成一个

     NSManagedObjectModel *model=[NSManagedObjectModel mergedModelFromBundles:nil];

     // 创建「持久化存储协调器」

     NSPersistentStoreCoordinator *coordinator=[[NSPersistentStoreCoordinator alloc]initWithManagedObjectModel:model];

     // 为「持久化存储协调器」添加 SQLite 类型的「持久化存储」

     NSError *error;

     [coordinator addPersistentStoreWithType:NSSQLiteStoreType

                               configuration:nil

                                         URL:fileURL

                                     options:nil

                                       error:&error];

     // 创建「被管理对象上下文」,并设置他的「持久化存储协调器」

     NSManagedObjectContext *context;

     if (!error) {

         NSLog(@"数据库打开成功");

         context = [NSManagedObjectContext new];

         context.persistentStoreCoordinator = coordinator;

     } else {

         NSLog(@"数据库打开失败,错误信息:%@", error.localizedDescription);

     }

     return context;

     /*

      // Persistent store types supported by Core Data:

      COREDATA_EXTERN NSString * const NSSQLiteStoreType NS_AVAILABLE(10_4, 3_0);

      COREDATA_EXTERN NSString * const NSXMLStoreType NS_AVAILABLE(10_4, NA);

      COREDATA_EXTERN NSString * const NSBinaryStoreType NS_AVAILABLE(10_4, 3_0);

      COREDATA_EXTERN NSString * const NSInMemoryStoreType NS_AVAILABLE(10_4, 3_0);

      */

 }

 @end
CoreDataGlobalInfoService.h
 #import <Foundation/Foundation.h>

 #import <CoreData/CoreData.h>

 #import "GlobalInfoModel.h" // 为了 KMAddRecordViewController 和 KMTableView 统一格式管理,这里引入 GlobalInfoModel(特殊情况特殊处理),一般情况不需要这样做,因为实际上在 CoreData 中已经生成了 GlobalInfo 实体映射来方便我们操作数据库了

 @interface CoreDataGlobalInfoService : NSObject

 @property (strong, nonatomic) NSManagedObjectContext *context;

 + (CoreDataGlobalInfoService *)sharedService;

 - (BOOL)insertGlobalInfo:(GlobalInfoModel *)globalInfo;

 - (BOOL)deleteGlobalInfoByID:(NSNumber *)ID;

 - (BOOL)updateGlobalInfo:(GlobalInfoModel *)globalInfo;

 - (GlobalInfoModel *)getGlobalInfoByID:(NSNumber *)ID;

 - (NSMutableArray *)getGlobalInfoGroup;

 @end
CoreDataGlobalInfoService.m
 #import "CoreDataGlobalInfoService.h"

 #import "CoreDataManager.h"

 #import "GlobalInfo.h"

 static NSString *const kGlobalInfo = @"GlobalInfo";

 @implementation CoreDataGlobalInfoService

 + (CoreDataGlobalInfoService *)sharedService {

     static CoreDataGlobalInfoService *service;

     static dispatch_once_t onceToken;

     dispatch_once(&onceToken, ^{

         service = [CoreDataGlobalInfoService new];

         service.context = [CoreDataManager sharedManager].context;

     });

     return service;

 }

 - (BOOL)insertGlobalInfo:(GlobalInfoModel *)globalInfo {

     BOOL isSuccess = NO;

     // 可以使用 insertNewObjectForEntityForName: 方法创建多个实体,最终只需执行一次 save: 方法就会全提交到数据库了

     GlobalInfo *globalInfoEntity =

     [NSEntityDescription insertNewObjectForEntityForName:kGlobalInfo

                                   inManagedObjectContext:_context];

     globalInfoEntity.customID = globalInfo.ID;

     globalInfoEntity.avatarImageStr = globalInfo.avatarImageStr;

     globalInfoEntity.name = globalInfo.name;

     globalInfoEntity.text = globalInfo.text;

     globalInfoEntity.link = globalInfo.link;

     globalInfoEntity.createdAt = globalInfo.createdAt;

     NSError *error;

     isSuccess = [_context save:&error];

     if (!isSuccess) {

         NSLog(@"插入记录过程出现错误,错误信息:%@", error.localizedDescription);

     }

     return isSuccess;

 }

 - (BOOL)deleteGlobalInfoByID:(NSNumber *)ID {

     BOOL isSuccess = NO;

     GlobalInfo *globalInfoEntity = [self getGlobalInfoEntityByID:ID];

     if (globalInfoEntity) {

         NSError *error;

         [_context deleteObject:globalInfoEntity];

         isSuccess = [_context save:&error];

         if (!isSuccess) {

             NSLog(@"删除记录过程出现错误,错误信息:%@", error.localizedDescription);

         }

     }

     return isSuccess;

 }

 - (BOOL)updateGlobalInfo:(GlobalInfoModel *)globalInfo {

     BOOL isSuccess = NO;

     GlobalInfo *globalInfoEntity = [self getGlobalInfoEntityByID:globalInfo.ID];

     if (globalInfoEntity) {

         NSError *error;

         globalInfoEntity.avatarImageStr = globalInfo.avatarImageStr;

         globalInfoEntity.name = globalInfo.name;

         globalInfoEntity.text = globalInfo.text;

         globalInfoEntity.link = globalInfo.link;

         globalInfoEntity.createdAt = globalInfo.createdAt;

         isSuccess = [_context save:&error];

         if (!isSuccess) {

             NSLog(@"修改记录过程出现错误,错误信息:%@", error.localizedDescription);

         }

     }

     return isSuccess;

 }

 - (GlobalInfoModel *)getGlobalInfoByID:(NSNumber *)ID {

     GlobalInfoModel *globalInfo;

     GlobalInfo *globalInfoEntity = [self getGlobalInfoEntityByID:ID];

     if (globalInfoEntity) {

         globalInfo = [[GlobalInfoModel alloc]

                       initWithAvatarImageStr:globalInfoEntity.avatarImageStr

                       name:globalInfoEntity.name

                       text:globalInfoEntity.text

                       link:globalInfoEntity.link

                       createdAt:globalInfoEntity.createdAt

                       ID:globalInfoEntity.customID];

     }

     return globalInfo;

 }

 - (NSMutableArray *)getGlobalInfoGroup {

     NSMutableArray *mArrResult = [[NSMutableArray alloc] initWithCapacity:];

     NSFetchRequest *request = [NSFetchRequest fetchRequestWithEntityName:kGlobalInfo];

     //request.fetchLimit = 2; // 读取返回记录数限制

     //request.fetchOffset = 2; // 读取偏移量;默认值为0,表示不偏移;比如设置为2,表示前两条记录就不被读取了

     NSError *error;

     NSArray *arrResult = [_context executeFetchRequest:request

                                                  error:&error];

     if (!error) {

         for (GlobalInfo *globalInfoEntity in arrResult) {

             GlobalInfoModel *globalInfo = [[GlobalInfoModel alloc]

                                            initWithAvatarImageStr:globalInfoEntity.avatarImageStr

                                            name:globalInfoEntity.name

                                            text:globalInfoEntity.text

                                            link:globalInfoEntity.link

                                            createdAt:globalInfoEntity.createdAt

                                            ID:globalInfoEntity.customID];

             [mArrResult addObject:globalInfo];

         }

     } else {

         NSLog(@"查询记录过程出现错误,错误信息:%@", error.localizedDescription);

     }

     return mArrResult;

 }

 #pragma mark - Private Method

 - (GlobalInfo *)getGlobalInfoEntityByID:(NSNumber *)ID {

     GlobalInfo *globalInfoEntity;

     NSFetchRequest *request = [NSFetchRequest fetchRequestWithEntityName:kGlobalInfo];

     // 使用谓词查询是基于 Keypath 查询的,如果键是一个变量,格式化字符串时需要使用 %K 而不是 %@

     request.predicate = [NSPredicate predicateWithFormat:@"%K=%@", @"customID", ID];

     NSError *error;

     NSArray *arrResult = [_context executeFetchRequest:request

                                                  error:&error];

     if (!error) {

         globalInfoEntity = [arrResult firstObject];

     } else {

         NSLog(@"查询记录过程出现错误,错误信息:%@", error.localizedDescription);

     }

     return globalInfoEntity;

 }

 @end
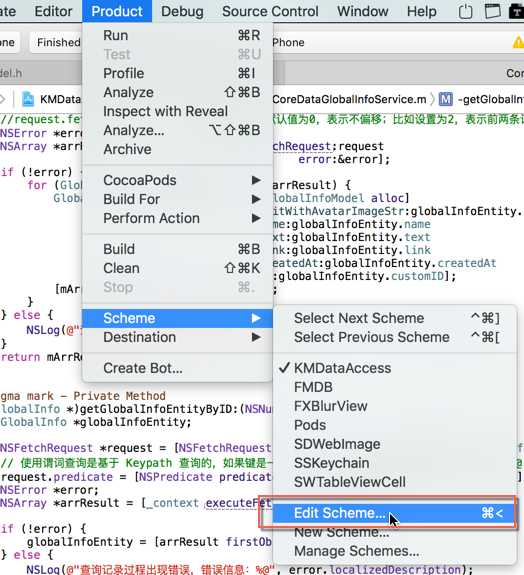
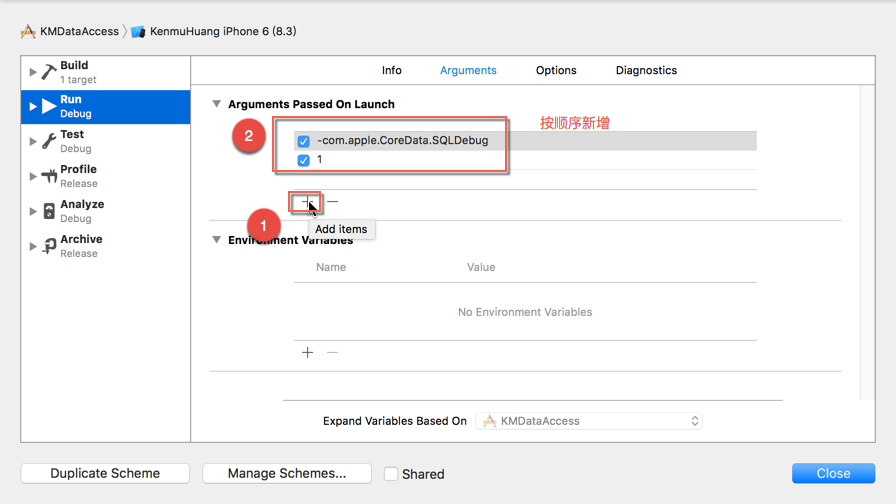
在 CoreData 中,为了更清晰地看到数据库层面的交互语句,我们可以开启 CoreData 的 SQL 调试功能:
在 「Product」-「Scheme」-「Edit Scheme...」-「Run」菜单下的「Arguments」中的「Arguments Passed On Launch」下按先后顺序新增两个项,内容分别为「-com.apple.CoreData.SQLDebug」和「1」

在 CoreData 生成的数据库相关文件中,以下三种文件对应的含义:
http://www.sqlite.org/fileformat2.html#walindexformat
databaseName.db:数据库文件
databaseName.db-shm「Shared Memory」:数据库预写式日志索引文件
databaseName.db-wal「Write-Ahead Log」:数据库预写式日志文件


2.7 FMDB
在使用过 SQLite 和 CoreData 之后,我们会发现 SQLite 由于是基于 C 语言开发的轻型数据库,他不像直接使用 ObjC 语言访问对象那么方便,而且他在数据库并发操作安全性方面也需要我们使用多线程技术去实现,比较繁琐。
然而使用 CoreData 这样的 ORM 框架虽然相比操作方便,但跟大多数语言的 ORM 框架一样,他在大量数据处理时性能方面并不够好(普通场景下用着还算爽)。
那么有没比较好的解决方案?这里我们会考虑使用第三方库「FMDB」
前面介绍 SQLite 时,会看到我们在 SQLiteManager 类中对 SQLite 方面的操作进行了简单封装。其实 FMDB 也是对 SQLite 方面的操作进行了封装,但他考虑得更全面更易用,有以下几个特点:
(1)封装为面向 ObjC 语言的类和方法,调用方便
(2)提供一系列用于列数据转换的方法
(3)结合多线程技术实现安全的数据库并发操作
(4)事务操作更方便
在 FMDB 中,有三大核心类:
「FMDatabase」:代表单一的 SQLite 数据库,他有对应方法用于执行 SQL 语句,他是线程不安全的。
「FMResultSet」:代表「FMDatabase」执行 SQL 语句返回的结果集。
「FMDatabaseQueue」:代表数据库队列,用于在多线程中执行查询和更新等操作,他是线程安全的。
「FMDatabase」生成的 SQLite 数据库文件的存放路径,databaseWithPath 方法参数值有如下三种:
(1)文件系统路径;指沙盒目录下的路径,如果数据库文件在此路径下不存在,他会被自动创建
(2)空字符串「@""」;在临时目录创建一个空数据库文件;当数据库连接关闭后,他会被自动删除
(3)NULL;在内存空间创建一个空数据库文件;当数据库连接关闭后,他会被自动销毁回收
FMDatabase *db = [FMDatabase databaseWithPath:@"/tmp/tmp.db"];
如何使用:
FMDBManager.h
 #import <Foundation/Foundation.h>

 @interface FMDBManager : NSObject

 + (FMDBManager *)sharedManager;

 - (void)openDB:(NSString *)databaseName;

 - (BOOL)executeNonQuery:(NSString *)sql withArgumentsInArray:(NSArray *)argumentsInArray;

 - (NSArray *)executeQuery:(NSString *)sql withArgumentsInArray:(NSArray *)argumentsInArray withDateArgumentsInArray:(NSArray *)dateArgumentsInArray;

 @end
FMDBManager.m
 #import "FMDBManager.h"

 #import "FMDatabase.h"

 @implementation FMDBManager {

     FMDatabase *_database;

 }

 - (instancetype)init {

     if (self = [super init]) {

         [self openDB:kFMDBDBName];

     }

     return self;

 }

 + (FMDBManager *)sharedManager {

     static FMDBManager *manager;

     static dispatch_once_t onceToken;

     dispatch_once(&onceToken, ^{

         manager = [FMDBManager new];

     });

     return manager;

 }

 - (void)openDB:(NSString *)databaseName {

     // 获取数据库保存路径,通常保存沙盒 Documents 目录下

     NSString *directory = [NSSearchPathForDirectoriesInDomains(NSDocumentDirectory, NSUserDomainMask, YES) firstObject];

     NSString *filePath = [directory stringByAppendingPathComponent:databaseName];

     // 打开数据库;如果数据库存在就直接打开,否则进行数据库创建并打开

     _database = [FMDatabase databaseWithPath:filePath];

     NSLog(@"数据库打开%@", [_database open] ? @"成功" : @"失败");

 }

 - (BOOL)executeNonQuery:(NSString *)sql withArgumentsInArray:(NSArray *)argumentsInArray {

     BOOL isSuccess = [_database executeUpdate:sql withArgumentsInArray:argumentsInArray];

     if (!isSuccess) {

         NSLog(@"执行sql语句过程中出现错误");

     }

     return isSuccess;

 }

 - (NSArray *)executeQuery:(NSString *)sql withArgumentsInArray:(NSArray *)argumentsInArray withDateArgumentsInArray:(NSArray *)dateArgumentsInArray {

     NSMutableArray *mArrResult = [NSMutableArray array];

     FMResultSet *resultSet = [_database executeQuery:sql withArgumentsInArray:argumentsInArray];

     while (resultSet.next) {

         NSMutableDictionary *mDicResult = [NSMutableDictionary dictionary];

         for (int i=, columnCount=resultSet.columnCount; i<columnCount; i++) {

             NSString *columnName = [resultSet columnNameForIndex:i];

             // 对时间类型数据进行合适的转换

             if ([dateArgumentsInArray indexOfObject:columnName] != NSNotFound) {

                 mDicResult[columnName] = [resultSet dateForColumnIndex:i];

             } else {

                mDicResult[columnName] = [resultSet stringForColumnIndex:i];

             }

         }

         [mArrResult addObject:mDicResult];

     }

     return mArrResult;

     /*

      一系列用于列数据转换的方法:

      intForColumn:

      longForColumn:

      longLongIntForColumn:

      boolForColumn:

      doubleForColumn:

      stringForColumn:

      dateForColumn:

      dataForColumn:

      dataNoCopyForColumn:

      UTF8StringForColumnName:

      objectForColumnName:

      */

 }

 @end
FMDBDBCreator.h
 #import <Foundation/Foundation.h>

 @interface FMDBDBCreator : NSObject

 + (void)createDB;

 @end
FMDBDBCreator.m
 #import "FMDBDBCreator.h"

 #import "FMDBManager.h"

 @implementation FMDBDBCreator

 #pragma mark - Private Method

 + (void)createTable {

     NSString *sql = [NSString stringWithFormat:@"CREATE TABLE GlobalInfo(ID integer PRIMARY KEY AUTOINCREMENT, %@ text, %@ text, \"%@\" text, %@ text, %@ date)", kAvatarImageStr, kName, kText, kLink, kCreatedAt];

     [[FMDBManager sharedManager] executeNonQuery:sql withArgumentsInArray:nil];

 }

 #pragma mark - Public Method

 + (void)createDB {

     // 使用偏好设置保存「是否已经初始化数据库表」的键值;避免重复创建

     NSString *const isInitializedTableStr = @"IsInitializedTableForFMDB";

     NSUserDefaults *userDefaults = [NSUserDefaults standardUserDefaults];

     if (![userDefaults boolForKey:isInitializedTableStr]) {

         [self createTable];

         [userDefaults setBool:YES forKey:isInitializedTableStr];

     }

 }

 @end
FMDBGlobalInfoService.h
 #import <Foundation/Foundation.h>

 #import "GlobalInfoModel.h"

 @interface FMDBGlobalInfoService : NSObject

 + (FMDBGlobalInfoService *)sharedService;

 - (BOOL)insertGlobalInfo:(GlobalInfoModel *)globalInfo;

 - (BOOL)deleteGlobalInfoByID:(NSNumber *)ID;

 - (BOOL)updateGlobalInfo:(GlobalInfoModel *)globalInfo;

 - (GlobalInfoModel *)getGlobalInfoByID:(NSNumber *)ID;

 - (NSMutableArray *)getGlobalInfoGroup;

 @end
FMDBGlobalInfoService.m
 #import "FMDBGlobalInfoService.h"

 #import "FMDBManager.h"

 #import "FMDBDBCreator.h"

 @implementation FMDBGlobalInfoService

 + (FMDBGlobalInfoService *)sharedService {

     static FMDBGlobalInfoService *service;

     static dispatch_once_t onceToken;

     dispatch_once(&onceToken, ^{

         service = [FMDBGlobalInfoService new];

         [FMDBDBCreator createDB];

     });

     return service;

 }

 - (BOOL)insertGlobalInfo:(GlobalInfoModel *)globalInfo {

     NSArray *arrArgument = @[

                              globalInfo.avatarImageStr,

                              globalInfo.name,

                              globalInfo.text,

                              globalInfo.link,

                              globalInfo.createdAt

                              ];

     NSString *sql = [NSString

                      stringWithFormat:

                      @"INSERT INTO GlobalInfo(%@, %@, %@, %@, %@) VALUES(?, ?, ?, ?, ?)",

                      kAvatarImageStr, kName, kText, kLink, kCreatedAt];

     return [[FMDBManager sharedManager] executeNonQuery:sql

                                    withArgumentsInArray:arrArgument];

 }

 - (BOOL)deleteGlobalInfoByID:(NSNumber *)ID {

     NSString *sql =

     [NSString stringWithFormat:@"DELETE FROM GlobalInfo WHERE %@=?", kID];

     return [[FMDBManager sharedManager] executeNonQuery:sql

                                    withArgumentsInArray:@[ ID ]];

 }

 - (BOOL)updateGlobalInfo:(GlobalInfoModel *)globalInfo {

     NSArray *arrArgument = @[

                              globalInfo.avatarImageStr,

                              globalInfo.name,

                              globalInfo.text,

                              globalInfo.link,

                              globalInfo.createdAt,

                              globalInfo.ID

                              ];

     NSString *sql = [NSString

                      stringWithFormat:

                      @"UPDATE GlobalInfo SET %@=?, %@=?, %@=?, %@=?, %@=? WHERE %@=?",

                      kAvatarImageStr, kName, kText, kLink, kCreatedAt, kID];

     return [[FMDBManager sharedManager] executeNonQuery:sql

                                    withArgumentsInArray:arrArgument];

 }

 - (GlobalInfoModel *)getGlobalInfoByID:(NSNumber *)ID {

     GlobalInfoModel *globalInfo;

     NSString *sql = [NSString

                      stringWithFormat:@"SELECT %@, %@, %@, %@, %@ FROM GlobalInfo WHERE %@=?",

                      kAvatarImageStr, kName, kText, kLink, kCreatedAt, kID];

     NSArray *arrResult = [[FMDBManager sharedManager] executeQuery:sql

                                               withArgumentsInArray:@[ ID ]

                                           withDateArgumentsInArray:@[ kCreatedAt ]];

     if (arrResult && arrResult.count > ) {

         globalInfo = [[GlobalInfoModel alloc] initWithDictionary:arrResult[]];

     }

     return globalInfo;

 }

 - (NSMutableArray *)getGlobalInfoGroup {

     NSMutableArray *mArrResult = [[NSMutableArray alloc] initWithCapacity:];

     NSString *sql = [NSString

                      stringWithFormat:@"SELECT %@, %@, %@, %@, %@, %@ FROM GlobalInfo", kID,

                      kAvatarImageStr, kName, kText, kLink, kCreatedAt];

     NSArray *arrResult =

     [[FMDBManager sharedManager] executeQuery:sql

                          withArgumentsInArray:nil

                      withDateArgumentsInArray:@[ kCreatedAt ]];

     if (arrResult && arrResult.count > ) {

         for (NSDictionary *dicResult in arrResult) {

             [mArrResult

              addObject:[[GlobalInfoModel alloc] initWithDictionary:dicResult]];

         }

     }

     return mArrResult;

 }

 @end
3. 扩展知识
3.1 模糊背景效果的实现
使用 FXBlurView 库对于 UIImage 的分类扩展方法 blurredImageWithRadius:
https://github.com/nicklockwood/FXBlurView
 // 模糊背景效果

 // 早上、黄昏、午夜、黎明;这里随机选择某张图片作为背景

 // 当然其他做法如:根据当前时间归属一天的某个时间段,选择对应相关的图片作为背景也是可以的

 NSArray *arrBlurImageName = @[ @"blur_morning",

                                @"blur_nightfall",

                                @"blur_midnight",

                                @"blur_midnight_afternoon" ];

 NSInteger randomVal = arc4random() % [arrBlurImageName count];

 UIImage *img = [UIImage imageNamed:arrBlurImageName[randomVal]];

 // 这里使用 FXBlurView 库对于 UIImage 的分类扩展方法 blurredImageWithRadius:,

 // blurredImageWithRadius: 模糊效果半径范围

 // iterations: 重复渲染迭代次数;最低次数值需要为1,值越高表示质量越高

 // tintColor: 原图混合颜色效果;可选操作,注意颜色的透明度会自动被忽略

 img = [img blurredImageWithRadius:5.0

                        iterations:

                         tintColor:nil];

 UIImageView *imgV = [[UIImageView alloc] initWithFrame:kFrameOfMainScreen];

 imgV.image = img;

 [self addSubview:imgV];
3.2 密码保护功能的实现
首先,创建密码保护自定义窗口 PasswordInputWindow,继承自 UIWindow,当他需要显示时,设置为主要窗口并且可见;在多个 UIWindow 显示的情况下,也可以通过 windowLevel 属性控制窗口层级显示优先级
然后,在 AppDelegate 生命周期中的以下两个地方控制他的显示:
 // App 启动之后执行,只有在第一次启动后才执行,以后不再执行

 - (BOOL)application:(UIApplication *)application didFinishLaunchingWithOptions:(NSDictionary *)launchOptions {

     ...

     [[PasswordInputWindow sharedInstance] show];

     return YES;

 }

 // App 将要进入前台时执行

 - (void)applicationWillEnterForeground:(UIApplication *)application {

     ...

     PasswordInputWindow *passwordInputWindow = [PasswordInputWindow sharedInstance];

     if (![passwordInputWindow isHaveLogined]) {

         [passwordInputWindow show];

     }

 }
最后,通过时间点对比的方式判断用户是否长期没操作,如果达到预定时间间隔没操作,当再次进入前台时就启动密码保护功能,在 AppDelegate 生命周期中的以下两个地方控制他的时效:(有的方式是使用 Timer 计时器控制他的时效,对于这种不需要实时执行操作的需求来说,就没有必要了,浪费资源)
 @interface AppDelegate () {

     NSDate *_dateOfEnterBackground;

 }

 @end

 @implementation AppDelegate

 // App 已经进入后台时执行

 - (void)applicationDidEnterBackground:(UIApplication *)application {

     _dateOfEnterBackground = [DateHelper localeDate];

 }

 // App 将要进入前台时执行

 - (void)applicationWillEnterForeground:(UIApplication *)application {

     NSDate *localeDate = [DateHelper localeDate];

     // 这里设置为5秒用于测试;实际上合理场景应该是60 * 5 = 5分钟或者更长时间

     _dateOfEnterBackground = [_dateOfEnterBackground dateByAddingTimeInterval: * ];

     PasswordInputWindow *passwordInputWindow = [PasswordInputWindow sharedInstance];

     // 规定的一段时间没操作,就自动注销登录

     if ([localeDate compare:_dateOfEnterBackground] == NSOrderedDescending) {

         [passwordInputWindow loginOut];

     }

     if (![passwordInputWindow isHaveLogined]) {

         [passwordInputWindow show];

     }

 }

 @end
4. 其他关键代码
KMDatePicker 模块,请查看这篇随笔:自定义支持多种格式可控范围的时间选择器控件
PrefixHeader.pch
 // ***********************仅仅让支持 Objective-C 语言的文件调用***********************

 #ifdef __OBJC__

 #define kTitleOfPList @"plist 文件「属性列表」"

 #define kTitleOfPreference @"preference「偏好设置」"

 #define kTitleOfNSKeyedArchiver @"NSKeyedArchiver「归档」"

 #define kTitleOfKeychain @"Keychain「钥匙串」"

 #define kTitleOfSQLite @"SQLite"

 #define kTitleOfCoreData @"CoreData"

 #define kTitleOfFMDB @"FMDB"

 #define kPListName @"GlobalInfo.plist"

 #define kNSKeyedArchiverName @"GlobalInfo.data"

 #define kSQLiteDBName @"SQLiteDB.db"

 #define kCoreDataDBName @"CoreDataDB.db"

 #define kFMDBDBName @"FMDBDB.db"

 #define kID @"ID"

 #define kAvatarImageStr @"avatarImageStr"

 #define kName @"name"

 #define kText @"text"

 #define kLink @"link"

 #define kCreatedAt @"createdAt"

 #define kHaveLink @"haveLink"

 #define kBlogImageStr @"http://pic.cnblogs.com/avatar/66516/20150521204639.png"

 #define kApplication [UIApplication sharedApplication]

 // *********************** iOS 通用宏定义内容 begin

 // iOS 版本

 #define kOSVersion [[[UIDevice currentDevice] systemVersion] floatValue]

 // App 显示名称

 #define kAppDisplayName [[NSBundle mainBundle] objectForInfoDictionaryKey:@"CFBundleDisplayName"]

 // 当前语言

 #define kLocaleLanguage [[NSLocale preferredLanguages] objectAtIndex:0]

 // 是否是 iPhone

 #define kIsPhone UI_USER_INTERFACE_IDIOM() == UIUserInterfaceIdiomPhone

 // 是否是 iPad

 #define kIsPad UI_USER_INTERFACE_IDIOM() == UIUserInterfaceIdiomPad

 // 判断机型;根据屏幕分辨率区别「像素」=屏幕大小「点素」*屏幕模式「iPhone 4开始比例就为2x」

 #define funcIsMatchingSize(width,height) [UIScreen instancesRespondToSelector:@selector(currentMode)] ? CGSizeEqualToSize(CGSizeMake(width, height), [[UIScreen mainScreen] currentMode].size) : NO

 #define kIsPhone4 funcIsMatchingSize(640.0,960.0)

 #define kIsPhone5 funcIsMatchingSize(640.0,1136.0)

 #define kIsPhone6 funcIsMatchingSize(750.0,1334.0)

 #define kIsPhone6Plus funcIsMatchingSize(1242.0,2208.0)

 // 高度:状态栏、导航栏、状态栏和导航栏、选项卡、表格单元格、英国键盘、中国键盘

 #define kHeightOfStatus 20.0

 #define kHeightOfNavigation 44.0

 #define kHeightOfStatusAndNavigation 64.0

 #define kHeightOfTabBar 49.0

 #define kHeightOfCell 44.0

 #define kHeightOfEnglishKeyboard 216.0

 #define kHeightOfChineseKeyboard 252.0

 // 屏幕大小

 #define kFrameOfMainScreen [[UIScreen mainScreen] bounds]

 #define kWidthOfMainScreen kFrameOfMainScreen.size.width

 #define kHeightOfMainScreen kFrameOfMainScreen.size.height

 #define kAbsoluteHeightOfMainScreen kHeightOfMainScreen - kHeightOfStatusAndNavigation

 // 去除状态栏后的屏幕大小

 #define kFrameOfApplicationFrame [[UIScreen mainScreen] applicationFrame]

 #define kWidthOfApplicationFrame kFrameOfApplicationFrame.size.width

 #define kHeightOfApplicationFrame kFrameOfApplicationFrame.size.height

 // View 的坐标(x, y)和宽高(width, height)

 #define funcX(v) (v).frame.origin.x

 #define funcY(v) (v).frame.origin.y

 #define funcWidth(v) (v).frame.size.width

 #define funcHeight(v) (v).frame.size.height

 // View 的坐标(x, y):视图起始点、视图中间点、视图终止点(视图起始点和视图宽高)

 #define funcMinX(v) CGRectGetMinX((v).frame)

 #define funcMinY(v) CGRectGetMinY((v).frame)

 #define funcMidX(v) CGRectGetMidX((v).frame)

 #define funcMidY(v) CGRectGetMidY((v).frame)

 #define funcMaxX(v) CGRectGetMaxX((v).frame)

 #define funcMaxY(v) CGRectGetMaxY((v).frame)

 // 文件路径

 #define funcFilePath(fileName,type) [[NSBundle mainBundle] pathForResource:[NSString stringWithUTF8String:(fileName)] ofType:(type)]

 // 读取图片

 #define funcImage(fileName,type) [UIImage imageWithContentsOfFile:funcFilePath(fileName,type)]

 // *********************** iOS 通用宏定义内容 end

 #endif
PasswordInputWindow.h
 #import <UIKit/UIKit.h>

 /**

  *  密码保护自定义窗口

  */

 @interface PasswordInputWindow : UIWindow

 + (PasswordInputWindow *)sharedInstance;

 - (void)show;

 - (BOOL)isHaveLogined;

 - (void)loginIn;

 - (void)loginOut;

 @end
PasswordInputWindow.m
 #import "PasswordInputWindow.h"

 #import "FXBlurView.h"

 static NSString *const isLoginedStr = @"IsLogined";

 @implementation PasswordInputWindow {

     UITextField *_txtFPassword;

 }

 - (instancetype)initWithFrame:(CGRect)frame {

     self = [super initWithFrame:frame];

     if (self) {

         // 模糊背景效果

         // 早上、黄昏、午夜、黎明;这里随机选择某张图片作为背景

         // 当然其他做法如:根据当前时间归属一天的某个时间段,选择对应相关的图片作为背景也是可以的

         NSArray *arrBlurImageName = @[ @"blur_morning",

                                        @"blur_nightfall",

                                        @"blur_midnight",

                                        @"blur_midnight_afternoon" ];

         NSInteger randomVal = arc4random() % [arrBlurImageName count];

         UIImage *img = [UIImage imageNamed:arrBlurImageName[randomVal]];

         // 这里使用 FXBlurView 库对于 UIImage 的分类扩展方法 blurredImageWithRadius:,

         // blurredImageWithRadius: 模糊效果半径范围

         // iterations: 重复渲染迭代次数;最低次数值需要为1,值越高表示质量越高

         // tintColor: 原图混合颜色效果;可选操作,注意颜色的透明度会自动被忽略

         img = [img blurredImageWithRadius:5.0

                                iterations:

                                 tintColor:nil];

         UIImageView *imgV = [[UIImageView alloc] initWithFrame:kFrameOfMainScreen];

         imgV.image = img;

         [self addSubview:imgV];

         // 密码输入文本框

         CGPoint pointCenter = CGPointMake(CGRectGetMidX(kFrameOfMainScreen), CGRectGetMidY(kFrameOfMainScreen));

         _txtFPassword = [[UITextField alloc] initWithFrame:CGRectMake(0.0, 0.0, 320.0, 40.0)];

         _txtFPassword.center = pointCenter;

         _txtFPassword.borderStyle = UITextBorderStyleRoundedRect;

         _txtFPassword.contentVerticalAlignment = UIControlContentVerticalAlignmentCenter;

         _txtFPassword.placeholder = @"请输入密码";

         _txtFPassword.secureTextEntry = YES;

         _txtFPassword.clearButtonMode = UITextFieldViewModeWhileEditing;

         [self addSubview:_txtFPassword];

         // 确定按钮

         UIButton *btnOK = [[UIButton alloc] initWithFrame:CGRectMake(0.0, 0.0, 300.0, 40.0)];

         pointCenter.y += 50.0;

         btnOK.center = pointCenter;

         [btnOK setTitle:@"确定" forState:UIControlStateNormal];

         [btnOK setTitleColor:[UIColor whiteColor] forState:UIControlStateNormal];

         btnOK.backgroundColor = [UIColor colorWithRed:0.400 green:0.800 blue:1.000 alpha:1.000];

         [btnOK addTarget:self

                   action:@selector(btnOKPressed:)

         forControlEvents:UIControlEventTouchUpInside];

         btnOK.layer.borderColor = [UIColor colorWithRed:0.354 green:0.707 blue:0.883 alpha:1.000].CGColor;

         btnOK.layer.borderWidth = 1.0;

         btnOK.layer.masksToBounds = YES;

         btnOK.layer.cornerRadius = 5.0;

         [self addSubview:btnOK];

         // 点击手势控制隐藏键盘

         UITapGestureRecognizer *tapGestureRecognizer = [[UITapGestureRecognizer alloc] initWithTarget:self action:@selector(hideKeyboard:)];

         [self addGestureRecognizer:tapGestureRecognizer];

     }

     return self;

 }

 - (void)btnOKPressed:(UIButton *)btnOK {

     if ([_txtFPassword.text isEqualToString:@""]) {

         _txtFPassword.text = @"";

         [_txtFPassword resignFirstResponder];

         [self resignKeyWindow];

         self.hidden = YES;

         [self loginIn];

     } else {

         UIAlertView *alertV = [[UIAlertView alloc] initWithTitle:@"提示信息"

                                                          message:@"密码错误,正确密码是123"

                                                         delegate:nil

                                                cancelButtonTitle:nil

                                                otherButtonTitles:@"确定", nil];

         [alertV show];

     }

 }

 - (void)hideKeyboard:(id)sender {

     // 多个控件的情况下,可以用 [self endEditing:YES];

     [_txtFPassword resignFirstResponder];

 }

 + (PasswordInputWindow *)sharedInstance {

     static PasswordInputWindow *sharedInstance;

     static dispatch_once_t onceToken;

     dispatch_once(&onceToken, ^{

         sharedInstance = [[PasswordInputWindow alloc] initWithFrame:kFrameOfMainScreen];

     });

     return sharedInstance;

 }

 - (void)show {

     /*

      // 窗口层级;层级值越大,越上层,就是覆盖在上面;可以设置的层级值不止以下三种,因为 UIWindowLevel 其实是 CGFloat 类型

      self.windowLevel = UIWindowLevelAlert;

      typedef CGFloat UIWindowLevel;

      UIKIT_EXTERN const UIWindowLevel UIWindowLevelNormal; // 默认配置;值为0.0

      UIKIT_EXTERN const UIWindowLevel UIWindowLevelAlert; // 弹出框;值为2000.0

      UIKIT_EXTERN const UIWindowLevel UIWindowLevelStatusBar __TVOS_PROHIBITED; // 状态栏;值为1000.0

      */

     [self makeKeyWindow];

     self.hidden = NO;

 }

 #pragma mark - NSUserDefaults

 - (BOOL)isHaveLogined {

     //使用偏好设置判断「是否已经登录」

     return [[NSUserDefaults standardUserDefaults] boolForKey:isLoginedStr];

 }

 - (void)loginIn {

     [[NSUserDefaults standardUserDefaults] setBool:YES forKey:isLoginedStr];

 }

 - (void)loginOut {

     [[NSUserDefaults standardUserDefaults] setBool:NO forKey:isLoginedStr];

 }

 @end
AppDelegate.h
 #import <UIKit/UIKit.h>

 @interface AppDelegate : UIResponder <UIApplicationDelegate>

 @property (strong, nonatomic) UIWindow *window;

 @property (strong, nonatomic) UINavigationController *navigationController;

 @property (assign, nonatomic) UIBackgroundTaskIdentifier backgroundTaskIdentifier;

 @end
AppDelegate.m
 #import "AppDelegate.h"

 #import "ViewController.h"

 #import "PasswordInputWindow.h"

 #import "DateHelper.h"

 @interface AppDelegate () {

     NSDate *_dateOfEnterBackground;

 }

 - (void)beginBackgroundUpdateTask;

 - (void)longtimeToHandleSomething;

 - (void)endBackgroundUpdateTask;

 @end

 @implementation AppDelegate

 - (BOOL)application:(UIApplication *)application didFinishLaunchingWithOptions:(NSDictionary *)launchOptions {

     _window = [[UIWindow alloc] initWithFrame:[[UIScreen mainScreen] bounds]];

     ViewController *viewController = [[ViewController alloc]

                                       initWithSampleNameArray:@[ kTitleOfPList,

                                                                  kTitleOfPreference,

                                                                  kTitleOfNSKeyedArchiver,

                                                                  kTitleOfKeychain,

                                                                  kTitleOfSQLite,

                                                                  kTitleOfCoreData,

                                                                  kTitleOfFMDB ]];

     _navigationController = [[UINavigationController alloc] initWithRootViewController:viewController];

     _window.rootViewController = _navigationController;

     [_window makeKeyAndVisible];

     [[PasswordInputWindow sharedInstance] show];

     return YES;

 }

 - (void)applicationWillResignActive:(UIApplication *)application {

 }

 - (void)applicationDidEnterBackground:(UIApplication *)application {

     [self beginBackgroundUpdateTask];

     [self longtimeToHandleSomething];

     [self endBackgroundUpdateTask];

 }

 - (void)applicationWillEnterForeground:(UIApplication *)application {

     NSDate *localeDate = [DateHelper localeDate];

     // 这里设置为5秒用于测试;实际上合理场景应该是60 * 5 = 5分钟或者更长时间

     _dateOfEnterBackground = [_dateOfEnterBackground dateByAddingTimeInterval: * ];

     PasswordInputWindow *passwordInputWindow = [PasswordInputWindow sharedInstance];

     // 规定的一段时间没操作,就自动注销登录

     if ([localeDate compare:_dateOfEnterBackground] == NSOrderedDescending) {

         [passwordInputWindow loginOut];

     }

     if (![passwordInputWindow isHaveLogined]) {

         [passwordInputWindow show];

     }

 }

 - (void)applicationDidBecomeActive:(UIApplication *)application {

 }

 - (void)applicationWillTerminate:(UIApplication *)application {

 }

 #pragma mark - backgroundTask

 - (void)beginBackgroundUpdateTask {

     _backgroundTaskIdentifier = [kApplication beginBackgroundTaskWithExpirationHandler:^{

         [self endBackgroundUpdateTask];

     }];

 }

 - (void)longtimeToHandleSomething {

     _dateOfEnterBackground = [DateHelper localeDate];

     NSLog(@"默认情况下,当 App 被按 Home 键退出进入后台挂起前,应用仅有最多5秒时间做一些保存或清理资源的工作。");

     NSLog(@"beginBackgroundTaskWithExpirationHandler 方法让 App 最多有10分钟时间在后台长久运行。这个时间可以用来清理本地缓存、发送统计数据等工作。");

 //    for (NSInteger i=0; i<1000; i++) {

 //        sleep(1);

 //        NSLog(@"后台长久运行做一些事情%ld", (long)i);

 //    }

 }

 - (void)endBackgroundUpdateTask {

     [kApplication endBackgroundTask:_backgroundTaskIdentifier];

     _backgroundTaskIdentifier = UIBackgroundTaskInvalid;

 }

 @end
EnumKMDataAccessFunction.h
 typedef NS_ENUM(NSUInteger, KMDataAccessFunction) {

     KMDataAccessFunctionPList,

     KMDataAccessFunctionPreference,

     KMDataAccessFunctionNSKeyedArchiver,

     KMDataAccessFunctionKeychain,

     KMDataAccessFunctionSQLite,

     KMDataAccessFunctionCoreData,

     KMDataAccessFunctionFMDB

 };
KMTableViewCell.h
 #import <UIKit/UIKit.h>

 #import "SWTableViewCell.h"

 @interface KMTableViewCell : SWTableViewCell

 @property (strong, nonatomic) IBOutlet UIImageView *imgVAvatarImage;

 @property (strong, nonatomic) IBOutlet UILabel *lblName;

 @property (strong, nonatomic) IBOutlet UILabel *lblCreatedAt;

 @property (strong, nonatomic) IBOutlet UIImageView *imgVLink;

 @property (strong, nonatomic) UILabel *lblText;

 @property (copy, nonatomic) NSString *avatarImageStr;

 @property (copy, nonatomic) NSString *name;

 @property (copy, nonatomic) NSString *text;

 @property (strong, nonatomic) NSDate *createdAt;

 @property (assign, nonatomic, getter=isHaveLink) BOOL haveLink;

 @end
KMTableViewCell.m
 #import "KMTableViewCell.h"

 #import "UIImageView+WebCache.h"

 #import "DateHelper.h"

 static UIImage *placeholderImage;

 static CGFloat widthOfLabel;

 @implementation KMTableViewCell

 - (void)awakeFromNib {

     // Initialization code

     static dispatch_once_t onceToken;

     dispatch_once(&onceToken, ^{

         placeholderImage = [UIImage imageNamed:@"JSON"];

         widthOfLabel = [[UIScreen mainScreen] bounds].size.width - 100.0;

     });

     _imgVAvatarImage.layer.masksToBounds = YES;

     _imgVAvatarImage.layer.cornerRadius = 10.0;

     // 由于 xib 中对标签自适应宽度找不到合适的方式来控制,所以这里用代码编写;这里屏幕复用的 Cell 有几个,就会执行几次 awakeFromNib 方法

     _lblText = [[UILabel alloc] initWithFrame:CGRectMake(90.0, 23.0, widthOfLabel, 42.0)];

     _lblText.numberOfLines = ;

     _lblText.font = [UIFont systemFontOfSize:12.0];

     [self addSubview:_lblText];

     [self sendSubviewToBack:_lblText]; // 把视图置于底层;避免遮住左右手势滑动出现的「实用按钮」

 }

 - (void)setSelected:(BOOL)selected animated:(BOOL)animated {

     [super setSelected:selected animated:animated];

     // Configure the view for the selected state

 }

 - (void)setAvatarImageStr:(NSString *)avatarImageStr {

     if (![_avatarImageStr isEqualToString:avatarImageStr]) {

         _avatarImageStr = [avatarImageStr copy];

         NSURL *avatarImageURL = [NSURL URLWithString:_avatarImageStr];

         // 图片缓存;使用 SDWebImage 框架:UIImageView+WebCache

         [_imgVAvatarImage sd_setImageWithURL:avatarImageURL

                             placeholderImage:placeholderImage];

     }

 }

 - (void)setName:(NSString *)name {

     _name = [name copy];

     _lblName.text = _name;

 }

 - (void)setText:(NSString *)text {

     _text = [text copy];

     _lblText.text = _text;

 }

 - (void)setCreatedAt:(NSDate *)createdAt {

     _createdAt = [createdAt copy];

     _lblCreatedAt.text = [DateHelper dateToString:_createdAt withFormat:nil];

 }

 - (void)setHaveLink:(BOOL)haveLink {

     _haveLink = haveLink;

     _imgVLink.hidden = !_haveLink;

 }

 @end
KMTableViewCell.xib
 <?xml version="1.0" encoding="UTF-8" standalone="no"?>

 <document type="com.apple.InterfaceBuilder3.CocoaTouch.XIB" version="3.0" toolsVersion="9059" systemVersion="15B42" targetRuntime="iOS.CocoaTouch" propertyAccessControl="none" useAutolayout="YES" useTraitCollections="YES">

     <dependencies>

         <deployment identifier="iOS"/>

         <plugIn identifier="com.apple.InterfaceBuilder.IBCocoaTouchPlugin" version="9049"/>

     </dependencies>

     <objects>

         <placeholder placeholderIdentifier="IBFilesOwner" id="-1" userLabel="File's Owner"/>

         <placeholder placeholderIdentifier="IBFirstResponder" id="-2" customClass="UIResponder"/>

         <tableViewCell contentMode="scaleToFill" selectionStyle="default" indentationWidth="10" reuseIdentifier="cellIdentifier" rowHeight="101" id="KGk-i7-Jjw" customClass="KMTableViewCell">

             <rect key="frame" x="0.0" y="0.0" width="375" height="101"/>

             <autoresizingMask key="autoresizingMask" flexibleMaxX="YES" flexibleMaxY="YES"/>

             <tableViewCellContentView key="contentView" opaque="NO" clipsSubviews="YES" multipleTouchEnabled="YES" contentMode="center" tableViewCell="KGk-i7-Jjw" id="H2p-sc-9uM">

                 <rect key="frame" x="0.0" y="0.0" width="375" height="100.5"/>

                 <autoresizingMask key="autoresizingMask"/>

                 <subviews>

                     <imageView userInteractionEnabled="NO" contentMode="scaleToFill" horizontalHuggingPriority="251" verticalHuggingPriority="251" fixedFrame="YES" translatesAutoresizingMaskIntoConstraints="NO" id="3Br-R7-YsD">

                         <rect key="frame" x="0.0" y="5" width="80" height="80"/>

                         <animations/>

                     </imageView>

                     <label opaque="NO" userInteractionEnabled="NO" contentMode="left" horizontalHuggingPriority="251" verticalHuggingPriority="251" fixedFrame="YES" text="name" lineBreakMode="tailTruncation" baselineAdjustment="alignBaselines" adjustsFontSizeToFit="NO" translatesAutoresizingMaskIntoConstraints="NO" id="kPR-pa-8uG">

                         <rect key="frame" x="90" y="2" width="230" height="21"/>

                         <animations/>

                         <fontDescription key="fontDescription" type="boldSystem" pointSize="14"/>

                         <color key="textColor" red="0.0" green="0.0" blue="0.0" alpha="1" colorSpace="calibratedRGB"/>

                         <nil key="highlightedColor"/>

                     </label>

                     <label opaque="NO" userInteractionEnabled="NO" contentMode="left" horizontalHuggingPriority="251" verticalHuggingPriority="251" fixedFrame="YES" text="created_at" lineBreakMode="tailTruncation" baselineAdjustment="alignBaselines" adjustsFontSizeToFit="NO" translatesAutoresizingMaskIntoConstraints="NO" id="iAH-dO-aus">

                         <rect key="frame" x="90" y="64" width="130" height="21"/>

                         <animations/>

                         <fontDescription key="fontDescription" type="system" pointSize="12"/>

                         <color key="textColor" red="0.40000000596046448" green="0.40000000596046448" blue="0.40000000596046448" alpha="1" colorSpace="calibratedRGB"/>

                         <nil key="highlightedColor"/>

                     </label>

                     <imageView userInteractionEnabled="NO" contentMode="scaleToFill" horizontalHuggingPriority="251" verticalHuggingPriority="251" fixedFrame="YES" image="Action_ReadOriginal" translatesAutoresizingMaskIntoConstraints="NO" id="By5-cw-IJd">

                         <rect key="frame" x="223" y="60" width="30" height="30"/>

                         <animations/>

                     </imageView>

                 </subviews>

                 <animations/>

             </tableViewCellContentView>

             <animations/>

             <connections>

                 <outlet property="imgVAvatarImage" destination="3Br-R7-YsD" id="KaV-vS-y5p"/>

                 <outlet property="imgVLink" destination="By5-cw-IJd" id="wrr-zz-EqH"/>

                 <outlet property="lblCreatedAt" destination="iAH-dO-aus" id="BNF-es-fb1"/>

                 <outlet property="lblName" destination="kPR-pa-8uG" id="BH7-oj-3Kx"/>

             </connections>

             <point key="canvasLocation" x="254.5" y="377.5"/>

         </tableViewCell>

     </objects>

     <resources>

         <image name="Action_ReadOriginal" width="60" height="60"/>

     </resources>

 </document>
KMTableView.h
 #import <UIKit/UIKit.h>

 #import "KMTableViewCell.h"

 #import "GlobalInfoModel.h"

 typedef void (^TableViewCellConfigureBlock)(KMTableViewCell *cell, GlobalInfoModel *globalInfo);

 typedef void (^DidSelectRowBlock)(NSInteger row, GlobalInfoModel *globalInfo);

 typedef void (^DidModifyRowBlock)(NSNumber *ID);

 typedef void (^DidDelectRowBlock)(NSNumber *ID);

 @interface KMTableView : UITableView <UITableViewDataSource, UITableViewDelegate, SWTableViewCellDelegate>

 @property (strong, nonatomic) NSMutableArray *mArrGlobalInfo; // 这里不能用 copy,必须用 strong,因为 copy 的话会复制出不可变数组,删除操作会出错;我们这里是需要可变数组的

 @property (copy, nonatomic) TableViewCellConfigureBlock cellConfigureBlock;

 @property (copy, nonatomic) DidSelectRowBlock didSelectRowBlock;

 @property (copy, nonatomic) DidModifyRowBlock didModifyRowBlock;

 @property (copy, nonatomic) DidDelectRowBlock didDelectRowBlock;

 - (instancetype)initWithGlobalInfoArray:(NSMutableArray *)mArrGlobalInfo frame:(CGRect)frame cellConfigureBlock:(TableViewCellConfigureBlock) cellConfigureBlock didSelectRowBlock:(DidSelectRowBlock)didSelectRowBlock didModifyRowBlock:(DidModifyRowBlock)didModifyRowBlock didDelectRowBlock:(DidDelectRowBlock)didDelectRowBlock;

 @end
KMTableView.m
 #import "KMTableView.h"

 static NSString *const cellIdentifier = @"cellIdentifier";

 @implementation KMTableView {

     UILabel *_lblEmptyDataMsg;

 }

 - (instancetype)initWithGlobalInfoArray:(NSMutableArray *)mArrGlobalInfo frame:(CGRect)frame cellConfigureBlock:(TableViewCellConfigureBlock) cellConfigureBlock didSelectRowBlock:(DidSelectRowBlock)didSelectRowBlock didModifyRowBlock:(DidModifyRowBlock)didModifyRowBlock didDelectRowBlock:(DidDelectRowBlock)didDelectRowBlock{

     if (self = [super init]) {

         _mArrGlobalInfo = mArrGlobalInfo;

         self.frame = frame;

         _cellConfigureBlock = [cellConfigureBlock copy];

         _didSelectRowBlock = [didSelectRowBlock copy];

         _didModifyRowBlock = [didModifyRowBlock copy];

         _didDelectRowBlock = [didDelectRowBlock copy];

         [self tableViewLayout];

     }

     return self;

 }

 - (void)tableViewLayout {

     // 设置边距,解决单元格分割线默认偏移像素过多的问题

     if ([self respondsToSelector:@selector(setSeparatorInset:)]) {

         [self setSeparatorInset:UIEdgeInsetsZero]; // 设置单元格(上左下右)内边距

     }

     if ([self respondsToSelector:@selector(setLayoutMargins:)]) {

         [self setLayoutMargins:UIEdgeInsetsZero]; // 设置单元格(上左下右)外边距

     }

     // 注册可复用的单元格

     UINib *nib = [UINib nibWithNibName:@"KMTableViewCell" bundle:nil];

     [self registerNib:nib forCellReuseIdentifier:cellIdentifier];

     self.dataSource = self;

     self.delegate = self;

     // 空数据时,显示的提示内容

     _lblEmptyDataMsg = [[UILabel alloc] initWithFrame:CGRectMake(0.0, 0.0, 300.0, 50.0)];

     CGPoint newPoint = self.center;

     newPoint.y -= 60.0;

     _lblEmptyDataMsg.center = newPoint;

     _lblEmptyDataMsg.text = @"点击「+」按钮添加全球新闻信息";

     _lblEmptyDataMsg.textColor = [UIColor grayColor];

     _lblEmptyDataMsg.textAlignment = NSTextAlignmentCenter;

     _lblEmptyDataMsg.font = [UIFont systemFontOfSize:16.0];

     [self addSubview:_lblEmptyDataMsg];

 }

 - (NSArray *)rightButtons {

     NSMutableArray *rightUtilityButtons = [NSMutableArray new];

     [rightUtilityButtons sw_addUtilityButtonWithColor:

      [UIColor colorWithRed:0.78f green:0.78f blue:0.8f alpha:1.0]

                                                 title:@"修改"];

     [rightUtilityButtons sw_addUtilityButtonWithColor:

      [UIColor colorWithRed:1.0f green:0.231f blue:0.188 alpha:1.0f]

                                                 title:@"删除"];

     return rightUtilityButtons;

 }

 #pragma mark - TableView DataSource and Delegate

 - (NSString *)tableView:(UITableView *)tableView titleForHeaderInSection:(NSInteger)section {

     return @"全球新闻信息列表";

 }

 - (NSInteger)numberOfSectionsInTableView:(UITableView *)tableView {

     return ;

 }

 - (NSInteger)tableView:(UITableView *)tableView numberOfRowsInSection:(NSInteger)section {

     NSUInteger count = _mArrGlobalInfo.count;

     _lblEmptyDataMsg.hidden = count > ;

     return count;

 }

 - (UITableViewCell *)tableView:(UITableView *)tableView cellForRowAtIndexPath:(NSIndexPath *)indexPath {

     KMTableViewCell *cell = [tableView dequeueReusableCellWithIdentifier:cellIdentifier];

     if (!cell) {

         cell = [[KMTableViewCell alloc] initWithStyle:UITableViewCellStyleDefault

                                       reuseIdentifier:cellIdentifier];

     }

     cell.rightUtilityButtons = [self rightButtons];

     cell.delegate = self;

     GlobalInfoModel *globalInfo = _mArrGlobalInfo[indexPath.row];

     cell.tag = [globalInfo.ID integerValue]; // 存储 ID 用于「修改」和「删除」记录操作

     cell.avatarImageStr = globalInfo.avatarImageStr;

     cell.name = globalInfo.name;

     cell.text = globalInfo.text;

     cell.createdAt = globalInfo.createdAt;

     cell.haveLink = globalInfo.haveLink;

     _cellConfigureBlock(cell, globalInfo);

     return cell;

 }

 - (CGFloat)tableView:(UITableView *)tableView heightForRowAtIndexPath:(NSIndexPath *)indexPath {

     return 90.0;

 }

 - (void)tableView:(UITableView *)tableView willDisplayCell:(UITableViewCell *)cell forRowAtIndexPath:(NSIndexPath *)indexPath {

     if ([cell respondsToSelector:@selector(setSeparatorInset:)]) {

         [cell setSeparatorInset:UIEdgeInsetsZero];

     }

     if ([cell respondsToSelector:@selector(setLayoutMargins:)]) {

         [cell setLayoutMargins:UIEdgeInsetsZero];

     }

 }

 - (void)tableView:(UITableView *)tableView didSelectRowAtIndexPath:(NSIndexPath *)indexPath {

     NSInteger row = indexPath.row;

     _didSelectRowBlock(row, _mArrGlobalInfo[row]);

 }

 #pragma mark - SWTableViewCellDelegate

 - (void)swipeableTableViewCell:(SWTableViewCell *)cell didTriggerRightUtilityButtonWithIndex:(NSInteger)index {

     NSNumber *ID = @(cell.tag);

     switch (index) {

         case : {

             NSLog(@"点击了修改按钮");

             _didModifyRowBlock(ID);

             break;

         }

         case : {

             NSLog(@"点击了删除按钮");

             _didDelectRowBlock(ID);

             NSIndexPath *cellIndexPath = [self indexPathForCell:cell];

             [_mArrGlobalInfo removeObjectAtIndex:cellIndexPath.row];

             [self deleteRowsAtIndexPaths:@[ cellIndexPath ]

                         withRowAnimation:UITableViewRowAnimationAutomatic];

             break;

         }

         default:

             break;

     }

 }

 - (BOOL)swipeableTableViewCellShouldHideUtilityButtonsOnSwipe:(SWTableViewCell *)cell {

     return YES; // 设置是否隐藏其他行的「实用按钮」,即不同时出现多行的「实用按钮」;默认值为NO

 }

 @end
KMAddRecordViewController.h
 #import <UIKit/UIKit.h>

 #import "EnumKMDataAccessFunction.h"

 #import "KMDatePicker.h"

 @interface KMAddRecordViewController : UIViewController <KMDatePickerDelegate, UIAlertViewDelegate>

 @property (assign, nonatomic) KMDataAccessFunction dataAccessFunction;

 @property (strong, nonatomic) NSNumber *ID;

 @property (strong, nonatomic) IBOutlet UITextField *txtFAvatarImageStr;

 @property (strong, nonatomic) IBOutlet UITextField *txtFName;

 @property (strong, nonatomic) IBOutlet UITextView *txtVText;

 @property (strong, nonatomic) IBOutlet UITextField *txtFLink;

 @property (strong, nonatomic) IBOutlet UITextField *txtFCreatedAt;

 @property (strong, nonatomic) IBOutlet UIButton *btnSave;

 @property (strong, nonatomic) IBOutlet UIButton *btnCancel;

 @end
KMAddRecordViewController.m
 #import "KMAddRecordViewController.h"

 #import "UIButton+BeautifulButton.h"

 #import "GlobalInfoModel.h"

 #import "SQLiteGlobalInfoService.h"

 #import "CoreDataGlobalInfoService.h"

 #import "FMDBGlobalInfoService.h"

 #import "DateHelper.h"

 @interface KMAddRecordViewController ()

 - (void)layoutUI;

 - (void)showAlertView:(NSString *)message;

 @end

 @implementation KMAddRecordViewController

 - (void)viewDidLoad {

     [super viewDidLoad];

     [self layoutUI];

 }

 - (void)didReceiveMemoryWarning {

     [super didReceiveMemoryWarning];

     // Dispose of any resources that can be recreated.

 }

 - (void)layoutUI {

     self.navigationItem.title = _ID ? @"修改记录" : @"添加记录";

     CGRect rect = [[UIScreen mainScreen] bounds];

     rect = CGRectMake(0.0, 0.0, rect.size.width, 216.0);

     //年月日时分

     KMDatePicker *datePicker = [[KMDatePicker alloc]

                                 initWithFrame:rect

                                 delegate:self

                                 datePickerStyle:KMDatePickerStyleYearMonthDayHourMinute];

     _txtFCreatedAt.inputView = datePicker;

     [_btnSave beautifulButton:[UIColor blackColor]];

     [_btnCancel beautifulButton:[UIColor brownColor]];

     [self setValueFromGlobalInfo];

 }

 - (void)setValueFromGlobalInfo {

     if (_ID) {

         GlobalInfoModel *globalInfo;

         switch (_dataAccessFunction) {

             case KMDataAccessFunctionSQLite: {

                 globalInfo = [[SQLiteGlobalInfoService sharedService] getGlobalInfoByID:_ID];

                 break;

             }

             case KMDataAccessFunctionCoreData: {

                 globalInfo = [[CoreDataGlobalInfoService sharedService] getGlobalInfoByID:_ID];

                 break;

             }

             case KMDataAccessFunctionFMDB: {

                 globalInfo = [[FMDBGlobalInfoService sharedService] getGlobalInfoByID:_ID];

                 break;

             }

             default: {

                 break;

             }

         }

         if (globalInfo) {

             _txtFAvatarImageStr.text = globalInfo.avatarImageStr;

             _txtFName.text = globalInfo.name;

             _txtVText.text = globalInfo.text;

             _txtFLink.text = globalInfo.link;

             _txtFCreatedAt.text = [DateHelper dateToString:globalInfo.createdAt

                                                 withFormat:nil];

         }

     } else {

         NSDate *localeDate = [DateHelper localeDate];

         _txtFCreatedAt.text = [DateHelper dateToString:localeDate

                                             withFormat:nil];

         _txtFName.text =

             [NSString stringWithFormat:@"anthonydali22 (%@)",

                                        [DateHelper dateToString:localeDate

                                                      withFormat:@"yyyyMMddHHmmss"]];

     }

 }

 - (void)showAlertView:(NSString *)message {

     // iOS (8.0 and later)

     /*

     UIAlertController* alert = [UIAlertController alertControllerWithTitle:@"提示信息"

                                                                    message:message

                                                             preferredStyle:UIAlertControllerStyleAlert];

     UIAlertAction* defaultAction = [UIAlertAction actionWithTitle:@"确定"

                                                             style:UIAlertActionStyleDefault

                                                           handler:^(UIAlertAction * action) {

                                                               if ([message hasSuffix:@"成功"]) {

                                                                   [self.navigationController popViewControllerAnimated:YES];

                                                               }

                                                           }];

     [alert addAction:defaultAction];

     [self presentViewController:alert animated:YES completion:nil];

      */

     // iOS (2.0 and later)

     UIAlertView *alertV = [[UIAlertView alloc] initWithTitle:@"提示信息"

                                                      message:message

                                                     delegate:self

                                            cancelButtonTitle:nil

                                            otherButtonTitles:@"确定", nil];

     [alertV show];

 }

 - (void)touchesEnded:(NSSet<UITouch *> *)touches withEvent:(UIEvent *)event {

 //    [_txtFAvatarImageStr resignFirstResponder];

 //    [_txtFName resignFirstResponder];

 //    [_txtVText resignFirstResponder];

 //    [_txtFLink resignFirstResponder];

 //    [_txtFCreatedAt resignFirstResponder];

     [self.view endEditing:YES];

 }

 - (IBAction)save:(id)sender {

     NSString *avatarImageStr = [_txtFAvatarImageStr text];

     NSString *name = [_txtFName text];

     NSString *text = [_txtVText text];

     NSString *link = [_txtFLink text];

     NSDate *createdAt = [DateHelper dateFromString:[_txtFCreatedAt text]

                                         withFormat:nil];

     GlobalInfoModel *globalInfo = [[GlobalInfoModel alloc] initWithAvatarImageStr:avatarImageStr

                                                                              name:name

                                                                              text:text

                                                                              link:link

                                                                         createdAt:createdAt

                                                                                ID:_ID];

     BOOL isSuccess;

     NSString *message;

     //NSLog(@"KMDataAccessFunction: %lu", (unsigned long)_dataAccessFunction);

     switch (_dataAccessFunction) {

         case KMDataAccessFunctionSQLite: {

             if (_ID) {

                 isSuccess = [[SQLiteGlobalInfoService sharedService] updateGlobalInfo:globalInfo];

             } else {

                 isSuccess = [[SQLiteGlobalInfoService sharedService] insertGlobalInfo:globalInfo];

             }

             break;

         }

         case KMDataAccessFunctionCoreData: {

             if (_ID) {

                 isSuccess = [[CoreDataGlobalInfoService sharedService] updateGlobalInfo:globalInfo];

             } else {

                 globalInfo.ID = [self getIdentityNumber];

                 isSuccess = [[CoreDataGlobalInfoService sharedService] insertGlobalInfo:globalInfo];

             }

             break;

         }

         case KMDataAccessFunctionFMDB: {

             if (_ID) {

                 isSuccess = [[FMDBGlobalInfoService sharedService] updateGlobalInfo:globalInfo];

             } else {

                 isSuccess = [[FMDBGlobalInfoService sharedService] insertGlobalInfo:globalInfo];

             }

             break;

         }

         default: {

             break;

         }

     }

     message = [NSString stringWithFormat:@"%@%@", _ID ? @"修改" : @"添加",

                isSuccess ? @"成功" : @"失败"];

     [self showAlertView:message];

 }

 - (IBAction)cancel:(id)sender {

     [self.navigationController popViewControllerAnimated:YES];

 }

 - (NSNumber *)getIdentityNumber {

     NSNumber *identityNumber;

     // 用于 CoreData 操作数据库新增记录时,自增长标示值

     NSString *const kIdentityValOfCoreData = @"identityValOfCoreData";

     NSUserDefaults *userDefaults = [NSUserDefaults standardUserDefaults];

     NSInteger identityVal = [userDefaults integerForKey:kIdentityValOfCoreData];

     identityVal = identityVal ==  ?  : ++identityVal; //当键值对不存在时,identityVal 的默认值为0

     [userDefaults setInteger: identityVal forKey:kIdentityValOfCoreData];

     identityNumber = @(identityVal);

     return identityNumber;

 }

 #pragma mark - KMDatePickerDelegate

 - (void)datePicker:(KMDatePicker *)datePicker didSelectDate:(KMDatePickerDateModel *)datePickerDate {

     NSString *dateStr = [NSString stringWithFormat:@"%@-%@-%@ %@:%@",

                          datePickerDate.year,

                          datePickerDate.month,

                          datePickerDate.day,

                          datePickerDate.hour,

                          datePickerDate.minute

                          ];

     _txtFCreatedAt.text = dateStr;

 }

 #pragma mark - UIAlertViewDelegate

 - (void)alertView:(UIAlertView *)alertView clickedButtonAtIndex:(NSInteger)buttonIndex {

     // 如果有提醒对话框有多个按钮,可以根据 buttonIndex 判断点击了哪个按钮

     if ([alertView.message hasSuffix:@"成功"]) {

         [self.navigationController popViewControllerAnimated:YES];

     }

 }

 @end
KMAddRecordViewController.xib
<?xml version="1.0" encoding="UTF-8" standalone="no"?>
<document type="com.apple.InterfaceBuilder3.CocoaTouch.XIB" version="3.0" toolsVersion="9059" systemVersion="15B42" targetRuntime="iOS.CocoaTouch" propertyAccessControl="none" useAutolayout="YES" useTraitCollections="YES">
<dependencies>
<deployment identifier="iOS"/>
<plugIn identifier="com.apple.InterfaceBuilder.IBCocoaTouchPlugin" version="9049"/>
</dependencies>
<objects>
<placeholder placeholderIdentifier="IBFilesOwner" id="-1" userLabel="File's Owner" customClass="KMAddRecordViewController">
<connections>
<outlet property="btnCancel" destination="Os2-q4-clQ" id="jQl-bV-B8a"/>
<outlet property="btnSave" destination="AW0-XJ-PQg" id="S0N-lA-cs6"/>
<outlet property="txtFAvatarImageStr" destination="170-lb-8QG" id="Eui-9P-eaK"/>
<outlet property="txtFCreatedAt" destination="nza-oE-SRm" id="98S-v0-6vD"/>
<outlet property="txtFLink" destination="M2S-di-gpj" id="g6L-nI-imp"/>
<outlet property="txtFName" destination="RBA-1K-Sij" id="PyN-Id-NRo"/>
<outlet property="txtVText" destination="QVG-4Y-ejF" id="D4J-y4-cRQ"/>
<outlet property="view" destination="i5M-Pr-FkT" id="sfx-zR-JGt"/>
</connections>
</placeholder>
<placeholder placeholderIdentifier="IBFirstResponder" id="-2" customClass="UIResponder"/>
<view clearsContextBeforeDrawing="NO" contentMode="scaleToFill" id="i5M-Pr-FkT">
<rect key="frame" x="0.0" y="0.0" width="600" height="600"/>
<autoresizingMask key="autoresizingMask" widthSizable="YES" heightSizable="YES"/>
<subviews>
<label opaque="NO" userInteractionEnabled="NO" contentMode="left" horizontalHuggingPriority="251" verticalHuggingPriority="251" fixedFrame="YES" text="图标路径" textAlignment="natural" lineBreakMode="tailTruncation" baselineAdjustment="alignBaselines" adjustsFontSizeToFit="NO" translatesAutoresizingMaskIntoConstraints="NO" id="ewt-HG-TF0">
<rect key="frame" x="20" y="80" width="80" height="21"/>
<animations/>
<fontDescription key="fontDescription" type="system" pointSize="17"/>
<color key="textColor" red="0.0" green="0.0" blue="0.0" alpha="1" colorSpace="calibratedRGB"/>
<nil key="highlightedColor"/>
</label>
<label opaque="NO" userInteractionEnabled="NO" contentMode="left" horizontalHuggingPriority="251" verticalHuggingPriority="251" fixedFrame="YES" text="标题名称" textAlignment="natural" lineBreakMode="tailTruncation" baselineAdjustment="alignBaselines" adjustsFontSizeToFit="NO" translatesAutoresizingMaskIntoConstraints="NO" id="N7j-iJ-2Ku">
<rect key="frame" x="20" y="120" width="80" height="21"/>
<animations/>
<fontDescription key="fontDescription" type="system" pointSize="17"/>
<color key="textColor" red="0.0" green="0.0" blue="0.0" alpha="1" colorSpace="calibratedRGB"/>
<nil key="highlightedColor"/>
</label>
<label opaque="NO" userInteractionEnabled="NO" contentMode="left" horizontalHuggingPriority="251" verticalHuggingPriority="251" fixedFrame="YES" text="标题内容" textAlignment="natural" lineBreakMode="tailTruncation" baselineAdjustment="alignBaselines" adjustsFontSizeToFit="NO" translatesAutoresizingMaskIntoConstraints="NO" id="JPG-Ig-lQw">
<rect key="frame" x="20" y="155" width="80" height="21"/>
<animations/>
<fontDescription key="fontDescription" type="system" pointSize="17"/>
<color key="textColor" red="0.0" green="0.0" blue="0.0" alpha="1" colorSpace="calibratedRGB"/>
<nil key="highlightedColor"/>
</label>
<label opaque="NO" userInteractionEnabled="NO" contentMode="left" horizontalHuggingPriority="251" verticalHuggingPriority="251" fixedFrame="YES" text="链接地址" textAlignment="natural" lineBreakMode="tailTruncation" baselineAdjustment="alignBaselines" adjustsFontSizeToFit="NO" translatesAutoresizingMaskIntoConstraints="NO" id="YoU-hs-Mmf">
<rect key="frame" x="20" y="320" width="80" height="21"/>
<animations/>
<fontDescription key="fontDescription" type="system" pointSize="17"/>
<color key="textColor" red="0.0" green="0.0" blue="0.0" alpha="1" colorSpace="calibratedRGB"/>
<nil key="highlightedColor"/>
</label>
<label opaque="NO" userInteractionEnabled="NO" contentMode="left" horizontalHuggingPriority="251" verticalHuggingPriority="251" fixedFrame="YES" text="创建时间" textAlignment="natural" lineBreakMode="tailTruncation" baselineAdjustment="alignBaselines" adjustsFontSizeToFit="NO" translatesAutoresizingMaskIntoConstraints="NO" id="Q2x-t1-vhv">
<rect key="frame" x="20" y="360" width="80" height="21"/>
<animations/>
<fontDescription key="fontDescription" type="system" pointSize="17"/>
<color key="textColor" red="0.0" green="0.0" blue="0.0" alpha="1" colorSpace="calibratedRGB"/>
<nil key="highlightedColor"/>
</label>
<textField opaque="NO" clipsSubviews="YES" contentMode="scaleToFill" fixedFrame="YES" contentHorizontalAlignment="left" contentVerticalAlignment="center" borderStyle="roundedRect" textAlignment="natural" minimumFontSize="17" translatesAutoresizingMaskIntoConstraints="NO" id="170-lb-8QG">
<rect key="frame" x="100" y="76" width="250" height="30"/>
<animations/>
<string key="text">https://d2rfichhc2fb9n.cloudfront.net/image/5/3AVtp5OTPpvSvblq73u2fDL_mux7InMiOiJzMyIsImIiOiJhZG4tdXNlci1hc3NldHMiLCJrIjoiYXNzZXRzL3VzZXIvNDQvYjAvYzAvNDRiMGMwMDAwMDAwMDAwMC5qcGciLCJvIjoiIn0?w=80&h=80</string>
<fontDescription key="fontDescription" type="system" pointSize="14"/>
<textInputTraits key="textInputTraits"/>
</textField>
<textField opaque="NO" clipsSubviews="YES" contentMode="scaleToFill" fixedFrame="YES" contentHorizontalAlignment="left" contentVerticalAlignment="center" text="anthonydali22" borderStyle="roundedRect" textAlignment="natural" minimumFontSize="17" translatesAutoresizingMaskIntoConstraints="NO" id="RBA-1K-Sij">
<rect key="frame" x="100" y="116" width="250" height="30"/>
<animations/>
<fontDescription key="fontDescription" type="system" pointSize="14"/>
<textInputTraits key="textInputTraits"/>
</textField>
<textField opaque="NO" clipsSubviews="YES" contentMode="scaleToFill" fixedFrame="YES" contentHorizontalAlignment="left" contentVerticalAlignment="center" text="https://syndwire.com/" borderStyle="roundedRect" textAlignment="natural" minimumFontSize="17" translatesAutoresizingMaskIntoConstraints="NO" id="M2S-di-gpj">
<rect key="frame" x="100" y="315" width="250" height="30"/>
<animations/>
<fontDescription key="fontDescription" type="system" pointSize="14"/>
<textInputTraits key="textInputTraits"/>
</textField>
<textField opaque="NO" clipsSubviews="YES" contentMode="scaleToFill" fixedFrame="YES" contentHorizontalAlignment="left" contentVerticalAlignment="center" borderStyle="roundedRect" textAlignment="natural" minimumFontSize="17" translatesAutoresizingMaskIntoConstraints="NO" id="nza-oE-SRm">
<rect key="frame" x="100" y="356" width="250" height="30"/>
<animations/>
<fontDescription key="fontDescription" type="system" pointSize="14"/>
<textInputTraits key="textInputTraits"/>
</textField>
<button opaque="NO" contentMode="scaleToFill" fixedFrame="YES" contentHorizontalAlignment="center" contentVerticalAlignment="center" buttonType="roundedRect" lineBreakMode="middleTruncation" translatesAutoresizingMaskIntoConstraints="NO" id="AW0-XJ-PQg">
<rect key="frame" x="40" y="439" width="100" height="30"/>
<animations/>
<state key="normal" title="保存"/>
<connections>
<action selector="save:" destination="-1" eventType="touchUpInside" id="lxY-5X-Hiv"/>
</connections>
</button>
<textView clipsSubviews="YES" multipleTouchEnabled="YES" contentMode="scaleToFill" fixedFrame="YES" text="The Best Invisalign Dentist in Williamsburg Floridahttp://youtube.com/watch?feature=youtube_gdata&v=_9p8QlqkH9c" textAlignment="natural" translatesAutoresizingMaskIntoConstraints="NO" id="QVG-4Y-ejF">
<rect key="frame" x="100" y="146" width="250" height="162"/>
<animations/>
<fontDescription key="fontDescription" type="system" pointSize="14"/>
<textInputTraits key="textInputTraits" autocapitalizationType="sentences"/>
</textView>
<button opaque="NO" contentMode="scaleToFill" fixedFrame="YES" contentHorizontalAlignment="center" contentVerticalAlignment="center" buttonType="roundedRect" lineBreakMode="middleTruncation" translatesAutoresizingMaskIntoConstraints="NO" id="Os2-q4-clQ">
<rect key="frame" x="214" y="439" width="100" height="30"/>
<animations/>
<state key="normal" title="取消"/>
<connections>
<action selector="cancel:" destination="-1" eventType="touchUpInside" id="yyx-6H-XZL"/>
</connections>
</button>
</subviews>
<animations/>
<color key="backgroundColor" white="1" alpha="1" colorSpace="custom" customColorSpace="calibratedWhite"/>
</view>
</objects>
</document>
SQLiteMainViewController.h
 #import <UIKit/UIKit.h>

 #import "EnumKMDataAccessFunction.h"

 @interface SQLiteMainViewController : UIViewController

 @property (assign, nonatomic) KMDataAccessFunction dataAccessFunction;

 @end
SQLiteMainViewController.m
 #import "SQLiteMainViewController.h"

 #import "KMAddRecordViewController.h"

 #import "GlobalInfoModel.h"

 #import "SQLiteGlobalInfoService.h"

 #import "KMTableView.h"

 @interface SQLiteMainViewController ()

 @property (strong, nonatomic) KMTableView *tableView;

 - (void)addRecord:(UIBarButtonItem *)sender;

 - (void)layoutUI;

 - (void)reloadData;

 @end

 @implementation SQLiteMainViewController

 - (void)viewDidLoad {

     [super viewDidLoad];

     [self layoutUI];

 }

 - (void)viewWillAppear:(BOOL)animated {

     [super viewWillAppear:animated];

     // popViewControllerAnimated 回来的本视图不会执行 viewDidLoad 方法,而会执行 viewWillAppear: 方法,所以在这里进行刷新加载数据

     [self reloadData];

 }

 - (void)didReceiveMemoryWarning {

     [super didReceiveMemoryWarning];

     // Dispose of any resources that can be recreated.

 }

 - (void)addRecord:(UIBarButtonItem *)sender {

     KMAddRecordViewController *addRecordVC = [KMAddRecordViewController new];

     addRecordVC.dataAccessFunction = _dataAccessFunction;

     [self.navigationController pushViewController:addRecordVC animated:YES];

 }

 - (void)layoutUI {

     self.navigationItem.title = kTitleOfSQLite;

     UIBarButtonItem *barButtonAddRecord = [[UIBarButtonItem alloc]

                                            initWithBarButtonSystemItem:UIBarButtonSystemItemAdd

                                            target:self

                                            action:@selector(addRecord:)];

     self.navigationItem.rightBarButtonItem = barButtonAddRecord;

     NSMutableArray *mArrGlobalInfo = [[SQLiteGlobalInfoService sharedService] getGlobalInfoGroup];

     CGRect frame = CGRectMake(5.0, 0.0, kWidthOfMainScreen - 10.0, kHeightOfMainScreen);

     __weak typeof(self)weakSelf = self;

     // 结合 block 操作来分离 dataSource 和 delegate

     _tableView = [[KMTableView alloc] initWithGlobalInfoArray:mArrGlobalInfo

                                                         frame:frame

                                            cellConfigureBlock:^(KMTableViewCell *cell,

                                                                 GlobalInfoModel *globalInfo) {

                                                // 覆盖 cell 的默认配置

                                                cell.text = [NSString stringWithFormat:@"Text: %@", globalInfo.text];

                                            }

                                             didSelectRowBlock:^(NSInteger row, GlobalInfoModel *globalInfo) {

                                                 NSLog(@"selectedRowIndex: %ld", (long)row);

                                                 NSLog(@"globalInfo: %@", globalInfo);

                                             }

                                             didModifyRowBlock:^(NSNumber *ID) {

                                                 KMAddRecordViewController *addRecordVC = [KMAddRecordViewController new];

                                                 addRecordVC.dataAccessFunction = weakSelf.dataAccessFunction;

                                                 addRecordVC.ID = ID;

                                                 [weakSelf.navigationController pushViewController:addRecordVC animated:YES];

                                             }

                                             didDelectRowBlock:^(NSNumber *ID){

                                                 [[SQLiteGlobalInfoService sharedService] deleteGlobalInfoByID:ID];

                                             }];

     [self.view addSubview:_tableView];

 }

 - (void)reloadData {

     _tableView.mArrGlobalInfo = [[SQLiteGlobalInfoService sharedService] getGlobalInfoGroup];

     [_tableView reloadData];

 }

 @end
源码下载地址:
https://github.com/KenmuHuang/KMDataAccess
iOS 数据持久化(扩展知识:模糊背景效果和密码保护功能)的更多相关文章
- iOS开发笔记-swift实现iOS数据持久化之归档NSKeyedArchiver
IOS数据持久化的方式分为三种: 属性列表 (plist.NSUserDefaults) 归档 (NSKeyedArchiver) 数据库 (SQLite.Core Data.第三方类库等 归档(又名 ...
- IOS数据持久化之归档NSKeyedArchiver
IOS数据持久化的方式分为三种: 属性列表 (自定义的Property List .NSUserDefaults) 归档 (NSKeyedArchiver) 数据库 (SQLite.Core Data ...
- iOS -数据持久化方式-以真实项目讲解
前面已经讲解了SQLite,FMDB以及CoreData的基本操作和代码讲解(CoreData也在不断学习中,上篇博客也会不断更新中).本篇我们将讲述在实际开发中,所使用的iOS数据持久化的方式以及怎 ...
- iOS数据持久化方式及class_copyIvarList与class_copyPropertyList的区别
iOS数据持久化方式:plist文件(属性列表)preference(偏好设置)NSKeyedArchiver(归档)SQLite3CoreData沙盒:iOS程序默认情况下只能访问自己的程序目录,这 ...
- iOS数据持久化-OC
沙盒详解 1.IOS沙盒机制 IOS应用程序只能在为该改程序创建的文件系统中读取文件,不可以去其它地方访问,此区域被成为沙盒,所以所有的非代码文件都要保存在此,例如图像,图标,声音,映像,属性列表,文 ...
- iOS数据持久化
在iOS中,实现数据持久化一般分为4大种: 1.属性列表 2.对象归档 3.SQLite 4.Core Data 一.属性列表 NSUserDefaults类的使用和NSKeyedArchiver有很 ...
- 转载 -- iOS数据持久化存储
作者:@翁呀伟呀 授权本站转载 概论 所谓的持久化,就是将数据保存到硬盘中,使得在应用程序或机器重启后可以继续访问之前保存的数据.在iOS开发中,有很多数据持久化的方案,接下来我将尝试着介绍一下5种方 ...
- iOS 数据持久化(1):属性列表与对象归档
@import url(http://i.cnblogs.com/Load.ashx?type=style&file=SyntaxHighlighter.css); @import url(/ ...
- iOS: 数据持久化方案
数据持久化方案(如果总结不到位,或者有误的地方,敬请斧正) 一.功能: 主要是将数据持久化到本地,减少对网络请求的次数,既节省了用户的流量,也增强了App的体验效果. 二.种类: plist存储:使 ...
随机推荐
- Linux 进程
Linux 进程 在用户空间,进程是由进程标识符(PID)表示的.从用户的角度来看,一个 PID 是一个数字值,可惟一标识一个进程.一个 PID 在进程的整个生命期间不会更改,但 PID 可以在进程销 ...
- [WinAPI] API 12 [获取程序所在的目录、程序模块路径,获取和设置当前目录]
Windows系统提供一组API实现对程序运行时相关目录的获取和设置.用户可以使用GetCurrentDirectory和SetCurrentDirectory获取程序的当前目录,获取模块的路径使用G ...
- 关于消除if-else的简单总结
if-else是计算机语言中基本的分支语句,虽然很简单,但可能会出现滥用的情况,如图: 这种标记判断,嵌套成这样(其实没有必要嵌套),会让别人觉得作者水平很低. 可以看出,这些if仅仅是在判断一个变量 ...
- Unity3d碰撞检测中碰撞器与触发器的区别
要产生碰撞必须为游戏对象添加刚体(Rigidbody)和碰撞器,刚体可以让物体在物理影响下运动.碰撞体是物理组件的一类,它要与刚体一起添加到游戏对象上才能触发碰撞.如果两个刚体相互撞在一起,除非两个对 ...
- thrift之TTransport层的分帧传输类TFramedTransport
帧传输类就是按照一帧的固定大小来传输数据,所有的写操作首先都是在内存中完成的直到调用了flush操作,然后传输节点在flush操作之后将所有数据根据数据的有效载荷写入数据的长度的二进制块发送出去,允许 ...
- iOS开发——高级技术&PassBook服务
PassBook服务 Passbook是苹果推出的一个管理登机牌.会员卡.电影票.优惠券等信息的 工具.Passbook就像一个卡包,用于存放你的购物卡.积分卡.电影票.礼品卡等,而这些票据就是一个“ ...
- AutoMapper完成Dto与Model的转换
在实际的软件开发项目中,我们的“业务逻辑”常常需要我们对同样的数据进行各种变换. 例如,一个Web应用通过前端收集用户的输入成为Dto,然后将Dto转换成领域模型并持久化到数据库中.相反,当用户请求数 ...
- VS2015 ASP.NET5 Web项目结构浅析
前言 本文个人同步博客地址http://aehyok.com/Blog/Detail/76.html 个人网站地址:aehyok.com QQ 技术群号:206058845,验证码为:aehyok 本 ...
- VMware安装RedHat Linux虚拟机图文详解
创建Red Hat Linux虚拟机 1.打开VMware,开始创建虚拟机 点击菜单[文件]->[新建虚拟机]. 2.默认典型,单击[下一步] 3.选择安装来源 在这里,我们选择安装来源为[安装 ...
- Jquery 实现input回车时跳转到下一个input元素
/** * 回车时跳转到下一个元素 * @Author HTL * @DateTime 2016-12-30T11:33:25+0800 * @param {[type]} $input [INP ...
