hibernate spring annotation setup
- First step setup for the pom.xml with hibernate dependency ,
hibernate dependency need to before the struts2,because the javassist dependency
<dependency><groupId>com.google.guava</groupId><artifactId>guava</artifactId><version>RELEASE</version></dependency><dependency><groupId>javax.servlet</groupId><artifactId>javax.servlet-api</artifactId><version>${servlet.version}</version><scope>provided</scope></dependency><dependency><groupId>javax.servlet.jsp</groupId><artifactId>jsp-api</artifactId><version>${servlet.jsp.version}</version><type>jar</type><scope>test</scope></dependency><!-- log4j dependency --><dependency><groupId>log4j</groupId><artifactId>log4j</artifactId><version>${log4j.version}</version></dependency><dependency><groupId>junit</groupId><artifactId>junit</artifactId><version>${junit.version}</version><scope>test</scope></dependency><!-- hibernate5 --><!-- hibernate 5 dependencies --><dependency><groupId>org.hibernate</groupId><artifactId>hibernate-core</artifactId><version>${hibernate.version}</version></dependency><dependency><groupId>org.jboss.spec.javax.transaction</groupId><artifactId>jboss-transaction-api_1.2_spec</artifactId><version>${jboss.api.version}</version></dependency><!-- Spring framework --><dependency><groupId>org.springframework</groupId><artifactId>spring-core</artifactId><version>${spring.version}</version></dependency><dependency><groupId>org.springframework</groupId><artifactId>spring-context</artifactId><version>${spring.version}</version></dependency><dependency><groupId>org.springframework</groupId><artifactId>spring-jdbc</artifactId><version>${spring.version}</version></dependency><dependency><groupId>org.springframework</groupId><artifactId>spring-tx</artifactId><version>${spring.version}</version></dependency><dependency><groupId>org.springframework</groupId><artifactId>spring-beans</artifactId><version>${spring.version}</version></dependency><dependency><groupId>org.springframework</groupId><artifactId>spring-web</artifactId><version>${spring.version}</version></dependency><dependency><groupId>org.springframework</groupId><artifactId>spring-expression</artifactId><version>${spring.version}</version></dependency><dependency><groupId>org.springframework</groupId><artifactId>spring-orm</artifactId><version>${spring.version}</version></dependency><dependency><groupId>commons-dbcp</groupId><artifactId>commons-dbcp</artifactId><version>${spring.dbcp.version}</version></dependency><dependency><groupId>xml-apis</groupId><artifactId>xml-apis</artifactId><version>${spring.xmapis.version}</version></dependency><!-- struts2 dependency had included spring dependencies --><dependency><groupId>org.apache.struts</groupId><artifactId>struts2-core</artifactId><version>${struts2.version}</version></dependency><!-- http://www.mkyong.com/struts2/struts-2-hello-world-annotation-example/ --><!-- --><dependency><groupId>org.apache.struts</groupId><artifactId>struts2-convention-plugin</artifactId><version>${struts2.version}</version></dependency><dependency><groupId>org.apache.struts</groupId><artifactId>struts2-json-plugin</artifactId><version>${struts2.version}</version></dependency><!-- input: http://localhost:8888/Mybatis_Sample/config-browser/index.action --><dependency><groupId>org.apache.struts</groupId><artifactId>struts2-config-browser-plugin</artifactId><version>${struts2.version}</version></dependency><dependency><groupId>org.apache.struts</groupId><artifactId>struts2-junit-plugin</artifactId><version>${struts2.version}</version><scope>test</scope></dependency><dependency><groupId>org.apache.struts</groupId><artifactId>struts2-spring-plugin</artifactId><version>${struts2.version}</version></dependency>
2. ApplicationContext.xml for hibernate :
<bean id="sessionFactory"class="org.springframework.orm.hibernate5.LocalSessionFactoryBean"><property name="dataSource" ref="dataSource" /><property name="packagesToScan" value="${entities.path}" /><property name="hibernateProperties"><props><prop key="hibernate.hbm2ddl.auto">${hibernate.hbm2ddl.auto}</prop><prop key="hibernate.dialect">${hibernate.dialect}</prop><prop key="hibernate.show_sql">${hibernate.show_sql}</prop><prop key="hibernate.format_sql">${hibernate.format_sql}</prop></props></property></bean>
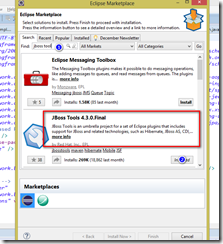
3. Install the hibernate tool to generate the entity class automatically:

choose the “hibernate tool” and “hibernate maven integration” and follow the step to install it .
4.using the hibernate reverse engineering(reveng.xml) to generate the reveng.xml file
5.using the hibernate code generate tool to generate the hibernate entities
6.create a new hibernate.cfg.xml file and then create the hibernate console
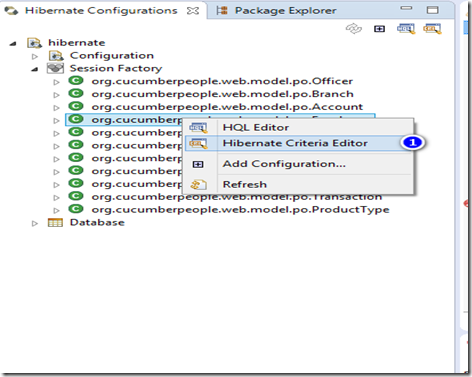
7.then you can use the HQL editor and hibernate criteria editor .

hibernate spring annotation setup的更多相关文章
- Spring的annotation用在set方法上 hibernate的annotation用get方法上
1.Spring的annotation用在set方法上 2.hibernate的annotation用在get方法上
- 最新版ssh hibernate spring struts2环境搭建
最新版ssh hibernate spring struts2环境搭建 最新版spring Framework下载地址:spring4.0.0RELEASE环境搭建 http://repo.sprin ...
- 【转】pringMVC+Hibernate+Spring 简单的一个整合实例
ref:http://langgufu.iteye.com/blog/2088355 SpringMVC又一个漂亮的web框架,他与Struts2并驾齐驱,Struts出世早而占据了一定优势,我在博客 ...
- Hibernate的Annotation注解
当项目变得比较大的时候,如何还使用hbm.xml文件来配置Hibernate实体就会变得比较复杂.这里Hibernate提供了Annotation注解方式,使得Hibernate的映射文件变得很方便管 ...
- hibernate+spring+mvc+Easyui框架模式下使用grid++report的总结
最近刚开始接触hibernate+spring+mvc+Easyui框架,也是刚开通了博客,希望能记录一下自己实践出来的东西,让其他人少走弯路. 转让正题,以个人浅薄的认识hibernate对于开发人 ...
- 工作笔记3.手把手教你搭建SSH(struts2+hibernate+spring)环境
上文中我们介绍<工作笔记2.软件开发经常使用工具> 从今天開始本文将教大家怎样进行开发?本文以搭建SSH(struts2+hibernate+spring)框架为例,共分为3步: 1)3个 ...
- SpringMVC Hibernate+Spring+Spring MVC+Bootstrap的管理系统实现
SpringMVC学习系列(12) 完结篇 之 基于Hibernate+Spring+Spring MVC+Bootstrap的管理系统实现 到这里已经写到第12篇了,前11篇基本上把Spring M ...
- 三大框架:Struts+Hibernate+Spring
三大框架:Struts+Hibernate+Spring Java三大框架主要用来做WEN应用. Struts主要负责表示层的显示 Spring利用它的IOC和AOP来处理控制业务(负责对数据库的操作 ...
- Structs hibernate spring=ssh简介
Structs hibernate spring Struts Struts是一个基于Sun J2EE平台的MVC框架,主要是采用Servlet和JSP技术来实现的. Struts框架可分为以下四 ...
随机推荐
- NDK开发总结
NDK开发差不多结束了, 估计后面也不会再碰了诶, 想着还是写个总结什么的,以后捡起来也方便哈.既然是总结,我这里就不会谈具体的细节,只会记录下我觉得重要的东西, 所以这篇随笔不是为萌新学习新知识准备 ...
- OkHttp使用进阶 译自OkHttp Github官方教程
版权声明: 欢迎转载,但请保留文章原始出处 作者:GavinCT 出处:http://www.cnblogs.com/ct2011/p/3997368.html 没有使用过OkHttp的,可以先看Ok ...
- 【转载】-- vi/vim使用
vi/vim 基本使用方法本文介绍了vi (vim)的基本使用方法,但对于普通用户来说基本上够了!i/vim的区别简单点来说,它们都是多模式编辑器,不同的是vim 是vi的升级版本,它不仅兼容vi的所 ...
- How to Call SharePoint 2013 API Service to Query The Lists
How to Call SharePoint 2013 API In SharePoint 2013, we can query the list by it owner service, then ...
- 《Automatic Face Classification of Cushing’s Syndrome in Women – A Novel Screening Approach》学习笔记
<针对女性库欣综合征患者的自动面部分类-一种新颖的筛查方法> Abstract 目的:库兴氏综合征对身体造成相当大的伤害如果不及时治疗,还经常是诊断的时间太长.在这项研究中,我们旨在测试面 ...
- Orchard SQLite v1.7.2
1. Upgrade NHibernate to v3.3.3 2. Add lib csharp-sqlite to support SQLite 3. Replace oracle client ...
- 团队项目--站立会议DAY5
第五次站立会议记录: 参会人员:张靖颜,钟灵毓秀,何玥,赵莹,王梓萱 项目进展: 1.张靖颜:继续对钟灵毓秀和赵莹同学编写的代码进行进一步审核及辅助. 2.钟灵毓秀:继续完善相关功能代码,逐步整理出各 ...
- libevent (二) 接收TCP连接
libevent 接收TCP连接 Evconnlistener 机制为您提供了侦听和接受传入的 TCP 连接的方法.下面的函数全部包含在`<event2/listener.h>`中. ev ...
- Apache CXF Webservice入门
1.步骤一览 关于CXF的介绍请移步官网.百科,这里仅供初次使用者入门. 2.步骤详情 2.1.环境准备 apache-cxf-3.0.0.zip下载 jdk1.7.0_51 Eclipse4.3.0 ...
- 【Android】Android开源项目分类汇总
第一部分 个性化控件(View) 主要介绍那些不错个性化的View,包括ListView.ActionBar.Menu.ViewPager.Gallery.GridView.ImageView.Pro ...
