QEMU KVM Libvirt(12): Live Migration
由于KVM的架构为
Libvirt –> qemu –> KVM
所以对于live migration有两种方式,一种是qemu + KVM自己的方式,一种是libvirt的方式,当然libvirt也是基于qemu+kvm的方式
qemu + KVM自己的方式为使用monitor
KVM Migration
KVM currently supports savevm/loadvm and offline or live migration Migration commands are given when in qemu-monitor (Alt-Ctrl-2). Upon successful completion, the migrated VM continues to run on the destination host.
Requirements
- The VM image is accessible on both source and destination hosts (located on a shared storage, e.g. using nfs).
- It is recommended an images-directory would be found on the same path on both hosts (for migrations of a copy-on-write image -- an image created on top of a base-image using "qemu-image create -b ...")
- The src and dst hosts must be on the same subnet (keeping guest's network when tap is used).
- Do not use -snapshot qemu command line option.
- For tcp: migration protocol
the guest on the destination must be started the same way it was started on the source.
The live migration process has the following steps:
The virtual machine instance is running on the source host.
The virtual machine is started on the destination host in the frozen listening mode. The parameters used are the same as on the source host plus the
-incoming tcp:parameter, whereip:portipspecifies the IP address andportspecifies the port for listening to the incoming migration. If 0 is set as IP address, the virtual machine listens on all interfaces.On the source host, switch to the monitor console and use the migrate -d tcp:
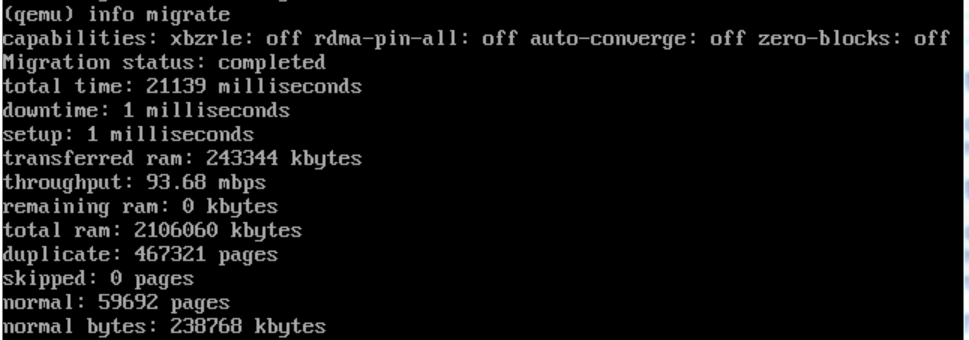
destination_ip:portcommand to initiate the migration.To determine the state of the migration, use the info migrate command in the monitor console on the source host.
To cancel the migration, use the migrate_cancel command in the monitor console on the source host.
To set the maximum tolerable downtime for migration in seconds, use the migrate_set_downtime
number_of_secondscommand.To set the maximum speed for migration in bytes per second, use the migrate_set_speed
bytes_per_secondcommand.
要进行live migration首先要存储共享,我们这里用nfs
在一台nfs server上安装
apt-get install nfs-kernel-server
export如下的文件夹
# cat /etc/exports
# /etc/exports: the access control list for filesystems which may be exported
# to NFS clients. See exports(5).
#
# Example for NFSv2 and NFSv3:
# /srv/homes hostname1(rw,sync,no_subtree_check) hostname2(ro,sync,no_subtree_check)
#
# Example for NFSv4:
# /srv/nfs4 gss/krb5i(rw,sync,fsid=0,crossmnt,no_subtree_check)
# /srv/nfs4/homes gss/krb5i(rw,sync,no_subtree_check)
#
/home/cliu8/nfs *(rw,sync,no_root_squash)
在source机器和destination机器上,都mount这个文件夹
mount 16.158.166.150:/home/cliu8/nfs /home/cliu8/migrate
在文件夹里面放入两个image
root@escto-bj-hp-z620:/home/cliu8/migrate# ls -l
total 3842908
-rwxr-xr-x 1 root root 1717567488 Jul 18 00:01 ubuntu-14.04.img
-rwxr-xr-x 1 root root 2217869312 Jul 17 22:13 ubuntutest.img
在source机器上启动
qemu-system-x86_64 -enable-kvm -name ubuntutest -m 2048 -hda /home/cliu8/migrate/ubuntu-14.04.img -vnc :19 -net nic -net user
在dest机器上同样启动,但是多了listen的参数
qemu-system-x86_64 -enable-kvm -name ubuntutest -m 2048 -hda /home/cliu8/migrate/ubuntu-14.04.img -vnc :19 -net nic -net user -incoming tcp:0:4444
打开source机器的monitor
运行migrate -d tcp:16.158.166.150:4444
这个时候info migrate,显示Migration status: active
等变成complete,则migration结束
这个时候,另一面的机器已经起来了。
Libvirt Migration
Network data transports
migration的时候的数据传输有两种方式:
Hypervisor native transport
所谓native的transport,就是依赖于hypervisor,也即KVM的自有的机制去做网络传输,不支持加密,可能对于某些hypervisor来讲,网络还需要特殊的配置。

libvirt tunnelled transport
依赖于libvirt的RPC的网络通路进行网络传输,支持加密。
只要下面的命令能够执行,就能够传输
virsh -c qemu+ssh://cliu8@16.158.166.150/system list --all
virsh -c qemu+tcp://popsuper1982/system list --all
virsh -c qemu+tls://popsuper1982/system list --all
缺点是有很多额外的性能损耗
Communication control paths/flows
看完了数据通路,我们再来看控制通路
Migration一般涉及三个较色,admin, source, destination
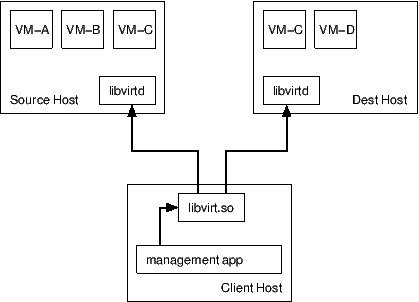
Managed direct migration
admin节点控制整个migration的全过程,admin既控制source, 也控制destination,然而source和destination之间并不交互,因而migration过程中,如果admin挂了,就失败了。
Managed peer to peer migration
admin节点仅仅和source交互,告诉source,你要migrate到destination,然后source控制整个过程,如果admin在这个过程中挂了,不影响接着进行migration

注意的是,admin登录source的credential信息和source登录destination的credential信息是不一样的。
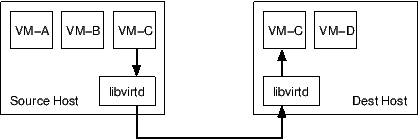
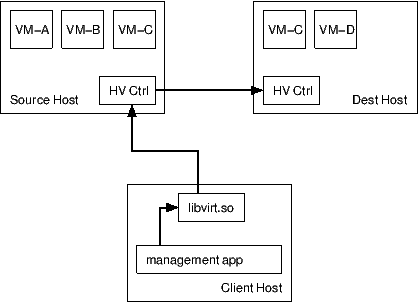
Unmanaged direct migration
admin和source都不控制migration的过程,而是admin的libvirt直接调用hypervisor的控制器,让hypervisor自己进行migration。
Configuration file handling
A transient guest only exists while it is running, and has no configuration file stored on disk.
A persistent guest maintains a configuration file on disk even when it is not running.
The virsh command has two flags to influence this behaviour.
The --undefine-source flag will cause the configuration file to be removed on the source host after a successful migration.
The --persist flag will cause a configuration file to be created on the destination host after a successful migration.
我们首先需要使得source和destination之间的libvirt是相互通的。
在source机器上,16.158.166.197
root@escto-bj-hp-z620:/home/cliu8/certtool# ls -l
total 60
-r--r--r-- 1 root root 1204 Jul 17 20:17 certificate_authority_certificate.pem
-r--r--r-- 1 root root 1972 Jul 17 20:17 certificate_authority_key.pem
-r--r--r-- 1 root root 37 Jul 17 20:17 certificate_authority_template.info
-r--r--r-- 1 root root 1379 Jul 17 20:17 escto-bj-hp-z620_client_certificate.pem
-r--r--r-- 1 root root 1968 Jul 17 20:17 escto-bj-hp-z620_client_key.pem
-r--r--r-- 1 root root 139 Jul 17 20:17 escto-bj-hp-z620_client_template.info
-r--r--r-- 1 root root 1310 Jul 17 20:17 escto-bj-hp-z620_server_certificate.pem
-r--r--r-- 1 root root 1968 Jul 17 20:17 escto-bj-hp-z620_server_key.pem
-r--r--r-- 1 root root 91 Jul 17 20:17 escto-bj-hp-z620_server_template.info
-r--r--r-- 1 root root 1371 Jul 17 20:17 popsuper1982_client_certificate.pem
-r--r--r-- 1 root root 1972 Jul 17 20:17 popsuper1982_client_key.pem
-r--r--r-- 1 root root 135 Jul 17 20:17 popsuper1982_client_template.info
-r--r--r-- 1 root root 1306 Jul 17 20:17 popsuper1982_server_certificate.pem
-r--r--r-- 1 root root 1968 Jul 17 20:17 popsuper1982_server_key.pem
-r--r--r-- 1 root root 87 Jul 17 20:17 popsuper1982_server_template.info
root@escto-bj-hp-z620:/home/cliu8/certtool# tree --charset ASCII /etc/pki/
/etc/pki/
|-- CA
| `-- cacert.pem -> /home/cliu8/certtool/certificate_authority_certificate.pem
|-- libvirt
| |-- clientcert.pem -> /home/cliu8/certtool/escto-bj-hp-z620_client_certificate.pem
| |-- private
| | |-- clientkey.pem -> /home/cliu8/certtool/escto-bj-hp-z620_client_key.pem
| | `-- serverkey.pem -> /home/cliu8/certtool/escto-bj-hp-z620_server_key.pem
| `-- servercert.pem -> /home/cliu8/certtool/escto-bj-hp-z620_server_certificate.pem
`-- nssdb -> /var/lib/nssdb
配置/etc/libvirt/libvirtd.conf
为了方便测试,我们对tcp, tls不进行密码设置
listen_tls = 1
listen_tcp = 1
tls_port = "16514"
tcp_port = "16509"
unix_sock_group = "libvirtd"
unix_sock_ro_perms = "0777"
unix_sock_rw_perms = "0770"
auth_unix_ro = "none"
auth_unix_rw = "none"
auth_tcp = "none"
auth_tls = "none"
测试下面的命令都能通过
virsh -c qemu+ssh://cliu8@16.158.166.150/system list --all
virsh -c qemu+tcp://popsuper1982/system list --all
virsh -c qemu+tls://popsuper1982/system list --all
在destination机器上,16.158.166.150
root@popsuper1982:/home/cliu8/certtool# ls -l
total 60
-r--r--r-- 1 root root 1204 Jul 15 22:31 certificate_authority_certificate.pem
-r--r--r-- 1 root root 1972 Jul 15 22:28 certificate_authority_key.pem
-r--r--r-- 1 root root 37 Jul 15 22:26 certificate_authority_template.info
-r--r--r-- 1 root root 1379 Jul 16 00:27 escto-bj-hp-z620_client_certificate.pem
-r--r--r-- 1 root root 1968 Jul 16 00:25 escto-bj-hp-z620_client_key.pem
-r--r--r-- 1 root root 139 Jul 16 00:24 escto-bj-hp-z620_client_template.info
-r--r--r-- 1 root root 1310 Jul 17 20:09 escto-bj-hp-z620_server_certificate.pem
-r--r--r-- 1 root root 1968 Jul 17 20:07 escto-bj-hp-z620_server_key.pem
-r--r--r-- 1 root root 91 Jul 17 20:06 escto-bj-hp-z620_server_template.info
-r--r--r-- 1 root root 1371 Jul 17 20:14 popsuper1982_client_certificate.pem
-r--r--r-- 1 root root 1972 Jul 17 20:13 popsuper1982_client_key.pem
-r--r--r-- 1 root root 135 Jul 17 20:12 popsuper1982_client_template.info
-r--r--r-- 1 root root 1306 Jul 16 00:09 popsuper1982_server_certificate.pem
-r--r--r-- 1 root root 1968 Jul 16 00:06 popsuper1982_server_key.pem
-r--r--r-- 1 root root 87 Jul 16 00:05 popsuper1982_server_template.info
root@popsuper1982:/home/cliu8/certtool# tree --charset ASCII /etc/pki/
/etc/pki/
|-- CA
| `-- cacert.pem -> /home/cliu8/certtool/certificate_authority_certificate.pem
|-- libvirt
| |-- clientcert.pem -> /home/cliu8/certtool/popsuper1982_client_certificate.pem
| |-- private
| | |-- clientkey.pem -> /home/cliu8/certtool/popsuper1982_client_key.pem
| | `-- serverkey.pem -> /home/cliu8/certtool/popsuper1982_server_key.pem
| `-- servercert.pem -> /home/cliu8/certtool/popsuper1982_server_certificate.pem
`-- nssdb -> /var/lib/nssdb
virsh -c qemu+ssh://cliu8@16.158.166.197/system list --all
virsh -c qemu+tcp://escto-bj-hp-z620/system list --all
virsh -c qemu+tls://escto-bj-hp-z620/system list –all
在source机器上,启动一个虚拟机virsh start ubuntu-14.04
# virsh dumpxml ubuntu-14.04
<domain type='kvm' id='55'>
<name>ubuntu-14.04</name>
<uuid>0f0806ab-531d-6134-5def-c5b495529284</uuid>
<memory unit='KiB'>2097152</memory>
<currentMemory unit='KiB'>2097152</currentMemory>
<vcpu placement='static'>1</vcpu>
<resource>
<partition>/machine</partition>
</resource>
<os>
<type arch='x86_64' machine='pc-i440fx-trusty'>hvm</type>
<boot dev='hd'/>
</os>
<features>
<acpi/>
<apic/>
<pae/>
</features>
<clock offset='utc'/>
<on_poweroff>destroy</on_poweroff>
<on_reboot>restart</on_reboot>
<on_crash>restart</on_crash>
<devices>
<emulator>/usr/bin/kvm-spice</emulator>
<disk type='file' device='disk'>
<driver name='qemu' type='qcow2' cache='none'/>
<source file='/home/cliu8/migrate/ubuntu-14.04.img'/>
<target dev='vda' bus='virtio'/>
<alias name='virtio-disk0'/>
<address type='pci' domain='0x0000' bus='0x00' slot='0x04' function='0x0'/>
</disk>
<disk type='block' device='cdrom'>
<driver name='qemu' type='raw'/>
<target dev='hdc' bus='ide'/>
<readonly/>
<alias name='ide0-1-0'/>
<address type='drive' controller='0' bus='1' target='0' unit='0'/>
</disk>
<controller type='usb' index='0'>
<alias name='usb0'/>
<address type='pci' domain='0x0000' bus='0x00' slot='0x01' function='0x2'/>
</controller>
<controller type='pci' index='0' model='pci-root'>
<alias name='pci.0'/>
</controller>
<controller type='ide' index='0'>
<alias name='ide0'/>
<address type='pci' domain='0x0000' bus='0x00' slot='0x01' function='0x1'/>
</controller>
<interface type='bridge'>
<mac address='52:54:11:9b:d5:11'/>
<source bridge='ubuntu_br'/>
<virtualport type='openvswitch'>
<parameters interfaceid='18a45d7e-d96b-4b9e-9d92-dc9ff3ea77e0'/>
</virtualport>
<target dev='vnet8'/>
<model type='virtio'/>
<alias name='net0'/>
<address type='pci' domain='0x0000' bus='0x00' slot='0x03' function='0x0'/>
</interface>
<serial type='pty'>
<source path='/dev/pts/16'/>
<target port='0'/>
<alias name='serial0'/>
</serial>
<console type='pty' tty='/dev/pts/16'>
<source path='/dev/pts/16'/>
<target type='serial' port='0'/>
<alias name='serial0'/>
</console>
<input type='mouse' bus='ps2'/>
<input type='keyboard' bus='ps2'/>
<graphics type='vnc' port='5908' autoport='yes' listen='0.0.0.0'>
<listen type='address' address='0.0.0.0'/>
</graphics>
<video>
<model type='cirrus' vram='9216' heads='1'/>
<alias name='video0'/>
<address type='pci' domain='0x0000' bus='0x00' slot='0x02' function='0x0'/>
</video>
<memballoon model='virtio'>
<alias name='balloon0'/>
<address type='pci' domain='0x0000' bus='0x00' slot='0x05' function='0x0'/>
</memballoon>
</devices>
<seclabel type='none'/>
</domain>
其中cdrom和usb的都应该去掉,才能migration成功。
# virsh migrate --verbose --live --persistent ubuntu-14.04 qemu+tcp://popsuper1982/system
Migration: [100 %]
QEMU KVM Libvirt(12): Live Migration的更多相关文章
- QEMU KVM Libvirt手册(10):Managing Virtual Machines with libvirt
libvirt is a library that provides a common API for managing popular virtualization solutions, among ...
- QEMU KVM Libvirt手册(11): Managing Storage
When managing a VM Guest on the VM Host Server itself, it is possible to access the complete file sy ...
- QEMU KVM Libvirt手册(7): 硬件虚拟化
在openstack中,如果我们启动一个虚拟机,我们会看到非常复杂的参数 qemu-system-x86_64 -enable-kvm -name instance-00000024 -S -mach ...
- QEMU KVM libvirt手册(4) – images
RAW raw是默认的格式,格式简单,容易转换为其他的格式.需要文件系统的支持才能支持sparse file 创建image # qemu-img create -f raw flat.img 10G ...
- QEMU KVM libvirt 手册(3) - Storage Media
访问Hard Drive 使用-hda –hdb qemu-system-x86_64 -enable-kvm -name ubuntutest -m 2048 -hda ubuntutest.im ...
- QEMU KVM libvirt手册(2): monitor
Administrating Virtual Machines with QEMU Monitor When QEMU is running, a monitor console is provide ...
- QEMU KVM Libvirt手册(10): KVM的各种限制
Overcommits KVM allows for both memory and disk space overcommit. However, hard errors resulting fro ...
- QEMU KVM Libvirt手册(5) – snapshots
前面讲了QEMU的qcow2格式的internal snapshot和external snapshot,这都是虚拟机文件格式的功能. 这是文件级别的. 还可以是文件系统级别的,比如很多文件系统支持s ...
- kvm/qemu/libvirt学习笔记 (1) qemu/kvm/libvirt介绍及虚拟化环境的安装
kvm简介 kvm最初由Quramnet公司开发,2008年被RedHat公司收购.kvm全称基于内核的虚拟机(Kernel-based Virtual Machine),它是Linux的一个内核模块 ...
随机推荐
- Go命令官方指南【原译】
启动错误报告 编译包和依赖项 删除目标文件和缓存的文件 显示包或符号的文档 打印Go环境信息 更新包以使用新API Gofmt(重新格式化)包源 通过处理源生成Go文件 下载并安装包和依赖项 编译并安 ...
- Centos 7部署docker
master安装: 安装zookeeper -openjdk java--openjdk-headless rpm -i packages/mesosphere-zookeeper--.centos7 ...
- java----GUI和接口回调
GUI: 图形用户接口 import javax.swing.*; import java.awt.*; import java.awt.event.ActionEvent; import java. ...
- IE8 disable 兼容行问题
在chrome 下 如果样式设置为disabled 则不能点击, 但是在IE9 或者IE8 则还是可以点击
- net core EF 链接mysql 数据库
这个主要是一个demo.就在一个工程里面写的 安装MySql.Data.EntityFrameworkCore 增加DbContext 相当于程序与数据库的中间层 public class Ident ...
- Istio 是什么?
使用云平台可以为组织提供丰富的好处.然而,不可否认的是,采用云可能会给 DevOps 团队带来压力.开发人员必须使用微服务以满足应用的可移植性,同时运营商管理了极其庞大的混合和多云部署.Istio 允 ...
- 蓝桥杯 穿越雷区(bfs)
题目描述 X星的坦克战车很奇怪,它必须交替地穿越正能量辐射区和负能量辐射区才能保持正常运转,否则将报废.某坦克需要从A区到B区去(A,B区本身是安全区,没有正能量或负能量特征),怎样走才能路径最短? ...
- Android Studio升级到3.4遇到的问题总结
1.gradle需要升级. 1).project的build.gradle文件写下如下代码: buildscript { repositories { google() jcenter() } dep ...
- 向mysql中导入向导时如表xlsx
如果出现这种问题那么是因为没有打开这个文件,如果想导入这个文件需要到开这个文件,然后再导入
- PCA:利用PCA(四个主成分的贡献率就才达100%)降维提高测试集辛烷值含量预测准确度并《测试集辛烷值含量预测结果对比》—Jason niu
load spectra; temp = randperm(size(NIR, 1)); P_train = NIR(temp(1:50),:); T_train = octane(temp(1:50 ...