spring boot到底帮我们做了那些事?
一、前言
上一篇介绍了注解,也是为这一篇做铺垫,传统的都是通过配置文件来启动spring,那spring boot到底是做了什么能让我们快速开发昵?
二、启动原理
看下程序启动的入口,主要两处地方一是SpringBootApplication注解,另外就是run方法,首先我们看注解部分,上一篇我们也说过注解应该不难看懂,我们看下这个注解里面有什么神奇的东西;
@SpringBootApplication

public class DemoApplication {

    public static void main(String[] args) {

        SpringApplication.run(DemoApplication.class, args);

    }

}

@Target(ElementType.TYPE)

@Retention(RetentionPolicy.RUNTIME)

@Documented

@Inherited

@SpringBootConfiguration

@EnableAutoConfiguration

@ComponentScan(excludeFilters = {

        @Filter(type = FilterType.CUSTOM, classes = TypeExcludeFilter.class),

        @Filter(type = FilterType.CUSTOM, classes = AutoConfigurationExcludeFilter.class) })

public @interface SpringBootApplication {

    /**

     * Exclude specific auto-configuration classes such that they will never be applied.

     * @return the classes to exclude

     */

    @AliasFor(annotation = EnableAutoConfiguration.class)

    Class<?>[] exclude() default {};

    /**

     * Exclude specific auto-configuration class names such that they will never be

     * applied.

     * @return the class names to exclude

     * @since 1.3.0

     */

    @AliasFor(annotation = EnableAutoConfiguration.class)

    String[] excludeName() default {};

    /**

     * Base packages to scan for annotated components. Use {@link #scanBasePackageClasses}

     * for a type-safe alternative to String-based package names.

     * @return base packages to scan

     * @since 1.3.0

     */

    @AliasFor(annotation = ComponentScan.class, attribute = "basePackages")

    String[] scanBasePackages() default {};

    /**

     * Type-safe alternative to {@link #scanBasePackages} for specifying the packages to

     * scan for annotated components. The package of each class specified will be scanned.

     * <p>

     * Consider creating a special no-op marker class or interface in each package that

     * serves no purpose other than being referenced by this attribute.

     * @return base packages to scan

     * @since 1.3.0

     */

    @AliasFor(annotation = ComponentScan.class, attribute = "basePackageClasses")

    Class<?>[] scanBasePackageClasses() default {};

}
看上面代码,除去元注解,主要有3个注解,
@ComponentScan
这个不需要我们多说太多,这个主要有2个作用,组件扫描和自动装配;
@SpringBootConfiguration
这个我们也不需要说太多,这个注解主要是继承@Configuration注解,这个我们就是为了加载配置文件用的;
@EnableAutoConfiguration
这个是我们的重点:

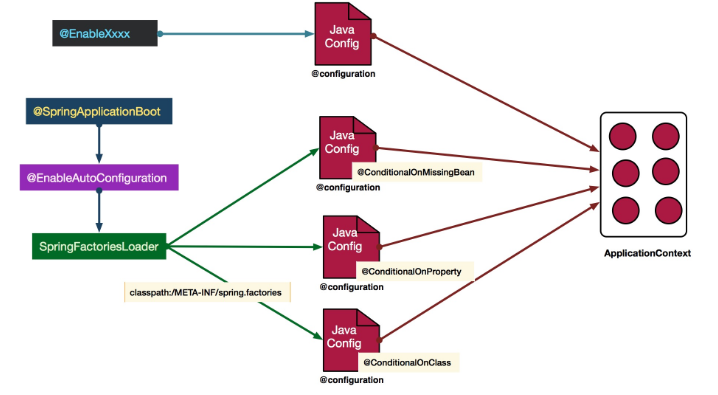
看图我们来走一下代码,这里有一个重点就是@Import注解,这个里面引入了AutoConfigurationImportSelector.class这个文件,所以我们就需要看下这里面有那些玩意,值得我们注意的,这个类里面代码有点多我将重点放到下一个代码片段中,让大家结构清晰一些;
@Target(ElementType.TYPE)

@Retention(RetentionPolicy.RUNTIME)

@Documented

@Inherited

@AutoConfigurationPackage

@Import(AutoConfigurationImportSelector.class)

public @interface EnableAutoConfiguration {

    String ENABLED_OVERRIDE_PROPERTY = "spring.boot.enableautoconfiguration";

    /**

     * Exclude specific auto-configuration classes such that they will never be applied.

     * @return the classes to exclude

     */

    Class<?>[] exclude() default {};

    /**

     * Exclude specific auto-configuration class names such that they will never be

     * applied.

     * @return the class names to exclude

     * @since 1.3.0

     */

    String[] excludeName() default {};

}
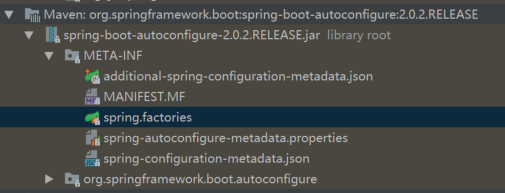
这是中间比较关键的代码,我们主要看下loadFactories方法,这个里面有个常量的配置,位置如下图所示,整段代码实现了把配置文件中的信息通过反射实例化成为@Configuration的配置文件,然后通过@Configuration最后汇总到容器当中;
    protected List<AutoConfigurationImportFilter> getAutoConfigurationImportFilters() {

        return SpringFactoriesLoader.loadFactories(AutoConfigurationImportFilter.class,

                this.beanClassLoader);

    }

public abstract class SpringFactoriesLoader {

    /**

     * The location to look for factories.

     * <p>Can be present in multiple JAR files.

     */

    public static final String FACTORIES_RESOURCE_LOCATION = "META-INF/spring.factories";

    private static final Log logger = LogFactory.getLog(SpringFactoriesLoader.class);

    private static final Map<ClassLoader, MultiValueMap<String, String>> cache = new ConcurrentReferenceHashMap<>();

    /**

     * Load and instantiate the factory implementations of the given type from

     * {@value #FACTORIES_RESOURCE_LOCATION}, using the given class loader.

     * <p>The returned factories are sorted through {@link AnnotationAwareOrderComparator}.

     * <p>If a custom instantiation strategy is required, use {@link #loadFactoryNames}

     * to obtain all registered factory names.

     * @param factoryClass the interface or abstract class representing the factory

     * @param classLoader the ClassLoader to use for loading (can be {@code null} to use the default)

     * @see #loadFactoryNames

     * @throws IllegalArgumentException if any factory implementation class cannot

     * be loaded or if an error occurs while instantiating any factory

     */

    public static <T> List<T> loadFactories(Class<T> factoryClass, @Nullable ClassLoader classLoader) {

        Assert.notNull(factoryClass, "'factoryClass' must not be null");

        ClassLoader classLoaderToUse = classLoader;

        if (classLoaderToUse == null) {

            classLoaderToUse = SpringFactoriesLoader.class.getClassLoader();

        }

        List<String> factoryNames = loadFactoryNames(factoryClass, classLoaderToUse);

        if (logger.isTraceEnabled()) {

            logger.trace("Loaded [" + factoryClass.getName() + "] names: " + factoryNames);

        }

        List<T> result = new ArrayList<>(factoryNames.size());

        for (String factoryName : factoryNames) {

            result.add(instantiateFactory(factoryName, factoryClass, classLoaderToUse));

        }

        AnnotationAwareOrderComparator.sort(result);

        return result;

    }

    /**

     * Load the fully qualified class names of factory implementations of the

     * given type from {@value #FACTORIES_RESOURCE_LOCATION}, using the given

     * class loader.

     * @param factoryClass the interface or abstract class representing the factory

     * @param classLoader the ClassLoader to use for loading resources; can be

     * {@code null} to use the default

     * @see #loadFactories

     * @throws IllegalArgumentException if an error occurs while loading factory names

     */

    public static List<String> loadFactoryNames(Class<?> factoryClass, @Nullable ClassLoader classLoader) {

        String factoryClassName = factoryClass.getName();

        return loadSpringFactories(classLoader).getOrDefault(factoryClassName, Collections.emptyList());

    }

    private static Map<String, List<String>> loadSpringFactories(@Nullable ClassLoader classLoader) {

        MultiValueMap<String, String> result = cache.get(classLoader);

        if (result != null) {

            return result;

        }

        try {

            Enumeration<URL> urls = (classLoader != null ?

                    classLoader.getResources(FACTORIES_RESOURCE_LOCATION) :

                    ClassLoader.getSystemResources(FACTORIES_RESOURCE_LOCATION));

            result = new LinkedMultiValueMap<>();

            while (urls.hasMoreElements()) {

                URL url = urls.nextElement();

                UrlResource resource = new UrlResource(url);

                Properties properties = PropertiesLoaderUtils.loadProperties(resource);

                for (Map.Entry<?, ?> entry : properties.entrySet()) {

                    List<String> factoryClassNames = Arrays.asList(

                            StringUtils.commaDelimitedListToStringArray((String) entry.getValue()));

                    result.addAll((String) entry.getKey(), factoryClassNames);

                }

            }

            cache.put(classLoader, result);

            return result;

        }

        catch (IOException ex) {

            throw new IllegalArgumentException("Unable to load factories from location [" +

                    FACTORIES_RESOURCE_LOCATION + "]", ex);

        }

    }

    @SuppressWarnings("unchecked")

    private static <T> T instantiateFactory(String instanceClassName, Class<T> factoryClass, ClassLoader classLoader) {

        try {

            Class<?> instanceClass = ClassUtils.forName(instanceClassName, classLoader);

            if (!factoryClass.isAssignableFrom(instanceClass)) {

                throw new IllegalArgumentException(

                        "Class [" + instanceClassName + "] is not assignable to [" + factoryClass.getName() + "]");

            }

            return (T) ReflectionUtils.accessibleConstructor(instanceClass).newInstance();

        }

        catch (Throwable ex) {

            throw new IllegalArgumentException("Unable to instantiate factory class: " + factoryClass.getName(), ex);

        }

    }

}

基本上注解这块就是说完了,但是中间少说了几个比较重要的东西,这里要说下需要注意的2个问题,
1.exclude和excludeName这个两个主要时排除你不想加载的配置,用法很简答,不需要说他太多;
2.scanBasePackages和scanBasePackageClasses这个是为了指定运行目录,好多小伙伴做了项目分离以后,会读取不到Mappr等,可以考虑下是不是这个错误;
重点来了,上面说了加载什么东西,那这些东西啥时候被调用被触发,那我们看下我们重点run方法:
1.调用run方法之前,首先初始化SpringApplication对象实例,这个对象初始化的过程中也做了不少事情让我们来慢慢看起来,接上上面思路,继续完成我们的取经;
//初始化SpringApplication对象

public SpringApplication(ResourceLoader resourceLoader, Class<?>... primarySources) {

          //加载classpatch文件下面的配置文件

        this.resourceLoader = resourceLoader;

        Assert.notNull(primarySources, "PrimarySources must not be null");

        this.primarySources = new LinkedHashSet<>(Arrays.asList(primarySources));

                //判断是否是web运行环境

        this.webApplicationType = deduceWebApplicationType();

                //使用SpringFactoriesLoader在应用的classpath中查找并加载所有可用的ApplicationContextInitializer。

        setInitializers((Collection) getSpringFactoriesInstances(

                ApplicationContextInitializer.class));

               //使用SpringFactoriesLoader在应用的classpath中查找并加载所有可用的ApplicationListener。

        setListeners((Collection) getSpringFactoriesInstances(ApplicationListener.class));

                //获得当前执行main方法的类对象

        this.mainApplicationClass = deduceMainApplicationClass();

}
ApplicationContextInitializer 接口是在spring容器刷新之前执行的一个回调函数,主要有2点作用:1.在上下文(ConfigurableApplicationContext)刷新(refresh)之前调用,2.通常被用作web应用,在一些程序设计在spring容器初始化使用。比如说注册一些配置或者激活一些配置文件针对(ConfigurableApplicationContext的getEnvironment()方法)。另外这个函数支持支持Order注解。并且代表着执行顺序。我在下面也写了一个简单的例子,同时这个也是支持在配置文件中配置的context.initializer.classes=后面加上回调函数的全限定名称;另外假设我们在当前项目中要引入别的jar,这个jar要在加载前做一些配置,这个时候我们项目下的resources下新建META-INF文件夹,文件夹下新建spring.factories文件,然后写上org.springframework.context.ApplicationContextInitializer=后面加上需要回调函数的全限定名称,这个是在主项目启动的时候就会优先加载了;
ApplicationListener接口是spring boot的监听器,有7种类型,我准备好了demo大家执行一下,我相信对下面run方法的运行就不是很迷惑了;
@Order(3)

public class TestApplicationContextInitializer implements ApplicationContextInitializer {

    @Override

    public void initialize(ConfigurableApplicationContext applicationContext) {

        System.out.println(applicationContext.getBeanDefinitionCount()+applicationContext.getBeanDefinitionNames().toString());

    }

}

@Order(1)

public class TestApplicationContextInitializer2 implements ApplicationContextInitializer {

    @Override

    public void initialize(ConfigurableApplicationContext applicationContext) {

        System.out.println(applicationContext.getDisplayName());

    }

}

@SpringBootApplication

public class DemoApplication {

    public static void main(String[] args) {

//        SpringApplication.run(DemoApplication.class, args);

        SpringApplication springApplication=new SpringApplication(DemoApplication.class);

        springApplication.addListeners((ApplicationListener<ApplicationStartingEvent>) event->{

            System.out.println("Starting");

        });

        springApplication.addListeners((ApplicationListener<ApplicationStartedEvent>) event->{

            System.out.println("Started");

        });

        springApplication.addListeners((ApplicationListener<ApplicationFailedEvent>) event->{

            System.out.println("Failed");

        });

        springApplication.addListeners((ApplicationListener<ApplicationPreparedEvent>) event->{

            System.out.println("Prepared");

        });

        springApplication.addListeners((ApplicationListener<SpringApplicationEvent>) event->{

            System.out.println("SpringApplication");

        });

        springApplication.addListeners((ApplicationListener<ApplicationEnvironmentPreparedEvent>) event->{

            System.out.println("EnvironmentPrepare");

        });

        springApplication.addListeners((ApplicationListener<ApplicationReadyEvent>) event->{

            System.out.println("Ready");

        });

        springApplication.addInitializers(new TestApplicationContextInitializer());

        springApplication.addInitializers(new TestApplicationContextInitializer2());

        springApplication.run(args);

    }

}
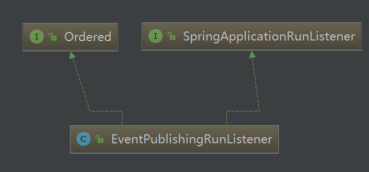
2.实例化完成开始执行run方法,这个里面流程比较多,我们先来看一个继承关系,然后结合上面ApplicationListener的demo我相信大家已经对其广播实现已经有了一个了解,这里我还是提一下通过SpringApplicationRunListener在ApplicationContext初始化过程中各个时点发布各种广播事件,并由ApplicationListener负责接收广播事件。接下来我们看下启动流程:

public ConfigurableApplicationContext run(String... args) {

        StopWatch stopWatch = new StopWatch();

        stopWatch.start();

        ConfigurableApplicationContext context = null;

                //收集异常

        Collection<SpringBootExceptionReporter> exceptionReporters = new ArrayList<>();

            //设置Headless模式为全局

        configureHeadlessProperty();

          //加载所有classpath下面的META-INF/spring.factories SpringApplicationRunListener(不同的时间点发送事件通知)

        SpringApplicationRunListeners listeners = getRunListeners(args);

          //spring boot启动初始化开始

        listeners.starting();

        try {

                        //装配参数和环境

            ApplicationArguments applicationArguments = new DefaultApplicationArguments(

                    args);

            ConfigurableEnvironment environment = prepareEnvironment(listeners,

                    applicationArguments);

            configureIgnoreBeanInfo(environment);

                        //打印Banner

            Banner printedBanner = printBanner(environment);

                        //创建ApplicationContext()

            context = createApplicationContext();

                        //返回异常

            exceptionReporters = getSpringFactoriesInstances(

                    SpringBootExceptionReporter.class,

                    new Class[] { ConfigurableApplicationContext.class }, context);

                        //装配Context

            prepareContext(context, environment, listeners, applicationArguments,

                    printedBanner);

            //执行context的refresh方法,并且调用context的registerShutdownHook方法(这一步执行完成之后,spring容器加载完成)

            refreshContext(context);

             //回调,获取容器中所有的ApplicationRunner、CommandLineRunner接口

            afterRefresh(context, applicationArguments);

            stopWatch.stop();

            if (this.logStartupInfo) {

                new StartupInfoLogger(this.mainApplicationClass)

                        .logStarted(getApplicationLog(), stopWatch);

            }

             //容器初始化完成

            listeners.started(context);

            //遍历所有注册的ApplicationRunner和CommandLineRunner,并执行其run()方法。

           //该过程可以理解为是SpringBoot完成ApplicationContext初始化前的最后一步工作,

            callRunners(context, applicationArguments);

        }

        catch (Throwable ex) {

            handleRunFailure(context, ex, exceptionReporters, listeners);

            throw new IllegalStateException(ex);

        }

        try {

            //容器开始被调用

            listeners.running(context);

        }

        catch (Throwable ex) {

            handleRunFailure(context, ex, exceptionReporters, null);

            throw new IllegalStateException(ex);

        }

        return context;

}
写了这么多我忘记放入执行结果了这里补进去:

三、总结
要是想在spring boot初始化的时候搞点事情的化,那么有3种方法:
1.创建ApplicationContextInitializer的实现类
2.创建ApplicationListener的实现类
3.创建ApplicationRunner和CommandLineRunner的实现类
上面2种已经有了demo,我再来写一个第3种的demo;
@Order(2)

@Component

public class CommandLineRunnerDemo implements CommandLineRunner {

    @Override

    public void run(String... args) throws Exception {

        System.out.println("CommandLineRunnerDemo");

    }

}

@Order(1)

@Component

public class ApplicationRunnerDemo implements ApplicationRunner {

    @Override

    public void run(ApplicationArguments args) throws Exception {

        System.out.println("ApplicationRunner");

    }

}
知道启动的流程又懂了扩展,我们接下来开始spring cloud吧。
上面有什么的不懂的可以加群:438836709
也可以关注我公众号

spring boot到底帮我们做了那些事?的更多相关文章
- Spring Boot到底是怎么运行的,你知道吗?
导读 Spring Boot方式的项目开发已经逐步成为Java应用开发领域的主流框架,它不仅可以方便地创建生产级的Spring应用程序,还能轻松地通过一些注解配置与目前比较流行的微服务框架Spring ...
- Spring Boot 2整合Redis做缓存
既然是要用Redis做缓存,自然少不了安装了.但是本文主要讲Spring Boot与Redis整合.安装教程请另行百度! 1.首先是我们的Redis配置类 package com.tyc; impor ...
- spring boot:使用caffeine+redis做二级缓存(spring boot 2.3.1)
一,为什么要使用二级缓存? 我们通常会使用caffeine做本地缓存(或者叫做进程内缓存), 它的优点是速度快,操作方便,缺点是不方便管理,不方便扩展 而通常会使用redis作为分布式缓存, 它的优点 ...
- Spring通过IOC帮我们做火鸡
一.IOC--setter注入 1.准备dmo 首先准备一只火鸡 public class Turkey { private int id; private String name; public i ...
- <mvc:annotation-driven />到底帮我们做了啥
一句 <mvc:annotation-driven />实际做了以下工作:(不包括添加自己定义的拦截器) 我们了解这些之后,对Spring3 MVC的控制力就更强大了,想改哪就改哪里. s ...
- spring mvc注解和spring boot注解
1 spring mvc和spring boot之间的关系 spring boot包含spring mvc.所以,spring mvc的注解在spring boot总都是可以用的吗? spring b ...
- spring mvc 和spring boot 中注解的使用
1 spring mvc和spring boot之间的关系 spring boot包含spring mvc.所以,spring mvc的注解在spring boot总都是可以用的吗? spring b ...
- spring boot(一):入门篇
构建微服务:Spring boot 入门篇 什么是spring boot Spring Boot是由Pivotal团队提供的全新框架,其设计目的是用来简化新Spring应用的初始搭建以及开发过程.该框 ...
- 为什么是Spring Boot
原文:https://dzone.com/articles/why-springboot 作者:Siva Prasad Reddy Katamreddy 译者:Oopsguy 本文介绍将各种Sprin ...
随机推荐
- REST API设计指导——译自Microsoft REST API Guidelines(三)
前面我们说了,如果API的设计更规范更合理,在很大程度上能够提高联调的效率,降低沟通成本.那么什么是好的API设计?这里我们不得不提到REST API. 关于REST API的书籍很多,但是完整完善实 ...
- Django学习笔记(9)—— 开发用户注册与登录系统
一,项目题目: 开发用户注册与登录系统 该项目主要练习使用Django开发一个用户注册与登录的系统,通过这个项目然后巩固自己这段时间所学习的Django知识. 二,项目需求: 开发一个简单的用户登录与 ...
- 封装一个基于NLog+NLog.Mongo的日志记录工具类LogUtil
封装一个基于NLog+NLog.Mongo的日志记录工具类LogUtil,代码比较简单,主要是把MongoTarget的配置.FileTarget的配置集成到类中,同时利用缓存依赖来判断是否需要重新创 ...
- [日常] imap协议读取邮件
telnet imap.sina.net 143 A01 LOGIN shihan@appdev.sinanet.com 密码 A02 list "" * //列出邮件夹 * LI ...
- 有关mysql实现oracle分析函数功能的方法
目前公司erp开发有一个脚本需求:对于收款合同审批单和收款合同(n:1),需要获取收款审批单中最新的一条审批记录来更新其对应的收款合同的相关信息. 难点主要在对相同类别的属性进行分组然后组内排序(分组 ...
- 环境搭建 - Tomcat(Windows)
Tomcat环境搭建 本文以Windows7下搭建tomcat-8.5.15为示例 下载tomcat压缩包 网址:Tomcat 非C盘根目录新建文件夹:Tomcat D:\tomcat 将tomcat ...
- SpringBoot究竟是如何跑起来的?
摘要: 神奇的SpringBoot. 原文:SpringBoot 究竟是如何跑起来的? 作者:老钱 Fundebug经授权转载,版权归原作者所有. 不得不说 SpringBoot 太复杂了,我本来只想 ...
- JavaScript splice() 方法和JavaScript split() 方法
定义和用法 splice() 方法向/从数组中添加/删除项目,然后返回被删除的项目. 注释:该方法会改变原始数组. 语法 arrayObject.splice(index,howmany,item1, ...
- 关于Skyline沿对象画boundingbox的探讨
先来说说为什么要搞这个?项目中经常遇到的一个操作就是选定对象,以前都是通过Tint设置对象颜色来标识选定对象,但是随着图层中模型增多,模型色彩丰富,会出现选定色与对象颜色对比不明显的情况.因为看到Te ...
- iOS ----------各种判断
iOS 判断数字 - (BOOL) deptNumInputShouldNumber:(NSString *)str { if (str.length == 0) { return NO; } NSS ...
