ElasticSearch Index操作源码分析
ElasticSearch Index操作源码分析
本文记录ElasticSearch创建索引执行源码流程。从执行流程角度看一下创建索引会涉及到哪些服务(比如AllocationService、MasterService),由于本人对分布式系统理解不是很深,所以很多一些细节原理也是不懂。
创建索引请求。这里仅仅是创建索引,没有写入文档。
curl -X PUT "localhost:9200/twitter"
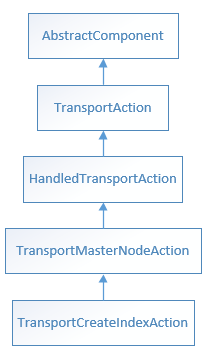
ElasticSearch服务器端收到Client的创建索引请求后,是从org.elasticsearch.action.admin.indices.create.TransportCreateIndexAction开始执行索引创建流程的。

创建索引是需要ElasticSearch Master节点参与的,因此TransportCreateIndexAction继承了TransportMasterNodeAction,而创建索引的具体操作由实例属性MetaDataCreateIndexService完成。
/**

 * Create index action.

 */

public class TransportCreateIndexAction extends TransportMasterNodeAction<CreateIndexRequest, CreateIndexResponse> {

	//

    private final MetaDataCreateIndexService createIndexService;
在MetaDataCreateIndexService.createIndex(...)调用onlyCreateIndex方法执行创建索引操作。
public void createIndex(...)

{

onlyCreateIndex(request, ActionListener.wrap(response -> {

            if (response.isAcknowledged()) {

                activeShardsObserver.waitForActiveShards

}
Creates an index in the cluster state and waits for the specified number of shard copies to become active as specified in CreateIndexClusterStateUpdateRequest#waitForActiveShards()before sending the response on the listener.
创建索引需要检查 Active shards,默认情况下:只要Primary Shard是Active的,就可以创建索引。如果Active shards未达到指定的数目,则会创建索引请求会阻塞,直到集群中Active shards恢复到指定数目或者超时返回。可参考:ActiveShardsObserver#waitForActiveShards(...)方法。
索引的创建封装在org.elasticsearch.cluster.metadata.MetaDataCreateIndexService.IndexCreationTask#IndexCreationTask对象中,最终由具有优先级任务队列的线程池PrioritizedEsThreadPoolExecutor执行。

创建索引这样的操作需要通知到集群中各个节点,修改集群的状态,因此IndexCreationTask继承了AckedClusterStateUpdateTask。
在MetaDataCreateIndexService#onlyCreateIndex(...)提交IndexCreationTask。
 clusterService.submitStateUpdateTask("create-index [" + request.index() + "], cause [" + request.cause() + "]",

            new IndexCreationTask(logger, allocationService, request, listener, indicesService, aliasValidator, xContentRegistry, settings,

                this::validate));
跟踪submitStateUpdateTasks(...)调用栈,在org.elasticsearch.cluster.service.MasterService#submitStateUpdateTasks(...)方法中lambda map函数 将IndexCreationTask对象转换成可供线程池执行的Runnable任务Batcher.UpdateTask。
public <T> void submitStateUpdateTasks(...,Map<T, ClusterStateTaskListener> tasks,...)

{

    try {

            List<Batcher.UpdateTask> safeTasks = tasks.entrySet().stream()

                .map(e -> taskBatcher.new UpdateTask(config.priority(), source, e.getKey(), safe(e.getValue()), executor))

                .collect(Collectors.toList());

        	//taskBatcher org.elasticsearch.cluster.service.TaskBatcher

            taskBatcher.submitTasks(safeTasks, config.timeout());

        }

}

//PrioritizedEsThreadPoolExecutor execute(...)提交创建索引任务

public abstract class TaskBatcher {

    private final PrioritizedEsThreadPoolExecutor threadExecutor;

    public void submitTasks(...){

         if (timeout != null) {

            threadExecutor.execute(firstTask, timeout, () -> onTimeoutInternal(tasks, timeout));

        } else {

            threadExecutor.execute(firstTask);

        }

    }

}
org.elasticsearch.cluster.service.MasterService.Batcher.UpdateTask的继承关系如下:可以看出它是一个Runnable任务,创建索引操作最终由PrioritizedEsThreadPoolExecutor线程池提交任务执行。

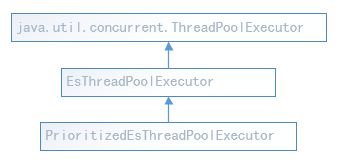
PrioritizedEsThreadPoolExecutor扩充自ThreadPoolExecutor,参考这个类的源代码,可以了解ElasticSearch是如何自定义一个带有任务优先级队列的线程池的,也可以学习一些如何扩展线程池的功能。

跟踪threadExecutor.execute(...)代码,
public void execute(Runnable command, final TimeValue timeout, final Runnable timeoutCallback) {

    	//给Runnable任务再添加一些额外的功能,比如优先级

        command = wrapRunnable(command);

    	//

        doExecute(command);

}

//EsThreadPoolExecutor

protected void doExecute(final Runnable command) {

try {

            super.execute(command);//提交任务

}catch (EsRejectedExecutionException ex) {

            if (command instanceof AbstractRunnable) {

                // If we are an abstract runnable we can handle the rejection

                // directly and don't need to rethrow it.

                try {

                    ((AbstractRunnable) command).onRejection(ex);

                } finally {

                    ((AbstractRunnable) command).onAfter();

                }

            }
当然了,由于PrioritizedEsThreadPoolExecutor扩展自ThreadPoolExecutor,最终的执行是在:ThreadPoolExecutor的内部类Worker#runWorker(Worker w)中执行。可参考探究ElasticSearch中的线程池实现中的第3点分析。
上面分析的是线程执行流程,而具体的业务逻辑代码(创建索引更新集群的状态信息)在Runnable#run()中,也就是org.elasticsearch.cluster.service.TaskBatcher.BatchedTask#run()方法中。
//BatchedTask

public void run() {runIfNotProcessed(this);}

void runIfNotProcessed(BatchedTask updateTask) {

    //任务的判断、检查是否重复、是否已经执行过了……

    //忽略其他无关代码....

    run(updateTask.batchingKey, toExecute, tasksSummary);

}

    /**

     * Action to be implemented by the specific batching implementation

     * All tasks have the given batching key.

     */

protected abstract void run(Object batchingKey, List<? extends BatchedTask> tasks, String tasksSummary);
抽象run(...)具体实现在:org.elasticsearch.cluster.service.MasterService.Batcher#run
@Override

protected void run(Object batchingKey, List<? extends BatchedTask> tasks, String tasksSummary) {

	ClusterStateTaskExecutor<Object> taskExecutor = (ClusterStateTaskExecutor<Object>) batchingKey;

	List<UpdateTask> updateTasks = (List<UpdateTask>) tasks;

    //TaskInputs Represents a set of tasks to be processed together with their executor

	runTasks(new TaskInputs(taskExecutor, updateTasks, tasksSummary));

}

//最终节点状态更新信息实现逻辑

protected void runTasks(TaskInputs taskInputs) {

    final ClusterState previousClusterState = state();

    //改变集群的状态(各个分片的处理逻辑)

    TaskOutputs taskOutputs = calculateTaskOutputs(taskInputs, previousClusterState, startTimeNS);

    //将变化了的状态同步给其他节点

    if (taskOutputs.clusterStateUnchanged()) {

        //未检测到集群状态信息变化

    }else{

        ClusterState newClusterState = taskOutputs.newClusterState;

        try {

            ClusterChangedEvent clusterChangedEvent = new ClusterChangedEvent(summary, newClusterState, previousClusterState);

            //Returns the DiscoveryNodes.Delta between the previous cluster state and the new cluster state.

            final DiscoveryNodes.Delta nodesDelta = clusterChangedEvent.nodesDelta();

    }

        if (nodesDelta.hasChanges() && logger.isInfoEnabled()) {

                    String nodeSummary = nodesDelta.shortSummary();

                    if (nodeSummary.length() > 0) {

                        logger.info("{}, reason: {}", summary, nodeSummary);

                    }

        }

        //Called when the result of the ClusterStateTaskExecutor#execute(ClusterState, List) have

        //been processed properly by all listeners.

        taskOutputs.processedDifferentClusterState(previousClusterState, newClusterState);

        //Callback invoked after new cluster state is published

        taskOutputs.clusterStatePublished(clusterChangedEvent);

}
在这行代码:TaskOutputs taskOutputs = calculateTaskOutputs(taskInputs, previousClusterState, startTimeNS);输入创建索引任务,输出集群状态变化结果。
public TaskOutputs calculateTaskOutputs(TaskInputs taskInputs, ClusterState previousClusterState) {

        ClusterTasksResult<Object> clusterTasksResult = executeTasks(taskInputs, startTimeNS, previousClusterState);

    //...

}

protected ClusterTasksResult<Object> executeTasks(TaskInputs taskInputs,...){

	List<Object> inputs = taskInputs.updateTasks.stream().map(tUpdateTask -> tUpdateTask.task).collect(Collectors.toList());

    //ShardStartedClusterStateTaskExecutor#execute

    clusterTasksResult = taskInputs.executor.execute(previousClusterState, inputs);

}

public ClusterTasksResult<StartedShardEntry> execute(ClusterState currentState, List<StartedShardEntry> tasks)

{

    List<ShardRouting> shardRoutingsToBeApplied = new ArrayList<>(tasks.size());

    for (StartedShardEntry task : tasks) {

        ShardRouting matched = currentState.getRoutingTable().getByAllocationId(task.shardId, task.allocationId);

        //....省略其他代码

        shardRoutingsToBeApplied.add(matched);

    }

    maybeUpdatedState = allocationService.applyStartedShards(currentState, shardRoutingsToBeApplied);

    builder.successes(tasksToBeApplied);

}
最终是在org.elasticsearch.cluster.action.shard.ShardStateAction.ShardStartedClusterStateTaskExecutor#execute方法里面更新各个分片的状态,具体实现逻辑我也不是很懂。里面涉及到:ShardRouting路由表、AllocationService。
AllocationService manages the node allocation of a cluster. For this reason the AllocationService keeps AllocationDeciders to choose nodes for shard allocation. This class also manages new nodes joining the cluster and rerouting of shards.
Elasticsearch集群状态信息
集群状态信息包括:集群uuid、版本号、索引的配置信息及修改/删除记录、分片的在各个节点上的分配信息……保证各个节点上拥有一致的集群状态信息是很重要的,TLA+是验证集群状态一致性的一种方法。
The cluster state contains important metadata about the cluster, including what the mappings look like, what settings the indices have, which shards are allocated to which nodes, etc. Inconsistencies in the cluster state can have the most horrid consequences including inconsistent search results and data loss, and the job of the cluster state coordination subsystem is to prevent any such inconsistencies.
集群状态信息示例:
cluster uuid: 3LZs2L1TRiCw6P2Xm6jfSQ

version: 7

state uuid: bPCusHNGRrCxGcEpkA6XkQ

from_diff: false

meta data version: 34

   [twitter/5gMqkF9oQaCdCCVXs7VrtA]: v[9]

      0: p_term [2], isa_ids [QSYDJpzBRtOQjUDJIIPm7g]

      1: p_term [2], isa_ids [LF3sOw51R1eS7XS_iXkkvQ]

      2: p_term [2], isa_ids [gEfexQgbQRmd1qRplOjmag]

      3: p_term [2], isa_ids [yZkB1nFHT22wtBnDBqGsKQ]

      4: p_term [2], isa_ids [9oFMzwuwSOK1Ir-1SLxqHg]

metadata customs:

   index-graveyard: IndexGraveyard[[[index=[twitter/KisMFiobQDSN23mjdugD0g], deleteDate=2018/12/25 02:05:54], [index=[twitter/trTv2ambSFOvKlGr_y0IKw], deleteDate=2019/01/03 03:19:44], [index=[twitter/sfWVXeklQ321QFxwLxSUPw], deleteDate=2019/01/03 09:51:45]]]   ingest: org.elasticsearch.ingest.IngestMetadata@6d83dbd7   licenses: LicensesMetaData{license={"uid":"2a6f6ac2-2b3a-4e7b-a6c6-aed3e6e8edce","type":"basic","issue_date_in_millis":1545294198272,"max_nodes":1000,"issued_to":"elasticsearch","issuer":"elasticsearch","signature":"/////QAAANDadY9WjYQDyz2N6XstmWiReALKju/xLVk8VGXRfRbPPJxRbjxUMfiX9PHLz5AdfV2aFaGS6aGTtzoyKC5sOZQQbXCxzq8YTt+zbs+ld5OxOfDJ3yMVaJS5vAZuIlQQfkmMdIAnq7VolQbiADUHjKJnIZc0/Sb51YEUTtPykjPRrHF0NEKCOfhbQ4Jn5xOaweKvsTjOqxp1JJkOUOA+vvGqgxuZVxbDATEnW+6+kGP8WdkcvRpFlhwKMAKso9LzPaJ3NCO4zrZ+N9WUfA+TlRz4","start_date_in_millis":-1}, trialVersion=null}

nodes:

   {debug_node}{JLqmOfYoTcS8IENG4pmnOA}{yhUOUQfXS7-Xzzm8_wzjoA}{127.0.0.1}{127.0.0.1:9300}{ml.machine_memory=8277266432, xpack.installed=true, ml.max_open_jobs=20, ml.enabled=true}, local, master

routing_table (version 5):

-- index [[twitter/5gMqkF9oQaCdCCVXs7VrtA]]

----shard_id [twitter][0]

--------[twitter][0], node[JLqmOfYoTcS8IENG4pmnOA], [P], s[STARTED], a[id=QSYDJpzBRtOQjUDJIIPm7g]

--------[twitter][0], node[null], [R], recovery_source[peer recovery], s[UNASSIGNED], unassigned_info[[reason=CLUSTER_RECOVERED], at[2019-01-22T00:50:44.164Z], delayed=false, allocation_status[no_attempt]]

----shard_id [twitter][1]

--------[twitter][1], node[JLqmOfYoTcS8IENG4pmnOA], [P], s[STARTED], a[id=LF3sOw51R1eS7XS_iXkkvQ]

--------[twitter][1], node[null], [R], recovery_source[peer recovery], s[UNASSIGNED], unassigned_info[[reason=CLUSTER_RECOVERED], at[2019-01-22T00:50:44.164Z], delayed=false, allocation_status[no_attempt]]

----shard_id [twitter][2]

--------[twitter][2], node[JLqmOfYoTcS8IENG4pmnOA], [P], s[STARTED], a[id=gEfexQgbQRmd1qRplOjmag]

--------[twitter][2], node[null], [R], recovery_source[peer recovery], s[UNASSIGNED], unassigned_info[[reason=CLUSTER_RECOVERED], at[2019-01-22T00:50:44.164Z], delayed=false, allocation_status[no_attempt]]

----shard_id [twitter][3]

--------[twitter][3], node[JLqmOfYoTcS8IENG4pmnOA], [P], s[STARTED], a[id=yZkB1nFHT22wtBnDBqGsKQ]

--------[twitter][3], node[null], [R], recovery_source[peer recovery], s[UNASSIGNED], unassigned_info[[reason=CLUSTER_RECOVERED], at[2019-01-22T00:50:44.164Z], delayed=false, allocation_status[no_attempt]]

----shard_id [twitter][4]

--------[twitter][4], node[JLqmOfYoTcS8IENG4pmnOA], [P], s[STARTED], a[id=9oFMzwuwSOK1Ir-1SLxqHg]

--------[twitter][4], node[null], [R], recovery_source[peer recovery], s[UNASSIGNED], unassigned_info[[reason=CLUSTER_RECOVERED], at[2019-01-22T00:50:44.164Z], delayed=false, allocation_status[no_attempt]]

routing_nodes:

-----node_id[JLqmOfYoTcS8IENG4pmnOA][V]

--------[twitter][1], node[JLqmOfYoTcS8IENG4pmnOA], [P], s[STARTED], a[id=LF3sOw51R1eS7XS_iXkkvQ]

--------[twitter][4], node[JLqmOfYoTcS8IENG4pmnOA], [P], s[STARTED], a[id=9oFMzwuwSOK1Ir-1SLxqHg]

--------[twitter][3], node[JLqmOfYoTcS8IENG4pmnOA], [P], s[STARTED], a[id=yZkB1nFHT22wtBnDBqGsKQ]

--------[twitter][2], node[JLqmOfYoTcS8IENG4pmnOA], [P], s[STARTED], a[id=gEfexQgbQRmd1qRplOjmag]

--------[twitter][0], node[JLqmOfYoTcS8IENG4pmnOA], [P], s[STARTED], a[id=QSYDJpzBRtOQjUDJIIPm7g]

---- unassigned

--------[twitter][1], node[null], [R], recovery_source[peer recovery], s[UNASSIGNED], unassigned_info[[reason=CLUSTER_RECOVERED], at[2019-01-22T00:50:44.164Z], delayed=false, allocation_status[no_attempt]]

--------[twitter][4], node[null], [R], recovery_source[peer recovery], s[UNASSIGNED], unassigned_info[[reason=CLUSTER_RECOVERED], at[2019-01-22T00:50:44.164Z], delayed=false, allocation_status[no_attempt]]

--------[twitter][3], node[null], [R], recovery_source[peer recovery], s[UNASSIGNED], unassigned_info[[reason=CLUSTER_RECOVERED], at[2019-01-22T00:50:44.164Z], delayed=false, allocation_status[no_attempt]]

--------[twitter][2], node[null], [R], recovery_source[peer recovery], s[UNASSIGNED], unassigned_info[[reason=CLUSTER_RECOVERED], at[2019-01-22T00:50:44.164Z], delayed=false, allocation_status[no_attempt]]

--------[twitter][0], node[null], [R], recovery_source[peer recovery], s[UNASSIGNED], unassigned_info[[reason=CLUSTER_RECOVERED], at[2019-01-22T00:50:44.164Z], delayed=false, allocation_status[no_attempt]]

customs:

   snapshots: SnapshotsInProgress[]   restore: RestoreInProgress[]   snapshot_deletions: SnapshotDeletionsInProgress[]   security_tokens: TokenMetaData{ everything is secret }
Index文档操作
PUT twitter/_doc/1

{

    "user" : "kimchy",

    "post_date" : "2009-11-15T14:12:12",

    "message" : "trying out Elasticsearch"

}
在创建索引时,写入文档到索引中。
整个具体流程从:TransportBulkAction#doExecute(...) 方法开始,分别两部分:创建索引、写入文档。
其中,创建索引由createIndex(String index, TimeValue timeout, ActionListener<CreateIndexResponse> listener)实现,整个具体流程如下:
//1 TransportBulkAction#doExecute(BulkRequest, ActionListener<BulkResponse>)

for (String index : autoCreateIndices) {

                    createIndex(index, bulkRequest.timeout(), new ActionListener<CreateIndexResponse>()

//2 TransportBulkAction#createIndex

 void createIndex(String index, TimeValue timeout, ActionListener<CreateIndexResponse> listener) {

        createIndexAction.execute(createIndexRequest, listener);

 }

//3 TransportAction#execute(Request, ActionListener<Response>)

execute(task, request, new ActionListener<Response>() {...}

//4 TransportAction#execute(Task, Request, ActionListener<Response>)

requestFilterChain.proceed(task, actionName, request, listener);

//5 TransportAction.RequestFilterChain#proceed(Task,String,Request,ActionListener<Response>)

this.action.doExecute(task, request, listener);

//6 TransportMasterNodeAction#doExecute

protected void doExecute(Task task, final Request request, ActionListener<Response> listener) {

    new AsyncSingleAction(task, request, listener).start();

}

//7 TransportMasterNodeAction.AsyncSingleAction#start

public void start() {doStart(state);}

//8 TransportMasterNodeAction.AsyncSingleAction#doStart

threadPool.executor(executor).execute(new ActionRunnable(delegate) {

                            @Override

                            protected void doRun() throws Exception {

                                masterOperation(task, request, clusterState, delegate);

                            }

                        });

//9 TransportMasterNodeAction#masterOperation(Task, Request,ClusterState,ActionListener<Response>)

masterOperation(request, state, listener);

//10  TransportCreateIndexAction#masterOperation

createIndexService.createIndex(updateRequest, ActionListener.wrap(response ->

            listener.onResponse(new CreateIndexResponse(response.isAcknowledged(), response.isShardsAcknowledged(), indexName)),

            listener::onFailure));

//11 MetaDataCreateIndexService.createIndex(...)

//到这里就是本文中提到 MetaDataCreateIndexService 创建索引的流程了
写入文档由executeBulk(task, bulkRequest, startTime, listener, responses, indicesThatCannotBeCreated)实现,整个代码流程如下,写入文档,先写primary shard,主要在TransportShardBulkAction类中实现。
//1 TransportBulkAction#executeBulk

executeBulk(task, bulkRequest, startTime, listener, responses, indicesThatCannotBeCreated)

//2 org.elasticsearch.common.util.concurrent.AbstractRunnable#run

new BulkOperation(task, bulkRequest, listener, responses, startTimeNanos, indicesThatCannotBeCreated).run();

//3 TransportBulkAction.BulkOperation#doRun

shardBulkAction.execute(bulkShardRequest, new ActionListener<BulkShardResponse>()

//4 TransportAction#execute(Request, org.elasticsearch.action.ActionListener<Response>)

execute(task, request, new ActionListener<Response>() {

//5 TransportAction.RequestFilterChain#proceed

// 到这里步骤,就已经和上面创建索引的第4步是一样的了,都是由TransportAction#doExecute提交任务

requestFilterChain.proceed(task, actionName, request, listener)

//6 --->各种TransportXXXAction都实现了TransportAction#doExecute

//创建索引:TransportBulkAction#doExecute()

//转发给 primary shard 进行写操作:TransportReplicationAction#doExecute()

this.action.doExecute(task, request, listener);

//7 TransportReplicationAction#doExecute(Task, Request, ActionListener<Response>)

protected void doExecute(Task task, Request request, ActionListener<Response> listener) {

        new ReroutePhase((ReplicationTask) task, request, listener).run();

}

//8 TransportReplicationAction.ReroutePhase#doRun

//获取primary shard相关信息,示例信息如下:文档被reroute到编号为3的primary shard上

//[twitter][3], node[JLqmOfYoTcS8IENG4pmnOA], [P], s[STARTED], a[id=N8n0QgxBQVeHljx1RpkYMg]

final ShardRouting primary = primary(state)

//获取 "primary shard在哪个节点上?"

final DiscoveryNode node = state.nodes().get(primary.currentNodeId());

//根据节点id判断primary shard是否在当前节点上

if (primary.currentNodeId().equals(state.nodes().getLocalNodeId())) {

    //primary shard在本节点上

    performLocalAction(state, primary, node, indexMetaData);

} else {

    //primary shard不在本节点,需要将索引操作转发到正确的节点上

    performRemoteAction(state, primary, node);

}

//9 TransportReplicationAction.ReroutePhase#performLocalAction(假设primary shard 在本机节点上)

//这里有2个重要的概念(属性): allocationId 和 primary term

 performAction(node, transportPrimaryAction, true,

                new ConcreteShardRequest<>(request, primary.allocationId().getId(), indexMetaData.primaryTerm(primary.id())));

//10 TransportReplicationAction.ReroutePhase#performAction

transportService.sendRequest(node, action, requestToPerform, transportOptions, new TransportResponseHandler<Response>() {

//11 TransportService#sendRequest(Transport.Connection, String, TransportRequest, TransportRequestOptions, TransportResponseHandler<T>)

asyncSender.sendRequest(connection, action, request, options, handler);

sendLocalRequest(requestId, action, request, options)

//TransportService#sendLocalRequest

final String executor = reg.getExecutor();

//到这里最终是EsThreadPoolExecutor#execute提交任务

threadPool.executor(executor).execute(new AbstractRunnable() {
AllocationID
allocationId是org.elasticsearch.cluster.routing.ShardRouting类的属性,引用书中一段话:“Allocation ID 存储在shard级元信息中,每个shard都有一个唯一的Allocation ID”,同时master节点在集群级元信息中维护一个被认为是最新shard的Allocation ID集合,这个集合称为in-sync allocation IDs
再看org.elasticsearch.cluster.routing.AllocationId类的注释:
Uniquely identifies an allocation. An allocation is a shard moving from unassigned to initializing,or relocation.

Relocation is a special case, where the origin shard is relocating with a relocationId and same id, and the target shard (only materialized in RoutingNodes) is initializing with the id set to the origin shard relocationId. Once relocation is done, the new allocation id is set to the relocationId. This is similar behavior to how ShardRouting#currentNodeId is used.
再看ES副本模型官方文档:in-sync 集合里面的shard维护着当前最新的索引文档操作写入的document。
Elasticsearch maintains a list of shard copies that should receive the operation. This list is called the in-sync copies and is maintained by the master node. As the name implies, these are the set of "good" shard copies that are guaranteed to have processed all of the index and delete operations that have been acknowledged to the user. The primary is responsible for maintaining this invariant and thus has to replicate all operations to each copy in this set.
在正常情况下,primary shard肯定是in-sync集合里面的shard,它是一个"good" shard copy。当primay shard所在的机器挂了时,master节点会立即从in-sync集合中选出一个replica shard作为 primary shard,这个replica shard升级为primary shard的操作是很快的,毕竟in-sync集合中的shard有着最新的数据,因此,也避免了因“将某个不太新的shard升级为primary shard而导致数据丢失的情况”。关于这个解释,耐心的话,可参考:ElasticSearch index 剖析
primary term
关于primary term参考:elasticsearch-sequence-ids和下面的源码注释:
The term of the current selected primary. This is a non-negative number incremented when a primary shard is assigned after a full cluster restart or a replica shard is promoted to a primary.Note: since we increment the term every time a shard is assigned, the term for any operational shard (i.e., a shard that can be indexed into) is larger than 0.
它为Index操作引入了一个全局顺序号。
The primary shard accepts indexing operations (indexing operations are things like "add documents" or "delete a document") first and replicates the index operations to replicas. It is therefore fairly straightforward to keep incrementing a counter and assign each operation a sequence number before it's being forwarded to the replicas.
看完了这篇介绍,知道设计一个分布式系统下全局的唯一ID有多难。有时候,难的地方不在于如何生成一个这样的ID,因为生成全局唯一ID只是手段。最终的目的,是需要这些的一个全局ID来干什么?当涉及到各种各样的应用场景时,这样的一个全局ID还能不能保证正确性?因为,也许引入了ID解决了当前的这个问题,但是由它引起的其他问题,或者尚未考虑到的其他问题,则极有可能导致数据不正确。而具体到ElasticSearch索引操作,一篇文档写入primary shard后,为了数据可靠性,还得写入replica。ES的数据副本模型借鉴了pacifica-replication-in-log-based-distributed-storage-systems算法,也引入了TLA+规范。而引入primary term,就能区分index操作是否由旧的primary shard执行,还是在当前新的primary shard上执行。各个shard的primary term信息由master维护并且持久化到集群状态中,每当shard的身份改变时(比如被提升为primary shard 或者 被降级为普通的shard/replica),primary term就会加1,解决在并发写情形下可能出现的数据不一致的问题。
The first step we took was to be able to distinguish between old and new primaries. We have to have a way to identify operations that came from an older primary vs operations that come from a newer primary. On top of that, the entire cluster needs to be in agreement as to that so there's no contention in the event of a problem. This drove us to implement primary terms.
global checkpoints and local checkpoints
global checkpoint作用:
The global checkpoint is a sequence number for which we know that all active shards histories are aligned at least up to it.
这里的active shards应该是 上面讨论的in-sync集合列表里面的shards。
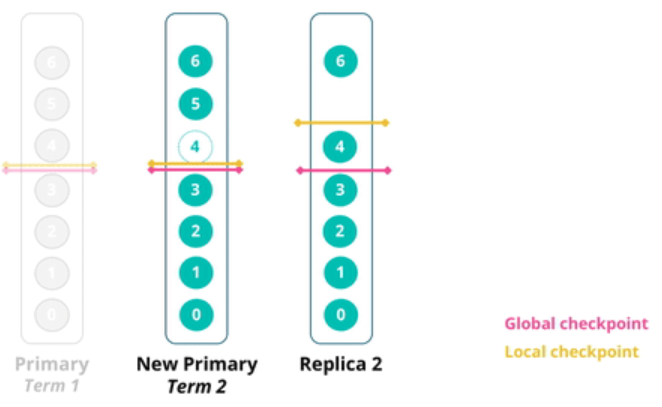
all operations with a lower sequence number than the global checkpoint are guaranteed to have been processed by all active shards and are equal in their respective histories. This means that after a primary fails, we only need to compare operations above the last known global checkpoint between the new primary and any remaining replicas.
引入global checkpoint之后,当前的primary shard因为故障宕机后,变成了旧的primary shard,master从in-sync集合列表中选出一个replica作为新的primary shard,Client发起的index操作可继续请求给新的primary shard(这也是为什么index操作默认有1分钟的超时的原因,只要在这1分钟里面顺利地选出新primary shard,就不会影响Client的index操作)。当旧的primary shard恢复过来后,对比旧primary shard的global checkpoint和新的primary shard的global checkpoint,进行数据同步。
Advancing the global checkpoint is the responsibility of the primary shard.It does so by keeping track of completed operations on the replicas.Once it detects that all replicas have advanced beyond a given sequence number, it will update the global checkpoint accordingly.
global checkpoint的更新由 primary shard推进完成。至于primary shard如何更新global checkpoint的值,可参考上面提到的pacifica-replication-in-log-based-distributed-storage-systems这篇论文。另外elasticsearch-sequence-ids-6-0动画图演示了 checkpoint 是如何更新的。
在这个动画演示中,有一个步骤:当Client发起第4、5、6篇文档的index请求操作时,当前primary shard将第5、6篇文档复制给了中间那个shard,将第4、6篇文档复制给了最右边那个shard,然后primary shard挂了。此时,master选择了中间那个shard作为 new primary shard,那new primary shard上的第4篇文档是如何来的呢?
我的理解是:还是前面提到的,Client 发起的Index操作默认有1分钟的超时,如果Client未收到索引成功Ack,ElasticSearch High Level Restful JAVA api 应该要重新发起请求。然后新的请求,就会被路由到中间那个shard,也即new primary shard,从而new primary shard有了第4篇文档。

这个issue中描述了Index操作的基本步骤(index flow)
总结
- ElasticSearch Index 操作(Action) 会转化成Runnable的任务,提交给线程池异步执行,创建索引。
- 创建索引涉及集群状态的变化,因此会创建一个更新任务,更新集群状态。
- 各种任务转化成Runnable 对象后,org.elasticsearch.common.util.concurrent.AbstractRunnable是这些任务的基类。各种操作TransportXXXAction都会继承TransportAction,在doExecute()里面通过线程池方式提交任务,最大的收获还是将各种任务转化、封装、回调执行结果、任务统一提交给线程池执行的这种设计思路。
- AbstractRunnable扩展了Runnable的功能,它里面实现了
public void onRejection(Exception e),当线程池提交任务被拒绝时(线程池的任务拒绝策略)就会调用该方法;里面还定义了抽象方法public abstract void onFailure(Exception e);,当线程执行过程中出现了异常时,就会调用该方法。(This method is invoked for all exception thrown by doRun()) - AbstractRunnable体现了如何扩展线程功能,因为java.lang.Runnable接口是不允许在run()方法里面向外抛出异常的,那我们如何优雅地处理run()方法里面运行时异常呢?AbstractRunnable重写run()方法如下:所有的业务逻辑实现放在doRun()方法里面,这也是为什么ES源码里面各个TransportXXXAction最终都会执行一个doRun()方法的逻辑,线程执行过程中所有的异常由onFailure()方法处理,而onFailure()是个抽象方法,每个Action可以有自己的异常处理逻辑,不得不佩服这种代码设计的思路。
    @Override

    public final void run() {

        try {

            doRun();

        } catch (Exception t) {

            onFailure(t);

        } finally {

            onAfter();

        }

    }
关于ElasticSearch Index操作的流程,参考ElasticSearch 索引 剖析
ElasticSearch源码阅读相关文章:
- 探究ElasticSearch中的线程池实现
- ElasticSearch 启动时加载 Analyzer 源码分析
- Elasticsearch6.3.2启动过程源码阅读记录
- Elasticsearch High Level Rest Client 发起请求的过程分析
原文:https://www.cnblogs.com/hapjin/p/10219219.html
ElasticSearch Index操作源码分析的更多相关文章
- ES6.3.2 index操作源码流程
ES 6.3.2 index 操作源码流程 client 发送请求 TransportBulkAction#doExecute(Task,BulkRequest,listener) 解析请求,是否要自 ...
- Django rest framework 权限操作(源码分析)
知识回顾http://www.cnblogs.com/ctztake/p/8419059.html 这一篇是基于上一篇写的,上一篇谢了认证的具体流程,看懂了上一篇这一篇才能看懂, 当用户访问是 首先执 ...
- ElasticStack系列之十六 & ElasticSearch5.x index/create 和 update 源码分析
开篇 在ElasticSearch 系列十四中提到的问题即 ElasticStack系列之十四 & ElasticSearch5.x bulk update 中重复 id 性能骤降,继续这个问 ...
- jQuery 源码分析(十二) 数据操作模块 html特性 详解
jQuery的属性操作模块总共有4个部分,本篇说一下第1个部分:HTML特性部分,html特性部分是对原生方法getAttribute()和setAttribute()的封装,用于修改DOM元素的特性 ...
- ConcurrentHashMap JDK 1.6 源码分析
前言 前段时间把 JDK 1.6 中的 HashMap 主要的一些操作源码分析了一次.既然把 HashMap 源码分析了, 就顺便把 JDK 1.6 中 ConcurrentHashMap 的主要一些 ...
- Net6 Configuration & Options 源码分析 Part1
Net6 Configuration & Options 源码分析 Part1 在Net6中配置系统一共由两个部分组成Options 模型与配置系统.它们是两个完全独立的系统. 第一部分主要记 ...
- Elasticsearch源码分析—线程池(十一) ——就是从队列里处理请求
Elasticsearch源码分析—线程池(十一) 转自:https://www.felayman.com/articles/2017/11/10/1510291570687.html 线程池 每个节 ...
- elasticsearch源码分析之search模块(server端)
elasticsearch源码分析之search模块(server端) 继续接着上一篇的来说啊,当client端将search的请求发送到某一个node之后,剩下的事情就是server端来处理了,具体 ...
- Solr4.8.0源码分析(3)之index的线程池管理
Solr4.8.0源码分析(3)之index的线程池管理 Solr建索引时候是有最大的线程数限制的,它由solrconfig.xml的<maxIndexingThreads>8</m ...
随机推荐
- 将CSV文件写入MySQL
先打开CSV文件查看第一行有哪些字段,然后新建数据库,新建表.(若字段内容很多建议类型text,如果设成char后续会报错) 命令如下: load data infile '路径XXXX.csv' i ...
- js 判断元素(例如div)里的数据显示不全(数据长度大于元素长度)
//判断div里元素是否超出长度,true 超出,false 没有 dom=document.getElementById('id');function isEllipsis(dom) { va ...
- Linux学习历程——Centos 7 passwd命令
一.命令介绍 passwd 命令用于修改用户密码,过期时间,认证信息等. 普通用户只能使用 passwd 命令修改自身的系统密码,而 root 管理员则有权限修改其他所有人的密码.更酷的是,root ...
- centos7安装docker并设置开机自启以及常用命令
Docker 是一个开源的应用容器引擎,让开发者可以打包他们的应用以及依赖包到一个可移植的容器中,然后发布到任何流行的 Linux 机器上,也可以实现虚拟化.容器是完全使用沙箱机制,相互之间不会有任何 ...
- C#基础知识之IOC
依赖注入:http://www.cnblogs.com/leoo2sk/archive/2009/06/17/1504693.html IOC:https://jinnianshilongnian.i ...
- 云计算openstack介绍
一.云计算的前世今生 所有的新事物都不是突然冒出来的,都有前世和今生.云计算也是IT技术不断发展的产物. 要理解云计算,需要对IT系统架构的发展过程有所认识. 请看下 IT系统架构的发展到目前为止大致 ...
- 转:互斥锁解决同时上传数据丢失BUG
互斥锁:在一个线程修改变量时加锁,则其他变量阻塞,等待加锁的变量解锁后再执行,避免数据覆盖或者其他的异常情况. 原子操作: 所谓原子操作是指不会被线程调度机制打断的操作:这种操作一旦开始,就一直运行到 ...
- 搭建一个MP-demo(mybatis_plus)
MyBatis-Plus(简称 MP)是一个 MyBatis 的增强工具,在 MyBatis 的基础上只做增强不做改变,为简化开发.提高效率而生. 搭建一个简单的MP-demo 1.配置pom.xml ...
- ajax存在跨域问题,为什么浏览器不允许js跨域请求?
举个例子,马蓉平时去某个酒店开房,酒店有在线的管理系统,该管理系统地址叫 xxoo.hotels.com 然后她正常登录该酒店管理系统欣赏着自己跟宋喆开房的记录,这一切都很正常,然后xxoo.hote ...
- java篇 之 流程控制语句
条件判断语句 条件语句: If(boolean类型) {} else {} (打大括号避免出错) switch (export)语句:export的类型必须是 byte,short,char,i ...
