webpack3_脚手架
webpack 记得 --save-dev 装入开发依赖
更新迭代快,需要有根据报错解决问题的能力,来融会贯通这个工具
这里的是 webpack3,其实已经到了 webpack4 了
采用了 webpack 以后,就相当于一个工程化的项目(自动化工程项目)
- 需求:
- html、css、js 代码检错
- ES6 转 ES5
- flex、css 这样的前缀兼容
- html、css、js 代码合并压缩
- 图片处理
- 热更新实时刷新页面
- 什么是 webpack
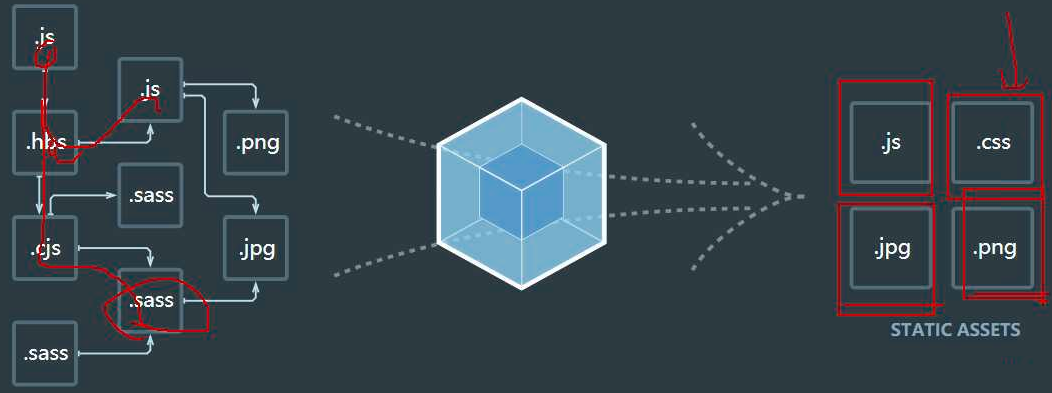
模块打包工具,将所有的 前端资源文件 作为模块处理
根据模块的依赖关系,进行静态分析,生成静态资源
脚手架 ---- (vue、react 有自己的脚手架)
- 核心概念
entry 入口 ---- 开始分析 的模块
output 输出 ---- 分析完了放在哪儿,在哪儿创建 bundles 目标文件,默认值是 ./dist
webpack 本身只识别处理 js 和 json,其他文件处理不了,需要 loader 甚至 plugins
loader ---- webpack 处理不了的,让 loader 处理
(比如 解决识别不了 less 引入的问题)
先去 官网找,再去 npm 找 loader
plugins 插件 ---- 处理 loader 也处理不了的
- 文件夹 功能分析
src ---- 生鸡蛋、生大米 ---- 最开始的源代码
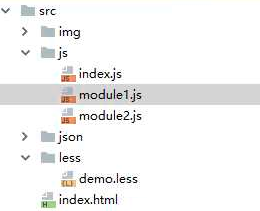
build ---- 熟鸡蛋、熟大米 ---- 简单的编译并合并代码 (4 个 css 合并成了 1 个 css 资源)
| dev ---- 模拟器 (模拟做饭) ---- 开发环境部署 (把 项目 借助 webpack 用自己配置的服务器 部署起来运行)
dist ---- 蛋炒饭 ---- 最终经过编译、压缩、语法检查等操作之后给生产环境的代码
- 基本使用:
安装:
npm install webpack@3 -g
npm install webpack@3 --save-dev
webpack src/js/index build/index.js // 第一次使用 webpack,自动生成 build 文件夹
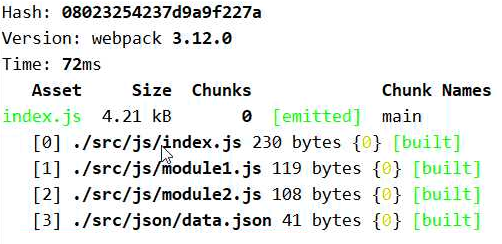
从此 js、json、less 等文件都可以引入 build/index.js 入口文件
import '../less/demo.less';
import img from './img/react.img';
build/index.js 可以直接运行,其中 json 引入时自动转成了 对象
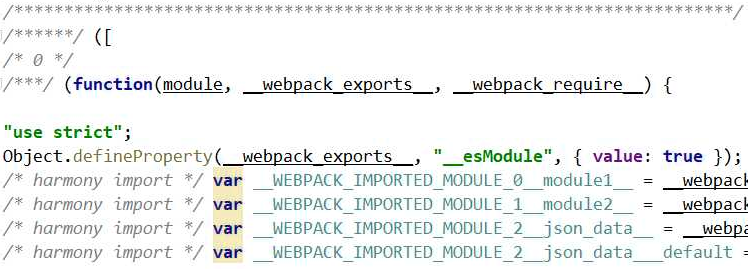
问题:
箭头函数 未被转换
- 项目脚手架搭建
----------------- 1 ----------------> 使用 webpack 核心配置文件
npm install less-loader --save-dev // 1. 解析 less
npm install css-loader --save -D // 2. 把 css 变成一个 webpack 可识别的模块
npm install style-loader --save -D // 3. 生成 <style> 并嵌入 html 中
npm install file-loader --save-dev // 解析 png、jpg、gif 图片
npm install url-loader --save-dev // 替代 file-loader
use:[
...
limit: 8192 // 当图片 小于 8kb 时,将图片变成 base64 编码
]
1. 创建 webpack.config.js 核心配置文件 // 固定写法
const path = require('path'); // node 内置模块
module.exports = {
entry: './src/js/index.js', // 整个 js 的入口文件,webpack 的入口文件
output: { // 输出配置
path: path.resolve(__dirname, ‘build’), // 输出文件路径配置
filename: 'index.js' // 输出的文件名
},
module: {
rules: [
{ test: /\.less$/, // 编译 less ----> css
use:[
{loader: "style-loader"}, // 3. 生成 <style> 并嵌入 html 中
{loader: "css-loader"}, // 2. 把 css 变成一个 webpack 可识别的模块
{loader: "less-loader"} // 1. 编译 less 成 css
]
},
{ test: "/\.(png|jpg|gif)$/" // 处理图片资源
user: [
loader: 'url-loader',
options: {
outputPath: 'img', // 图片最终输出的位置
publicPath: '../build/img', // css 资源图片路径
name: '[hash:5].[ext]' // 修改图片名称
limit: 8192 // 当图片小于 8kb 时,将图片转换为 base64
}
]
}
]
}
}
2. 一条命令: webpack 或者 webpack --display-modules
------------------ 2 ----------------> 使用插件
ExtractTextWebpackPlugin
npm install --save-dev extract-text-webpack-plugin
---------------------------------------
const path = require('path');
// 1. 安装插件
// 编译 less 为 css ,合并 css,再将 css 提取为一个单独的文件
const ExtractTextPlugin = require("extract-text-webpack-plugin");
module.exports = {
entry: './src/js/index.js',
output: {
path: path.resolve(__dirname, ‘build’),
filename: 'index.js'
},
module: {
rules: [
{ test: /\.less$/,
use: ExtractTextPlugin.extract({ // 2. 设置图片解析
fallback: "style-loader",
use: ["css-loader", "less-loader"]
})
},
{ test: "/\.(png|jpg|gif)$/",
user: [
loader: 'url-loader',
options: {
outputPath: 'img',
publicPath: '../img', // 3. less 文件与 img 文件的相对路径
name: '[hash:5].[ext]'
limit: 8192
}
]
}
]
},
plugins: [
new ExtractTextPlugin("./css/styles.css") // 4. 实例化一个对象,指定生成路径
]
}
------------------- 3 ---------------> 语法检查 jshint-loader
webStorm 集成工具一般不用,因为协同开发配置可能不统一,导致不必要的错误
npm install --save jshint-loader -D // 添加到开发依赖
npm audit fix
npm install --save jshint -D // 添加到开发依赖
npm audit fix
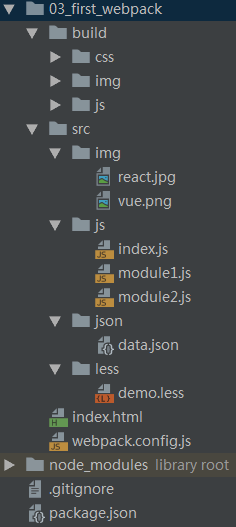 前期 2 ----> 7 后期
---------------------------------------
webpack.config.js
const {resolve} = require('path');

const ExtractTextPlugin = require('extract-text-webpack-plugin');

module.exports = {

    entry: './src/js/index.js',

    output: {

        path: resolve(__dirname, 'build/js/'),    // 输出到 build/js

        filename: "index.js"    // js 输出文件

    },

    module: {

        rules: [

            {    // less 编译成 css,

                test: /\.less$/,

                use: ExtractTextPlugin.extract({

                    fallback: "style-loader",

                    use: ["css-loader", "less-loader"]

                })

            },

            {    // loader 让 webpack 处理图片,并有 base64 功能

                test: /\.(png|jpg|gif)$/,

                use: [

                    {

                        loader: "url-loader",

                        options:{

                            outputPath: '../img',    // build/js

                            publicPath: '../img',    // build/css/styles.css

                            name:'[hash:5].[ext]',

                            limit: 8192

                        }

                    }

                ]

            },

            {    // js 检错功能

                test: /\.js$/,    // 覆盖 .js 文件

                enforce: "pre",    // 预先加载好 jshint-loader

                exclude: /node_modules/,    // 排除掉 node_modules 文件夹下的所有文件

                use: [

                    {

                        loader: "jshint-loader",

                        options: {    //camelcase 已经弃用了

                            // jslint 的错误信息在默认情况下会显示为 warning(警告)类信息

                            // 将 emitErrors 参数设置为 true 可使错误显示为 error(错误)类信息

                            emitErrors: false,

                            // jshint 默认情况下不会打断 webpack 编译

                            //如果你想在 jshint 出现错误时,立刻停止编译, 设置 failOnHint 参数为 true

                            failOnHint: false,
esversion: 6
                        }

                    }

                ]

            }

        ]

    },

    plugins: [    // 将 css 抽出成一个文件,以备 link 进 html

        new ExtractTextPlugin("../css/styles.css"),

    ]

};
webpack 执行编译
------------------- 4 ---------------> 处理未转换的 箭头函数,即 ES6 ----> ES5
npm install babel-loader@7 babel-core babel-preset-es2015 --save -D
npm audit fix
----------------------------------
webpack.config.js
const {resolve} = require('path');

const ExtractTextPlugin = require('extract-text-webpack-plugin');

module.exports = {

    entry: './src/js/index.js',

    output: {

        path: resolve(__dirname, 'build/'),    // 输出到 build/

        filename: "./js/index.js"    // js 输出文件 build/

    },

    module: {

        rules: [

            {    // less 编译成 css,

                test: /\.less$/,

                use: ExtractTextPlugin.extract({

                    fallback: "style-loader",

                    use: ["css-loader", "less-loader"]

                })

            },

            {    // loader 让 webpack 处理图片,并有 base64 功能

                test: /\.(png|jpg|gif)$/,

                use: [

                    {

                        loader: "url-loader",

                        options:{

                            outputPath: './img',    // build/

                            publicPath: '../img',    // build/css/styles.css

                            name:'[hash:5].[ext]',

                            limit: 8192

                        }

                    }

                ]

            },

            {    // js 检错功能

                test: /\.js$/,    // 覆盖 .js 文件

                enforce: "pre",    // 预先加载好 jshint-loader

                exclude: /node_modules/,    // 排除掉 node_modules 文件夹下的所有文件

                use: [

                    {

                        loader: "jshint-loader",

                        options: {    // camelcase 已经弃用了

                            // jslint 的错误信息在默认情况下会显示为 warning(警告)类信息

                            // 将 emitErrors 参数设置为 true 可使错误显示为 error(错误)类信息

                            emitErrors: false,

                            // jshint 默认情况下不会打断 webpack 编译

                            //如果你想在 jshint 出现错误时,立刻停止编译, 设置 failOnHint 参数为 true

                            failOnHint: false,
                            esversion: 6

                        }

                    }

                ]

            },

            {    //es6 转 es5

                test: /\.js$/,

                exclude: /(node_modules|bower_components)/,

                use: {

                    loader: 'babel-loader',

                    options: {

                        presets: ['es2015']

                    }

                }

            }

        ]

    },

    plugins: [    // 将 css 抽出成一个文件,以备 link 进 html

        new ExtractTextPlugin("./css/styles.css"),    // build/

    ]

};
----------------- 5 -----------------> html 文件的清理 和 文件夹的清除插件
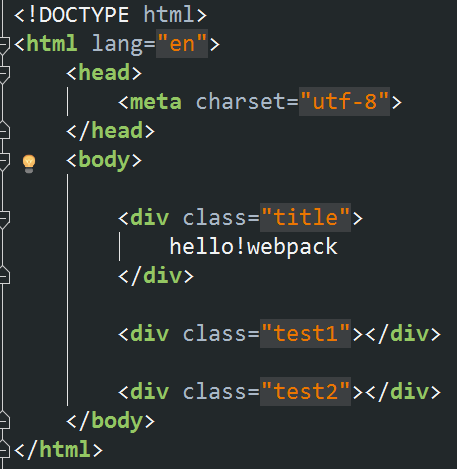
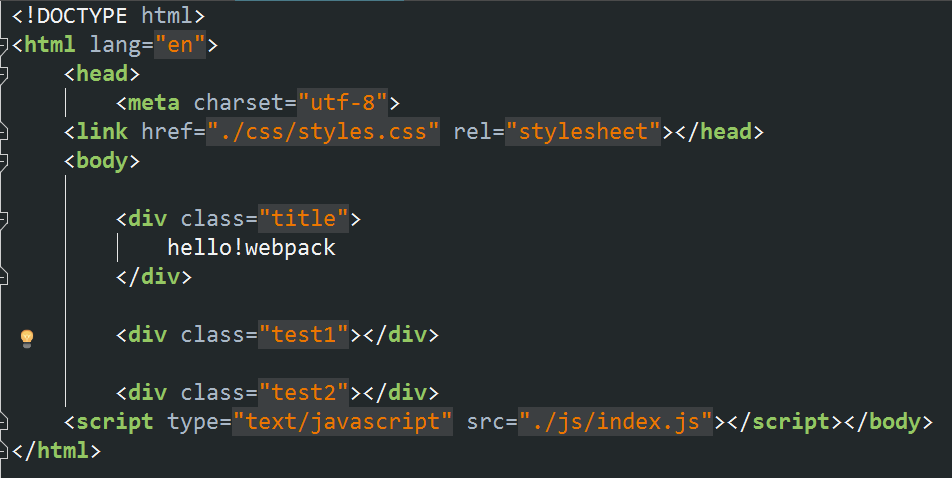
html-loader 没什么用 ----> 为了让 webpack 自动创建一个 html,
然后将需求的 js、css 引入该 html 文件,所以就需要 HtmlWebpackPlugin 插件
npm install --save-dev html-webpack-plugin
npm audit fix
----------------------------------
webpack.config.js
const {resolve} = require('path');

const ExtractTextPlugin = require('extract-text-webpack-plugin');

const HtmlWebpackPlugin = require('html-webpack-plugin');

module.exports = {

    entry: "./src/js/index.js",

    output: {

        path: resolve(__dirname, 'build/'),    // 输出到 webpack.build.js 同级的 build/

        filename: "./js/index.js"    // js 输出文件 build/

    },

    module: {

        rules: [

            {    // less 编译成 css,

                test: /\.less$/,

                use: ExtractTextPlugin.extract({

                    fallback: "style-loader",

                    use: ["css-loader", "less-loader"]

                })

            },

            {    // loader 让 webpack 处理图片,并有 base64 功能

                test: /\.(png|jpg|gif)$/,

                use: [

                    {

                        loader: "url-loader",

                        options:{

                            outputPath: './img',    // build/

                            publicPath: '../img',    // build/css/styles.css

                            name:'[hash:5].[ext]',

                            limit: 8192

                        }

                    }

                ]

            },

            {    // js 检错功能

                test: /\.js$/,    // 覆盖 .js 文件

                enforce: "pre",    // 预先加载好 jshint-loader

                exclude: /node_modules/,    // 排除掉 node_modules 文件夹下的所有文件

                use: [

                    {

                        loader: "jshint-loader",

                        options: {    // camelcase 已经弃用了

                            // jslint 的错误信息在默认情况下会显示为 warning(警告)类信息

                            // 将 emitErrors 参数设置为 true 可使错误显示为 error(错误)类信息

                            emitErrors: false,

                            // jshint 默认情况下不会打断 webpack 编译

                            //如果你想在 jshint 出现错误时,立刻停止编译, 设置 failOnHint 参数为 true

                            failOnHint: false,

                            esversion: 6

                        }

                    }

                ]

            },

            {    //es6 转 es5

                test: /\.js$/,

                exclude: /(node_modules|bower_components)/,

                use: {

                    loader: 'babel-loader',

                    options: {

                        presets: ['es2015']

                    }

                }

            }

        ]

    },

    plugins: [    // 将 css 抽出成一个文件,以备 link 进 html

        new ExtractTextPlugin("./css/styles.css"),    // build/

        new HtmlWebpackPlugin({    //

            title: "webpack",    // 网页 <head> <title>的页签名字

            filename: "index.html",    // 生成文件的名字

            template: "./src/index.html"    // 程序员自己的 html

        })

    ]

};
------------------ 6 -----------------> 用来清空 build 文件夹 的插件
npm install clean-webpack-plugin --save-dev
----------------------------------------------------
const CleanWebpackPlugin = require("clean-webpack-plugin");
...
new CleanWebpackPlugin("./build");
...
webpack.config.js
const {resolve} = require('path');

const ExtractTextPlugin = require('extract-text-webpack-plugin');

const HtmlWebpackPlugin = require('html-webpack-plugin');

const CleanWebpackPlugin = require("clean-webpack-plugin");

module.exports = {

    entry: "./src/js/index.js",

    output: {

        path: resolve(__dirname, 'build/'),    // 输出到 webpack.build.js 同级的 build/

        filename: "./js/index.js"    // js 输出文件 build/

    },

    module: {

        rules: [

            {    // less 编译成 css,

                test: /\.less$/,

                use: ExtractTextPlugin.extract({

                    fallback: "style-loader",

                    use: ["css-loader", "less-loader"]

                })

            },

            {    // loader 让 webpack 处理图片,并有 base64 功能

                test: /\.(png|jpg|gif)$/,

                use: [

                    {

                        loader: "url-loader",

                        options:{

                            outputPath: './img',    // build/

                            publicPath: '../img',    // build/css/styles.css

                            name:'[hash:5].[ext]',

                            limit: 8192

                        }

                    }

                ]

            },

            {    // js 检错功能

                test: /\.js$/,    // 覆盖 .js 文件

                enforce: "pre",    // 预先加载好 jshint-loader

                exclude: /node_modules/,    // 排除掉 node_modules 文件夹下的所有文件

                use: [

                    {

                        loader: "jshint-loader",

                        options: {    // camelcase 已经弃用了

                            // jslint 的错误信息在默认情况下会显示为 warning(警告)类信息

                            // 将 emitErrors 参数设置为 true 可使错误显示为 error(错误)类信息

                            emitErrors: false,

                            // jshint 默认情况下不会打断 webpack 编译

                            //如果你想在 jshint 出现错误时,立刻停止编译, 设置 failOnHint 参数为 true

                            failOnHint: false,

                            esversion: 6

                        }

                    }

                ]

            },

            {    //es6 转 es5

                test: /\.js$/,

                exclude: /(node_modules|bower_components)/,

                use: {

                    loader: 'babel-loader',

                    options: {

                        presets: ['es2015']

                    }

                }

            }

        ]

    },

    plugins: [    // 将 css 抽出成一个文件,以备 link 进 html

        new ExtractTextPlugin("./css/styles.css"),    // build/

        new HtmlWebpackPlugin({    //

            title: "webpack",    // 网页 <head> <title>的页签名字

            filename: "index.html",    // 生成文件的名字

            template: "./src/index.html"    // 程序员自己的 html

        }),

        new CleanWebpackPlugin("./build")    // 用来清空 build 文件夹 的插件

    ]

};
------------------- 7 提交环境 ----------------> build 环境搭建
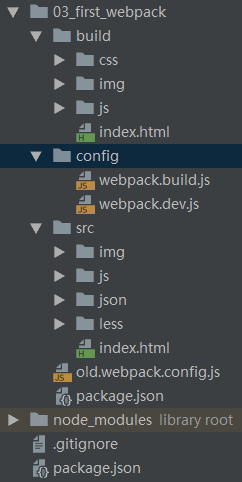
新建config 文件夹,将 webpack.build.js 放入其中
配置 package.json 的 scripts
"scripts": {
"build": "webpack --display-modules --config ./config/webpack.build.js"
...
...
output:{
path: resolve(__dirname, "../build/"), // 指定 输出文件夹
...
// new CleanWebpackPlugin("./build");
new CleanWebpackPlugin("./build", {
root: resolve(__dirname, "../"); // 默认的 root 目录为 ./
});
...
./config/webpack.build.js
const {resolve} = require('path');

const ExtractTextPlugin = require('extract-text-webpack-plugin');

const HtmlWebpackPlugin = require('html-webpack-plugin');

const CleanWebpackPlugin = require("clean-webpack-plugin");

module.exports = {

    entry: "./src/js/index.js",

    output: {

        path: resolve(__dirname, '../build/'),    // 输出到 webpack.build.js 同级的 build/

        filename: "./js/index.js"    // js 输出文件 build/

    },

    module: {

        rules: [

            {    // less 编译成 css,

                test: /\.less$/,

                use: ExtractTextPlugin.extract({

                    fallback: "style-loader",

                    use: ["css-loader", "less-loader"]

                })

            },

            {    // loader 让 webpack 处理图片,并有 base64 功能

                test: /\.(png|jpg|gif)$/,

                use: [

                    {

                        loader: "url-loader",

                        options:{

                            outputPath: './img',    // build/

                            publicPath: '../img',    // build/css/styles.css

                            name:'[hash:5].[ext]',

                            limit: 8192

                        }

                    }

                ]

            },

            {    // js 检错功能

                test: /\.js$/,    // 覆盖 .js 文件

                enforce: "pre",    // 预先加载好 jshint-loader

                exclude: /node_modules/,    // 排除掉 node_modules 文件夹下的所有文件

                use: [

                    {

                        loader: "jshint-loader",

                        options: {    // camelcase 已经弃用了

                            // jslint 的错误信息在默认情况下会显示为 warning(警告)类信息

                            // 将 emitErrors 参数设置为 true 可使错误显示为 error(错误)类信息

                            emitErrors: false,

                            // jshint 默认情况下不会打断 webpack 编译

                            //如果你想在 jshint 出现错误时,立刻停止编译, 设置 failOnHint 参数为 true

                            failOnHint: false,

                            esversion: 6

                        }

                    }

                ]

            },

            {    //es6 转 es5

                test: /\.js$/,

                exclude: /(node_modules|bower_components)/,

                use: {

                    loader: 'babel-loader',

                    options: {

                        presets: ['es2015']

                    }

                }

            }

        ]

    },

    plugins: [    // 将 css 抽出成一个文件,以备 link 进 html

        new ExtractTextPlugin("./css/styles.css"),    // build/

        new HtmlWebpackPlugin({    //

            title: "webpack",    // 网页 <head> <title>的页签名字

            filename: "index.html",    // 生成文件的名字

            template: "./src/index.html"    // 程序员自己的 html

        }),

        new CleanWebpackPlugin("./build", {

            root: resolve(__dirname, "../")    // 修改默认 root 目录 "./" 为 "../"

        })    // 用来清空 build 文件夹 的插件

    ]

};
------------------- 8 开发环境 ----------------> dev 开发环境的部署 (检测到代码的改变后,实时显示结果)
dev 的运行方式是加载在内存中的,没有任何输出, 用户察觉不到,执行时写入内存,关闭时清除内存相关数据
在 build 配置文件的基础上,增加 dev-server
entry、output、module、plugins + devServer
npm install webpack-dev-server@2 --save -D // @3 有问题, 不能用
cp webpack.build.js webpack.dev.js
"dev": "webpack-dev-server --config ./config/webpack.dev.js"
devServer: { // 以后用的就这么几个配置
hot: true, // 模块热更新 (热模替换, 也称 HMR) ? 不必刷新,即可实时显示最新页面
open: true, // 自动打开浏览器 (取决于 PC 配置的默认浏览器)
port: 3001, // 自定义开发服务器 端口号, 不一定要 3001
compress: true // 启用 gzip 来传输资源
}
npm run dev // 有坑报错: 模块热更新被禁止了
解决: 还需要引入 webpack 利用其上面的一个插件 webpack.HotModuleReplacementPlugin()
new webpack.HotModuleReplacementPlugin() // 热模更新 支持插件
此时运行 npm run dev
然后需要使用 loader 去处理 css 和 html ,才能实现 热模替换
----> css 重新使用 loader 的方式
/****
-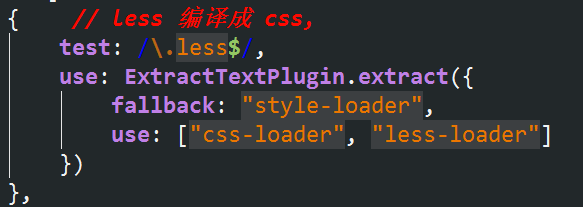
改回传统 loader, dev 环境自带将 css 抽出为一个文件,且 link 进 html ****/
+
----> html 也要追加使用传统的 html-loader
npm install html-loader -D
...
entry: ["./src/js/index.js", "./src/index.html"] // 让 webpack 编译 index.js 和 index.html
...
// module: { rules:[{ // 添加一个 loader 让热模更新起作用

----> js 必须刷新 html 页面, 无法解决,其实 html 也是刷新了页面
webpack.dev.js
const {resolve} = require('path');

const ExtractTextPlugin = require('extract-text-webpack-plugin');

const HtmlWebpackPlugin = require('html-webpack-plugin');

const CleanWebpackPlugin = require("clean-webpack-plugin");

const webpack = require('webpack');

module.exports = {

    entry: ["./src/js/index.js", "./src/index.html"],

    output: {

        path: resolve(__dirname, '../build/'),    // 输出到 webpack.build.js 同级的 build/

        filename: "./js/index.js"    // js 输出文件 build/

    },

    module: {

        rules: [

            {    // dev 环境下使用传统的 loader 处理 css

                test: /\.less$/,

                use: [

                    {loader:"style-loader"},    // 3. html 中建立 <style>,将 js 中 css 放入其中

                    {loader:"css-loader"},    // 2. 将 css 以 commonJS 打包到 js 中

                    {loader:"less-loader"},    // 1. 将 less 转为 css

                ]

            },

            {    // loader 让 webpack 处理图片,并有 base64 功能

                test: /\.(png|jpg|gif)$/,

                use: [

                    {

                        loader: "url-loader",

                        options:{

                            outputPath: './img',    // build/

                            publicPath: '../img',    // build/css/styles.css

                            name:'[hash:5].[ext]',

                            limit: 8192

                        }

                    }

                ]

            },

            {    // js 检错功能

                test: /\.js$/,    // 覆盖 .js 文件

                enforce: "pre",    // 预先加载好 jshint-loader

                exclude: /node_modules/,    // 排除掉 node_modules 文件夹下的所有文件

                use: [

                    {

                        loader: "jshint-loader",

                        options: {    // camelcase 已经弃用了

                            // jslint 的错误信息在默认情况下会显示为 warning(警告)类信息

                            // 将 emitErrors 参数设置为 true 可使错误显示为 error(错误)类信息

                            emitErrors: false,

                            // jshint 默认情况下不会打断 webpack 编译

                            //如果你想在 jshint 出现错误时,立刻停止编译, 设置 failOnHint 参数为 true

                            failOnHint: false,

                            esversion: 6

                        }

                    }

                ]

            },

            {    //es6 转 es5

                test: /\.js$/,

                exclude: /(node_modules|bower_components)/,

                use: {

                    loader: 'babel-loader',

                    options: {

                        presets: ['es2015']

                    }

                }

            },

            {

                test: /\.(html)$/,

                use: {loader:"html-loader"}    // 仅仅让热模更新起作用

            }

        ]

    },

    plugins: [    // 将 css 抽出成一个文件,以备 link 进 html

        new ExtractTextPlugin("./css/styles.css"),    // build/

        new HtmlWebpackPlugin({    //

            title: "webpack",    // 网页 <head> <title>的页签名字

            filename: "index.html",    // 生成文件的名字

            template: "./src/index.html"    // 程序员自己的 html

        }),

        new CleanWebpackPlugin("./build", {

            root: resolve(__dirname, "../")    // 修改默认 root 目录 "./" 为 "../"

        }),    // 用来清空 build 文件夹 的插件

        new webpack.HotModuleReplacementPlugin()    // 热模更新 支持插件

    ]

};
-------------------- 9 -----------------> 不同配合文件的公共部分合并, 实现复用
- cp webpack.build.js webpack.common.js
公共部分:
入口、出口不动
处理图片 loader 保留 url-loader
js 语法检查 loader 保留 jshint-loader
es6 转 es5 的 loader 保留 babel-loader
处理 html 的 loader 保留 html-loader (build 输出 html, dev 热更新支持)
删除 less 文件处理 loader (build 需要 ExtractTextPlugin 处理,dev 需要传统 loader 方式处理支持热更新)
删除 CleanWebpackPlugin 因为 dev 无需清空文件夹,因为没有生成 文件夹
删除 ExtractTextPlugin 插件 dev 不用
webpack.common.js
const {resolve} = require('path');

const HtmlWebpackPlugin = require('html-webpack-plugin');

module.exports = {

    entry: "./src/js/index.js",

    output: {

        path: resolve(__dirname, '../build/'),    // 输出到 webpack.build.js 同级的 build/

        filename: "./js/index.js"    // js 输出文件 build/

    },

    module: {

        rules: [

            {    // loader 让 webpack 处理图片,并有 base64 功能

                test: /\.(png|jpg|gif)$/,

                use: [

                    {

                        loader: "url-loader",

                        options:{

                            outputPath: './img',    // build/

                            publicPath: '../img',    // build/css/styles.css

                            name:'[hash:5].[ext]',

                            limit: 8192

                        }

                    }

                ]

            },

            {    // js 检错功能

                test: /\.js$/,    // 覆盖 .js 文件

                enforce: "pre",    // 预先加载好 jshint-loader

                exclude: /node_modules/,    // 排除掉 node_modules 文件夹下的所有文件

                use: [

                    {

                        loader: "jshint-loader",

                        options: {    // camelcase 已经弃用了

                            // jslint 的错误信息在默认情况下会显示为 warning(警告)类信息

                            // 将 emitErrors 参数设置为 true 可使错误显示为 error(错误)类信息

                            emitErrors: false,

                            // jshint 默认情况下不会打断 webpack 编译

                            //如果你想在 jshint 出现错误时,立刻停止编译, 设置 failOnHint 参数为 true

                            failOnHint: false,

                            esversion: 6

                        }

                    }

                ]

            },

            {    //es6 转 es5

                test: /\.js$/,

                exclude: /(node_modules|bower_components)/,

                use: {

                    loader: 'babel-loader',

                    options: {

                        presets: ['es2015']

                    }

                }

            }

        ]

    },

    plugins: [    // 将 css 抽出成一个文件,以备 link 进 html

        new HtmlWebpackPlugin({    //

            title: "webpack",    // 网页 <head> <title>的页签名字

            filename: "index.html",    // 生成文件的名字

            template: "./src/index.html"    // 程序员自己的 html

        }) // 用来清空 build 文件夹 的插件

    ]

};- 在 webpack.build.js 中
npm install webpack-merge --save -D
...
const common = require("./webpack.common"); // 1. 引入 webpack.common.js 公共部分
const merge = require("webpack-merge"); // 2. 使用第三方库,合并
// 3. 合并 common 公共部分

保留
less 处理成一个 css 并抽出为一个文件
删除
入口、出口、
图片处理、语法检查、es6 转 es5
webpack.build.js
const {resolve} = require('path');

const ExtractTextPlugin = require('extract-text-webpack-plugin');

const CleanWebpackPlugin = require("clean-webpack-plugin");

const common = require("./webpack.common");    // 1. 引入 webpack.common.js 公共部分

const merge = require("webpack-merge");    // 2. 使用第三方库,合并

module.exports = merge(common, {    // 3. 合并 common 公共部分

    module: {

        rules: [

            {    // less 编译成 css,

                test: /\.less$/,

                use: ExtractTextPlugin.extract({    // 将 css 抽取成一个文件,并引入 html 文件

                    fallback: "style-loader",

                    use: ["css-loader", "less-loader"]

                })

            },

        ]

    },

    plugins: [    // 将 css 抽出成一个文件,以备 link 进 html

        new ExtractTextPlugin("./css/styles.css"),    // build/

        new CleanWebpackPlugin("./build", {

            root: resolve(__dirname, "../")    // 修改默认 root 目录 "./" 为 "../"

        })    // 用来清空 build 文件夹 的插件

    ]

});- 在 webpack.dev.js 中
...
const common = require("./webpack.common"); // 1. 引入 webpack.common.js 公共部分
const merge = require("webpack-merge"); // 2. 使用第三方库,合并
// 3. 合并 common 公共部分

不删
入口
删除
出口
图片处理、语法检查、es6 转 es5
ExtractTextPlugin 无需处理 less 为css 再为文件,dev 热更新自带功能
cleanWebpackPlugin 无需清除文件夹,因为根本没生成过文件夹
webpack.dev.js
const {resolve} = require('path');

const webpack = require('webpack');

const common = require("./webpack.common");    // 1. 引入 webpack.common.js 公共部分

const merge = require("webpack-merge");    // 2. 使用第三方库,合并

module.exports = merge(common, {    // 3. 合并 common 公共部分

    entry: ["./src/js/index.js", "./src/index.html"],

    module: {

        rules: [

            {    // dev 环境下使用传统的 loader 处理 css

                test: /\.less$/,

                use: [

                    {loader:"style-loader"},    // 3. html 中建立 <style>,将 js 中 css 放入其中

                    {loader:"css-loader"},    // 2. 将 css 以 commonJS 打包到 js 中

                    {loader:"less-loader"},    // 1. 将 less 转为 css

                ]

            },

            {

                test: /\.(html)$/,

                use: {loader:"html-loader"}    // 仅仅让热模更新起作用

            }

        ]

    },

    plugins: [    // 将 css 抽出成一个文件,以备 link 进 html

        new webpack.HotModuleReplacementPlugin()    // 热模更新 支持插件

    ],

    devServer: {    // 以后用的就这么几个配置

        hot: true,    // 模块热更新 (热模替换, 也称 HMR)

        open: true,

        port: 3001,

        compress: true

    }

});
---------------- 10 产品上线环境----------------> dist 环境配置 --或者说-- prod 环境配置
(压缩js、扩展前缀兼容、压缩 css、压缩 html)
- cp webpack.build.js webpack.dist.js
- dist: "webpack --display-modules --config ./config/webpack.dist.js";
- 修改出口配置
output: {
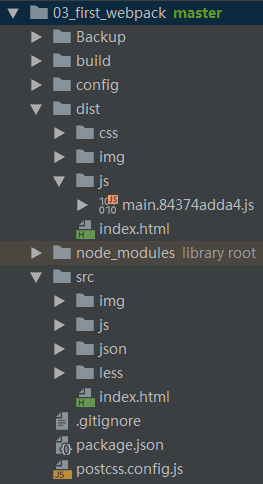
path: resolve(__dirname, '../dist/'), // 输出到 webpack.build.js 上一级的 dist 文件夹下
filename: "./js/[name].[hash:10].js" // main.84374adda4.js
},
- 修改 css 插件配置
plugins: [ // 将 css 抽出成一个文件,以备 link 进 html
new ExtractTextPlugin("./css/[name].[hash:10].css"),
...
- 压缩 js 需要插件 UglifyJsPlugin()
- npm install UglifyJsPlugin --save -D // 压缩 js
const webpack = require("webpack"); // 1. 引入 webpack
new webpack.optimize.UglifyJsPlugin({ // 2. 追加一个插件
sourceMap: true // 3. 生成映射文件,开发人员可以查找错误
})
...
devtool: ‘source-map’ // 4. 新增配置
...
运行会发现,所有代码资源都已经压缩了,包括 html
- css 扩展前缀: 有些测试属性,在不同的浏览器需要加对应的前缀兼容
1. npm install postcss-loader --save -D // 将测试样式 加 前缀 处理兼容
2. 在 use: EtractTextPlugin.extract({
...
use:[新增一个 postcss-loader] // 顺序要注意,否则报错

3. 在 package.json 同级目录,新建 postcss.config.js
module.exports = {
"plugins":{
"autoprefixer":{
"browsers":[
"ie>=8",
"ff>=30",
"chrome>=34",
"safari>=7",
"opera>=23"
]
}
}
}
4. npm install autoprefixer -save -D // 扩展前缀
5. npm install less-plugin-clean-css --save -D // 压缩 css
const CleanCssPlugin = require("less-plugin-clean-css"); // 1. 引入插件
// 2. 替换 use 中的 less-loader 如下
{loader:"less-loader", options:{
plugins:[new CleanCssPlugin({advanced: true})]
}
}
6. 添加 一个删除文件夹的插件
new CleanWebpackPlugin("./dist", {
root: resolve(__dirname, "../")
})
7. npm install html-webpack-plugin --save -D // 使用 html-webpack-plugin 插件压缩 html 中的 minify: {}
const HtmlWebpackPlugin = require('html-webpack-plugin');
// 并追加一个配置 minify:{removeComents:true, collapseWhitespace: true}

webpack.dist.js
const {resolve} = require('path');

const ExtractTextPlugin = require('extract-text-webpack-plugin');

const CleanWebpackPlugin = require("clean-webpack-plugin");

const webpack = require("webpack");    // 4. 引入 webpack, 利用其 API 压缩 js

const CleanCssPlugin = require("less-plugin-clean-css");    // 9. 引入插件,压缩 css

const HtmlWebpackPlugin = require('html-webpack-plugin');    // 12. 引入插件,压缩压缩 html

const common = require("./webpack.common");    // 1. 引入 webpack.common.js 公共部分

const merge = require("webpack-merge");    // 2. 使用第三方库,合并

module.exports = merge(common, {    // 3. 合并 common 公共部分

    output: {

        path: resolve(__dirname, '../dist/'),    // 输出到 webpack.build.js 上一级的 dist

        filename: "./js/[name].[hash:10].js"    // main.72856.js

    },

    module: {

        rules: [

            {    // less 编译成 css,

                test: /\.less$/,

                use: ExtractTextPlugin.extract({    // 将 css 抽取成一个文件,并引入 html 文件

                    fallback: "style-loader",

                    use: [

                        "css-loader",

                        "postcss-loader",    // 8. 前缀兼容

                        {

                            loader:"less-loader",    // 10. 新增 less-loader 配置有压缩 css

                            options:{plugins:[new CleanCssPlugin({advanced: true})]}

                        }

                    ]

                })

            },

        ]

    },

    plugins: [    // 将 css 抽出成一个文件,以备 link 进 html

        new ExtractTextPlugin("./css/[name].[hash:10].css"),    // build/

        new CleanWebpackPlugin("./dist", {    // 11. 修改清除文件夹

            root: resolve(__dirname, "../")    // 修改默认 root 目录 "./" 为 "../"

        }),    // 用来清空 build 文件夹 的插件

        new webpack.optimize.UglifyJsPlugin({    // 5. 追加一个插件

            sourceMap: true    // 6. 生成映射文件,开发人员可以查找错误

        }),

        new HtmlWebpackPlugin({    //

            title: "webpack",    // 网页 <head> <title>的页签名字

            filename: "index.html",    // 生成文件的名字

            template: "./src/index.html",    // 程序员自己的 html

            minify:{removeComents:true, collapseWhitespace: true}    // 13. 压缩html

        })    // 用来清空 build 文件夹 的插件

    ],

    devtool: 'source-map'    // 7. 新增配置

});
-------------------------------------
npm install webpack@3 --save -D //局部安装
npm install less-loader less --save -D
npm install css-loader style-loader --save -D
npm install file-loader --save -D
npm install url-loader --save -D
npm install extract-text-webpack-plugin --save -D
npm i jshint-loader --save -D
npm audit fix
npm i jshint --save -D
npm install babel-loader@7 babel-core babel-preset-es2015 --save -D
npm install html-webpack-plugin --save -D
npm i clean-webpack-plugin --save -D
npm i webpack-dev-server@2 --save -D
npm i html-loader --save -D
npm i webpack-merge --save -D
npm i postcss-loader --save -D
npm i autoprefixer --save -D
npm i less-plugin-clean-css --save -D
npm i less-plugin-clean-css html-withimg-loader --save -D
{
test: /\.(htm|html)$/i,
use:[ 'html-withimg-loader']
}, // 2. 加入 loader 处理 html 中的 img-src 问题
webpack3_脚手架的更多相关文章
- 开发属于自己的yeoman脚手架(generator-reactpackage)
自从前后端开始分离之后,前端项目工程化也显得越来越重要了,之前写过一篇搭建基于Angular+Requirejs+Grunt的前端项目教程,有兴趣的可以点这里去看 但是有些项目可以使用这种方式,但有些 ...
- 利用yeoman快速搭建React+webpack+es6脚手架
自从前后端开始分离之后,前端项目工程化也显得越来越重要了,之前写过一篇搭建基于Angular+Requirejs+Grunt的前端项目教程,有兴趣的可以点这里去看 但是有些项目可以使用这种方式,但有些 ...
- 【React】dva-cli建立脚手架后发现页面样式不对的问题
用dva-cli作为脚手架建立工程后,开始尝试编写页面.然后立马发现一个坑爹的问题. 在我less文件里面写了一个class ,比如:MainHead. 但是编译出来之后发现css文件里面变成了 Ma ...
- 【React】启动dva脚手架
开始前: 确保node版本为6.5以上. // 安装脚手架 npm i dva-cli -g // 自动安装新工程 dva new newProjectName // 导入antd包 npm i an ...
- 【vuejs小项目】一、脚手架搭建工作
一.关于vuejs 这是一个MVVM的前端开发框架,model(数据).viewmode(通讯).view(视图),它吸取了reactjs和angularjs的长处,核心重点在于组件化的设计原则. 我 ...
- 在基于vue的webpack脚手架开发中使用了代理转发,结果浏览器发出的请求中不带cookie导致登录时总是session失效怎么办?
环境: 有2个业务接口需要转发到82的服务器上: ../user/getCode.do ../user/doLogin.do 现象: 使用上述的 ...
- Nodejs:简单的脚手架(一)
html-webpack-plugin: 用来生成html文件的插件 glob: 用来筛选文件,文件目录 path: 管理文件路径 次脚手架里主要用到的是这3个插件,后续会根据所用插件逐渐完善 ...
- 自定义项目脚手架- Maven Archetypes
在上篇Intellij修改archetype Plugin配置 中我们已经简单介绍了关于archetype的作用. 简单来说maven archetype插件就是创建项目的脚手架,你可以通过命令行或者 ...
- Wee – 为现代 Web 开发打造的 CSS 脚手架
Wee 包含许多开发人员在搭建响应的,互动的网站和应用程序时需要的组件.正如它的名字一样,Wee 是一个微小.移动优先的 CSS 复位框架.Wee 组织在一个简单的.可扩展的层次结构,拥有一致的样式和 ...
随机推荐
- Oracle使用PLSQL导入数据后中文乱码的解决方法
新建环境变量 名:NLS_LANG 值:SIMPLIFIE DCHINESE_CHINA.ZHS16GBK 保存后重启PLSQL Developer 重新导入. 如果还是乱码,将上面8的环境变量值改为 ...
- 面试经验合集-Java后端<一>
面试一:CDKHXJSYJS 时间:2018-12-29 周六 地点:航天科技大厦32楼 一 技术题目 <回忆版> 1.上下转型 2.Java异常:分类.处理.设计 3.二叉排序树 ...
- Django的项目创建,以及该端口号,语言随地区而变化
注:myway是项目的名称创建项目:cd wwwdjango-admin startproject mywaycd mywaypython manage.py runserver 如果想改Django ...
- python:函数和循环判断
输出显示 先说一下最基础的输出: print('hello world') 唯一值得提到是字符串的format函数. format函数代替了C中的%s. print('{0} say:{0} {1}. ...
- Spring Cloud 2-Eureka服务发现注册(一)
Spring Cloud Eureka 1.服务端配置 pom.xml application.yml Application.java 2.客户端配置 pom.xml application.ym ...
- 通过go-ethereum源码看如何管理项目
今天抽空看了下go-ethereum项目的源码 ( https://github.com/ethereum/go-ethereum ),其中 ethereum 是github下的一个帐号.go-eth ...
- C++设计模式——职责链模式
什么是职责链模式? 在GOF的<设计模式:可复用面向对象软件的基础>一书中对职责链模式是这样说的:使多个对象都有机会处理请求,从而避免请求的发送者和接收者之间的耦合关系.将这些对象连成一条 ...
- Visual studio 配置
解决方案 一个解决方案的文件结构: .sln 项目目录 debug release 其中,debug与release放置最终生成的dll或exe,项目目录下包含 头文 ...
- PYTHON-进程 子进程
并发编程 学习目标: 见35复习 1.操作系统 什么是操作系统 操作系统的两大作用: 批处理操作系统: 操作系统发展史: 多道技术***** 产生背景: 两大核心点: 应用软件的优化的核心:***** ...
- linux安装selenium+chrome+phantomjs
1. 安装 selenium pip3 install selenium pip3 安装参考 2. 安装 ChromeDriver yum install chromedriver.x86_64 3. ...

