安卓入门——————简单记账本的开发(用sqlite存储数据)(一)
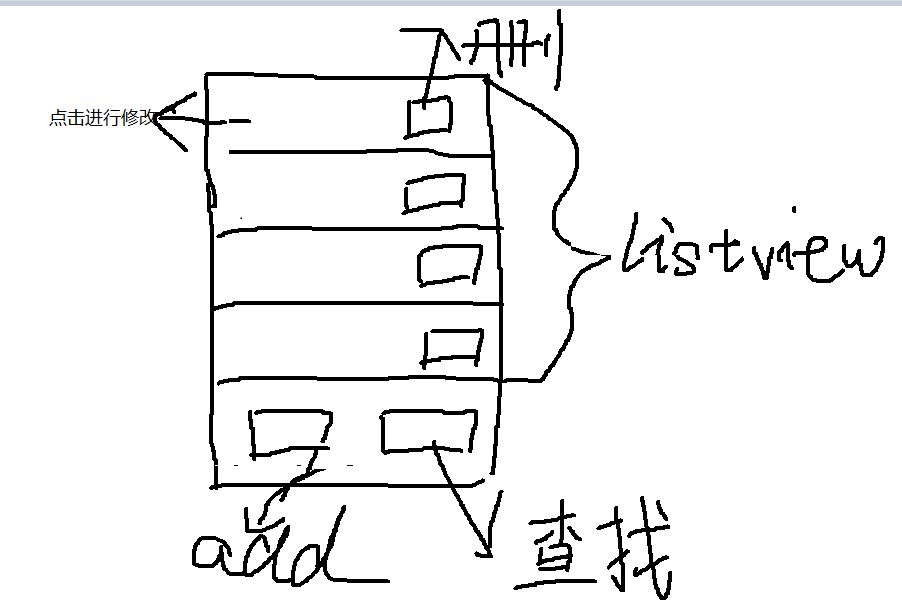
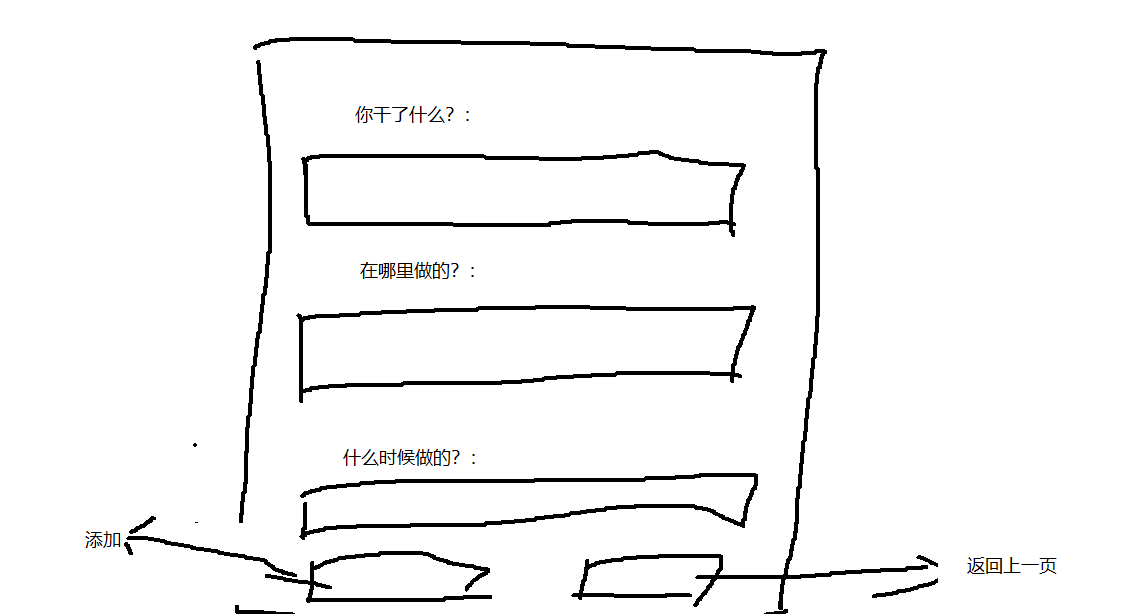
设计思想————首先要确定有几个页面、和每个页面的大致布局
由于是入门,我也是学习了不是很长的时间,所以项目比较low。。。。
第一个页面,也就是打开APP的首页面:
今天这个博客,先实现添加功能!:
首先对主界面进行布局:其中 activity_main.xml的代码为
<?xml version="1.0" encoding="utf-8"?>

<LinearLayout xmlns:android="http://schemas.android.com/apk/res/android"

    xmlns:tools="http://schemas.android.com/tools"

    android:layout_width="match_parent"

    android:layout_height="wrap_content"

    android:orientation="vertical"

    tools:context=".MainActivity" >

    <ListView

        android:id="@+id/lv"

        android:layout_width="match_parent"

        android:layout_height="wrap_content"

        android:layout_weight="1" >

</ListView>

   <LinearLayout android:layout_width="match_parent"

       android:layout_height="wrap_content">

    <Button

    android:onClick="click1"

    android:layout_width="wrap_content"

    android:layout_height="wrap_content"

    android:layout_weight="1"

    android:text="新建"

    />

<Button

    android:onClick="click2"

    android:layout_width="wrap_content"

    android:layout_height="wrap_content"

    android:layout_weight="1"

    android:text="delete"

    />       </LinearLayout>

</LinearLayout>
然后就是MainActivity的代码了,其中内部含有注释,而且我实际使用的是BaseAdapter,但是在学习的过程中我发现SimpleAdatapter更加方便简单,所以我以注释的形式将SimpleAdapter的内容保存了,。可以方便学习:
package com.example.hhah;

import java.util.ArrayList;

import java.util.HashMap;

import java.util.List;

import org.w3c.dom.Text;

import org.w3c.dom.ls.LSInput;

import android.app.Activity;

import android.app.DownloadManager.Query;

import android.content.ClipData.Item;

import android.content.Intent;

import android.database.Cursor;

import android.database.sqlite.SQLiteDatabase;

import android.os.Bundle;

import android.provider.ContactsContract.DataUsageFeedback;

import android.view.Menu;

import android.view.MenuItem;

import android.view.View;

import android.view.ViewGroup;

import android.widget.BaseAdapter;

import android.widget.ListView;

import android.widget.SimpleAdapter;

import android.widget.TextView;

import android.widget.Toast;

public class MainActivity extends Activity {

    private ArrayList<Bean> list;

    private MyOpenHelper myOpenHelper;

    private SQLiteDatabase db;

    private ListView lv;

    @Override

    protected void onCreate(Bundle savedInstanceState) {

        super.onCreate(savedInstanceState);

        setContentView(R.layout.activity_main);

        list = new ArrayList<Bean>();

        lv = (ListView) this.findViewById(R.id.lv);

        myOpenHelper = new MyOpenHelper(this);

        db = myOpenHelper.getWritableDatabase();

        Cursor cursor = db.rawQuery("select * from biao01;", null);

        while (cursor.moveToNext()) {

            String t_name = cursor.getString(cursor.getColumnIndex("t_name"));

            String t_place = cursor.getString(cursor.getColumnIndex("t_place"));

            String time = cursor.getString(cursor.getColumnIndex("time"));

            Bean bean = new Bean();

            bean.setT_name(t_name);

            bean.setT_place(t_place);

            bean.setTime(time);

            list.add(bean);

        }

        MyAdapter myAdapter = new MyAdapter(this, list, R.layout.item);

        /*

         * ArrayList<HashMap<String, Object>> yy = new

         * ArrayList<HashMap<String,Object>>(); for(Bean bean1:list) { HashMap<String,

         * Object> zzz = new HashMap<String,Object>(); zzz.put("t_name",

         * bean1.getT_name()); zzz.put("t_place", bean1.getT_place()); zzz.put("time",

         * bean1.getTime()); yy.add(zzz); } SimpleAdapter simpleAdapter=new

         * SimpleAdapter(this, yy, R.layout.item, new String[]

         * {"t_name","t_place","time"},new int[]

         * {R.id.tv_name,R.id.tv_place,R.id.tv_time});

         *

         */

        lv.setAdapter(myAdapter);

    }

    public void click1(View view) {

        // 该方法只用于跳转,实际增加步骤在增加页面

        Intent intent = new Intent();

        intent.setAction("android.intent.action.add");

        intent.addCategory("android.intent.category.DEFAULT");

        startActivity(intent);

    }

}
在上面我提到,这个APP涉及到连接数据库,所以我们必须要实现SQLiteOpenHelper为我们提供的诸多方法,所以我创建了一个类,专门用来连接数据库以及实现方法:
package com.example.hhah;

import java.sql.ResultSet;

import android.content.Context;

import android.database.sqlite.SQLiteDatabase;

import android.database.sqlite.SQLiteDatabase.CursorFactory;

import android.database.sqlite.SQLiteOpenHelper;

public class MyOpenHelper extends SQLiteOpenHelper {

    // context:上下文

    // name:数据库名字

    // 目的创建cursor对象

    // 数据库的版本从一开始

    public MyOpenHelper(Context context) {

        super(context, "zhanghao", null, 1);

    }

    @Override

    // 当数据库第一次被创建的时候调用,用来建表

    public void onCreate(SQLiteDatabase db) {

        db.execSQL("create table biao01 (t_name varchar(20),t_place varchar(20),time varchar(20));");

        db.execSQL("insert into biao01 values('吃饭','白骆驼','2019.3.21');");

    }

    @Override

    public void onUpgrade(SQLiteDatabase db, int oldVersion, int newVersion) {

        // TODO Auto-generated method stub

    }

}
因为上面提到,我用的是baseadapter所以我也新建了一个class用来配置适配器继承BaseAdapter,其实这个一般是固定的写法,你也可以使用在MainActivity里内部类。不过不推荐使用内部类,因为容易导致其代码结构错乱,引发诸多问题:
package com.example.hhah;

import java.util.ArrayList;

import android.content.Context;

import android.text.Layout;

import android.view.LayoutInflater;

import android.view.View;

import android.view.ViewGroup;

import android.widget.BaseAdapter;

import android.widget.TextView;

public class MyAdapter extends BaseAdapter {

    private Context context;

    private ArrayList<Bean> list = new ArrayList<Bean>();

    private LayoutInflater inflator;

    private int resore;

    private TextView t_name;

    private TextView t_place;

    private TextView time;

    public MyAdapter(Context context, ArrayList<Bean> list, int resore) {

        this.context = context;

        this.list = list;

        this.resore = resore;

    }

    @Override

    public int getCount() {

        // TODO Auto-generated method stub

        return list.size();

    }

    @Override

    public Object getItem(int position) {

        // TODO Auto-generated method stub

        return null;

    }

    @Override

    public long getItemId(int position) {

        // TODO Auto-generated method stub

        return 0;

    }

    @Override

    public View getView(int position, View convertView, ViewGroup parent) {

        if (convertView == null) {

            inflator = (LayoutInflater) context.getSystemService(context.LAYOUT_INFLATER_SERVICE);

            convertView = inflator.inflate(resore, null);

            t_name = (TextView) convertView.findViewById(R.id.tv_name);

            t_place = (TextView) convertView.findViewById(R.id.tv_place);

            time = (TextView) convertView.findViewById(R.id.tv_time);

        }

        Bean bean = list.get(position);

        t_name.setText(bean.getT_name());

        t_place.setText(bean.getT_place());

        time.setText(bean.getTime());

        return convertView;

    }

}
然后就是最简单的Bean对象了,同样是新建一个类(变量比较少,也是为了方便学习,如果要实现更多的记录内容可以自行添加):
package com.example.hhah;

public class Bean {

    private String t_name;

    private String time;

    private String t_place;

    public String getT_name() {

        return t_name;

    }

    public void setT_name(String t_name) {

        this.t_name = t_name;

    }

    public String getTime() {

        return time;

    }

    public void setTime(String time) {

        this.time = time;

    }

    public String getT_place() {

        return t_place;

    }

    public void setT_place(String t_place) {

        this.t_place = t_place;

    }

}
好那么只涉及增加的主界面搭建好了,接下来就是实现增加功能的页面,以及运用适配器传输数据的接口页面:
我的添加界面:
还是,创建一个xml文件。用来显示这个添加页面:
<?xml version="1.0" encoding="utf-8"?>

<LinearLayout xmlns:android="http://schemas.android.com/apk/res/android"

    xmlns:tools="http://schemas.android.com/tools"

    android:layout_width="match_parent"

    android:layout_height="match_parent"

    android:orientation="vertical"

    tools:context=".addActivity" >

    <TextView

        android:layout_width="match_parent"

        android:layout_height="wrap_content"

        android:text="事件名:"

        android:textSize="30dp" />

    <EditText

        android:id="@+id/et_things"

        android:layout_width="match_parent"

        android:layout_height="wrap_content"

        android:hint="请输入事件名"

        android:textSize="25dp" />

    <TextView

        android:layout_width="match_parent"

        android:layout_height="wrap_content"

        android:text="时间:"

        android:textSize="30dp" />

    <EditText

        android:id="@+id/et_time"

        android:layout_width="match_parent"

        android:layout_height="wrap_content"

        android:hint="请输入时间"

        android:textSize="25dp" />

    <TextView

        android:layout_width="match_parent"

        android:layout_height="wrap_content"

        android:text="地点:"

        android:textSize="30dp" />

    <EditText

        android:id="@+id/et_place"

        android:layout_width="match_parent"

        android:layout_height="wrap_content"

        android:hint="请输入地点"

        android:textSize="25dp" />

    <Button

        android:layout_width="match_parent"

        android:layout_height="wrap_content"

        android:layout_weight="1"

        android:onClick="click_add"

        android:text="添加" />

    <Button

        android:layout_width="match_parent"

        android:layout_height="wrap_content"

        android:layout_weight="1"

        android:onClick="click_return"

        android:text="放弃添加" />

</LinearLayout>
然后就是用来实现接口功能的item.xml文件:
<?xml version="1.0" encoding="utf-8"?>

<LinearLayout xmlns:android="http://schemas.android.com/apk/res/android"

    android:layout_width="match_parent"

    android:layout_height="match_parent"

    android:orientation="horizontal" >

    <TextView

        android:id="@+id/tv_name"

        android:layout_width="0dp"

        android:layout_height="wrap_content"

        android:layout_weight="1"

        android:textSize="20sp" />

    <TextView

        android:id="@+id/tv_place"

        android:layout_width="0dp"

        android:layout_height="wrap_content"

        android:layout_weight="1"

        android:textSize="20sp" />

    <TextView

        android:id="@+id/tv_time"

        android:layout_width="0dp"

        android:layout_height="wrap_content"

        android:layout_weight="1"

        android:textSize="20sp" />

</LinearLayout>
之后创建一个AddActivity,进行数据的输入,之后点击按钮,将数据保存到数据库:
package com.example.hhah;

import java.util.List;

import android.app.Activity;

import android.content.ContentValues;

import android.content.Intent;

import android.database.sqlite.SQLiteDatabase;

import android.os.Bundle;

import android.text.TextUtils;

import android.view.View;

import android.widget.EditText;

import android.widget.Toast;

public class addActivity extends Activity {

    private EditText et_thing;

    private EditText et_place;

    private EditText et_time;

    private SQLiteDatabase db;

    private Bean bean;

    private long ll;

    private MyOpenHelper myOpenHelper;

    @Override

    protected void onCreate(Bundle savedInstanceState) {

        // TODO Auto-generated method stub

        super.onCreate(savedInstanceState);

        // 加载布局

        setContentView(R.layout.add_activity);

        et_thing = (EditText) findViewById(R.id.et_things);

        et_place = (EditText) findViewById(R.id.et_place);

        et_time = (EditText) findViewById(R.id.et_time);

        myOpenHelper = new MyOpenHelper(getApplicationContext());

        // db = myOpenHelper.getWritableDatabase();

    }

    public void click_add(View view) {

        db = myOpenHelper.getWritableDatabase();

        String thing = et_thing.getText().toString().trim();

        String place = et_place.getText().toString().trim();

        String time = et_time.getText().toString().trim();

        if (TextUtils.isEmpty(thing) || TextUtils.isEmpty(place) || TextUtils.isEmpty(time)) {

            Toast.makeText(getApplicationContext(), "亲输入内容不能为空哦!", 1).show();

            return;

        } else {

            bean = new Bean();

            bean.setT_name(thing);

            bean.setT_place(place);

            bean.setTime(time);

            ContentValues values = new ContentValues();

            values.put("t_name", thing);

            values.put("t_place", place);

            values.put("time", time);

            ll = db.insert("biao01", null, values);

            db.close();

            System.out.println(ll);

            if (ll > 0) {

                Toast.makeText(getApplicationContext(), "保存成功", 1).show();

                addActivity.this.finish();

            } else {

                Toast.makeText(getApplicationContext(), "系统繁忙,请稍后再试!", 1).show();

            }

        }

    }

    public void click_return(View view) {

        addActivity.this.finish();

    }

}
最后千万别忘了配置清单文件!!!具体涉及到的内容如下:
<application

        android:allowBackup="true"

        android:icon="@drawable/ic_launcher"

        android:label="@string/app_name"

        android:theme="@style/AppTheme" >

        <activity

            android:name="com.example.hhah.MainActivity"

            android:label="@string/app_name" >

            <!-- main主入口   -->

            <intent-filter>

                <action android:name="android.intent.action.MAIN" />

                <category android:name="android.intent.category.LAUNCHER" />

            </intent-filter>

        </activity>

        <activity

            android:name="com.example.hhah.addActivity"

         >

            <!-- main主入口   -->

            <intent-filter>

                <action android:name="android.intent.action.add" />

                <category android:name="android.intent.category.DEFAULT" />

            </intent-filter>

        </activity>

    </application>
好做到这里,添加功能就实现了,那么之后的博客,会对其他功能进行实现,也会逐步的对界面进行美化,毕竟现在这个界面是在是难以入目。。。
安卓入门——————简单记账本的开发(用sqlite存储数据)(一)的更多相关文章
- 安卓入门——————简单记账本的开发(二)-点击listview跳转并实现数据的更新
前言: 这个博客主要实现listview的跳转并实现对数据库内容的更新并显示到listview上,还没有实现listview的实时更新和listview具体线条的添加(接下来的几篇博客会实现),如 ...
- Android开发:SharedPreferences 存储数据、获取数据
Android开发:SharedPreferences 存储数据.获取数据 email:chentravelling@163.com 开发环境:win7 64位,Android Studio. 关于S ...
- 【搬砖】安卓入门(1)- Java开发入门
01.01_计算机基础知识(计算机概述)(了解) A:什么是计算机?计算机在生活中的应用举例 计算机(Computer)全称:电子计算机,俗称电脑.是一种能够按照程序运行,自动.高速处理海量数据的现代 ...
- 【搬砖】安卓入门(3)- Java开发编程基础--循环控制语句
04.01_Java语言基础(循环结构概述和for语句的格式及其使用) A:循环结构的分类 for(初始化表达式;条件表达式;循环后的操作表达式) { 循环体; } 复制代码 B:循环结构for语句的 ...
- 【搬砖】安卓入门(2)- Java开发编程基础--进制转换和运算符
02.01_Java语言基础(常量的概述和使用)(掌握) A:什么是常量 在程序执行的过程中其值不可以发生改变 B:Java中常量的分类 字面值常量 自定义常量(面向对象部分讲) C:字面值常量的分类 ...
- 【搬砖】安卓入门(4)- Java开发编程基础--数组
05.01_Java语言基础(数组概述和定义格式说明)(了解) A:为什么要有数组(容器) 为了存储同种数据类型的多个值 B:数组概念 数组是存储同一种数据类型多个元素的集合.也可以看成是一个容器. ...
- Android开发手记(18) 数据存储三 SQLite存储数据
Android为数据存储提供了五种方式: 1.SharedPreferences 2.文件存储 3.SQLite数据库 4.ContentProvider 5.网络存储 SQLite 是以嵌入式为目的 ...
- iOS开发系列-SQLite
概述 SQLite3是一款轻型的嵌入式数据库.它占用资源非常低,在嵌入式设备中,可能只需要几百K的内存就够了.它的处理速度比Mysql.PostgreSQL这两款著名的数据库速度还快. 数据库简介 常 ...
- 课程上线 -“新手入门 : Windows Phone 8.1 开发”
经过近1个月的准备和录制,“新手入门 : Windows Phone 8.1 开发”系列课程已经在Microsoft 虚拟学院上线,链接地址为:http://www.microsoftvirtuala ...
随机推荐
- Bypass 360主机卫士SQL注入防御(附tamper脚本)
0x01 前言 在测试过程中,经常会遇到一些主机防护软件,对这方面做了一些尝试,可成功bypass了GET和POST的注入防御,分享一下姿势. 0x02 环境搭建 Windows Server 200 ...
- C语言面试题分类->宏定义
1.写一个“标准”宏,这个宏输入两个参数并返回较小的一个 答:#define MIN(x, y) ((x)<(y)?(x):(y))//注意x,y要加括号,因为x,y如果有复合运算会出现问题. ...
- cpu读取指令时读取的长度
CPU读取指令时,如果单字节指令,一次访存即可完成读取操作:如果是多字节指令,会根据第一次读取指令的操作码与寻址标志位,判断指令的后续长度,进而完成整个指令的读取,同时指令指针IP会自动进行修改,指向 ...
- 审核被拒Guideline 2.1 - Information Needed we are unable to find 账号登录 option
Guideline 2.1 - Information Needed We were unable to sign in to review your app with the demo accoun ...
- COMP9021 PRINCIPLES OF PROGRAMMING
QUIZ 7COMP9021 PRINCIPLES OF PROGRAMMING$ python3 quiz_7.pyEnter four integers: 0 2 2 8Here is the g ...
- 关于VMware(虚拟机) 出现错误时处理办法
我们在开发中难免会用到虚拟机.前段时间老有同学问我虚拟机报错解决办法,趁今天有空特随笔. 错误如下图 首先科普下VT是个啥? Intel VirtualTechnology(VT)既“虚拟化技术” V ...
- [译]《Sphinx权威指南》 - Sphinx入门
本章中,我们会讨论到Sphinx基础的安装.配置和维护.不要被“基础”这形容词糊弄而跳过这个章节.对于“基础”,我不是指简单到显而易见的东西,而是指所有人都会用到的功能. 一般来说,Sphinx会使用 ...
- 于用cocoapods添加第三方库,并且cocoapods添加成功,但是却在任何一个文件上都导入不了头文件
关于用cocoapods添加第三方库,并且cocoapods添加成功,但是却在任何一个文件上都导入不了头文件,而且根本没有提示,即使手动打#import "xxxx.h"也报错xx ...
- zabbix源码安装实例
环境 系统 Centos7 zabbix版本 Zabbix 3.4.15 (revision 86739) zabbix源码安装 .tar.gz cd zab ...
- vue深度监控数据改变,缓存数据到本地
项目效果图: var vm = new Vue({ el:'#app', data:{ students:[], }, watch:{ students:{ handler(){ localStora ...
