【SpringBoot】单元测试进阶实战、自定义异常处理、t部署war项目到tomcat9和启动原理讲解
========================4、Springboot2.0单元测试进阶实战和自定义异常处理 ==============================
1、@SpringBootTest单元测试实战
简介:讲解SpringBoot的单元测试
1、引入相关依赖
<!--springboot程序测试依赖,如果是自动创建项目默认添加-->
<dependency>
<groupId>org.springframework.boot</groupId>
<artifactId>spring-boot-starter-test</artifactId>
<scope>test</scope>
</dependency>
2、使用
@RunWith(SpringRunner.class) //底层用junit SpringJUnit4ClassRunner
@SpringBootTest(classes={XdclassApplication.class})//启动整个springboot工程
public class SpringBootTests { }
2、SpringBoot测试进阶高级篇之MockMvc讲解
简介:讲解MockMvc类的使用和模拟Http请求实战
1、增加类注解 @AutoConfigureMockMvc
@SpringBootTest(classes={XdclassApplication.class})
2、相关API
perform:执行一个RequestBuilder请求
andExpect:添加ResultMatcher->MockMvcResultMatchers验证规则
andReturn:最后返回相应的MvcResult->Response
package com.atguigu.springboot;

import org.junit.Test;

import org.junit.runner.RunWith;

import org.springframework.beans.factory.annotation.Autowired;

import org.springframework.boot.test.autoconfigure.web.servlet.AutoConfigureMockMvc;

import org.springframework.boot.test.context.SpringBootTest;

import org.springframework.test.context.junit4.SpringRunner;

import org.springframework.test.web.servlet.MockMvc;

import org.springframework.test.web.servlet.MvcResult;

import org.springframework.test.web.servlet.request.MockMvcRequestBuilders;

import org.springframework.test.web.servlet.result.MockMvcResultMatchers;

/**

 * 功能描述:测试mockmvc类

 *

 * <p> 创建时间:Apr 24, 2018 10:01:12 PM </p>

 * <p> 作者:小D课堂</p>

 */

@RunWith(SpringRunner.class)  //底层用junit  SpringJUnit4ClassRunner

@SpringBootTest(classes={SpringBoot04WebRestfulcurdApplication.class}) //启动整个springboot工程

@AutoConfigureMockMvc

public class MockMvcTestDemo {

    @Autowired

    private MockMvc mockMvc;

    @Test

    public void apiTest() throws Exception {

        MvcResult mvcResult =  mockMvc.perform( MockMvcRequestBuilders.get("/test/home") ).

                andExpect( MockMvcResultMatchers.status().isOk() ).andReturn();

        int status = mvcResult.getResponse().getStatus();

        System.out.println(status);

    }

}
mockmvctest
3、SpringBoot2.x个性化启动banner设置和debug日志
简介:自定义应用启动的趣味性日志图标和查看调试日志
1、启动获取更多信息 java -jar xxx.jar --debug
2、修改启动的banner信息
1)在类路径下增加一个banner.txt,里面是启动要输出的信息
2)在applicatoin.properties增加banner文件的路径地址
spring.banner.location=banner.txt
3)官网地址 https://docs.spring.io/spring-boot/docs/2.1.0.BUILD-SNAPSHOT/reference/htmlsingle/#boot-features-banners
4、SpringBoot2.x配置全局异常实战
讲解:服务端异常讲解和SpringBoot配置全局异常实战
1、默认异常测试 int i = 1/0,不友好
2、异常注解介绍
@ControllerAdvice 如果是返回json数据 则用 RestControllerAdvice,就可以不加 @ResponseBody
//捕获全局异常,处理所有不可知的异常
@ExceptionHandler(value=Exception.class)
package com.atguigu.springboot.controller.domain;

import java.util.HashMap;

import java.util.Map;

import javax.servlet.http.HttpServletRequest;

import org.slf4j.Logger;

import org.slf4j.LoggerFactory;

import org.springframework.web.bind.annotation.ExceptionHandler;

import org.springframework.web.bind.annotation.RestControllerAdvice;

@RestControllerAdvice

public class CustomeExtHandler {

    private static final Logger LOG = LoggerFactory.getLogger(CustomeExtHandler.class);

    //捕获全局异常,处理所有不可知的异常

    @ExceptionHandler(value = Exception.class)

    //@ResponseBody

    Object handleException(Exception e, HttpServletRequest request) {

        LOG.error("url {}, msg {}", request.getRequestURL(), e.getMessage());

        Map<String, Object> map = new HashMap<>();

        map.put("code", 100);

        map.put("msg", e.getMessage());

        map.put("url", request.getRequestURL());

        return map;

    }

}
exceptionAdvice

5、SpringBoot2.x配置全局异常返回自定义页面
简介:使用SpringBoot自定义异常和错误页面跳转实战
1、返回自定义异常界面,需要引入thymeleaf依赖
<dependency>
<groupId>org.springframework.boot</groupId>
<artifactId>spring-boot-starter-thymeleaf</artifactId>
</dependency>
package com.atguigu.springboot.controller.domain;

public class MyException extends RuntimeException {

    public MyException(String code, String msg) {

        this.code = code;

        this.msg = msg;

    }

    private String code;

    private String msg;

    public String getCode() {

        return code;

    }

    public void setCode(String code) {

        this.code = code;

    }

    public String getMsg() {

        return msg;

    }

    public void setMsg(String msg) {

        this.msg = msg;

    }

}
自定义exception
2、resource目录下新建templates,并新建error.html
ModelAndView modelAndView = new ModelAndView();
modelAndView.setViewName("error.html");
modelAndView.addObject("msg", e.getMessage());
return modelAndView;
https://docs.spring.io/spring-boot/docs/2.1.0.BUILD-SNAPSHOT/reference/htmlsingle/#boot-features-error-handling
package net.xdclass.demo.domain;

import java.util.HashMap;

import java.util.Map;

import javax.servlet.http.HttpServletRequest;

import org.slf4j.Logger;

import org.slf4j.LoggerFactory;

import org.springframework.web.bind.annotation.ExceptionHandler;

import org.springframework.web.bind.annotation.RestControllerAdvice;

import org.springframework.web.servlet.ModelAndView;

@RestControllerAdvice

public class CustomExtHandler {

    private static final Logger LOG = LoggerFactory.getLogger(CustomExtHandler.class);

    //捕获全局异常,处理所有不可知的异常

    @ExceptionHandler(value=Exception.class)

    Object handleException(Exception e,HttpServletRequest request){

        LOG.error("url {}, msg {}",request.getRequestURL(), e.getMessage());

        Map<String, Object> map = new HashMap<>();

            map.put("code", 100);

            map.put("msg", e.getMessage());

            map.put("url", request.getRequestURL());

            return map;

    }

    /**

     * 功能描述:处理自定义异常

     * @return

     */

    @ExceptionHandler(value=MyException.class)

    Object handleMyException(MyException e,HttpServletRequest request){

        //进行页面跳转

//        ModelAndView modelAndView = new ModelAndView();

//        modelAndView.setViewName("error.html");

//        modelAndView.addObject("msg", e.getMessage());

//        return modelAndView;

        //返回json数据,由前端去判断加载什么页面

        Map<String, Object> map = new HashMap<>();

        map.put("code", e.getCode());

        map.put("msg", e.getMsg());

        map.put("url", request.getRequestURL());

        return map;

    }

}
ExceHandler
package net.xdclass.demo.domain;

/**

 * 功能描述:自定义异常类

 *

 * <p> 创建时间:Apr 25, 2018 12:06:51 AM </p>

 * <p> 作者:小D课堂</p>

 */

public class MyException extends RuntimeException {

    public MyException(String code, String msg) {

        this.code = code;

        this.msg = msg;

    }

    private String code;

    private String msg;

    public String getCode() {

        return code;

    }

    public void setCode(String code) {

        this.code = code;

    }

    public String getMsg() {

        return msg;

    }

    public void setMsg(String msg) {

        this.msg = msg;

    }

}
MyException
package com.atguigu.springboot.controller;

import com.atguigu.springboot.controller.domain.MyException;

import com.atguigu.springboot.controller.domain.User;

import org.springframework.stereotype.Controller;

import org.springframework.web.bind.annotation.RequestMapping;

import org.springframework.web.bind.annotation.RestController;

@RestController

public class ExcptionController {

    @RequestMapping("/test_ext")

    public Object index(){

        int i=1/0;

        return new User(11,"pwd_123","phone123");

    }

    @RequestMapping("/my_ext")

    public Object myexc(){

        throw new MyException("500","my exception");

    }

}
Controller
========================5、SpringBoot部署war项目到tomcat9和启动原理讲解 2节课==============================
加入小D课堂技术交流答疑群:Q群:699347262
1、SpringBoot启动方式讲解和部署war项目到tomcat9
简介:SpringBoot常见启动方式讲解和部署war项目Tomcat
1、ide启动
2、jar包方式启动
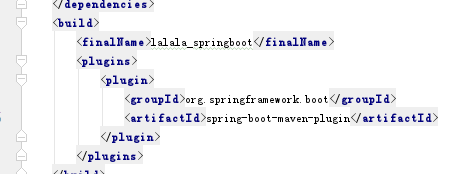
maven插件:
<build>
<plugins>
<plugin>
<groupId>org.springframework.boot</groupId>
<artifactId>spring-boot-maven-plugin</artifactId>
</plugin>
</plugins>
</build>
如果没有加,则执行jar包 ,报错如下
java -jar spring-boot-demo-0.0.1-SNAPSHOT.jar
no main manifest attribute, in spring-boot-demo-0.0.1-SNAPSHOT.jar
如果有安装maven 用 mvn spring-boot:run
项目结构
example.jar
|
+-META-INF
| +-MANIFEST.MF
+-org
| +-springframework
| +-boot
| +-loader
| +-<spring boot loader classes>
+-BOOT-INF
+-classes
| +-mycompany
| +-project
| +-YourClasses.class
+-lib
+-dependency1.jar
+-dependency2.jar
目录结构讲解
https://docs.spring.io/spring-boot/docs/2.1.0.BUILD-SNAPSHOT/reference/htmlsingle/#executable-jar-jar-file-structure
3、war包方式启动
1)在pom.xml中将打包形式 jar 修改为war <packaging>war</packaging>

构建项目名称 <finalName>xdclass_springboot</finalName>

2)tocmat下载 https://tomcat.apache.org/download-90.cgi
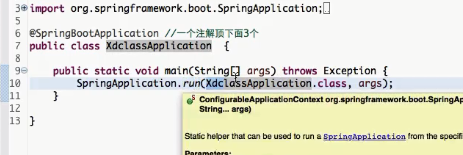
3)修改启动类
public class XdclassApplication extends SpringBootServletInitializer {
@Override
protected SpringApplicationBuilder configure(SpringApplicationBuilder application) {
return application.sources(XdclassApplication.class);
}
public static void main(String[] args) throws Exception {
SpringApplication.run(XdclassApplication.class, args);
}
}
4)打包项目,启动tomcat
4、启动容器介绍和第三方测试数据讲解
使用Jmter测试工具测试性能(压力测试),QPS(每秒查询书),TPS(每秒失误数),RT(响应时间),判断容器的好坏
https://examples.javacodegeeks.com/enterprise-java/spring/tomcat-vs-jetty-vs-undertow-comparison-of-spring-boot-embedded-servlet-containers/

package net.xdclass.base_project;

import org.springframework.boot.SpringApplication;

import org.springframework.boot.autoconfigure.SpringBootApplication;

import org.springframework.boot.builder.SpringApplicationBuilder;

import org.springframework.boot.web.servlet.support.SpringBootServletInitializer;

@SpringBootApplication //一个注解顶下面3个

public class XdclassApplication extends SpringBootServletInitializer {

    @Override

    protected SpringApplicationBuilder configure(SpringApplicationBuilder application) {

        return application.sources(XdclassApplication.class);

    }

    public static void main(String[] args) throws Exception {

        SpringApplication.run(XdclassApplication.class, args);

    }

}
main
2、SpringBoot2.x启动原理概述
简介:讲解SpringBoot启动流程概述和基本加载案例

【SpringBoot】单元测试进阶实战、自定义异常处理、t部署war项目到tomcat9和启动原理讲解的更多相关文章
- 小D课堂 - 零基础入门SpringBoot2.X到实战_第5节 SpringBoot部署war项目到tomcat9和启动原理讲解_22、SpringBoot启动方式和部署war项目到tomcat9
笔记 1.SpringBoot启动方式讲解和部署war项目到tomcat9 简介:SpringBoot常见启动方式讲解和部署war项目Tomcat 1.ide启动 2.jar包方式启动 ...
- SpringBoot启动方式讲解和部署war项目到tomcat9
1.SpringBoot启动方式讲解和部署war项目到tomcat9简介:SpringBoot常见启动方式讲解和部署war项目Tomcat 1.ide启动 2.jar包方式启动 maven插件: &l ...
- SpringBoot 2.x (5):异常处理与部署WAR项目
异常处理: SpringBoot的异常处理是不友好的,前端只会显示最基本的错误名称 后端控制台会报出具体的错误,那么我们如何告知前端具体的错误信息呢? 1:对全局异常进行处理 一个测试的Control ...
- tomcat从manager部署war项目上传失败
tomcat从manager部署war项目上传失败, 查看manager.2018-07-17.log 日志,可以看到如下信息. less manager.2018-07-17.log 17-Jul- ...
- 小D课堂 - 零基础入门SpringBoot2.X到实战_第4节 Springboot2.0单元测试进阶实战和自定义异常处理_17、SpringBootTest单元测试实战
笔记 1.@SpringBootTest单元测试实战 简介:讲解SpringBoot的单元测试 1.引入相关依赖 <!--springboot程 ...
- Jenkins自动化部署war项目
基于上一篇Jenkins安装环境,下面对自动打包部署做个备忘 1.安装:Publish over SSH 插件 2.安装完成后,进入下图配置 ↓↓↓ 3.翻到底下↓↓↓ 找到刚刚安装的Publish ...
- 【转】部署web项目到weblogic上启动错误
启动weblogic报错:java.lang.ClassCastException: com.sun.faces.application.WebappLifecycleListener cannot ...
- tomcat 部署war项目
前提是 jdk环境已配好 把项目war包放到tomcat的webapps目录下 启动tomcat: 这里我把8080端口修改成了80 IP也修改了 如果没修改直接输入localhost:8080/te ...
- SpringBoot图片上传(三)——调用文件上传项目的方法(同时启动两个项目)
简单说明:图片上传有一个专门的工程A,提供了图片的上传和下载预览,工程B涉及到图片上传以及回显,都是调用的工程A的方法,言外之意就是要同时启动两个项目. 代码: //工程B的html代码 <di ...
随机推荐
- dgango中admin下添加搜索功能
admin下添加搜索功能: 在表单中加入search_fields = ['ip','hostname'] 可模糊匹配 当有人在管理搜索框中进行搜索时,Django将搜索查询分解成单词,并返回包含 ...
- SharePoint Framework 企业向导(七)
博客地址:http://blog.csdn.net/FoxDave 企业中的SPFx SharePoint是最成功的企业协作平台之一,能够成功的其中一点是它能够进行扩展并作为一个应用集成平台.SP ...
- tf 版本更新 记录
tf 经常更新版本,网上教程又是各版本都有,且不标明版本,致使各种用法难以分清哪个新,哪个旧,这里做个记录,以前的博客我就不更新了,请大家见谅. tf.nn.rnn_cell 改为 tf.contri ...
- 2019-02-25 EST 科技文翻译
The Definition of Theme and Rheme The point of departure is equally presented to the speaker and to ...
- day 53 练习
1 <!DOCTYPE html><html lang="en"><head> <meta charset="UTF-8&qu ...
- UIIimageView读取图片的两种方式及动画的执行
/**count:图片数量 name:图片名称*/ - (void)runAnimationWithCount:(int)count name:(NSString *)name { if(self.t ...
- HDU 1205 吃糖果(想想题)
题目传送:http://acm.hdu.edu.cn/showproblem.php?pid=1205 Problem Description HOHO,终于从Speakless手上赢走了所有的糖果, ...
- 神州数码RIP协议认证
实验要求:掌握RIP协议的简单认证及MD5认证 拓扑如下 简单认证 R1 enable 进入特权模式 config 进入全局模式 hostname R1 修改名称 interface s0/1 进入 ...
- [转]ZooKeeper学习第一期---Zookeeper简单介绍
ZooKeeper学习第一期---Zookeeper简单介绍 http://www.cnblogs.com/sunddenly/p/4033574.html 一.分布式协调技术 在给大家介绍ZooKe ...
- JAVA中日期和时间的格式化选项
一.使用printf方法 import java.util.Date; import java.util.Scanner; public class Test { public static void ...
