【译】第24节---Fluent API - 属性映射
原文:http://www.entityframeworktutorial.net/code-first/configure-property-mappings-using-fluent-api.aspx
本节,我们将学习如何使用Fluent API配置实体类的属性。 我们将使用我们学校app的Student和Standard域类:
public class Student

{

    public Student()

    {

    }

    public int StudentKey { get; set; }

    public string StudentName { get; set; }

    public DateTime DateOfBirth { get; set; }

    public byte[]  Photo { get; set; }

    public decimal Height { get; set; }

    public float Weight { get; set; }

    public Standard Standard { get; set; }

}

public class Standard

{

    public Standard()

    {

    }

    public int StandardKey { get; set; }

    public string StandardName { get; set; }

    public ICollection<Student> Students { get; set; }

}
配置主键和复合主键
上面的域类,没有按照主键的Code-First约定,因为它们没有Id或{Class Name} + Id属性。
因此,你可以使用Fluent API使用EntityTypeConfiguration的HasKey()方法配置key属性,如下所示。 记住modelBuilder.Entity <TEntity>()返回EntityTypeConfiguration对象。
public class SchoolContext: DbContext

{

    public SchoolDBContext(): base()

    {

    }

    public DbSet<Student> Students { get; set; }

    public DbSet<Standard> Standards { get; set; }

    protected override void OnModelCreating(DbModelBuilder modelBuilder)

    {

        //Configure primary key

        modelBuilder.Entity<Student>().HasKey<int>(s => s.StudentKey);

        modelBuilder.Entity<Standard>().HasKey<int>(s => s.StandardKey);

        //Configure composite primary key

        modelBuilder.Entity<Student>().HasKey<int>(s => new { s.StudentKey, s.StudentName });

    }

}
配置列名、列类型和排序
默认Code-First约定为名属性创建一个同名的列名、顺序和数据类型的列。 你可以覆盖此约定,如下所示:
public class SchoolContext: DbContext

{

    public SchoolDBContext(): base()

    {

    }

    public DbSet<Student> Students { get; set; }

    public DbSet<Standard> Standards { get; set; }

    protected override void OnModelCreating(DbModelBuilder modelBuilder)

    {

        //Configure Column

        modelBuilder.Entity<Student>()

                    .Property(p => p.DateOfBirth)

                    .HasColumnName("DoB")

                    .HasColumnOrder()

                    .HasColumnType("datetime2");

    }

}
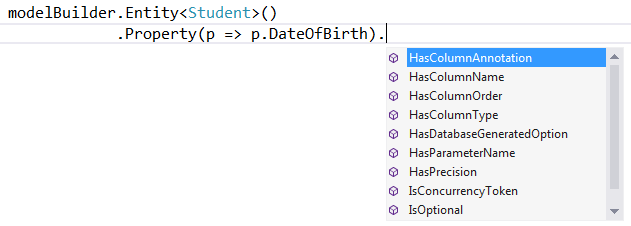
如上例所示,我们使用Property()方法为实体的属性配置任何东西。
在这里,我们使用HasColumnName来更改DateOfBirth属性的列名。 此外,我们调用HasColumnOrder和HasColumnType来更改列的顺序和数据类型。
modelBuilder.Entity <TEntity>().Property(expression)允许您使用不同的方法配置特定属性,如下所示:

为属性配置Null或Not Null列
Code-First将为原始数据类型属性创建NotNull列,因为原始数据类型不能为空,除非使用?符号或Nullable <T>。
使用IsOptional方法为属性创建一个可空的列。
以同样的方式,使用IsRequired方法创建一个NotNull列。
namespace CodeFirst_FluentAPI_Tutorials

{

    public class SchoolContext: DbContext

    {

        public SchoolDBContext(): base()

        {

        }

        public DbSet<Student> Students { get; set; }

        public DbSet<Standard> Standards { get; set; }

        protected override void OnModelCreating(DbModelBuilder modelBuilder)

        {

                //Configure Null Column

            modelBuilder.Entity<Student>()

                    .Property(p => p.Heigth)

                    .IsOptional();

                //Configure NotNull Column

                modelBuilder.Entity<Student>()

                    .Property(p => p.Weight)

                    .IsRequired();

        }

    }

}
配置列大小
Code-First将设置列的数据类型的最大大小。 您可以覆盖此约定,如下所示:
namespace CodeFirst_FluentAPI_Tutorials

{

    public class SchoolContext: DbContext

    {

        public SchoolDBContext(): base()

        {

        }

        public DbSet<Student> Students { get; set; }

        public DbSet<Standard> Standards { get; set; }

        protected override void OnModelCreating(DbModelBuilder modelBuilder)

        {

            //Set StudentName column size to 50

            modelBuilder.Entity<Student>()

                    .Property(p => p.StudentName)

                    .HasMaxLength();

            //Set StudentName column size to 50 and change datatype to nchar

            //IsFixedLength() change datatype from nvarchar to nchar

            modelBuilder.Entity<Student>()

                    .Property(p => p.StudentName)

                    .HasMaxLength().IsFixedLength();

            //Set size decimal(2,2)

                modelBuilder.Entity<Student>()

                    .Property(p => p.Height)

                    .HasPrecision(, );

        }

    }

}
如上例所示,我们使用HasMaxLength方法设置列的大小。
IsFixedLength方法将nvarchar转换为nchar类型。
以同样的方式,HasPrecision方法改变了十进制列的精度。
配置并发列
你可以使用ConcurrencyToken方法将属性配置为并发列,如下所示:
namespace CodeFirst_FluentAPI_Tutorials

{

    public class SchoolContext: DbContext

    {

        public SchoolDBContext(): base()

        {

        }

        public DbSet<Student> Students { get; set; }

        public DbSet<Standard> Standards { get; set; }

        protected override void OnModelCreating(DbModelBuilder modelBuilder)

        {

            //Set StudentName as concurrency column

            modelBuilder.Entity<Student>()

                    .Property(p => p.StudentName)

                    .IsConcurrencyToken();

        }

    }

}
如上例所示,我们将StudentName列设置为并发列,以便它被包含在update和delete命令的where子句中。
您也可以使用IsRowVersion()方法来将byte []属性作为并发列。
【译】第24节---Fluent API - 属性映射的更多相关文章
- 【译】第23节---Fluent API - 实体映射
原文:http://www.entityframeworktutorial.net/code-first/configure-entity-mappings-using-fluent-api.aspx ...
- 使用 Fluent API 配置/映射属性和类型(摘自微软Data Access and Storage)
使用 Fluent API 配置/映射属性和类型 使用实体框架 Code First 时,默认行为是使用一组 EF 中内嵌的约定将 POCO 类映射到表.但是,有时您无法或不想遵守这些约定,需要将实体 ...
- 使用Fluent API 配置/映射属性和类型
Code First约定-Fluent API配置 使用Fluent API 配置/映射属性和类型 简介 通常通过重写派生DbContext 上的OnModelCreating 方法来访问Code F ...
- 使用 Fluent API 配置/映射属性和类型
使用 Fluent API 配置/映射属性和类型 使用实体框架 Code First 时,默认行为是使用一组 EF 中内嵌的约定将 POCO 类映射到表.但是,有时您无法或不想遵守这些约定,需要将实体 ...
- 【译】第22节---Fluent API - EntityTypeConfiguration类
原文:http://www.entityframeworktutorial.net/code-first/entitytypeconfiguration-class.aspx 在我们开始使用Fluen ...
- 【译】第21节---Fluent API
原文:http://www.entityframeworktutorial.net/code-first/fluent-api-in-code-first.aspx 在前面的学习中.我们已经看到不同的 ...
- 使用 Fluent API 配置/映射属性和类型2
1.将多个实体类映射到数据库中的一个表 要将多个实体映射到一个数据库表需要满足: a. 两个实体必须是一对一关系 b.两个实体共享一个主键 public class MyContext:DbConte ...
- EF使用Fluent API配置映射关系
定义一个继承自EntityTypeConfiguration<>泛型类的类来定义domain中每个类的数据库配置,在这个自定义类的构造函数中使用我们上次提到的那些方法配置数据库的映射. 映 ...
- 1.【使用EF Code-First方式和Fluent API来探讨EF中的关系】
原文链接:http://www.c-sharpcorner.com/UploadFile/3d39b4/relationship-in-entity-framework-using-code-firs ...
随机推荐
- highchart 柱状图,单个样例
var chart = Highcharts.chart('container', { chart: { type: 'column' }, title: { text: '月平均气温' }, sub ...
- ptrace线程
在ptrace时使用waitpid(-1, &status, 0);无法正常trace 修改为waitpid(-1, &status, __WALL);即可 原因是:
- python+selenium win32gui实现文件上传 enumerate()
upload = dr.find_element_by_id('exampleInputFile0') upload.click() time.sleep(1) # win32gui dialog = ...
- python里面的xlrd模块
♦python操作excel主要用到xlrd和xlwt这两个库,即xlrd是读excel,xlwt是写excel的库. 今天就先来说一下xlrd模块: 一.安装xlrd模块 ♦ 到python官网下载 ...
- nvidia-docker
参考资料 https://github.com/NVIDIA/nvidia-docker/wiki/Installation#prerequisites https://github.com/NVID ...
- Inferred type 'S' for type parameter 'S' is not within its bound;
在使用springboot 方法报错: Inferred type 'S' for type parameter 'S' is not within its bound; should extends ...
- 栈的压入和弹出序列(剑指Offer)
输入两个整数序列,第一个序列表示栈的压入顺序,请判断第二个序列是否为该栈的弹出顺序.假设压入栈的所有数字均不相等.例如序列1,2,3,4,5是某栈的压入顺序,序列4,5,3,2,1是该压栈序列对应的一 ...
- 全球最大的3D数据集公开了!标记好的10800张全景图
Middlebury数据集 http://vision.middlebury.edu/stereo/data/ KITTI数据集简介与使用 https://blog.csdn.net/solomon1 ...
- Linux启动报:UNEXPECTED INCONSISTENCY: RUN fsck MANUALLY问题解决
现象: 在此界面输入下root的密码.会进入到修复模式 在修复模式下,输入命令fsck –y /dev/mapper/vg_swnode1-lv_root 这个后面跟的路径就是你上面提示出错的那个路 ...
- AnswerOpenCV一周佳作欣赏(0615-0622)
一.How to make auto-adjustments(brightness and contrast) for image Android Opencv Image Correction i' ...
