『翻译』Access USB Devices on the Web
https://developers.google.com/web/updates/2016/03/access-usb-devices-on-the-web
Access USB Devices on the Web 访问USB设备通过Web

If I said plain and simple "USB", there is a good chance that you will immediately think of keyboards, mice, audio, video and storage devices. You're right but you'll find other kinds of Universal Serial Bus (USB) devices out there.
如果我说简单的“USB”,很有可能会立即想到键盘,鼠标,音频,视频和存储设备。你是对的,但你会发现其他种类的通用串行总线(USB)设备。
These non-standardized USB devices require hardware vendors to write native drivers and SDKs in order for you (the developer) to take advantage of them. Sadly this native code has historically prevented these devices from being used by the Web. And that's one of the reasons the WebUSB API has been created: to provide a way to expose USB device services to the Web. With this API, hardware manufacturers will be able to build cross-platform JavaScript SDKs for their devices. But most importantly this will make USB safer and easier to use by bringing it to the Web.
这些非标准的USB设备要求硬件供应商编写本机驱动程序和SDK,以便您(开发人员)利用它们。遗憾的是,本机代码历来阻止了这些设备被Web使用。这就是WebUSB API创建的原因之一:提供一种将USB设备服务公开到Web的方法。借助这种API,硬件制造商将能够为其设备构建跨平台的JavaScript SDK。但最重要的是,这 将使USB更安全,更容易使用,将其带到Web上。
Let's see what you could expect with the WebUSB API:
- Buy a USB device.
- Plug it into your computer.
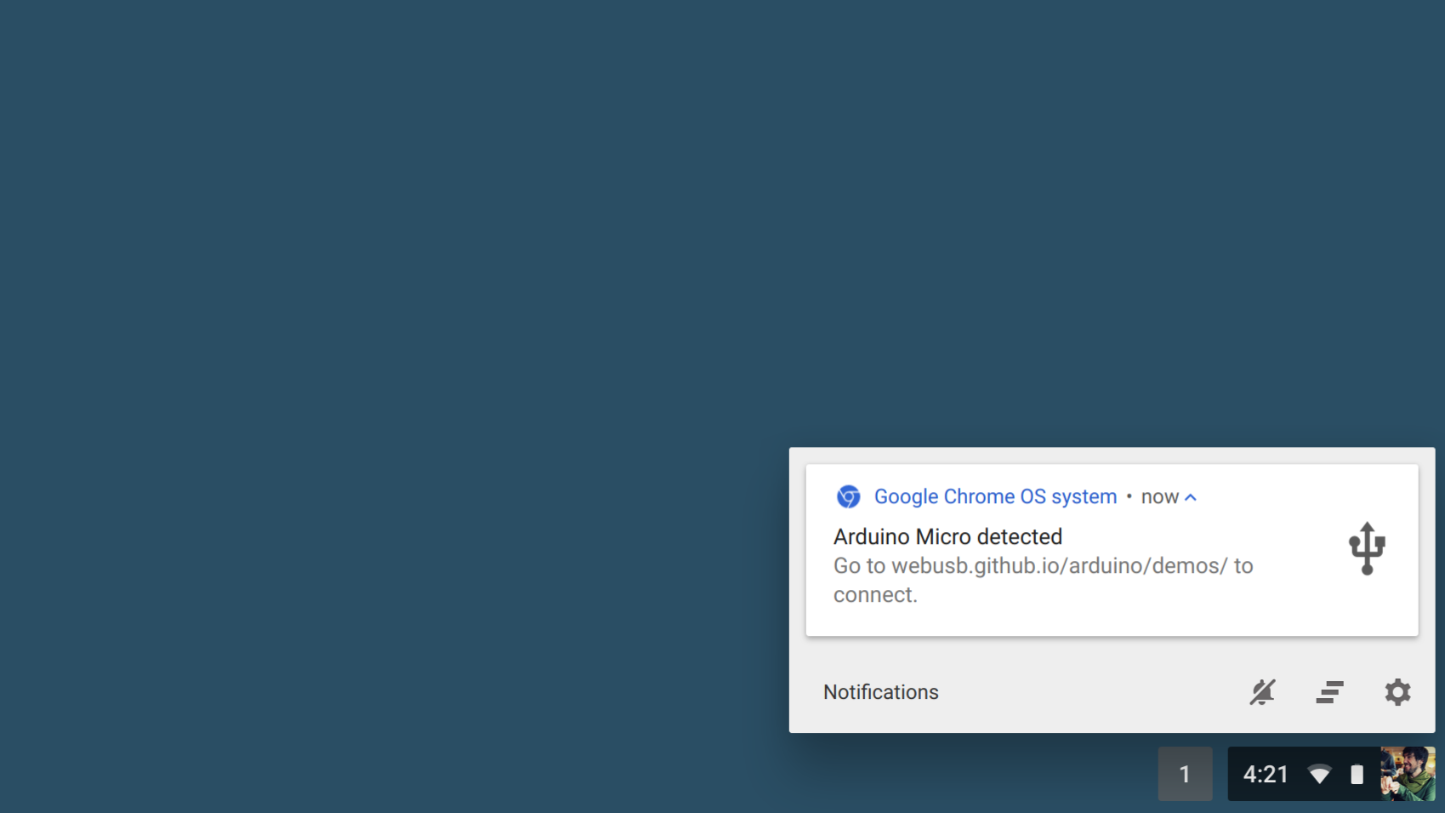
- A notification appears right away, with the right website to go to for this device.
- Simply click on it. Website is there and ready to use!
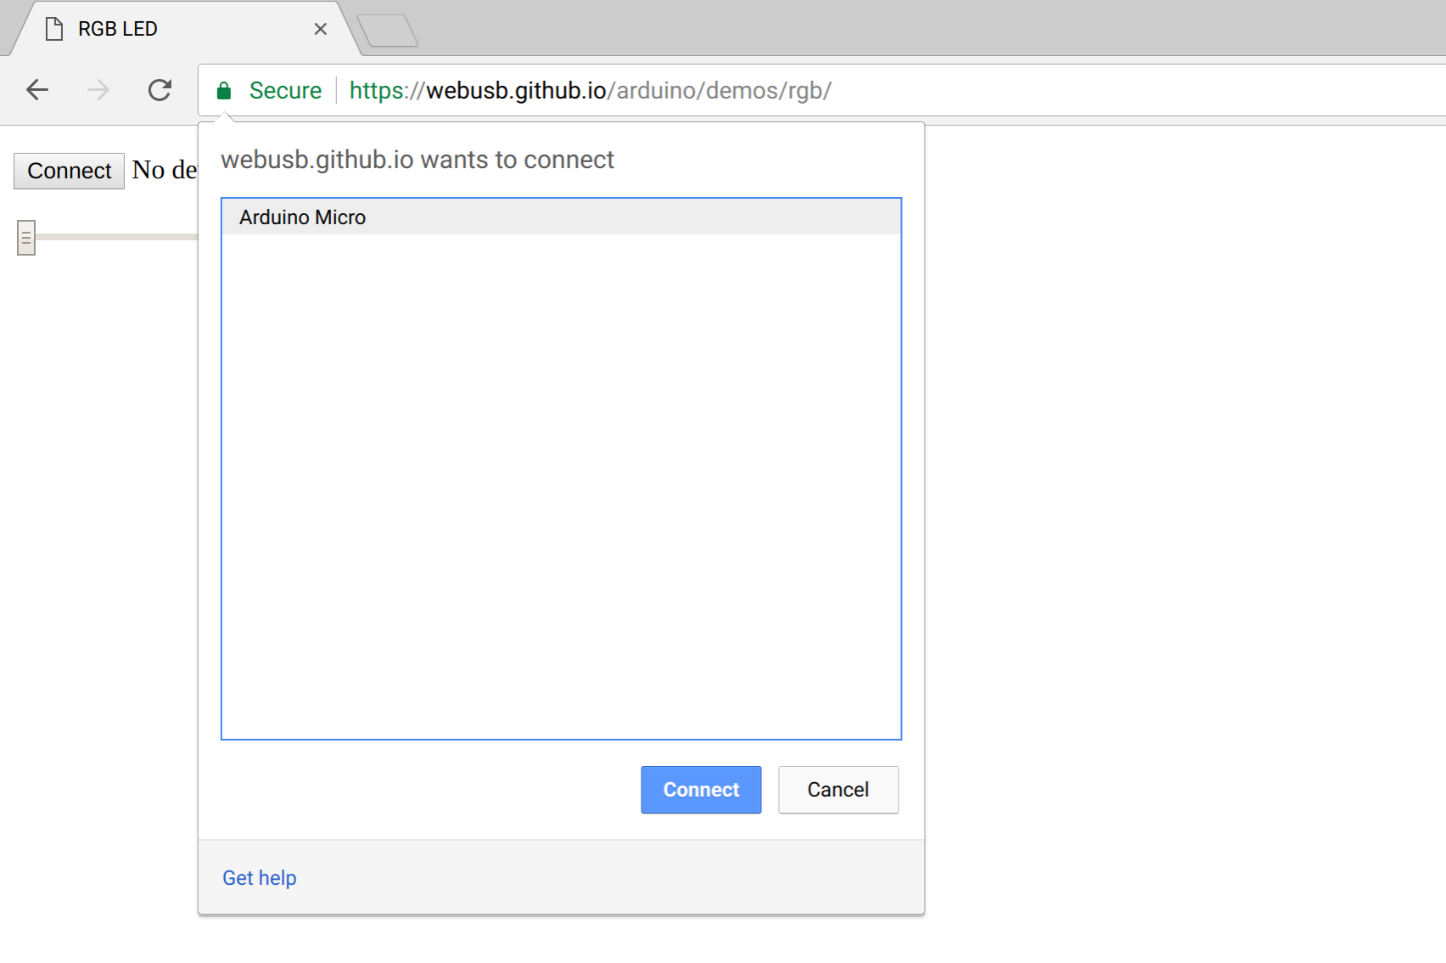
- Click to connect and a USB device chooser shows up in Chrome, where you can pick your device.
- Tada!
让我们看看您可以用WebUSB API预期什么:
购买USB设备。
将其插入计算机。
立即出现通知,正确的网站将转到此设备。
只需点击它。网站在那里,准备使用!
点击连接,并在Chrome中显示一个USB设备选择器,您可以在其中选择您的设备。
然后!
What would this procedure be like without the WebUSB API?
- Read a box, label, or search on line and possibly end up on the wrong website.
- Have to install a native application.
- Is it supported on my operating system? Make sure you download the "right" thing.
- Scary OS prompts popup and warn you about installing drivers/applications from the Internet.
- Malfunctioning code harms the whole computer. The Web is built to contain malfunctioning websites.
- Only use the USB device once? On the Web, the website is gone once you closed tab. On a computer the code sticks around.
没有WebUSB API,这个程序是什么样的?
- 阅读框,标签或在线搜索,可能最终在错误的网站上。
- 必须安装本机应用程序。
- 是否支持我的操作系统?确保你下载了“正确”的东西。
- 可怕的操作系统提示弹出窗口并警告您有关从Internet安装驱动程序/应用程序。
- 故障代码损害整个计算机。网页是为了 包含故障的网站。
- 只能使用USB设备一次?在网络上,一旦您关闭标签,该网站就会消失。在电脑上,代码贴在一起。
Before we start 在我们开始之前
This article assumes you have some basic knowledge of how USB works. If not, I recommend reading USB in a NutShell. For background information about USB, check out the official USB specifications.
The WebUSB API is available in Chrome 61.
本文假设您对USB的工作原理有一些基础知识。如果没有,我建议在NutShell中阅读 USB。有关USB的背景信息,请查看 官方USB规格。
该 WebUSB API 在Chrome 61是可用的。
Available for Origin Trials 可用于原始试验
In order to get as much feedback as possible from developers using the WebUSB API in the field, we've previously added this feature in Chrome 54 and Chrome 57 as an origin trial.
The latest trial has successfully ended in September 2017.
Privacy and security 隐私和安全
HTTPS only 仅限HTTPS
Because this API is a powerful new feature added to the Web, Chrome aims to make it available only to secure contexts. This means you'll need to build with TLS in mind.
由于这个API是一个功能强大的新增功能,因此Chrome旨在使其可用于 安全上下文。这意味着您需要使用TLS来构建。
Note: We care deeply about security, so you will notice that new Web capabilities require HTTPS. The WebUSB API is no different, and is yet another good reason to get HTTPS up and running on your site.
During development you'll be able to interact with WebUSB through http://localhost by using tools like the Chrome Dev Editor or the handy python -m SimpleHTTPServer, but to deploy it on a site you'll need to have HTTPS set up on your server. I personally enjoy GitHub Pages for demo purposes.
在开发过程中,您可以通过http://localhost 使用Chrome开发者编辑器 或方便的 工具 与WebUSB进行交互 python -m SimpleHTTPServer,但将其部署在您需要在服务器上设置HTTPS的站点上。我个人喜欢 GitHub Pages 进行演示。
To add HTTPS to your server you'll need to get a TLS certificate and set it up. Be sure to check out the Security with HTTPS article for best practices there. For info, you can now get free TLS certificates with the new Certificate Authority Let's Encrypt.
要向您的服务器添加HTTPS,您需要获取TLS证书并进行设置。请务必查看有关HTTPS的 安全性文章, 了解最佳做法。有关信息,您现在可以使用新的证书颁发机构加密来获得免费的TLS证书 。
User gesture required 需要用户手势
As a security feature, getting access to connected USB devices withnavigator.usb.requestDevice must be called via a user gesture like a touch or mouse click.
Caution: User gesture do not propagate through async events like Promises. Seecrbug.com/404161
作为安全功能,navigator.usb.requestDevice 必须通过用户手势(如触摸或鼠标点击)来访问连接的USB设备。
注意: 用户手势不会通过异步事件(如Promises)传播。见crbug.com/404161
Feature Policy 功能政策
A feature policy is a mechanism that allows developers to selectively enable and disable various browser features and APIs. It can be defined via a HTTP header and/or an iframe "allow" attribute.
You can define a feature that controls whether the usb attribute is exposed on the Navigator object, or in other words if you allow WebUSB.
Below is an example of a header policy where WebUSB is not allowed:
功能策略是允许开发人员有选择地启用和禁用各种浏览器功能和API的机制。它可以通过HTTP头和/或iframe“allow”属性进行定义。
您可以定义一个功能,用于控制是否在Navigator对象上显示usb属性,或者换句话说,如果允许WebUSB。
以下是不允许使用WebUSB的标题策略的示例:
Feature-Policy: fullscreen "*"; usb "none"; payment "self" https://payment.example.com
Below is another example of a different container policy where USB is allowed:
以下是允许USB允许的其他容器策略的另一个示例:
<iframe allowpaymentrequest allow=’usb fullscreen’></iframe>
Let's start coding
The WebUSB API relies heavily on JavaScript Promises. If you're not familiar with them, check out this great Promises tutorial. One more thing, () => {} are simply ECMAScript 2015 Arrow functions -- they have a shorter syntax compared to function expressions and lexically bind the value of this.
WebUSB API非常依赖JavaScript 承诺。如果你不熟悉他们,看看这个伟大的 Promises教程。还有一件事, () => {} 就是简单的ECMAScript 2015 Arrow函数 - 与函数表达式相比,它们具有较短的语法,并且可以对其值进行词法绑定 this。
Get access to USB devices 访问USB设备
You can either prompt the user to select a single connected USB device usingnavigator.usb.requestDevice or call navigator.usb.getDevices to get a list of all connected USB devices the origin has access to.
您可以提示用户选择一个连接的USB设备,navigator.usb.requestDevice 或使用或调用 navigator.usb.getDevices 以获取原始设备可以访问的所有连接的USB设备的列表。
The navigator.usb.requestDevice function takes a mandatory JavaScript object that defines filters. These filters are used to match any USB device with the given vendor (vendorId) and optionally product (productId) identifiers. The classCode, protocolCode, serialNumber, and subclassCode keys can also be defined there as well.
该 navigator.usb.requestDevice 函数需要一个定义的强制性JavaScript对象 filters。这些过滤器用于将任何USB设备与给定的供应商(vendorId)和可选的product(productId)标识符进行匹配。在 classCode, protocolCode, serialNumber,和 subclassCode 键也可以在那里定义为好。

For instance, here's how to get access to a connected Arduino device configured to allow the origin.
例如,以下是如何访问配置为允许源的连接的Arduino设备。
navigator.usb.requestDevice({ filters: [{ vendorId: 0x2341 }] })
.then(device => {
  console.log(device.productName);      // "Arduino Micro"
  console.log(device.manufacturerName); // "Arduino LLC"
})
.catch(error => { console.log(error); });
Before you ask, I didn't magically come up with this 0x2341 hexadecimal number. I simply searched for the word "Arduino" in this List of USB ID's.
在你问之前,我没有神奇地想出这个 0x2341 十六进制数字。我只是在这个USB ID列表中搜索“Arduino”这个词 。
The USB device returned in the fulfilled promise above has some basic, yet important information about the device such as the supported USB version, maximum packet size, vendor and product IDs, the number of possible configurations the device can have - basically all fields contained in the device USB Descriptor
device 在上述履行的承诺中返回的USB 有一些关于设备的基本但重要的信息,例如支持的USB版本,最大包大小,供应商和产品ID,设备可能具有的可能配置的数量 - 基本上包含在 设备USB描述符
For info, if a USB device announces its support for WebUSB, as well as defining a landing page URL, Chrome will show a persistent notification when the USB device is plugged in. Clicking on this notification will open the landing page.
有关信息,如果USB设备宣布 对WebUSB的支持以及定义着陆页网址,Chrome将在USB设备插入时显示持久的通知。点击此通知将打开加载页。

From there, you can simply call navigator.usb.getDevices and get access to your Arduino device as shown below.
navigator.usb.getDevices 并访问您的Arduino设备,如下所示。navigator.usb.getDevices().then(devices => {
devices.map(device => {
console.log(device.productName); // "Arduino Micro"
console.log(device.manufacturerName); // "Arduino LLC"
});
})
Talk to an Arduino USB board
Okay, now let's see how easy it is to communicate from a WebUSB compatible Arduino board over the USB port. Check out instructions at https://github.com/webusb/arduino to WebUSB-enable your sketches.
好的,现在让我们看看通过USB端口与WebUSB兼容的Arduino板进行通信是多么容易。请访问 https://github.com/webusb/arduino ,查看WebUSB启用您的 草图的说明。
Don't worry, I'll cover all the WebUSB device methods mentioned below later in this article.
var device;

navigator.usb.requestDevice({ filters: [{ vendorId: 0x2341 }] })
.then(selectedDevice => {
   device = selectedDevice;
   return device.open(); // Begin a session.
 })
.then(() => device.selectConfiguration(1)) // Select configuration #1 for the device.
.then(() => device.claimInterface(2)) // Request exclusive control over interface #2.
.then(() => device.controlTransferOut({
    requestType: 'class',
    recipient: 'interface',
    request: 0x22,
    value: 0x01,
    index: 0x02})) // Ready to receive data
.then(() => device.transferIn(5, 64)) // Waiting for 64 bytes of data from endpoint #5.
.then(result => {
  let decoder = new TextDecoder();
  console.log('Received: ' + decoder.decode(result.data));
})
.catch(error => { console.log(error); });
Please keep in mind that the WebUSB library we are using here is just implementing one example protocol (based on the standard USB serial protocol) and that manufacturers can create any set and types of endpoints they wish. Control transfers are especially nice for small configuration commands as they get bus priority and have a well defined structure.
And here's the sketch that has been uploaded to the Arduino board.
请记住,我们在这里使用的WebUSB库只是实现一个示例协议(基于标准USB串行协议),制造商可以创建任何所需的端点类型和类型。控制传输对于小型配置命令特别好,因为它们获得总线优先级并具有良好定义的结构。
这是样例,已经上传到Arduino板。
// Third-party WebUSB Arduino library
#include <WebUSB.h>

const WebUSBURL URLS[] = {
  { 1, "webusb.github.io/arduino/demos/" },
  { 0, "localhost:8000" },
};

const uint8_t ALLOWED_ORIGINS[] = { 1, 2 };

WebUSB WebUSBSerial(URLS, 2, 1, ALLOWED_ORIGINS, 2);

#define Serial WebUSBSerial

void setup() {
  Serial.begin(9600);
  while (!Serial) {
    ; // Wait for serial port to connect.
  }
  Serial.write("WebUSB FTW!");
  Serial.flush();
}

void loop() {
  // Nothing here for now.
}
The third-party WebUSB Arduino library used in the sample code above does basically two things:
- The device acts as a WebUSB device enabling Chrome to read the landing page URL.
- It exposes a WebUSB Serial API that you may use to override the default one.
上面的示例代码中使用的第三方 WebUSB Arduino库基本上有两件事情:
- 该设备充当WebUSB设备,使Chrome可以读取 加载页网址。
- 它暴露了一个WebUSB Serial API,您可以使用它来覆盖默认的。
Let's look at the JavaScript code again. Once we get the device picked by the user, device.open simply runs all platform-specific steps to start a session with the USB device. Then, we have to select an available USB Configuration with device.selectConfiguration. Remember that a Configuration specifies how the device is powered, its maximum power consumption and its number of interfaces. Talking about interfaces, we also need to request exclusive access with device.claimInterface since data can only be transferred to an interface or associated endpoints when the interface is claimed. Finally callingdevice.controlTransferOut is needed to set up the Arduino device with the appropriate commands to communicate through the WebUSB Serial API.
From there, device.transferIn performs a bulk transfer onto the device to inform it that the host is ready to receive bulk data. Then, the promise is fulfilled with a result object containing a DataView data that has to be parsed appropriately.
For those who are familiar with USB, all of this should look pretty familiar.
我们再来看一下JavaScript代码。一旦我们得到 device 用户的选择, device.open 只需运行所有特定于平台的步骤来开始与USB设备的会话。然后,我们必须选择一个可用的USB配置 device.selectConfiguration。请记住,配置指定设备的供电方式,最大功耗以及接口数量。谈到接口,我们还需要请求独占访问,device.claimInterface 因为在声明接口时, 数据只能传输到接口或相关端点。最后调用device.controlTransferOut ,需要通过适当的命令来设置Arduino设备,通过WebUSB Serial API进行通信。
从那里, device.transferIn 对设备执行批量传输,通知主机准备好接收批量数据。然后,使用result 包含 必须正确解析的DataView 的对象 来满足诺言 data。
对于熟悉USB的用户,所有这些应该看起来很熟悉。
I want moar
The WebUSB API lets you interact with the all USB transfer/endpoint types: WebUSB API允许您与所有USB传输/端点类型进行交互:
- CONTROL transfers, used to send or receive configuration or command parameters to a USB device are handled with
controlTransferIn(setup, length)andcontrolTransferOut(setup, data). - INTERRUPT transfers, used for a small amount of time sensitive data are handled with the same methods as BULK transfers with
transferIn(endpointNumber, length)andtransferOut(endpointNumber, data). - ISOCHRONOUS transfers, used for streams of data like video and sound are handled with
isochronousTransferIn(endpointNumber, packetLengths)andisochronousTransferOut(endpointNumber, data, packetLengths). - BULK transfers, used to transfer a large amount of non-time-sensitive data in a reliable way are handled with
transferIn(endpointNumber, length)andtransferOut(endpointNumber, data).
- 控制传输,用于发送或接收配置或命令参数到USB设备与处理
controlTransferIn(setup, length)和controlTransferOut(setup, data)。 - 中断传输,用于少量时间敏感数据与批量传输处理用相同的方法
transferIn(endpointNumber, length)和transferOut(endpointNumber, data)。 - ISOCHRONOUS传输,用于数据流(如视频和声音)的ISOCHRONOUS传输是用
isochronousTransferIn(endpointNumber, packetLengths)和处理的isochronousTransferOut(endpointNumber, data, packetLengths)。 - BULK传输,用于以可靠的方式传输大量非时间敏感数据的BULK传输是用
transferIn(endpointNumber, length)和处理的transferOut(endpointNumber, data)。
You may also want to have a look at Mike Tsao's WebLight project which provides a ground-up example of building a USB-controlled LED device designed for the WebUSB API (not using an Arduino here). You'll find hardware, software, and firmware.
您可能还想看看Mike Tsao的 WebLight项目 ,该项目为构建针对WebUSB API(不使用Arduino)的USB控制LED设备提供了一个基础实例。你会发现硬件,软件和固件。
Tips
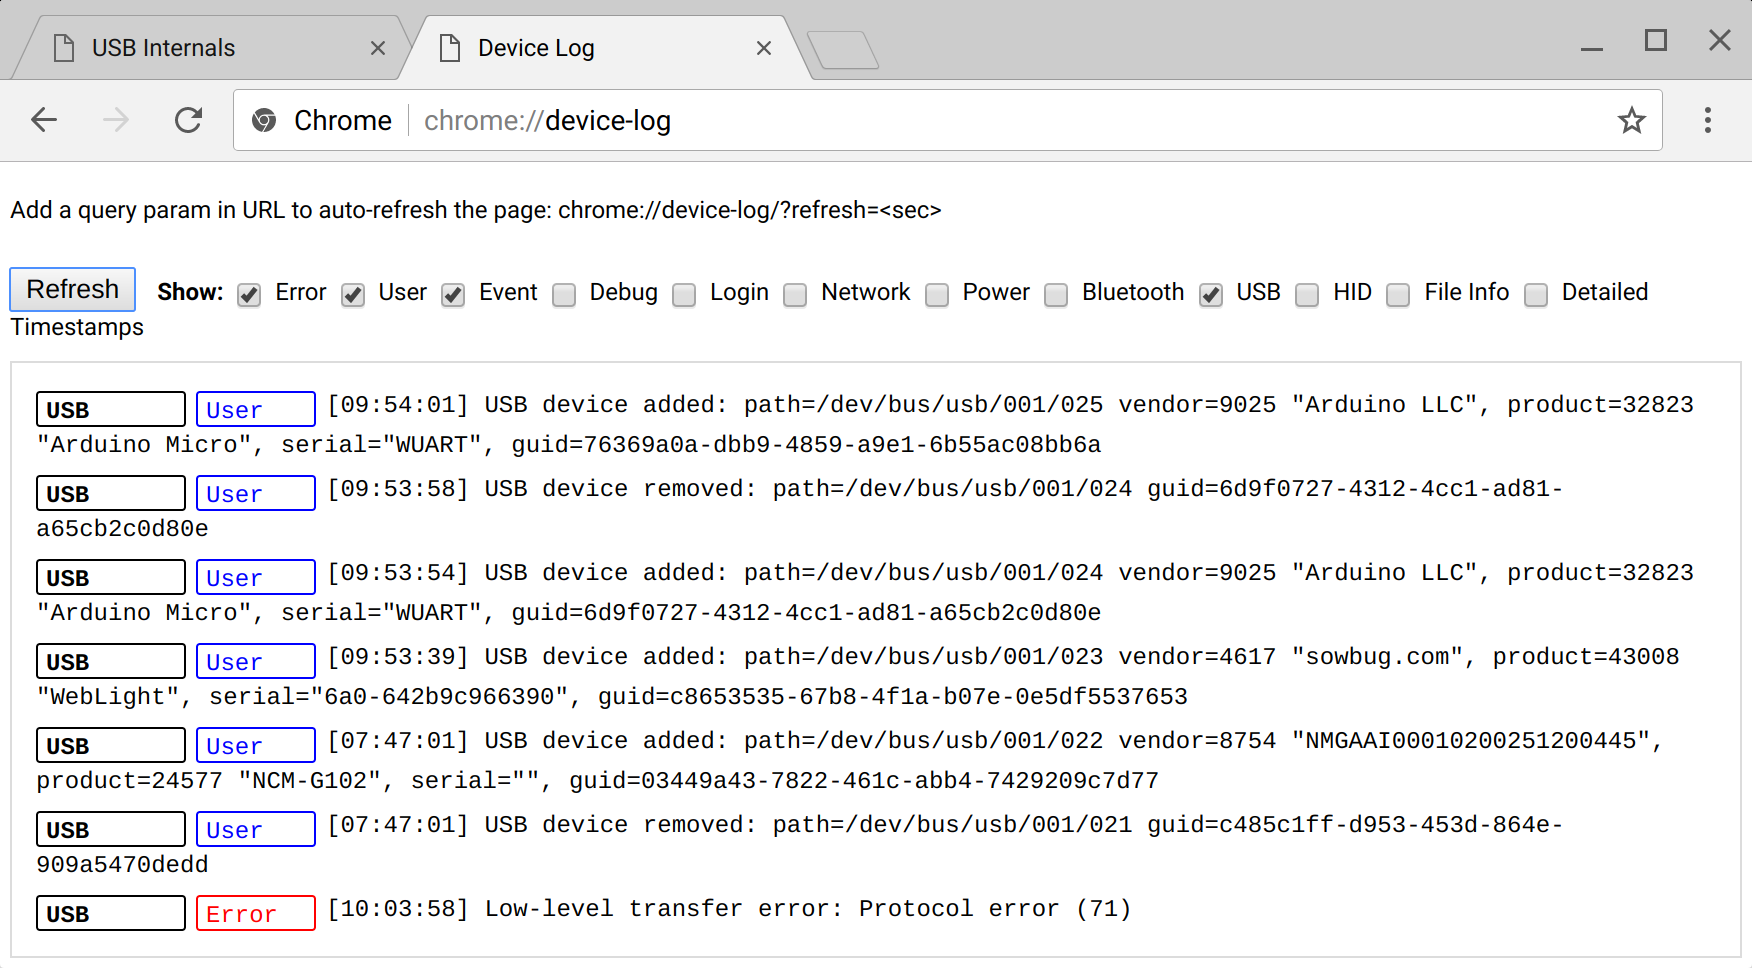
Debugging USB in Chrome is easier with the internal page chrome://device-log where you can see all USB device related events in one single place.
通过内部页面chrome://device-log ,您可以在一个地方查看所有与USB设备相关的事件,在Chrome中调试USB非常方便 。

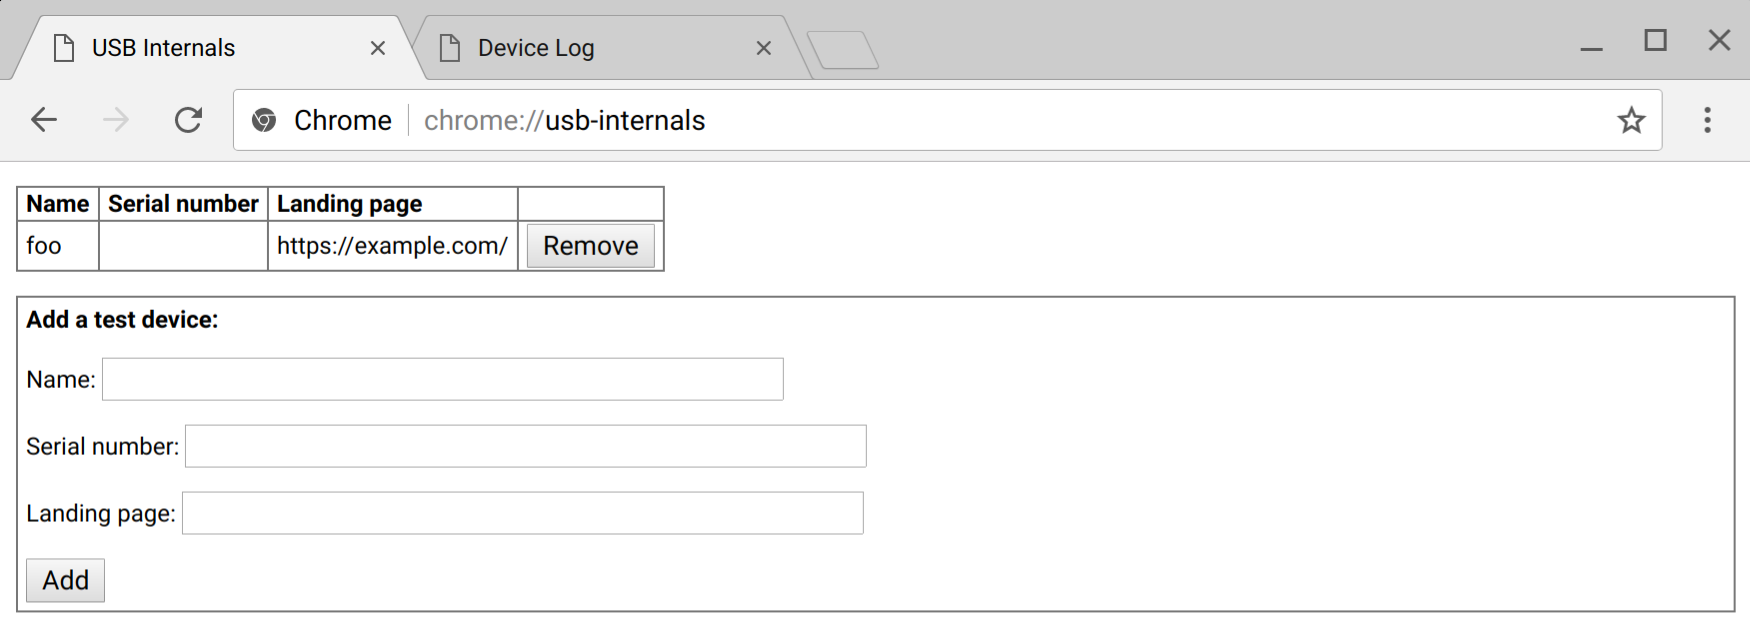
The internal page chrome://usb-internals also comes in handy and allows you to simulate connection connection and disconnection of virtual WebUSB devices. This is be useful for doing UI testing without the need for real hardware.
内部页面 chrome://usb-internals 也派上用场,允许您模拟虚拟WebUSB设备的连接连接和断开连接。这对于在不需要真实硬件的情况下进行UI测试是有用的。

On most Linux systems, USB devices are mapped with read-only permissions by default. To allow Chrome to open a USB device, you will need to add a new udev rule. Create a file at /etc/udev/rules.d/50-yourdevicename.rules with the following content:
/etc/udev/rules.d/50-yourdevicename.rules 以下内容的文件 :SUBSYSTEM=="usb", ATTR{idVendor}=="[yourdevicevendor]", MODE="0664", GROUP="plugdev"
where [yourdevicevendor] is 2341 if your device is an Arduino for instance.ATTR{idProduct} can also be added for a more specific rule. Make sure your user is a member of the plugdev group. Then, just reconnect your device.
这里 [yourdevicevendor] 是 2341 如果你的设备是例如一个Arduino。ATTR{idProduct} 也可以添加更具体的规则。确保您 user 是该plugdev 组的成员 。然后,只需重新连接设备。
What's next
A second iteration of the WebUSB API will look at Shared Worker and Service Worker support. Imagine for instance a security key website using the WebUSB API that would install a service worker to act as a middle man to authenticate users.
Note: Microsoft OS 2.0 Descriptors used by the Arduino examples only work on Windows 8.1 and later. Without that Windows support still requires manual installation of an INF file.
WebUSB API的第二次迭代将关注 Shared Worker 和 Service Worker 支持。想象一下,例如使用WebUSB API的安全密钥网站,它将安装服务工作者作为中间人来验证用户。
注意: Arduino示例使用的Microsoft OS 2.0描述符仅适用于Windows 8.1及更高版本。没有Windows支持仍然需要手动安装INF文件。
Resources
- Stack Overflow: https://stackoverflow.com/questions/tagged/webusb
- WebUSB API Spec: http://wicg.github.io/webusb/
- Chrome Feature Status: https://www.chromestatus.com/features/5651917954875392
- Spec Issues: https://github.com/WICG/webusb/issues
- Implementation Bugs: http://crbug.com?q=component:Blink>USB
- WebUSB ❤ ️Arduino: https://github.com/webusb/arduino
- IRC: #webusb on W3C's IRC
- WICG Mailing list: https://lists.w3.org/Archives/Public/public-wicg/
- WebLight project: https://github.com/sowbug/weblight
Please share your WebUSB demos with the #webusb hashtag.
『翻译』Access USB Devices on the Web的更多相关文章
- 『翻译』Android USB Host
USB Host When your Android-powered device is in USB host mode, it acts as the USB host, powers the b ...
- 『转载』Debussy快速上手(Verdi相似)
『转载』Debussy快速上手(Verdi相似) Debussy 是NOVAS Software, Inc(思源科技)发展的HDL Debug & Analysis tool,这套软体主要不是 ...
- 在Ubuntu 11.10工具栏上用数字显示网速、CPU负荷和内存占用量『译』
基本上照抄了<How To Display Network Upload / Download Speed On The Panel In Ubuntu 11.04>,只不过我的实践环境是 ...
- 『WPF』DataGrid的使用
原文 『WPF』DataGrid的使用 几点说明 这里主要是参考了MSDN中关于DataGrid的说明 这里只会简单说明在WPF中,DataGird最简单的使用方法 对于MSDN中的翻译不会很详细,也 ...
- 『计算机视觉』Mask-RCNN_从服装关键点检测看KeyPoints分支
下图Github地址:Mask_RCNN Mask_RCNN_KeyPoints『计算机视觉』Mask-RCNN_论文学习『计算机视觉』Mask-RCNN_项目文档翻译『计算机视觉』Mas ...
- 『计算机视觉』Mask-RCNN_训练网络其一:数据集与Dataset类
Github地址:Mask_RCNN 『计算机视觉』Mask-RCNN_论文学习 『计算机视觉』Mask-RCNN_项目文档翻译 『计算机视觉』Mask-RCNN_推断网络其一:总览 『计算机视觉』M ...
- 『TensorFlow』分布式训练_其三_多机分布式
本节中的代码大量使用『TensorFlow』分布式训练_其一_逻辑梳理中介绍的概念,是成熟的多机分布式训练样例 一.基本概念 Cluster.Job.task概念:三者可以简单的看成是层次关系,tas ...
- iOS 多线程:『RunLoop』详尽总结
1. RunLoop 简介 1.1 什么是 RunLoop? 可以理解为字面意思:Run 表示运行,Loop 表示循环.结合在一起就是运行的循环的意思.哈哈,我更愿意翻译为『跑圈』.直观理解就像是不停 ...
- 『AngularJS』$location 服务
项目中关于 $location的用法 简介 $location服务解析在浏览器地址栏中的URL(基于window.location)并且让URL在你的应用中可用.改变在地址栏中的URL会作用到$loc ...
随机推荐
- 机器学习ML策略
1.为什么是ML策略 例如:识别cat分类器的识别率是90%,怎么进一步提高识别率呢? 想法: (1)收集更多数据 (2)收集更多的多样性训练样本 (3)使用梯度下降训练更长时间 (4)尝试Adam代 ...
- 如何阻止div中的子div触发div的事件
<div class="sideFrame" v-on:click="hideside"> <div class="sideFram ...
- Leetcode 692 - Note
1. 题目要求 Given a non-empty list of words, return the k most frequent elements. Your answer should be ...
- 『TensorFlow』SSD源码学习_其四:数据介绍及TFR文件生成
Fork版本项目地址:SSD 一.数据格式介绍 数据文件夹命名为VOC2012,内部有5个子文件夹,如下, 我们的检测任务中使用JPEGImages文件夹和Annotations文件夹. JPEGIm ...
- python-django rest framework框架之渲染器
渲染器 看到的页面时什么样子的,返回数据. restframework中默认就是下面 这两个render类,它的内部实现原理是拿url中的后缀名 .json 和类中的format字段进行比较,如果re ...
- windows下进程间通信与线程间通信
进程间通信: 1.文件映射(Memory-Mapped Files) 文件映射(Memory-Mapped Files)能使进程把文件内容当作进程地址区间一块内存那样来对待.因此,进程不必使用文件I/ ...
- PostgreSQL常用查看命令
1. 查看当前库sehcma大小,并按schema排序 SELECT schema_name, pg_size_pretty(sum(table_size)::bigint) as "dis ...
- vue虚拟DOM源码学习-vnode的挂载和更新流程
代码如下: <div id="app"> {{someVar}} </div> <script type="text/javascript& ...
- [LeetCode] 110. Balanced Binary Tree ☆(二叉树是否平衡)
Balanced Binary Tree [数据结构和算法]全面剖析树的各类遍历方法 描述 解析 递归分别判断每个节点的左右子树 该题是Easy的原因是该题可以很容易的想到时间复杂度为O(n^2)的方 ...
- Pandas初学者代码优化指南
原文:A Beginner’s Guide to Optimizing Pandas Code for Speed 作者:Sofia Heisler 翻译:无阻我飞扬 摘要:Pandas 是Pytho ...
