MIT 6.828 Lab 1/ Part 2
Exercise 03
- obj/boot/boot.asm 反汇编文件
- 截取asm部分文件并注释理解
  # Set up the important data segment registers (DS, ES, SS).

  xorw    %ax,%ax             # Segment number zero

    7c02:	31 c0                	xor    %eax,%eax

 //指令地址: 指令机器码      指令机器码反汇编到的指令

  movw    %ax,%ds             # -> Data Segment

    7c04:	8e d8                	mov    %eax,%ds

  movw    %ax,%es             # -> Extra Segment

    7c06:	8e c0                	mov    %eax,%es

  movw    %ax,%ss             # -> Stack Segment

    7c08:	8e d0                	mov    %eax,%ss
gdb指令:
- 在bootloader第一条语句 0x7C00处设置断点并对比查看后续指令(与boot.asm对比)
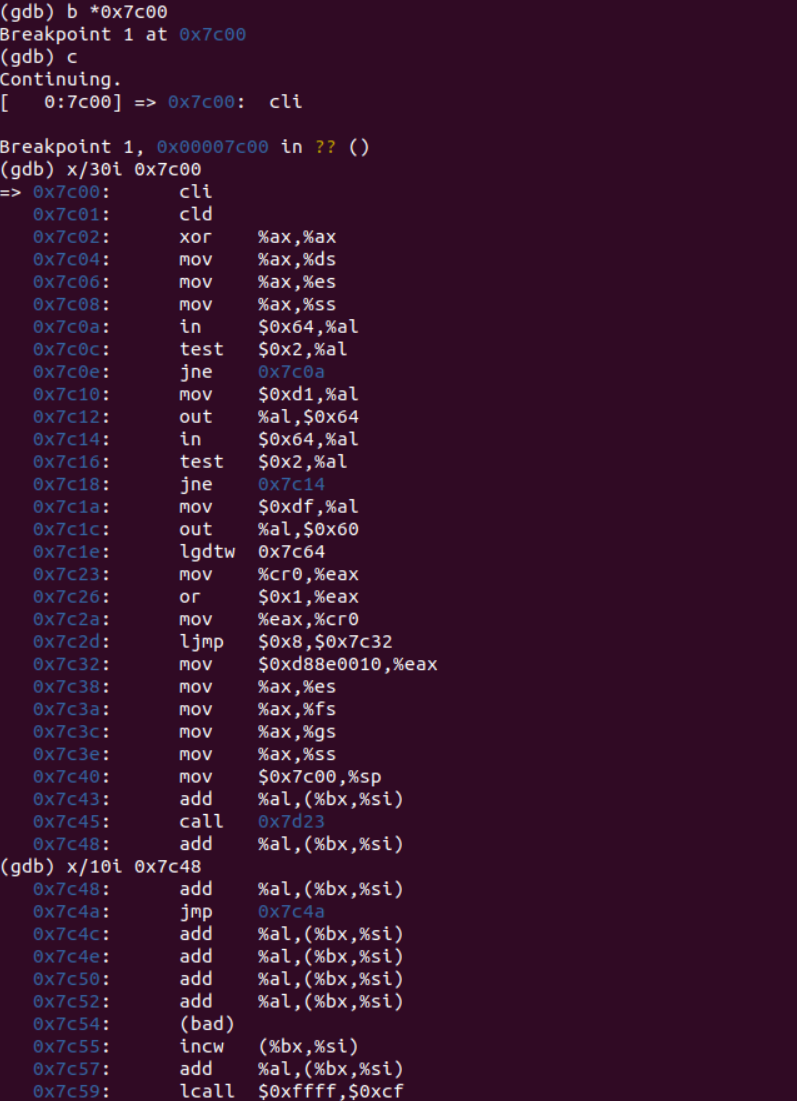
4个问题回答:
At what point does the processor start executing 32-bit code? What exactly causes the switch from 16- to 32-bit mode?
当计算机加电后首先以实模式(real mode)运行,此时为16-bit;
当执行
ljmp $PROT_MODE_CSEG, $protcseg后切换到32-bit,因为此时需要运行保护模式,而linux系统下的保护模式为32-bit
What is the last instruction of the boot loader executed, and what is the first instruction of the kernel it just loaded?
- boot loader执行的最后一条语句是bootmain子程序中的最后一条语句 ” ((void (*)(void)) (ELFHDR->e_entry))(); “,即跳转到操作系统内核程序的起始指令处。
- 这个第一条指令位于/kern/entry.S文件中,第一句 movw $0x1234, 0x472
Where is the first instruction of the kernel?
- 第一条指令位于/kern/entry.S文件中
How does the boot loader decide how many sectors it must read in order to fetch the entire kernel from disk? Where does it find this information?
- 首先关于操作系统一共有多少个段,每个段又有多少个扇区的信息位于操作系统文件中的Program Header Table中。这个表中的每个表项分别对应操作系统的一个段。并且每个表项的内容包括这个段的大小,段起始地址偏移等等信息。所以如果我们能够找到这个表,那么就能够通过表项所提供的信息来确定内核占用多少个扇区。
- 那么关于这个表存放在哪里的信息,则是存放在操作系统内核映像文件的ELF头部信息中。
Exercise 04
读pointer.c 代码复习c语言指针用法
#include <stdio.h>

#include <stdlib.h>

void

f(void)

{

    int a[4];

    int *b = malloc(16);   //申请一个15字节的内存块大小并返回一个指针

    int *c;

    int i;

    printf("1: a = %p, b = %p, c = %p\n", a, b, c);  //打印地址

    c = a;                                 //指针C 指向数组a的首地址

    for (i = 0; i < 4; i++)

	a[i] = 100 + i;                        //给a数组赋值100~103

    c[0] = 200;                            //给c[0]赋值200, 也就是修改a[0]

    printf("2: a[0] = %d, a[1] = %d, a[2] = %d, a[3] = %d\n",

	   a[0], a[1], a[2], a[3]);           //打印数组a的值

    c[1] = 300;                           //修改a[1]

    *(c + 2) = 301;                       //指针+2,代表是index+2,指向的是c[2]

    3[c] = 302;                           //c编译器当成*(3+c),故c[3]=302

    printf("3: a[0] = %d, a[1] = %d, a[2] = %d, a[3] = %d\n",

	   a[0], a[1], a[2], a[3]);           //200 300 301 302

    c = c + 1;                            //c指针前移,指向a[1]

    *c = 400;                             //a[1]=400

    printf("4: a[0] = %d, a[1] = %d, a[2] = %d, a[3] = %d\n",

	   a[0], a[1], a[2], a[3]);           //200 400 301 302

    c = (int *) ((char *) c + 1);         //char类型占1个字节,int类型占16位(2字节),所以此时c指针先被转换为char类型,然后+1,相当于指向了下一个字节,即a[1]的第二个字节,然后再改为int*,即控制对象为16位;

    *c = 500;                             //修改c指针指向的内容,a[1]a[2]都会受影响

    printf("5: a[0] = %d, a[1] = %d, a[2] = %d, a[3] = %d\n",

	   a[0], a[1], a[2], a[3]);           //200 128144 256 302

    b = (int *) a + 1;                    //b指针指向a的下一个对象(后移16个字节)

    c = (int *) ((char *) a + 1);         //与第一次c的改变类似

    printf("6: a = %p, b = %p, c = %p\n", a, b, c);

    //第6个输出表明指针加减某个整数对应的内存偏移量取决于指针的类型。

}

int

main(int ac, char **av)

{

    f();

    return 0;

}
更深层解析:https://blog.csdn.net/amgtgsh3150267/article/details/101834733
运行截图

指针复习总结:
- char类型占1个字节;int/short类型占2字节(16位);long类型占4字节
int *ip表明*ip 是 int类型的;*ip=\*ip+10就是*ip的内容+10(*ip)++的括号不可以省略,因为*/++运算符是遵循从右至左的结合顺序int *pa;pa+1将指向下一个int对象a[10] ; pa=a;那么pa[i] 等价于*(pa+i)等价于a[i]3[a]也成立,c编译器当成:*(3+i)- int *pa; pa = &a[0] 与 pa = a 等价;
ELF binary 解析
编译并连接C程序时:
- compiler 将(.c)file → (.o)file[包含二进制汇编语言指令]
- linker将所有的compiled objects files 合并成binary image[即 a binary in ELF format]
ELF binary 关注
将ELF executable 当作是 a header with loading information
关注ELF binary中的变长的program header段(记录program sections的信息) 以及 具体的program sections
练习要求:
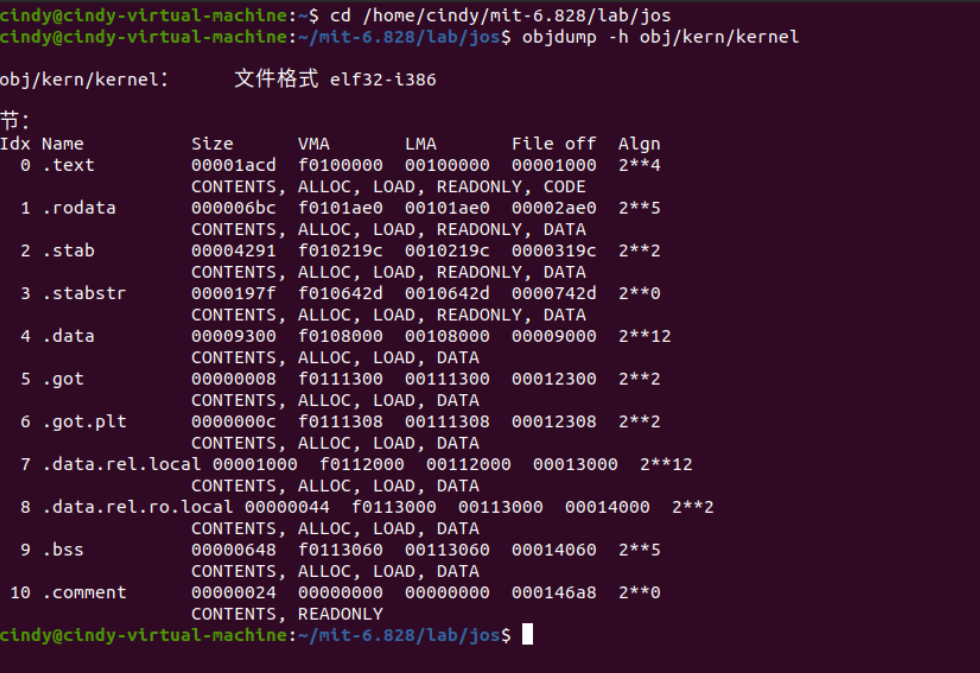
Examine the full list of the names, sizes, and link addresses of all the sections in the kernel executable
链接地址 & 运行地址
VMA(link address,链接地址):The link address of a section is the memory address from which the section expects to execute.
LMA(load address,加载地址): The load address of a section is the memory address at which that section should be loaded into memory.
补充材料:(清华 ucore)
Link addr& Load addr
Link Address是指编译器指定代码和数据所需要放置的内存地址,由链接器配置。Load Address是指程序被实际加载到内存的位置(由程序加载器ld配置)。一般由可执行文件结构信息和加载器可保证这两个地址相同。Link Addr和LoadAddr不同会导致:
- 直接跳转位置错误
- 直接内存访问(只读数据区或bss等直接地址访问)错误
- 堆和栈等的使用不受影响,但是可能会覆盖程序、数据区域
注意:也存在Link地址和Load地址不一样的情况(例如:动态链接库,即动态重定位的时候)。
补充:程序执行前的步骤:
- 编译-链接-装入
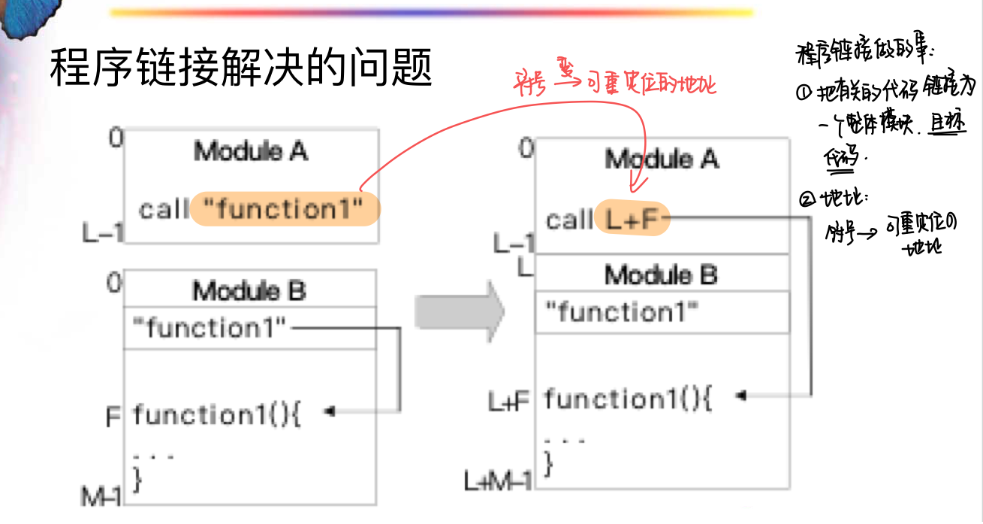
装入:
绝对装入:固定地址再定位,程序地址在编译链接时直接制定程序在执行时访问的实际存储器地址
静态重定位装入:装入程序在程序执行之前地址在定位,执行期间不会改变

动态重定位装入:程序装入时不修改逻辑地址,访问物理内存前再实时地修改逻辑地址为物理地址

练习
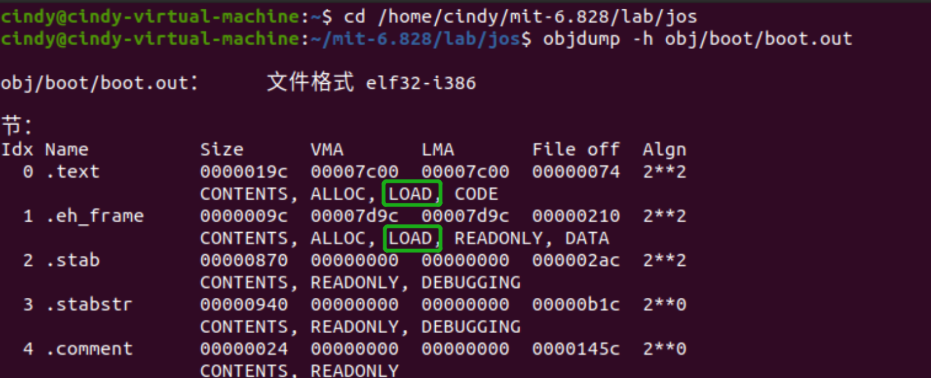
objdump指令:objdump命令是Linux下的反汇编目标文件或者可执行文件的命令,它以一种可阅读的格式让你更多地了解二进制文件可能带有的附加信息。objdump -h obj/kern/kernel:
objdump -h obj/boot/boot.out
objdump -x obj/kern/kernel"vaddr"Other information for each program header is given, such as the virtual address ,"paddr"the physical address"memsz" and "filesz"the size of the loaded area
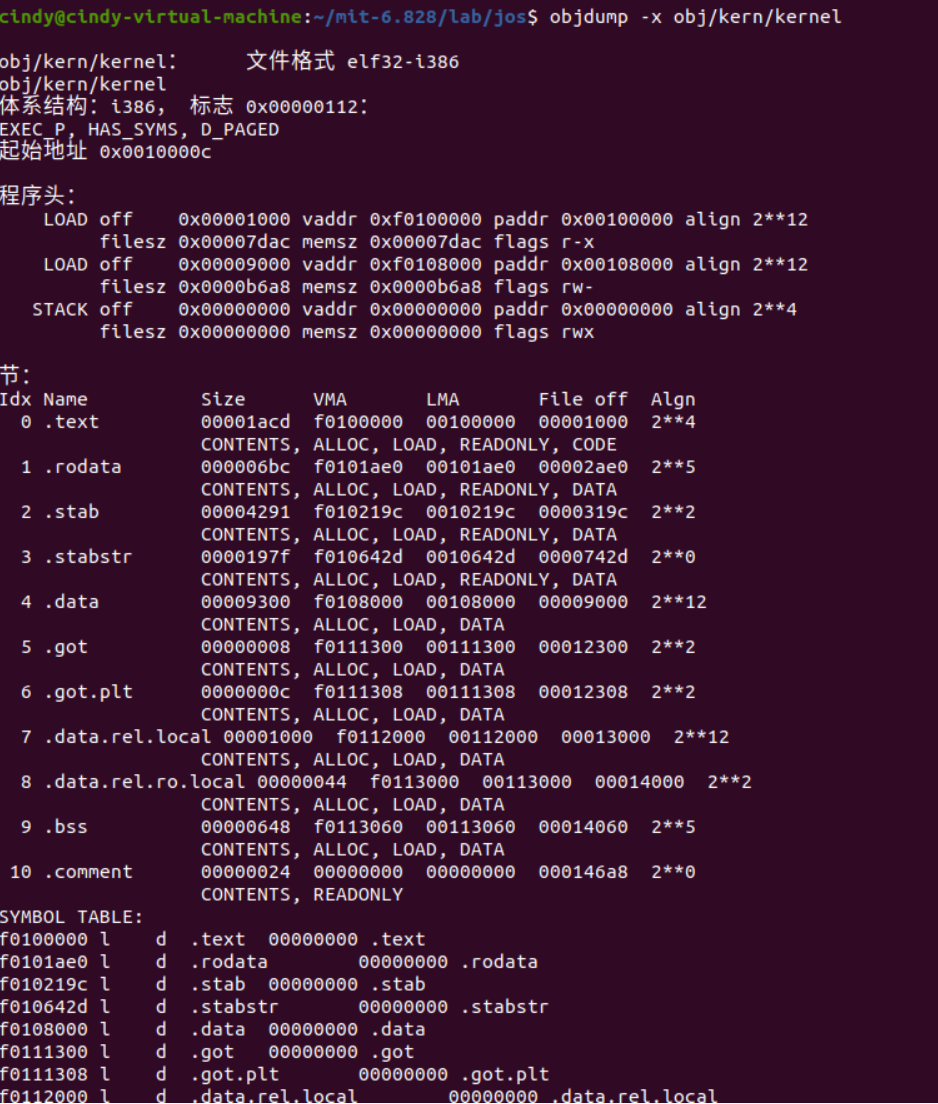
备注:SYMBOL TABLE模块完整代码:
cindy@cindy-virtual-machine:~/mit-6.828/lab/jos$ objdump -x obj/kern/kernel

obj/kern/kernel:     文件格式 elf32-i386

obj/kern/kernel

体系结构:i386, 标志 0x00000112:

EXEC_P, HAS_SYMS, D_PAGED

起始地址 0x0010000c

程序头:

    LOAD off    0x00001000 vaddr 0xf0100000 paddr 0x00100000 align 2**12

         filesz 0x00007dac memsz 0x00007dac flags r-x

    LOAD off    0x00009000 vaddr 0xf0108000 paddr 0x00108000 align 2**12

         filesz 0x0000b6a8 memsz 0x0000b6a8 flags rw-

   STACK off    0x00000000 vaddr 0x00000000 paddr 0x00000000 align 2**4

         filesz 0x00000000 memsz 0x00000000 flags rwx

节:

Idx Name          Size      VMA       LMA       File off  Algn

  0 .text         00001acd  f0100000  00100000  00001000  2**4

                  CONTENTS, ALLOC, LOAD, READONLY, CODE

  1 .rodata       000006bc  f0101ae0  00101ae0  00002ae0  2**5

                  CONTENTS, ALLOC, LOAD, READONLY, DATA

  2 .stab         00004291  f010219c  0010219c  0000319c  2**2

                  CONTENTS, ALLOC, LOAD, READONLY, DATA

  3 .stabstr      0000197f  f010642d  0010642d  0000742d  2**0

                  CONTENTS, ALLOC, LOAD, READONLY, DATA

  4 .data         00009300  f0108000  00108000  00009000  2**12

                  CONTENTS, ALLOC, LOAD, DATA

  5 .got          00000008  f0111300  00111300  00012300  2**2

                  CONTENTS, ALLOC, LOAD, DATA

  6 .got.plt      0000000c  f0111308  00111308  00012308  2**2

                  CONTENTS, ALLOC, LOAD, DATA

  7 .data.rel.local 00001000  f0112000  00112000  00013000  2**12

                  CONTENTS, ALLOC, LOAD, DATA

  8 .data.rel.ro.local 00000044  f0113000  00113000  00014000  2**2

                  CONTENTS, ALLOC, LOAD, DATA

  9 .bss          00000648  f0113060  00113060  00014060  2**5

                  CONTENTS, ALLOC, LOAD, DATA

 10 .comment      00000024  00000000  00000000  000146a8  2**0

                  CONTENTS, READONLY

SYMBOL TABLE:

f0100000 l    d  .text	00000000 .text

f0101ae0 l    d  .rodata	00000000 .rodata

f010219c l    d  .stab	00000000 .stab

f010642d l    d  .stabstr	00000000 .stabstr

f0108000 l    d  .data	00000000 .data

f0111300 l    d  .got	00000000 .got

f0111308 l    d  .got.plt	00000000 .got.plt

f0112000 l    d  .data.rel.local	00000000 .data.rel.local

f0113000 l    d  .data.rel.ro.local	00000000 .data.rel.ro.local

f0113060 l    d  .bss	00000000 .bss

00000000 l    d  .comment	00000000 .comment

00000000 l    df *ABS*	00000000 obj/kern/entry.o

f010002f l       .text	00000000 relocated

f010003e l       .text	00000000 spin

00000000 l    df *ABS*	00000000 entrypgdir.c

00000000 l    df *ABS*	00000000 init.c

00000000 l    df *ABS*	00000000 console.c

f01001d0 l     F .text	0000001e serial_proc_data

f01001ee l     F .text	00000062 cons_intr

f0113080 l     O .bss	00000208 cons

f0100250 l     F .text	0000012e kbd_proc_data

f0113060 l     O .bss	00000004 shift.1385

f0101ca0 l     O .rodata	00000100 shiftcode

f0101ba0 l     O .rodata	00000100 togglecode

f0113000 l     O .data.rel.ro.local	00000010 charcode

f010037e l     F .text	00000203 cons_putc

f0113288 l     O .bss	00000002 crt_pos

f0113290 l     O .bss	00000004 addr_6845

f011328c l     O .bss	00000004 crt_buf

f0113294 l     O .bss	00000001 serial_exists

f0111200 l     O .data	00000100 normalmap

f0111100 l     O .data	00000100 shiftmap

f0111000 l     O .data	00000100 ctlmap

00000000 l    df *ABS*	00000000 monitor.c

f0113010 l     O .data.rel.ro.local	00000018 commands

00000000 l    df *ABS*	00000000 printf.c

f0100a2c l     F .text	00000026 putch

00000000 l    df *ABS*	00000000 kdebug.c

f0100aa5 l     F .text	000000f5 stab_binsearch

00000000 l    df *ABS*	00000000 printfmt.c

f0100dac l     F .text	000000be printnum

f0100e6a l     F .text	00000021 sprintputch

f0113028 l     O .data.rel.ro.local	0000001c error_string

f01012fe l       .text	00000000 .L20

f0100fa2 l       .text	00000000 .L36

f01012eb l       .text	00000000 .L35

f0100f5e l       .text	00000000 .L34

f0100f27 l       .text	00000000 .L66

f0100f8a l       .text	00000000 .L33

f0100f30 l       .text	00000000 .L32

f0100f39 l       .text	00000000 .L31

f0100fc5 l       .text	00000000 .L30

f010112f l       .text	00000000 .L29

f0100fe1 l       .text	00000000 .L28

f0100fb9 l       .text	00000000 .L27

f010120a l       .text	00000000 .L26

f010122a l       .text	00000000 .L25

f010103a l       .text	00000000 .L24

f01011b8 l       .text	00000000 .L23

f0101296 l       .text	00000000 .L21

00000000 l    df *ABS*	00000000 readline.c

f01132a0 l     O .bss	00000400 buf

00000000 l    df *ABS*	00000000 string.c

00000000 l    df *ABS*	00000000

f0111308 l     O .got.plt	00000000 _GLOBAL_OFFSET_TABLE_

f0100da8 g     F .text	00000000 .hidden __x86.get_pc_thunk.cx

f010000c g       .text	00000000 entry

f01014f6 g     F .text	00000026 strcpy

f01005ac g     F .text	00000021 kbd_intr

f01008b1 g     F .text	0000000a mon_backtrace

f010010e g     F .text	0000006e _panic

f0100784 g     F .text	00000000 .hidden __x86.get_pc_thunk.si

f01000aa g     F .text	00000064 i386_init

f01016ac g     F .text	00000066 memmove

f010138c g     F .text	0000001e snprintf

f0100eac g     F .text	0000047d vprintfmt

f01005cd g     F .text	0000005a cons_getc

f0100a8d g     F .text	00000018 cprintf

f0101712 g     F .text	0000001a memcpy

f01013aa g     F .text	00000109 readline

f0110000 g     O .data	00001000 entry_pgtable

f0100040 g     F .text	0000006a test_backtrace

f0101329 g     F .text	00000063 vsnprintf

f0113060 g       .bss	00000000 edata

f0100627 g     F .text	00000126 cons_init

f0100780 g     F .text	00000000 .hidden __x86.get_pc_thunk.ax

f010642c g       .stab	00000000 __STAB_END__

f010642d g       .stabstr	00000000 __STABSTR_BEGIN__

f0101980 g     F .text	0000014d .hidden __umoddi3

f0100581 g     F .text	0000002b serial_intr

f0101870 g     F .text	0000010a .hidden __udivdi3

f0100776 g     F .text	0000000a iscons

f010178a g     F .text	000000de strtol

f01014cf g     F .text	00000027 strnlen

f010151c g     F .text	00000029 strcat

f01136a4 g     O .bss	00000004 panicstr

f01136a0 g       .bss	00000000 end

f010017c g     F .text	00000050 _warn

f0101640 g     F .text	00000020 strfind

f0101acd g       .text	00000000 etext

0010000c g       .text	00000000 _start

f0101576 g     F .text	0000003f strlcpy

f01015df g     F .text	0000003c strncmp

f0101545 g     F .text	00000031 strncpy

f01001cc g     F .text	00000000 .hidden __x86.get_pc_thunk.bx

f010172c g     F .text	0000003d memcmp

f010074d g     F .text	00000014 cputchar

f0101660 g     F .text	0000004c memset

f0100761 g     F .text	00000015 getchar

f0100e8b g     F .text	00000021 printfmt

f0107dab g       .stabstr	00000000 __STABSTR_END__

f01015b5 g     F .text	0000002a strcmp

f0100b9a g     F .text	0000020e debuginfo_eip

f0100a52 g     F .text	0000003b vcprintf

f0110000 g       .data	00000000 bootstacktop

f0112000 g     O .data.rel.local	00001000 entry_pgdir

f0108000 g       .data	00000000 bootstack

f010219c g       .stab	00000000 __STAB_BEGIN__

f01014b3 g     F .text	0000001c strlen

f010161b g     F .text	00000025 strchr

f01007dc g     F .text	000000d5 mon_kerninfo

f01008bb g     F .text	00000171 monitor

f0101769 g     F .text	00000021 memfind

f0100788 g     F .text	00000054 mon_help
Exercise 05
上面引入了VMA 和 LMA,理解如下:
- 链接地址:可以理解为通过编译器链接器处理形成的可执行程序中指令的地址,即逻辑地址
- 加载地址则是可执行文件真正被装入内存后运行的地址,即物理地址
由于在boot loader运行时还没有任何的分段处理机制,或分页处理机制,所以boot loader可执行程序中的链接地址就应该等于加载地址。
- step01:拷贝原有的obj/boot/boot.asm 以便用来比较
- step02:打开boot/Makefrag文件,修改链接地址,这里改为
0x7E00
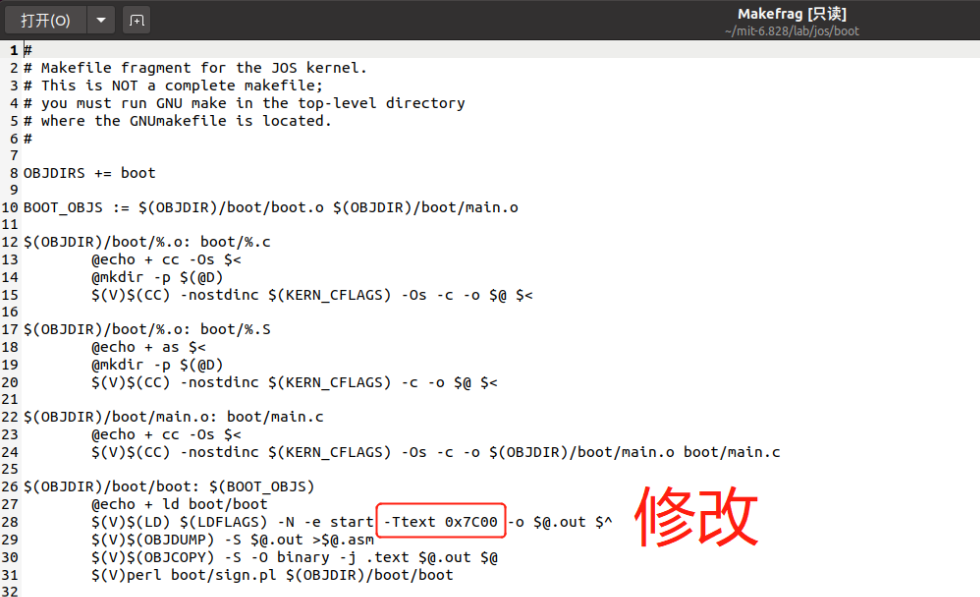
- step03:在lab下输入make,重新编译内核,首先查看一下obj/boot/boot.asm,并且和之前的那个obj/boot/boot.asm文件做比较。下图是新编译出来的boot.asm:

下图是修改之前的boot.asm
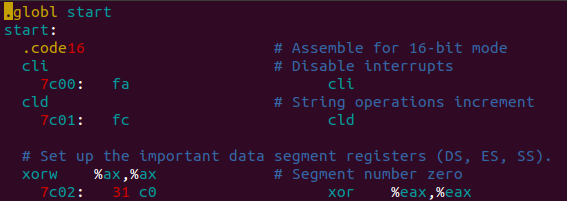
可以看出,二者区别在于可执行文件中的链接地址不同了,原来是从0x7C00开始,现在则是从0x7E00开始
- step04:然后我们还是按照原来的方式,调试一下内核:
由于BIOS会把boot loader程序默认装入到0x7c00处,所以我们还是再0x7C00处设置断点,并且运行到那里,结果发现如下:
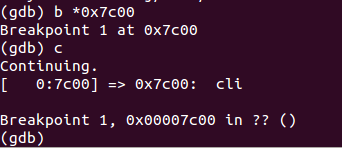
可见第一条执行指令仍旧是正确的,所以我们接着往下一步步运行。
接下来的几步仍旧是正常的,但是直到运行到一条指令:

图中的0x7c1e处指令,
lgdtw 0x7e64
这条指令我们之前讲述过,是把指令后面的值所指定内存地址处后6个字节的值输入全局描述符表寄存器GDTR,但是当前这条指令读取的内存地址是0x7e64,我们在图中也展示了一下这个地址处后面6个单元存放的值,发现是全部是0。这肯定是不对的,正确的应该是在0x7c64处存放的值,即图中最下面一样的值。可见,问题出在这里,GDTR表的值读取不正确,这是实现从实模式到保护模式转换的非常重要的一步。
我们可以继续运行,知道发现下面这句:

正常来说,0x7c2d处的指令
ljmp $0x08m $0x7e32
应该跳转到的地址应该就是ljmp的下一条指令地址,即0x7c32,但是这里给的值是0x7e32,所以造成错误,此时下条指令变成了0xfe05b。 然后后面 就..全面崩盘
Excersise 06:
- kernel起始地址查看
objdump -f obj/kern/kernel

- 理解boot/main.c 里面的ELF loader
minimal ELF loader 把kernel里面的每个section从disk 按照section's load address读进memory之后, 跳到了kernel的entry point
- 知识概要总结
BIOS负责执行基本的系统初始化,从某些适当的位置(如 floppy disk(软盘), hard disk, CD-ROM, or the network)加载操作系统,并将机器的控制权给操作系统(通过jmp指令将CS:IP设置为0000:7c00,0x7c00是the boot sector被加载到的物理地址)the boot loader将处理器从16-bit real model切换到32-bit protected model,使得1M以上的内存地址可以访问(主要boot.S完成。将控制信号传递0x60与0x64端口,加载GDT表,将CR0的bit0位设为1,call bootmain)。还从硬盘中读取内核到内存并跳转到内核入口地址(主要main.c完成。先读取ELF program headers,然后通过ELFHDR内的信息将kernel加载到内存正确位置,最后跳转内核入口地址0x00100000)- the boot loader将内核加载到内存的物理地址(加载地址)是
0x00100000,但内核在内存中的虚拟地址(链接地址)是0xf0100000 - CR0中的两个控制位
PG (Paging)和PE(Protection Enable)。只有在保护方式下(PE=1)分页机制才可能生效。PE=1, PG=1,分页机制生效,把线性地址转换为物理地址。PE=1, PG=0,分页机制无效,线性地址就直接作为物理地址。 - 数据在内存中有
大端(big-endian)格式–高尾端,尾端放在高地址处和小端(little-endian)格式—低尾端, 尾端放在低地址处 backtrace函数实现的关键在于ebp。当前ebp指向当前子程序的栈帧(frame)基地址,地址内存的是caller的栈帧基地址,里面存的又是再外层的caller的栈帧基地址,这样就可以区分出每一层程序的栈帧,从而实现回溯。
- 开机第一条指令:0xffff0 BIOS系统启动,这里只是存放了一条跳转指令,
- BIOS 基本输入/输出系统,其本质是一个固化在主板Flash/CMOS上的软件)和位于软盘/硬盘引导扇区中的OS Boot Loader(在ucore中的bootasm.S和bootmain.c)一起组成。通过跳转指令跳到BIOS例行程序起始点(0xe05b)。BIOS做完计算机硬件自检和初始化后,会选择一个启动设备(例如软盘、硬盘、光盘等),并且读取该设备的第一扇区(即主引导扇区或启动扇区)到内存一个特定的地址0x7c00处,然后CPU控制权会转移到那个地址继续执行。
- boot loader 加载内核并跳到内核入口 0x0010000c
- 注意:内核加载到内存的物理地址(加载地址)是
0x00100000,但内核在内存中的虚拟地址(链接地址)是0xf0100000
- Exercise 06
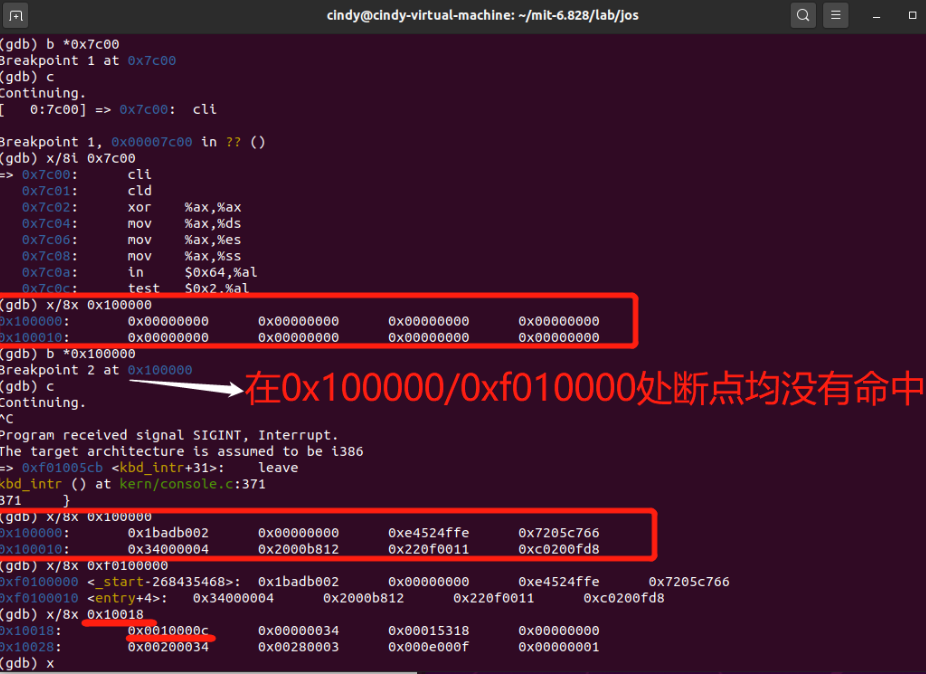
- BIOS切换到boot loader之前,检查内存
0x100000处8个word(此处1个word=2bytes)- 往后8个 word全是0
- 当boot loader将内核加载到内存之后,再检查
- 往后8个word有内容了
※:进入内核后,内核已经加载到以0x100000为始地址的主存空间,所以相邻地址都有内容了
重点:
boot loader 进入到内核:
- 从kernel文件中可以看到起始地址为
0x10000c
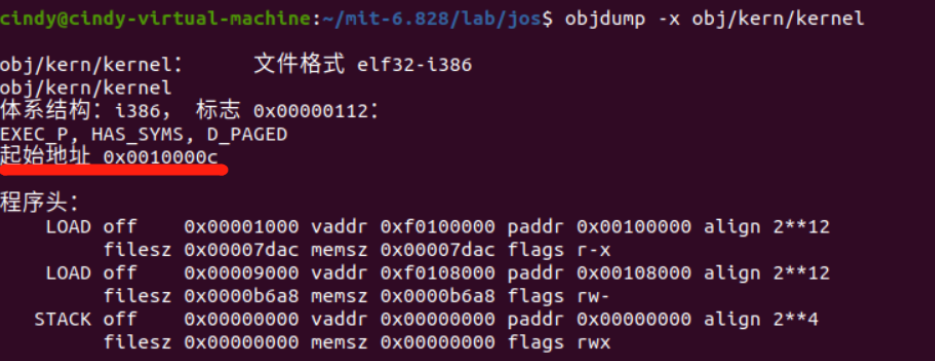
- 从main.c文件中看到e_entry的地址:
- 从kernel文件中可以看到起始地址为

- 疑惑:
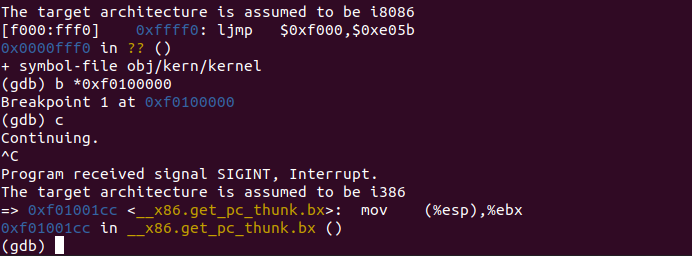
MIT 6.828 Lab 1/ Part 2的更多相关文章
- 《MIT 6.828 Lab 1 Exercise 12》实验报告
本实验的网站链接:MIT 6.828 Lab 1 Exercise 12. 题目 Exercise 12. Modify your stack backtrace function to displa ...
- 《MIT 6.828 Lab 1 Exercise 11》实验报告
本实验的网站链接:MIT 6.828 Lab 1 Exercise 11. 题目 The above exercise should give you the information you need ...
- 《MIT 6.828 Lab 1 Exercise 10》实验报告
本实验的网站链接:MIT 6.828 Lab 1 Exercise 10. 题目 Exercise 10. To become familiar with the C calling conventi ...
- 《MIT 6.828 Lab 1 Exercise 8》实验报告
本实验的网站链接:MIT 6.828 Lab 1 Exercise 8. 题目 Exercise 8. Read through kern/printf.c, lib/printfmt.c, and ...
- 《MIT 6.828 Lab 1 Exercise 3》实验报告
本实验的网站链接:mit 6.828 lab1 Exercise 3. 题目 Exercise 3. Take a look at the lab tools guide, especially th ...
- 《MIT 6.828 Lab 1 Exercise 7》实验报告
本实验链接:mit 6.828 lab1 Exercise 7. 题目 Exercise 7. Use QEMU and GDB to trace into the JOS kernel and st ...
- 《MIT 6.828 Lab 1 Exercise 4》实验报告
本实验链接:mit 6.828 lab1 Exercise 4. 题目 Exercise 4. Read about programming with pointers in C. The best ...
- 《MIT 6.828 Lab 1 Exercise 2》实验报告
本实验链接:mit 6.828 lab1 Exercise2. 题目 Exercise 2. Use GDB's si (Step Instruction) command to trace into ...
- 《MIT 6.828 Lab1: Booting a PC》实验报告
<MIT 6.828 Lab1: Booting a PC>实验报告 本实验的网站链接见:Lab 1: Booting a PC. 实验内容 熟悉x86汇编语言.QEMU x86仿真器.P ...
随机推荐
- Ubuntu查看和设置Root账户
前言: 要在Linux中运行管理任务,必须要具有root(也称为超级用户)访问权限.在大多数Linux发行版中,拥有一个单独的root账户是很常见的,但是Ubuntu默认禁用root账户.这可以防止用 ...
- linux日志朔源分析记录
lastlog 记录用户最后一次登录情况 只有root最近登录过 lastlog -u 用户名或者uid uid 直接在passwd文件中的低三位可以看到 lastb 记录用户用户登录失败的用户记录, ...
- 笨办法学Python 3|百度网盘免费下载|新手基础入门书籍
点击下方即可百度网盘免费提取 百度网盘免费下载:笨办法学Python 3 提取码:to27 内容简介: 本书是一本Python入门书,适合对计算机了解不多,没有学过编程,但对编程感兴趣的读者学习使用. ...
- 轻松应对并发问题,Newbe.Claptrap 框架中 State 和 Event 应该如何理解?
Newbe.Claptrap 框架中 State 和 Event 应该如何理解?最近整理了一下项目的术语表.今天就谈谈什么是 Event 和 State. Newbe.Claptrap 是一个用于轻松 ...
- Shiro @RequiresRoles注解相关参数说明
@RequiresRoles(value={"admin","user"},logical = Logical.OR) @RequiresPermissions ...
- Mybatis开启二级缓存(全局缓存)的方法
Mybatis开启二级缓存的方法 开启步骤 1.在 mybatis-config.xml 的配置文件中进行显示配置,开启二级缓存(全局缓存) 2.在 Mapper.xml 文件中添加cache标签 一 ...
- Python os.openpty() 方法
概述 os.openpty() 方法用于打开一个新的伪终端对.返回 pty 和 tty的文件描述符.高佣联盟 www.cgewang.com 语法 openpty()方法语法格式如下: os.open ...
- Blob分析之board.hdev
* board.hdev: Detection of missing solder* 获取当前系统参数get_system ('clip_region', Information)*设置当前系统参数s ...
- C/C++编程笔记:C++入门知识丨函数和函数模板
本篇要学习的内容和知识结构概览 函数的参数及其传递方式 1. 函数参数传递方式 传值: 传变量值: 将实参内存中的内容拷贝一份给形参, 两者是不同的两块内存 传地址值: 将实参所对应的内存空间的地址值 ...
- day3. 六大标准数据类型的类型转换
一.强制类型转换Number 1.int 强制转换成整型 var1 = 13 var2 = 13.789 var3 = True var4 = 5-7j var5 = "" va ...
