pytest测试框架 -- assert断言和fixture固件
一、断言
(1)使用assert语句进行断言
# test_run.py

   @pytest.mark.assert

    def test_assert(self):

        r = requests.get("https://www.baidu.com")

        assert r.status_code == 100
# pytest常用的python断言:

1)assert xx:判断xx为真

2)assert not xx:判断xx不为真

3)assert a in b:判断b包含a

4)assert a not in b: 判断b不包含a

5)assert a == b:判断a等于b

6)assert a !=b:判断a不等于b
(2)使用pytest.raises触发期望异常的断言
# test_run.py

  @pytest.mark.arrser

    def test_assert(self):

        r = requests.get("https://www.baidu.com")

        with pytest.raises(AssertionError) as excinfo:

            assert r.status_code == 201     # 此处可能存在异常,所以主动raises抛出

            print("This will be not execute")   # 此处未被执行

        assert excinfo.type == AssertionError   # 此处被执行

        assert "" in str(excinfo.value)      # 此处被执行

        print("This will be execute")           # 此处被执行
excinfo 是一个异常信息实例,它是围绕实际引发的异常的包装器。主要属性是.type、 .value 和 .traceback
注意:断言type的时候,异常类型是不需要加引号的,断言value值的时候需转str。
二、fixture的使用
(1)fixture的作用
- 完成setup和teardown操作,处理数据库、文件等资源的打开和关闭
- 完成大部分测试用例需要完成的通用操作,例如login、设置config参数、环境变量等
- 准备测试数据,将数据提前写入到数据库,或者通过params返回给test用例,等
(2)fixture的优势
- 命名方式灵活,不局限于setup和teardown这几个命名
- conftest.py 配置里可以实现数据共享,不需要import就能自动找到一些配置
- scope="function",若多个用例都调用了fixture函数,则此fixture在每个用例开始前都执行一次
- scope="class",如果一个class的多个用例都调用了次fixture,则此fixture仅在第一次调用开始前执行一次,后续调用不执行
- scope="module" 在当前.py脚本里面所有用例开始前只执行一次。
- scope="session" 以实现多个.py跨文件使用一个session来完成多个用例
(3)fixture源码详解
fixture(scope='function',params=None,autouse=False,ids=None,name=None):
scope:有四个级别参数"function"(默认),"class","module","session"
params:一个可选的参数列表,它将导致多个参数调用fixture功能和所有测试使用它。
autouse:如果True,则为所有测试激活fixture func可以看到它。如果为False则显示需要参考来激活fixture
ids:每个字符串id的列表,每个字符串对应于params这样他们就是测试ID的一部分。如果没有提供ID它们将从params自动生成
name:fixture的名称。这默认为装饰函数的名称。如果fixture在定义它的统一模块中使用,夹具的功能名称将被请求夹具的功能arg遮蔽,解决这个问题的一种方法时将装饰函数命令"fixture_<fixturename>"然后使用"@pytest.fixture(name='<fixturename>')"。
(4)源码演示
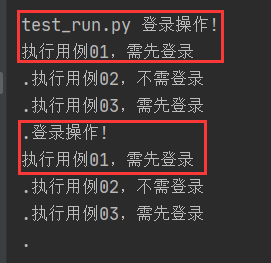
1、若scope="function"
@pytest.fixture()

def login():

    print("登录操作!")

def test_01(login):

    print("执行用例01,需先登录")

def test_02():

    print("执行用例02,不需登录")

def test_03(login):

    print("执行用例03,需先登录"
输出结果:

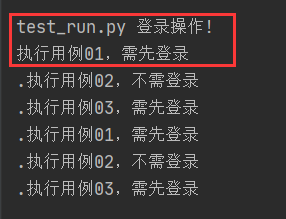
2、若scope="class"
@pytest.fixture(scope='class')
def login():
    print("登录操作!")

class TestFixture1():
    def test_01(self, login):
        print("执行用例01,需先登录")
    def test_02(self):
        print("执行用例02,不需登录")
    def test_03(self, login):
        print("执行用例03,需先登录")

class TestFixture2():
    def test_01(self, login):
        print("执行用例01,需先登录")
    def test_02(self):
        print("执行用例02,不需登录")
    def test_03(self, login):
        print("执行用例03,需先登录")
输出结果:
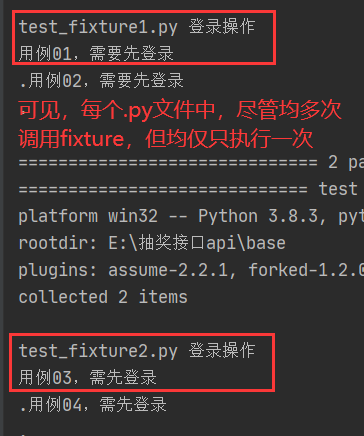
3、若scope="module"
@pytest.fixture(scope='module')

def login():

    print("登录操作!")

class TestFixture1():

    def test_01(self, login):

        print("执行用例01,需先登录")

    def test_02(self):

        print("执行用例02,不需登录")

    def test_03(self, login):

        print("执行用例03,需先登录")

class TestFixture2():

    def test_01(self, login):

        print("执行用例01,需先登录")

    def test_02(self):

        print("执行用例02,不需登录")

    def test_03(self, login):

        print("执行用例03,需先登录")
输出结果:
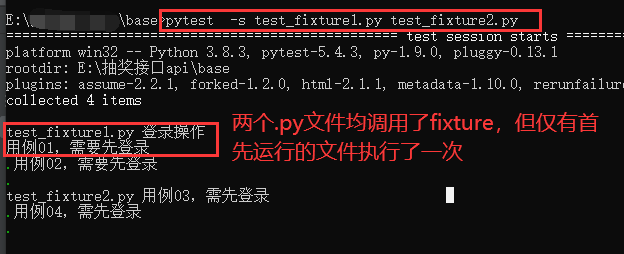
4、若scope="session"
fixture为session级别是可以跨.py模块调用的,也就是当我们有多个.py文件的用例的时候,如果多个用例只需调用一次fixture,那就可以设置为scope="session",并且写到conftest.py文件里。
conftest.py文件名称时固定的,pytest会自动识别该文件。放到项目的根目录下就可以全局调用了,如果放到某个package下,那就在该package内有效。
一个工程下可以建多个conftest.py的文件,一般在工程根目录下设置的conftest文件起到全局作用。在不同子目录下也可以放conftest.py的文件,作用范围只能在该层级以及以下目录生效。
# conftest.py

import pytest

@pytest.fixture(scope='session')

def test1():

    print("登录操作")
# test_fixture1.py

import pytest

def test_01(test1):

    print("用例01,需要先登录")

def test_02(test1):

    print("用例02,需要先登录")

if __name__ == "__main__":

    pytest.main(['-s', 'test_fixture1.py'])

    pytest.main(['-s', 'test_fixture2.py'])
#  test_fixture2.py

import pytest

class TestCase():

    def test_03(self, test1):

        print("用例03,需先登录")

    def test_04(self, test1):

        print("用例04,需先登录")

if __name__ == "__main__":

    pytest.main(['-s', 'test_fixture2.py'])
(1)若pycharm下运行test_fixture1.py,则输出结果如下:
(2)若在命令行下同时运行test_fixture1.py 和test_fixture2.py两个文件,则结果输出如下:
三、使用装饰器@pytest.mark.usefixtures()修饰需要运行的用例
如果一个方法或者一个class用例想要同时调用多个fixture,可以使用@pytest.mark.usefixture()进行叠加。注意叠加顺序,先执行的放底层,后执行的放上层。
import pytest

@pytest.fixture()
def test1():
    print("执行function1")

@pytest.fixture()
def test2():
    print("执行function2")

@pytest.mark.usefixtures('test1')
def test_01():
    print("---用例a执行---")

@pytest.mark.usefixtures('test1')   # 后执行
@pytest.mark.usefixtures('test2')   # 先执行
class TestCase():
    def test_02(self):
        print("---用例b执行---")

    def test_03(self):
        print("---用例c执行---")

输出结果:
test_fixture2.py 执行function1
---用例a执行---
.执行function2
执行function1
---用例b执行---
.执行function2
执行function1
---用例c执行---
usefixtures与传fixture区别
(1)如果fixture有返回值,那么usefixture就无法获取到返回值,这个是装饰器usefixture与用例直接传fixture参数的区别。
(2)当fixture需要用到return出来的参数时,只能将参数名称直接当参数传入,不需要用到return出来的参数时,两种方式都可以。
四、使用pytestmark或autouse使得每个函数都调用该固件
(1)如果你想要模块中的每个函数都调用该固件,你也可以使用pytestmark标记(注意:pytestmark变量名不可更改)
import pytest

@pytest.fixture()

def test2():

    print("执行function2")

pytestmark = pytest.mark.usefixtures('test2')

def test_01():

    print("---用例a执行---")

class TestCase():

    def test_02(self):

        print("---用例b执行---")

    def test_03(self):

        print("---用例c执行---")

输出结果:
test_fixture2.py 执行function2
---用例a执行---
.执行function2
---用例b执行---
.执行function2
---用例c执行---
(2)使用@pytest.fixture()中的参数autouse(自动使用),将其设为true(默认为false),这样每个函数都会自动调用该前置函数了:
import pytest

@pytest.fixture(autouse='true')

def test1():

    print("执行function1")

def test_01():

    print("---用例a执行---")

class TestCase():

    def test_02(self):

        print("---用例b执行---")

    def test_03(self):

        print("---用例c执行---")

输出结果:
test_fixture2.py 执行function1
---用例a执行---
.执行function1
---用例b执行---
.执行function1
---用例c执行---
五、params参数化
params参数可以实现前置函数的参数化,调用前置函数的测试用例可以根据前置函数不同的参数执行多次。
在fixture标签中的params参数传入了列表类型的参数列表;我们又在前置函数中传入了request参数;最后在测试函数中我们通过request.param来表示参数(参数列表中的每个值)
import pytest

@pytest.fixture(params=['参数1','参数2'])

def test1(request):

    print("执行前置函数, %s" % request.param)

def test_01(test1):           # 注意,此时test1未用引号

    print("---用例a执行---")

class TestCase():

    def test_02(self):

        print("---用例b执行---")

    def test_03(self):

        print("---用例c执行---")

输出结果:
test_fixture2.py 执行前置函数, 参数1
---用例a执行---
.执行前置函数, 参数2
---用例a执行---
.---用例b执行---
.---用例c执行--

或者:
import pytest
import requests

url_datas = ["http://www.baidu.com", "http://www.weibo.com"]

@pytest.fixture(params=url_datas)
def get_url(request):
    return request.param

def test_get_status_code(get_url):
    r = requests.get(get_url)
    print(r.status_code)

if __name__ == "__main__":
    pytest.main(['-s', 'test_fixture1.py'])

输出结果:
test_fixture1.py 200
.200
.
使用yield实现前置和后置函数(如setUp和tearDown)。
yield相当于 return 返回一个值,并且记住这个返回的位置,下次迭代时,代码从yield的下一条语句开始执行。
import pytest

def connect():

    print("连接数据库")

def disconnect():

    print("断开数据库")

@pytest.fixture(scope="class")

def databases():

    connect()       # 前置函数

    yield

    disconnect()    # 后置函数

def test_01(databases):

    print("执行用例a")

class TestCase():

    def test_02(self, databases):

        print("执行用例b")

    def test_03(self, databases):

        print("执行用例c")

if __name__ == "__main__":

    pytest.main(['-s', 'test_fixture1.py'])

运行结果:
连接数据库
执行用例a
.断开数据库
连接数据库
执行用例b
.执行用例c
.断开数据库
参考:https://www.cnblogs.com/huizaia/p/10331469.html
参考:https://blog.csdn.net/qq_39721240/article/details/88650329
pytest测试框架 -- assert断言和fixture固件的更多相关文章
- Pytest测试框架(三):pytest fixture 用法
xUnit style 结构的 fixture用于初始化测试函数, pytest fixture是对传统的 xUnit 架构的setup/teardown功能的改进.pytest fixture为测试 ...
- 『德不孤』Pytest框架 — 1、Pytest测试框架介绍
目录 1.什么是单元测试框架 2.单元测试框架主要做什么 3.单元测试框架和自动化测试框架有什么关系 4.Pytest测试框架说明 5.Pytest框架和Unittest框架区别 (1)Unittes ...
- Pytest测试框架(一):pytest安装及用例执行
PyTest是基于Python的开源测试框架,语法简单易用,有大量的插件,功能非常多.自动检测测试用例,支持参数化,跳过特定用例,失败重试等功能. 安装 pip install -U pytest ...
- Pytest测试框架(二):pytest 的setup/teardown方法
PyTest支持xUnit style 结构, setup() 和 teardown() 方法用于初始化和清理测试环境,可以保证测试用例的独立性.pytest的setup/teardown方法包括:模 ...
- Pytest测试框架(五):pytest + allure生成测试报告
Allure 是一款轻量级.支持多语言的开源自动化测试报告生成框架,由Java语言开发,可以集成到 Jenkins. pytest 测试框架支持Allure 报告生成. pytest也可以生成juni ...
- pytest测试框架 -- 简介
一.pytest测试框架简介: (1)pytest是python的第三方测试框架,是基于unittest的扩展框架,比unittest更简洁,更高效. (2)pytest框架可以兼容unittest用 ...
- 技术面试没过,居然是没有用pytest测试框架
1.引言 我有一个朋友是做Python自动化测试的.前几天他告诉我去参加一个大厂面试被刷了. 我问他是有没有总结被刷下来的原因.他说面试官问了一些 pytest 单元测试框架相关的知识,包括什么插件系 ...
- Pytest 测试框架
一 . Pytest 简介 Pytest是python的一种单元测试框架. 1. pytest 特点 入门简单,文档丰富 支持单元测试,功能测试 支持参数化,重复执行,部分执行,测试跳过 兼容其他测试 ...
- 【pytest系列】- pytest测试框架介绍与运行
如果想从头学起pytest,可以去看看这个系列的文章! https://www.cnblogs.com/miki-peng/category/1960108.html 前言 目前有两种纯测试的测 ...
随机推荐
- Vue在v-for中给css传递一个数组参数
需求就是将很多个数据,以进度条的形式展示在页面上,形成一个可视化. 接下来是html代码 <!DOCTYPE html> <html> <head> <tit ...
- java jsp实现网络考试系统(mysql)
java网络考试系统 功能:可进行学生.管理员登录,学生考试.管理员出卷.列表分页 @ 目录 java网络考试系统 实现效果 主要代码实现 写在最后 实现效果 主要代码实现 package cn.it ...
- SpringMVC9——异常处理
异常处理 SpringMVC: HandlerExceptionResolver接口 该接口的每个实现类都是异常的一种处理方式: 一.ExceptionHandlerExceptionResolv ...
- (转)mybatis一级缓存二级缓存
一级缓存 Mybatis对缓存提供支持,但是在没有配置的默认情况下,它只开启一级缓存,一级缓存只是相对于同一个SqlSession而言.所以在参数和SQL完全一样的情况下,我们使用同一个SqlSess ...
- 团队作业4:第四篇Scrum冲刺博客(歪瑞古德小队)
目录 一.Daily Scrum Meeting 1.1 会议照片 1.2 项目进展 二.项目燃尽图 三.签入记录 3.1 代码/文档签入记录 3.2 Code Review 记录 3.3 issue ...
- JS 对象基本用法
声明对象的两种语法 let obj = { 'name': 'frank', 'age': 18 } let obj = new Object({'name': 'frank'}) 如何删除对象的属性 ...
- Shell编程—数据展示
1.标准文件描述符 Linux用文件描述符(file descriptor)来标识每个文件对象.文件描述符是一个非负整数,可以唯一标识会话中打开的文件.每个进程一次 多可以有九个文件描述符.出于特殊目 ...
- packmol建模流程-计算
一.建模流程(modelling procedure): 1.美国数据库下载amc.cif文件:http://rruff.geo.arizona.edu/AMS/amcsd.php 2.导入vesta ...
- .net core 3.0 web api 重点设置,主要为了解决axios post不到参数问题
这两天研究.net core 3.0升级,前端vue+axios 后端web api.测试过程中发现post的时候,由于提交的是json对象,后端web api获取不到数据. 今天贴了下解决过程.主要 ...
- Java8中的Stream API
本篇文章继续介绍Java 8的另一个新特性——Stream API.新增的Stream API与InputStream和OutputStream是完全不同的概念,Stream API是对Java中集合 ...