iOS手势处理
iOS手势处理
iOS手势有着如下几种:
- UITapGestureRecognizer
- UIPinchGestureRecognizer
- UIRotationGestureRecognizer
- UISwipeGestureRecognizer
- UIPanGestureRecognizer
- UILongPressGestureRecognizer
上面的手势对应的操作是:
- Tap (点一下)
- Pinch (二指往內或往外拨动,平时经常用到的缩放) 矩阵变换
- Rotation (旋转) 矩阵变换
- Swipe (滑动,快速移动)
- Pan (拖移,慢速移动) 矩阵变换
- LongPress (长按)
注意:以下示例均把手势封装进一个View当中
UITapGestureRecognizer - 点击手势
GestureView.h + GestureView.m
- #import <UIKit/UIKit.h>
- @interface GestureView : UIView
- @end
GestureView.h
- #import "GestureView.h"
- @interface GestureView ()
- @property (nonatomic, strong) UITapGestureRecognizer *tapGesture;
- @property (nonatomic, strong) CALayer *colorLayer;
- @end
- @implementation GestureView
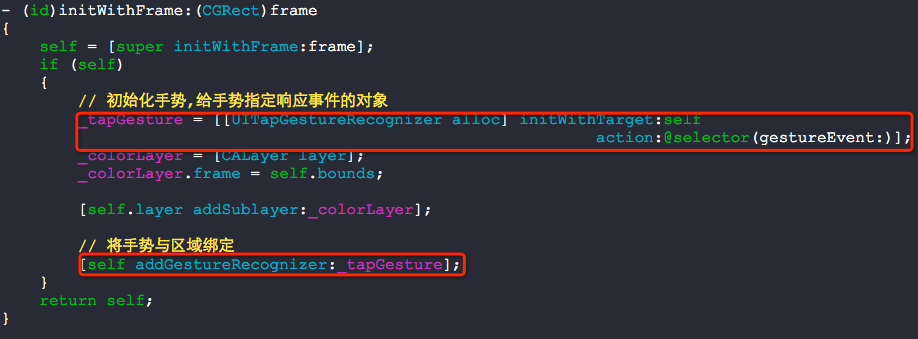
- - (id)initWithFrame:(CGRect)frame {
- self = [super initWithFrame:frame];
- if (self) {
- // 初始化手势,给手势指定响应事件的对象
- _tapGesture = [[UITapGestureRecognizer alloc] initWithTarget:self
- action:@selector(gestureEvent:)];
- _colorLayer = [CALayer layer];
- _colorLayer.frame = self.bounds;
- [self.layer addSublayer:_colorLayer];
- // 将手势与区域绑定
- [self addGestureRecognizer:_tapGesture];
- }
- return self;
- }
- - (void)gestureEvent:(UIGestureRecognizer *)sender {
- _colorLayer.backgroundColor = [UIColor colorWithRed:arc4random() % / .f
- green:arc4random() % / .f
- blue:arc4random() % / .f
- alpha:1.0f].CGColor;
- }
- @end
GestureView.m
- (void)addGestureRecognizer:(UIGestureRecognizer *)gestureRecognizer
Attaching a gesture recognizer to a view defines the scope of the represented gesture, causing it to receive touches hit-tested to that view and all of its subviews. The view establishes a strong reference to the gesture recognizer.
将手势识别器附着在一个view上,实际上定义了一个手势接收的区域,会将接收到的触摸事件传递给这个view以及这个view的所有的subviews.这个view会对这个手势识别器强引用.
可以总结两点:
1. 手势会传递给这个view中所有的subviews
2. view会强引用手势识别器
使用如下:

点击手势有两个参数可以设置:
numberOfTapsRequired 点击几次触发事件(默认是1)
numberOfTouchesRequired 需要几个手指点击(默认是1)
UIPinchGestureRecognizer - 缩放
GestureView.h + GestureView.m
- #import <UIKit/UIKit.h>
- @interface GestureView : UIView
- @end
GestureView.h
- #import "GestureView.h"
- @interface GestureView ()
- @property (nonatomic, strong) UIPinchGestureRecognizer *pinchGesture;
- @end
- @implementation GestureView
- - (id)initWithFrame:(CGRect)frame
- {
- self = [super initWithFrame:frame];
- if (self)
- {
- // 初始化手势,给手势指定响应事件的对象
- _pinchGesture = \
- [[UIPinchGestureRecognizer alloc] initWithTarget:self
- action:@selector(gestureEvent:)];
- // 将手势与区域绑定
- [self addGestureRecognizer:_pinchGesture];
- }
- return self;
- }
- - (void)gestureEvent:(UIPinchGestureRecognizer *)sender
- {
- //
- self.transform = CGAffineTransformScale(self.transform, sender.scale, sender.scale);
- sender.scale = ;
- }
- @end
GestureView.m

缩放手势会用到矩阵变换.
UIRotationGestureRecognizer - 旋转
GestureView.h + GestureView.m
- #import <UIKit/UIKit.h>
- @interface GestureView : UIView
- @end
GestureView.h
- #import "GestureView.h"
- @interface GestureView ()
- @property (nonatomic, strong) UIRotationGestureRecognizer *rotationGesture;
- @end
- @implementation GestureView
- - (id)initWithFrame:(CGRect)frame
- {
- self = [super initWithFrame:frame];
- if (self)
- {
- // 初始化手势,给手势指定响应事件的对象
- _rotationGesture = \
- [[UIRotationGestureRecognizer alloc] initWithTarget:self
- action:@selector(gestureEvent:)];
- // 将手势与区域绑定
- [self addGestureRecognizer:_rotationGesture];
- }
- return self;
- }
- - (void)gestureEvent:(UIRotationGestureRecognizer *)sender
- {
- // 此处用到了矩阵变换
- self.transform = CGAffineTransformRotate(self.transform, sender.rotation);
- sender.rotation = ;
- }
GestureView.m

UISwipeGestureRecognizer - 滑动
GestureView.h + GestureView.m
- #import <UIKit/UIKit.h>
- @interface GestureView : UIView
- @end
GestureView.h
- #import "GestureView.h"
- @interface GestureView ()
- @property (nonatomic, strong) UISwipeGestureRecognizer *swipeGesture;
- @end
- @implementation GestureView
- - (id)initWithFrame:(CGRect)frame
- {
- self = [super initWithFrame:frame];
- if (self)
- {
- // 初始化手势,给手势指定响应事件的对象
- _swipeGesture = \
- [[UISwipeGestureRecognizer alloc] initWithTarget:self
- action:@selector(gestureEvent:)];
- _swipeGesture.direction = \
- UISwipeGestureRecognizerDirectionLeft | UISwipeGestureRecognizerDirectionRight;
- // 将手势与区域绑定
- [self addGestureRecognizer:_swipeGesture];
- }
- return self;
- }
- - (void)gestureEvent:(UISwipeGestureRecognizer *)sender
- {
- NSLog(@"left or right");
- }
- @end
GestureView.m

UIPanGestureRecognizer - 平移
GestureView.h + GestureView.m
- #import <UIKit/UIKit.h>
- @interface GestureView : UIView
- @end
GestureView.h
- #import "GestureView.h"
- @interface GestureView ()
- @property (nonatomic, strong) UIPanGestureRecognizer *panGesture;
- @end
- @implementation GestureView
- - (id)initWithFrame:(CGRect)frame
- {
- self = [super initWithFrame:frame];
- if (self)
- {
- // 初始化手势,给手势指定响应事件的对象
- _panGesture = \
- [[UIPanGestureRecognizer alloc] initWithTarget:self
- action:@selector(gestureEvent:)];
- // 将手势与区域绑定
- [self addGestureRecognizer:_panGesture];
- }
- return self;
- }
- - (void)gestureEvent:(UIPanGestureRecognizer *)sender
- {
- // 此处用到了矩阵变换
- CGPoint translation = [sender translationInView:self];
- self.center = CGPointMake(self.center.x + translation.x,
- self.center.y + translation.y);
- [sender setTranslation:CGPointZero
- inView:self];
- }
- @end
GestureView.m

UILongPressGestureRecognizer - 长按手势
GestureView.h + GestureView.m
- #import <UIKit/UIKit.h>
- @interface GestureView : UIView
- @end
GestureView.h
- #import "GestureView.h"
- @interface GestureView ()
- @property (nonatomic, strong) UILongPressGestureRecognizer *longPressGesture;
- @end
- @implementation GestureView
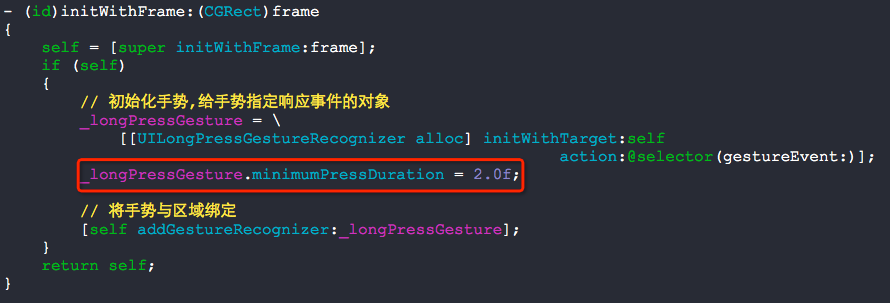
- - (id)initWithFrame:(CGRect)frame
- {
- self = [super initWithFrame:frame];
- if (self)
- {
- // 初始化手势,给手势指定响应事件的对象
- _longPressGesture = \
- [[UILongPressGestureRecognizer alloc] initWithTarget:self
- action:@selector(gestureEvent:)];
- _longPressGesture.minimumPressDuration = 2.0f;
- // 将手势与区域绑定
- [self addGestureRecognizer:_longPressGesture];
- }
- return self;
- }
- - (void)gestureEvent:(UILongPressGestureRecognizer *)sender
- {
- NSLog(@"触发事件");
- }
- @end
GestureView.m
问题:如何处理一个view中添加了两个手势,1个是单击的手势,一个是双击的手势呢?
可以使用这个方法requireGestureRecognizerToFail:
- #import "GestureView.h"
- @interface GestureView ()
- @property (nonatomic, strong) UITapGestureRecognizer *tapGesture1;
- @property (nonatomic, strong) UITapGestureRecognizer *tapGesture2;
- @end
- @implementation GestureView
- - (id)initWithFrame:(CGRect)frame {
- self = [super initWithFrame:frame];
- if (self) {
- // 单击手势
- _tapGesture1 = \
- [[UITapGestureRecognizer alloc] initWithTarget:self
- action:@selector(gesture1Event:)];
- _tapGesture1.numberOfTapsRequired = ;
- // 双击手势
- _tapGesture2 = \
- [[UITapGestureRecognizer alloc] initWithTarget:self
- action:@selector(gesture2Event:)];
- _tapGesture2.numberOfTapsRequired = ;
- // 注意: 判断双击手势需要时间,也就是说会有延时
- // 有事件触发时,先判断是不是 双击手势,如果不是就执行 单击手势
- [_tapGesture1 requireGestureRecognizerToFail:_tapGesture2];
- // 将手势与区域绑定
- [self addGestureRecognizer:_tapGesture1];
- [self addGestureRecognizer:_tapGesture2];
- }
- return self;
- }
- - (void)gesture1Event:(UIGestureRecognizer *)sender {
- NSLog(@"");
- }
- - (void)gesture2Event:(UIGestureRecognizer *)sender {
- NSLog(@"");
- }
- @end
GestureView.m
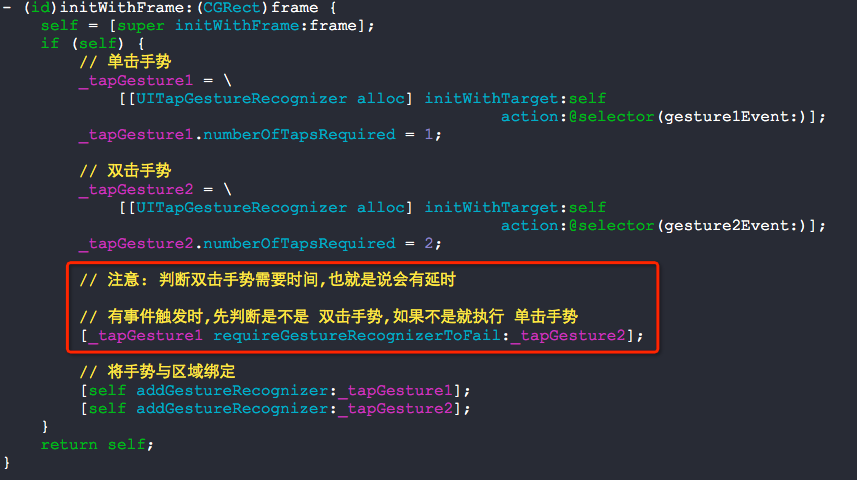
实际上,这种方式会有延时感-_-!!!!
问题:如何将长按手势和拖拽手势合并在一起呢?
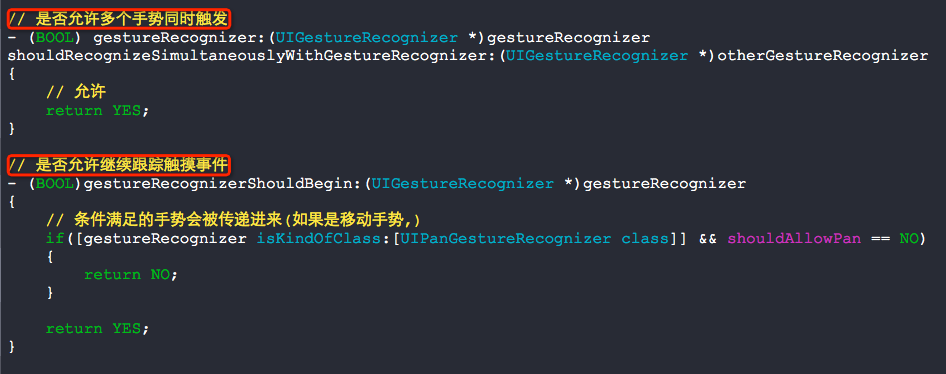
我们需要用代理实现,实现以下的方法:
- (BOOL)gestureRecognizer:(UIGestureRecognizer *)gestureRecognizer shouldRecognizeSimultaneouslyWithGestureRecognizer:(UIGestureRecognizer *)otherGestureRecognizer
Asks the delegate if two gesture recognizers should be allowed to recognize gestures simultaneously.
询问这个代理,是否允许两个手势同时触发.
- #import "GestureView.h"
- @interface GestureView ()<UIGestureRecognizerDelegate>
- {
- BOOL shouldAllowPan;
- }
- @property (nonatomic, strong) UIPanGestureRecognizer *panGesture;
- @property (nonatomic, strong) UILongPressGestureRecognizer *longPressGesture;
- @end
- @implementation GestureView
- - (id)initWithFrame:(CGRect)frame {
- self = [super initWithFrame:frame];
- if (self) {
- // 初始化时不允许拖拽
- shouldAllowPan = NO;
- _panGesture = \
- [[UIPanGestureRecognizer alloc] initWithTarget:self
- action:@selector(panEvent:)];
- [self addGestureRecognizer:_panGesture];
- _panGesture.delegate = self;
- _longPressGesture = \
- [[UILongPressGestureRecognizer alloc] initWithTarget:self
- action:@selector(longPressEvent:)];
- _longPressGesture.minimumPressDuration = 1.0f;
- [self addGestureRecognizer:_longPressGesture];
- _longPressGesture.delegate = self;
- }
- return self;
- }
- - (void)panEvent:(UIPanGestureRecognizer *)sender {
- if(shouldAllowPan == YES)
- {
- // 移动的操作
- CGPoint translation = [sender translationInView:self];
- self.center = CGPointMake(self.center.x + translation.x,
- self.center.y + translation.y);
- [sender setTranslation:CGPointZero
- inView:self];
- }
- else if(sender.state == UIGestureRecognizerStateEnded || \
- sender.state == UIGestureRecognizerStateFailed || \
- sender.state == UIGestureRecognizerStateCancelled)
- {
- shouldAllowPan = NO;
- }
- }
- - (void)longPressEvent:(UIGestureRecognizer *)sender
- {
- // 长按开始
- if(UIGestureRecognizerStateBegan == sender.state)
- {
- NSLog(@"长按开始");
- self.backgroundColor = [UIColor redColor];
- shouldAllowPan = NO;
- }
- // 长按进行中
- if(UIGestureRecognizerStateChanged == sender.state)
- {
- NSLog(@"长按进行中");
- shouldAllowPan = YES;
- }
- // 长按结束
- if(UIGestureRecognizerStateEnded == sender.state)
- {
- NSLog(@"长按结束");
- self.backgroundColor = [UIColor blackColor];
- shouldAllowPan = NO;
- }
- }
- // 是否允许多个手势同时触发
- - (BOOL) gestureRecognizer:(UIGestureRecognizer *)gestureRecognizer
- shouldRecognizeSimultaneouslyWithGestureRecognizer:(UIGestureRecognizer *)otherGestureRecognizer
- {
- // 允许
- return YES;
- }
- // 是否允许继续跟踪触摸事件
- - (BOOL)gestureRecognizerShouldBegin:(UIGestureRecognizer *)gestureRecognizer
- {
- // 条件满足的手势会被传递进来(如果是移动手势,)
- if([gestureRecognizer isKindOfClass:[UIPanGestureRecognizer class]] && shouldAllowPan == NO)
- {
- return NO;
- }
- return YES;
- }
- @end
GestureView.m
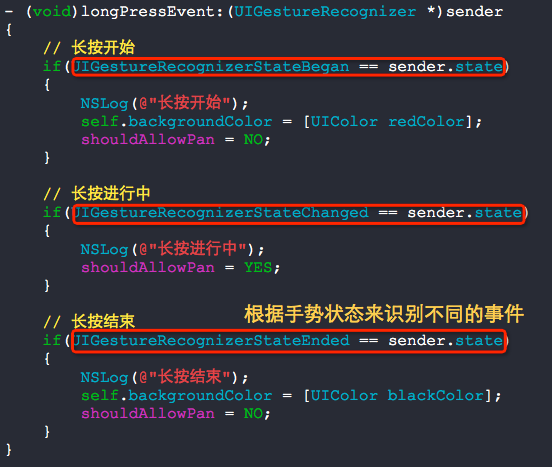
根据手势状态来识别手势触发事件的全称细节是十分重要的.
问题:如何让一个view的部分区域响应拖拽事件呢?
比方说,我们只需要下面红色线指定的区域响应拖拽事件:

- #import "GestureView.h"
- @interface GestureView ()
- {
- BOOL allowPan;
- }
- @property (nonatomic, strong) UIPanGestureRecognizer *panGesture;
- @end
- @implementation GestureView
- - (id)initWithFrame:(CGRect)frame
- {
- self = [super initWithFrame:frame];
- if (self)
- {
- // 初始化时不允许拖拽
- allowPan = NO;
- _panGesture = \
- [[UIPanGestureRecognizer alloc] initWithTarget:self
- action:@selector(panEvent:)];
- [self addGestureRecognizer:_panGesture];
- }
- return self;
- }
- - (void)panEvent:(UIPanGestureRecognizer *)sender
- {
- // 获取到当前手势在当前视图坐标中触摸的点
- CGPoint point = [sender locationInView:self];
- // 手势开始时置位(手势事件开始过程中仅仅执行一回)
- if (sender.state == UIGestureRecognizerStateBegan)
- {
- // 设定响应的区域
- if (self.bounds.size.height / .f >= point.x && self.bounds.size.width / .f >= point.y)
- {
- allowPan = YES;
- }
- }
- // 手势持续(手势事件开始过程中执行多回)
- if (sender.state == UIGestureRecognizerStateChanged && allowPan == YES)
- {
- // 移动的操作
- CGPoint translation = [sender translationInView:self];
- self.center = CGPointMake(self.center.x + translation.x,
- self.center.y + translation.y);
- [sender setTranslation:CGPointZero
- inView:self];
- }
- // 手势结束后置位(手势事件开始过程中仅仅执行一回)
- if (sender.state == UIGestureRecognizerStateEnded)
- {
- allowPan = NO;
- }
- }
- @end
GestureView.m
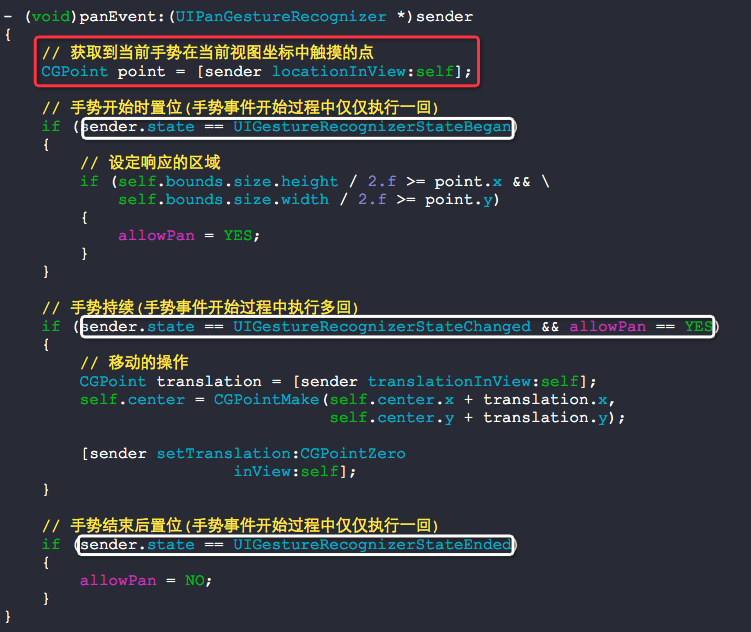
要实现那个效果,以下方法是核心方法,配合手势的状态使用:
// 获取到当前手势在当前视图坐标中触摸的点
CGPoint point = [sender locationInView:self];
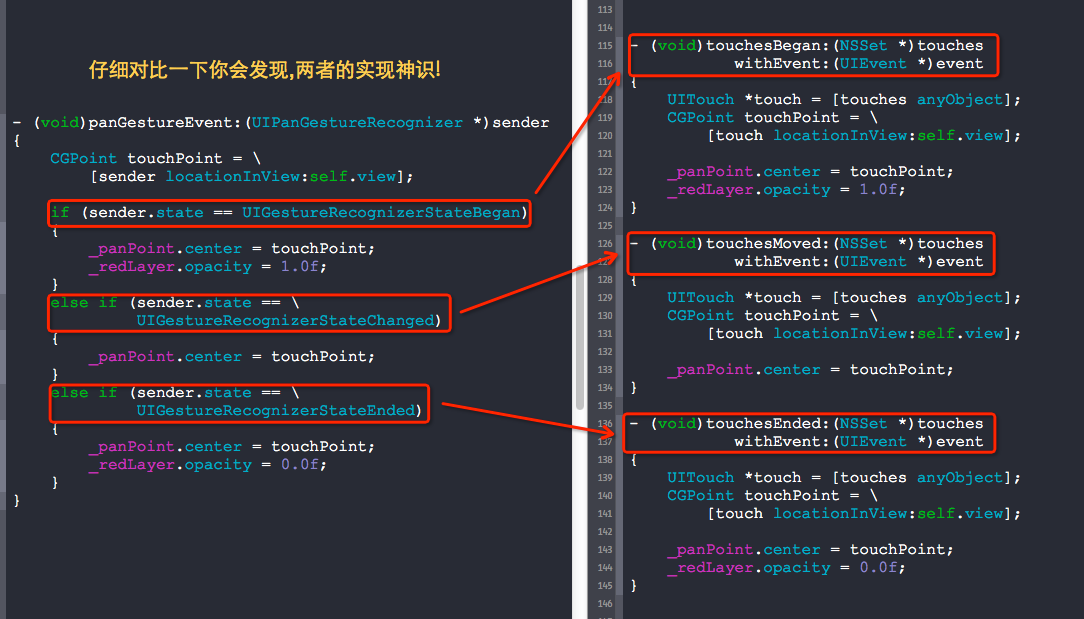
问题:如何在ViewController中获取到点击的坐标,让一个view跟随触摸点移动呢?
可以使用这几个最原始的处理触摸事件的方法来达到效果.
- (void)touchesBegan:(NSSet *)touches withEvent:(UIEvent *)event;
- (void)touchesMoved:(NSSet *)touches withEvent:(UIEvent *)event;
- (void)touchesEnded:(NSSet *)touches withEvent:(UIEvent *)event;
- #import "RootViewController.h"
- @interface RootViewController ()
- {
- UIView *_panPoint;
- CALayer *_redLayer;
- }
- @end
- @implementation RootViewController
- - (void)viewDidLoad
- {
- [super viewDidLoad];
- // 初始化view
- _panPoint = [[UIView alloc] initWithFrame:CGRectMake(, , , )];
- _panPoint.layer.cornerRadius = .f;
- _panPoint.layer.masksToBounds = YES;
- [self.view addSubview:_panPoint];
- // 初始化一个layer
- _redLayer = [CALayer layer];
- _redLayer.frame = _panPoint.bounds;
- _redLayer.backgroundColor = [UIColor redColor].CGColor;
- _redLayer.opacity = .f;
- [_panPoint.layer addSublayer:_redLayer];
- }
- // 一次完整的触摸事件中,touchesBegan只执行一回
- - (void)touchesBegan:(NSSet *)touches withEvent:(UIEvent *)event
- {
- // 获取触摸点坐标
- UITouch *touch = [touches anyObject];
- CGPoint touchPoint = [touch locationInView:self.view];
- _panPoint.center = touchPoint;
- _redLayer.opacity = 1.0f;
- }
- - (void)touchesMoved:(NSSet *)touches withEvent:(UIEvent *)event
- {
- // 获取触摸点坐标
- UITouch *touch = [touches anyObject];
- CGPoint touchPoint = [touch locationInView:self.view];
- _panPoint.center = touchPoint;
- }
- // 一次完整的触摸事件中,touchesEnded只执行一回
- - (void)touchesEnded:(NSSet *)touches withEvent:(UIEvent *)event
- {
- // 获取触摸点坐标
- UITouch *touch = [touches anyObject];
- CGPoint touchPoint = [touch locationInView:self.view];
- _panPoint.center = touchPoint;
- _redLayer.opacity = 0.0f;
- }
- @end
RootViewController.m
也可以直接使用拖拽手势来实现的,不过不完美
- #import "RootViewController.h"
- @interface RootViewController ()
- {
- UIView *_panPoint;
- CALayer *_redLayer;
- }
- @end
- @implementation RootViewController
- - (void)viewDidLoad
- {
- [super viewDidLoad];
- // 初始化view
- _panPoint = [[UIView alloc] initWithFrame:CGRectMake(, , , )];
- _panPoint.layer.cornerRadius = .f;
- _panPoint.layer.masksToBounds = YES;
- [self.view addSubview:_panPoint];
- // 初始化一个layer
- _redLayer = [CALayer layer];
- _redLayer.frame = _panPoint.bounds;
- _redLayer.backgroundColor = [UIColor redColor].CGColor;
- _redLayer.opacity = .f;
- [_panPoint.layer addSublayer:_redLayer];
- // 定义手势
- UIPanGestureRecognizer *panGesture = \
- [[UIPanGestureRecognizer alloc] initWithTarget:self
- action:@selector(panGestureEvent:)];
- [self.view addGestureRecognizer:panGesture];
- }
- - (void)panGestureEvent:(UIPanGestureRecognizer *)sender
- {
- CGPoint touchPoint = [sender locationInView:self.view];
- if (sender.state == UIGestureRecognizerStateBegan)
- {
- _panPoint.center = touchPoint;
- _redLayer.opacity = 1.0f;
- }
- else if (sender.state == UIGestureRecognizerStateChanged)
- {
- _panPoint.center = touchPoint;
- }
- else if (sender.state == UIGestureRecognizerStateEnded)
- {
- _panPoint.center = touchPoint;
- _redLayer.opacity = 0.0f;
- }
- }
- @end
RootViewController.m
他们两者的对比关系:
手势处理中核心的地方:
1. UIGestureRecognizerState非常重要,触发事件时可以直接根据这个状态值来判断事件的发生顺序
2. 处理多手势冲突时,可以使用依赖requireGestureRecognizerToFail:来处理,但效果不好
3. 处理多个手势并发响应的时候,需要实现代理并执行方法,请参考上面的事例
4. 仅仅处理一个view上局部的手势事件,需要用到手势的locationInView:方法,并与UIGestureRecognizerState状态值配合使用
附录:
- (BOOL)gestureRecognizer:(UIGestureRecognizer *)gestureRecognizer shouldReceiveTouch:(UITouch *)touch
这是手势的代理方法,在可以不移除手势的情况下关闭手势的响应,此方法涉及到响应链.
iOS手势处理的更多相关文章
- ios手势
iOS 手势操作:拖动.捏合.旋转.点按.长按.轻扫.自定义 大 中 小 1.UIGestureRecognizer 介绍 手势识别在 iOS 中非常重要,他极大地提高了移动设备的使用便捷性. i ...
- iOS手势学习UIGestureRecognizer & cocos2d 手势推荐
iOS手势学习UIGestureRecognizer & cocos2d 手势推荐 手势识别类型: UILongPressGestureRecognizer // 长按UIPanGestur ...
- iOS 手势识别器概述
手势识别器 iOS 手势识别器(UIGestureRecognizer) 点击手势(UITapGestureRecognizer) 滑动手势(UISwipeGestureRecognizer) 旋转手 ...
- swift 实现iOS手势密码、指纹密码、faceID
本博客包含了如何实现iOS手势密码.指纹密码.faceID全步骤,包括了完整的代码. 先附上demo地址https://github.com/Liuyubao/LYBTouchID,支持swift3. ...
- iOS手势解锁、指纹解锁--Swift代码
一.手势密码 1. 1.1.用UIButton组成手势的节点. 1.2.当手指接触屏幕时,调用重写的 touchesBegan:withEvent方法(在touchesBegan里调用setNeeds ...
- IOS 手势-轻点、触摸、手势、事件
1.概念 手势是从你用一个或多个手指接触屏幕时开始,直到手指离开屏幕为止所发生的所有事件.无论手势持续多长时间,只要一个或多个手指仍在屏幕上,这个手势就存在. 触摸是指把手指放到IOS设备的屏幕上,从 ...
- IOS 手势详解
在IOS中手势可以让用户有很好的体验,因此我们有必要去了解一下手势. (在设置手势是有很多值得注意的地方) *是需要设置为Yes的点击无法响应* *要把手势添加到所需点击的View,否则无法响应* 手 ...
- iOS 手势操作:拖动、捏合、旋转、点按、长按、轻扫、自定义
1.UIGestureRecognizer 介绍 手势识别在 iOS 中非常重要,他极大地提高了移动设备的使用便捷性. iOS 系统在 3.2 以后,他提供了一些常用的手势(UIGestureReco ...
- IOS 手势事件的冲突
关于手操作需要强调几点: UIImageView默认是不支持交互的,也就是userInteractionEnabled=NO ,因此要接收触摸事件(手势识别),必须设置userInteractionE ...
随机推荐
- YAOLEI
http://www.cnblogs.com/skyblue/p/3356933.html
- Mysql——权限管理
安装Mysql时会自动安装一个名为mysql的数据库.这个数据库下面存储的是权限表. mysql> show databases; +--------------------+ | Databa ...
- Golang 知识图谱
- 详解REST架构风格
编辑推荐: 本文来自于segmentfault.com,一起了解REST的内在,认识REST的优势,而不再将它当作是“理所当然” 引言 作为Web开发者,你可能或多或少了解一些REST的知识,甚至已经 ...
- Redis--redis集群环境搭建
1.redis-cluster架构图 Redis 自3.0以后开始支持集群.从上图我们可以看出,redis集群的每个节点之间都进行相互通信,在redis集群中,不存在代理层,即没有固定的入口.redi ...
- UA 用户代理
User Agent中文名为用户代理,简称 UA,它是一个特殊字符串头,使得服务器能够识别客户使用的操作系统及版本.CPU 类型.浏览器及版本.浏览器渲染引擎.浏览器语言.浏览器插件等.被广泛用来标识 ...
- Javascript数组操作函数总结
(1) shift 删除原数组第一项,并返回删除元素的值:如果数组为空则返回undefined var a = [1,2,3,4,5]; var b = a.shift(); //a:[2,3,4, ...
- JDBC连接数据库的完整实例
package com.sinovatech.util; import java.sql.CallableStatement; import java.sql.Connection; import ...
- Exception的情况——java基础1
除数为0等ArithmeticException,是RuntimException的子类.而运行时异常将由运行时系统自动抛出,不需要使用throw语句.Java编译器允许忽略运行时异常,一个方法可以既 ...
- SpringBoot集成Jersey
SpringBoot集成Jersey 添加依赖 <dependency> <groupId>org.springframework.boot</groupId> & ...