Lnmmp
简介
LNMMP=Linux+Nginx+MySQL+Memcache+PHP;
利用Nginx的高性能特点做前端反向代理服务器,分发用户请求,并在能够利用缓存的地方使用Memcache缓存服务,以加速缓存效率,具体架构图如下;
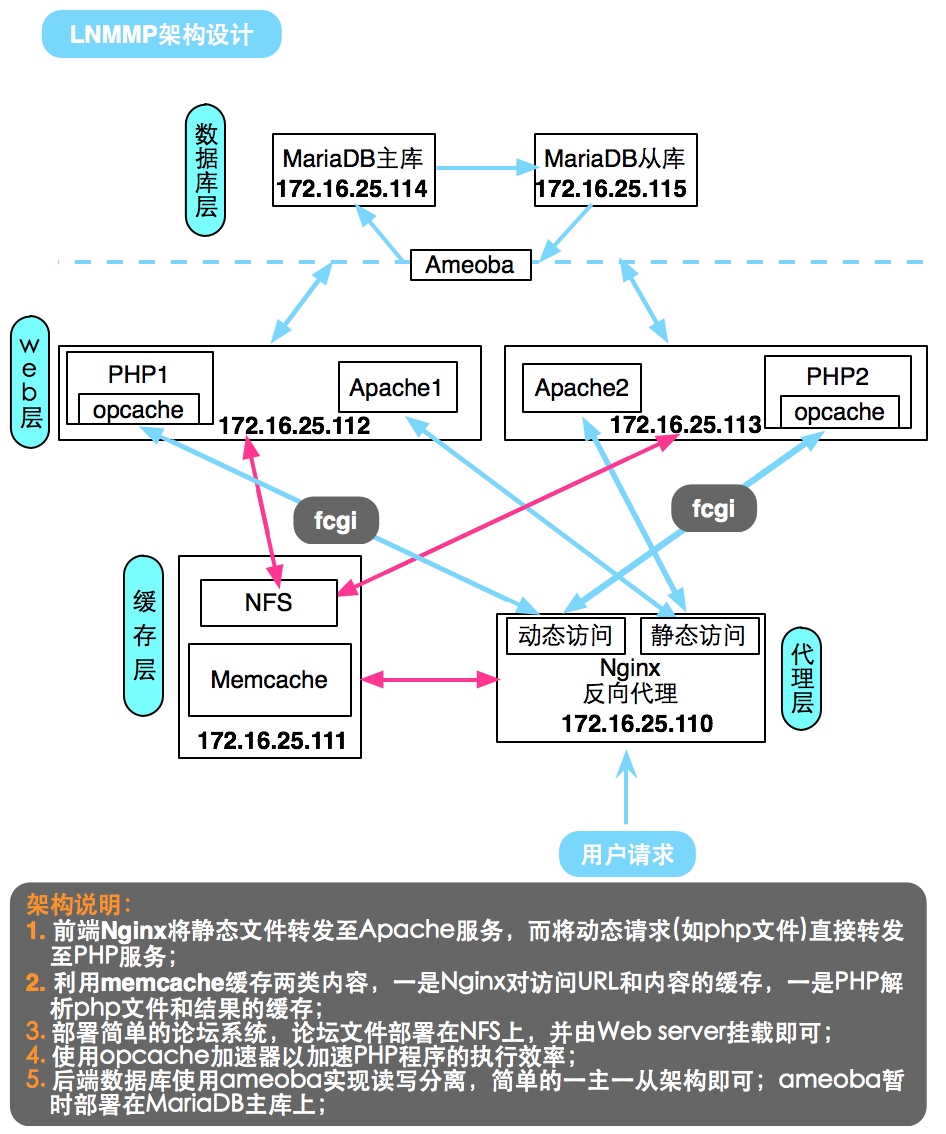
具体部署
代理层:Nginx
编译安装Nginx
yum install gcc openssl-devel pcre-devel zlib-devel

groupadd -r nginx

useradd -r -g nginx -M nginx

./configure \

  --prefix=/usr/local/nginx \

  --sbin-path=/usr/sbin/nginx \

  --conf-path=/etc/nginx/nginx.conf \

  --error-log-path=/var/log/nginx/error.log \

  --http-log-path=/var/log/nginx/access.log \

  --pid-path=/var/run/nginx/nginx.pid  \

  --lock-path=/var/lock/nginx.lock \

  --user=nginx \

  --group=nginx \

  --with-http_ssl_module \

  --with-http_flv_module \

  --with-http_stub_status_module \

  --with-http_gzip_static_module \

  --http-client-body-temp-path=/var/tmp/nginx/client/ \

  --http-proxy-temp-path=/var/tmp/nginx/proxy/ \

  --http-fastcgi-temp-path=/var/tmp/nginx/fcgi/ \

  --http-uwsgi-temp-path=/var/tmp/nginx/uwsgi \

  --http-scgi-temp-path=/var/tmp/nginx/scgi \

  --with-pcre

make && make install

vi /etc/init.d/nginx # 编辑服务脚本

#!/bin/sh

#

# nginx - this script starts and stops the nginx daemon

#

# chkconfig:   -

# description:  Nginx is an HTTP(S) server, HTTP(S) reverse \

#               proxy and IMAP/POP3 proxy server

# processname: nginx

# config:      /etc/nginx/nginx.conf

# config:      /etc/sysconfig/nginx

# pidfile:     /var/run/nginx.pid

# Source function library.

. /etc/rc.d/init.d/functions

# Source networking configuration.

. /etc/sysconfig/network

# Check that networking is up.

[ "$NETWORKING" = "no" ] && exit

nginx="/usr/sbin/nginx"

prog=$(basename $nginx)

NGINX_CONF_FILE="/etc/nginx/nginx.conf"

[ -f /etc/sysconfig/nginx ] && . /etc/sysconfig/nginx

lockfile=/var/lock/subsys/nginx

make_dirs() {

   # make required directories

   user=`nginx -V >& | grep "configure arguments:" | sed 's/[^*]*--user=\([^ ]*\).*/\1/g' -`

   options=`$nginx -V >& | grep 'configure arguments:'`

   for opt in $options; do

       if [ `echo $opt | grep '.*-temp-path'` ]; then

           value=`echo $opt | cut -d "=" -f `

           if [ ! -d "$value" ]; then

               # echo "creating" $value

               mkdir -p $value && chown -R $user $value

           fi

       fi

   done

}

start() {

    [ -x $nginx ] || exit

    [ -f $NGINX_CONF_FILE ] || exit

    make_dirs

    echo -n $"Starting $prog: "

    daemon $nginx -c $NGINX_CONF_FILE

    retval=$?

    echo

    [ $retval -eq  ] && touch $lockfile

    return $retval

}

stop() {

    echo -n $"Stopping $prog: "

    killproc $prog -QUIT

    retval=$?

    echo

    [ $retval -eq  ] && rm -f $lockfile

    return $retval

}

restart() {

    configtest || return $?

    stop

    sleep

    start

}

reload() {

    configtest || return $?

    echo -n $"Reloading $prog: "

    killproc $nginx -HUP

    RETVAL=$?

    echo

}

force_reload() {

    restart

}

configtest() {

  $nginx -t -c $NGINX_CONF_FILE

}

rh_status() {

    status $prog

}

rh_status_q() {

    rh_status >/dev/null >&

}

case "$1" in

    start)

        rh_status_q && exit

        $

        ;;

    stop)

        rh_status_q || exit

        $

        ;;

    restart|configtest)

        $

        ;;

    reload)

        rh_status_q || exit

        $

        ;;

    force-reload)

        force_reload

        ;;

    status)

        rh_status

        ;;

    condrestart|try-restart)

        rh_status_q || exit

            ;;

    *)

        echo $"Usage: $0 {start|stop|status|restart|condrestart|try-restart|reload|force-reload|configtest}"

        exit

esac
配置Nginx
upstream memcached {

        server    172.16.25.111:;

        keepalive ;

    }

    upstream webserver {

        server    172.16.25.112:;

        server    172.16.25.113:;

    }

    upstream phpserver {

        server    172.16.25.112:;

        server    172.16.25.113:;

    }

    server {

        listen       ;

        server_name  xxrenzhe.lnmmp.com;

    access_log      /var/log/nginx/lnmmp.access.log;

    error_log       /var/log/nginx/lnmmp.errors.log notice;

    root              /www/lnmmp.com;

    index       index.php index.html;

    location / {

        set $memcached_key $request_uri;

        add_header X-mem-key $memcached_key;

        memcached_pass memcached;

        default_type test/html;

        error_page     = @webnocache;

    }

    location @webnocache {

        rewrite ^(\/)?$ /index.php last; # 配置直接访问域名或IP地址时,重定向至index.php文件

        rewrite ^/.*$ /set_mem.php?$request_uri last; # 将静态访问重定向至后端set_mem.php,以实现set memcache的功能

        proxy_pass http://webserver;

    }

    location ~* \.php(\?.*)?$ {

        fastcgi_pass phpserver;

        fastcgi_param SCRIPT_FILENAME $document_root$fastcgi_script_name;

        include fastcgi_params;

    }
启动服务
chmod +x /etc/init.d/nginx

chkconfig --add nginx

chkconfig nginx on

service nginx start
缓存层:Memcache+NFS
安装配置memcache
# 安装libevent

tar xf libevent-2.0.-stable.tar.gz

cd libevent-2.0.

./configure --prefix=/usr/local/libevent

make && make install

echo "/usr/local/libevent/lib" > /etc/ld.so.conf.d/libevent.conf

ldconfig

# 安装memcache

tar xf memcached-1.4..tar.gz

cd memcached-1.4.

./configure --prefix=/usr/local/memcached --with-libevent=/usr/local/libevent

make && make install

# 编辑服务脚本 # 一次启动了2个memcache实例,一个用于Nginx,一个用于后端PHP服务

vi /etc/init.d/memcached

#!/bin/bash

#

# Init file for memcached

#

# chkconfig: -

# description: Distributed memory caching daemon

#

# processname: memcached

# config: /etc/sysconfig/memcached

. /etc/rc.d/init.d/functions

## Default variables

PORT1=""

PORT2=""

USER="nobody"

MAXCONN=""

CACHESIZE=""

OPTIONS=""

RETVAL=

prog="/usr/local/memcached/bin/memcached"

desc="Distributed memory caching"

lockfile1="/var/lock/subsys/memcached_$PORT1"

lockfile2="/var/lock/subsys/memcached_$PORT2"

start() {

        echo -n $"Starting $desc (memcached): "

        daemon $prog -d -p $PORT1 -u $USER -c $MAXCONN -m $CACHESIZE -o "$OPTIONS"

daemon $prog -d -p $PORT2 -u $USER -c $MAXCONN -m $CACHESIZE -o "$OPTIONS"

        RETVAL=$?

        [ $RETVAL -eq  ] && success && touch $lockfile1 && touch $lockfile2 || failure

        echo

        return $RETVAL

}

stop() {

        echo -n $"Shutting down $desc (memcached): "

        killproc $prog

        RETVAL=$?

        [ $RETVAL -eq  ] && success && rm -f $lockfile1 && rm -f $lockfile2 | failure

        echo

        return $RETVAL

}

restart() {

        stop

        start

}

reload() {

        echo -n $"Reloading $desc ($prog): "

        killproc $prog -HUP

        RETVAL=$?

        [ $RETVAL -eq  ] && success || failure

        echo

        return $RETVAL

}

case "$1" in

  start)

        start

        ;;

  stop)

        stop

        ;;

  restart)

        restart

        ;;

  condrestart)

        [ -e $lockfile1 ] && [ -e $lockfile1 ] && restart

        RETVAL=$?

        ;;

  reload)

        reload

        ;;

  status)

        status $prog

        RETVAL=$?

        ;;

   *)

        echo $"Usage: $0 {start|stop|restart|condrestart|status}"

        RETVAL=

esac

exit $RETVAL
启动memcache服务
# 安装libevent

tar xf libevent-2.0.-stable.tar.gz

cd libevent-2.0.

./configure --prefix=/usr/local/libevent

make && make install

echo "/usr/local/libevent/lib" > /etc/ld.so.conf.d/libevent.conf

ldconfig

# 安装memcache

tar xf memcached-1.4..tar.gz

cd memcached-1.4.

./configure --prefix=/usr/local/memcached --with-libevent=/usr/local/libevent

make && make install

# 编辑服务脚本 # 一次启动了2个memcache实例,一个用于Nginx,一个用于后端PHP服务

vi /etc/init.d/memcached

#!/bin/bash

#

# Init file for memcached

#

# chkconfig: -

# description: Distributed memory caching daemon

#

# processname: memcached

# config: /etc/sysconfig/memcached

. /etc/rc.d/init.d/functions

## Default variables

PORT1=""

PORT2=""

USER="nobody"

MAXCONN=""

CACHESIZE=""

OPTIONS=""

RETVAL=

prog="/usr/local/memcached/bin/memcached"

desc="Distributed memory caching"

lockfile1="/var/lock/subsys/memcached_$PORT1"

lockfile2="/var/lock/subsys/memcached_$PORT2"

start() {

        echo -n $"Starting $desc (memcached): "

        daemon $prog -d -p $PORT1 -u $USER -c $MAXCONN -m $CACHESIZE -o "$OPTIONS"

daemon $prog -d -p $PORT2 -u $USER -c $MAXCONN -m $CACHESIZE -o "$OPTIONS"

        RETVAL=$?

        [ $RETVAL -eq  ] && success && touch $lockfile1 && touch $lockfile2 || failure

        echo

        return $RETVAL

}

stop() {

        echo -n $"Shutting down $desc (memcached): "

        killproc $prog

        RETVAL=$?

        [ $RETVAL -eq  ] && success && rm -f $lockfile1 && rm -f $lockfile2 | failure

        echo

        return $RETVAL

}

restart() {

        stop

        start

}

reload() {

        echo -n $"Reloading $desc ($prog): "

        killproc $prog -HUP

        RETVAL=$?

        [ $RETVAL -eq  ] && success || failure

        echo

        return $RETVAL

}

case "$1" in

  start)

        start

        ;;

  stop)

        stop

        ;;

  restart)

        restart

        ;;

  condrestart)

        [ -e $lockfile1 ] && [ -e $lockfile1 ] && restart

        RETVAL=$?

        ;;

  reload)

        reload

        ;;

  status)

        status $prog

        RETVAL=$?

        ;;

   *)

        echo $"Usage: $0 {start|stop|restart|condrestart|status}"

        RETVAL=

esac

exit $RETVAL
安装配置NFS
yum -y install nfs-utils

vi /etc/exports

/www/lnmmp.com 172.16.0.0/(rw,no_root_squash)

exportfs -ar # 导出NFS共享目录

cd /www/lnmmp.com

unzip phpwind_v9.0_utf8.zip

mv phpwind_v9.0_utf8/upload/* .

chmod -R 777 attachment conf data html res src themes windid
Web层:Apache
Apache的安装见博客"httpd-2.4 编译安装";
PHP-fpm的安装见博客“LAMP架构之PHP-FPM 服务器”;
PHP加速器opcache的安装配置见博客“LAMP-PHP各加速器性能剖析”;
配置PHP支持memcache
tar xf memcache-2.2..tgz

cd memcache-2.2.

/usr/local/php/bin/phpize

./configure --with-php-config=/usr/local/php/bin/php-config --enable-memcache

make && make install

# 上述安装完后会有类似这样的提示:

Installing shared extensions:     /usr/local/php/lib/php/extensions/no-debug-non-zts-/

vi /usr/local/php/lib/php.ini # 配置memcache模块位置及php会话保存至memcache中

extension=/usr/local/php/lib/php/extensions/no-debug-non-zts-/memcache.so

session.save_handler = memcache

session.save_path = "tcp://172.16.25.111:11311"

# 自定义set memcache的程序

vi /www/lnmmp.com/set_mem.php

<?php

    $fn = dirname(__FILE__).$_SERVER['QUERY_STRING'];

    if (file_exists($fn)) {

        $data = file_get_contents($fn);

        $mem = new Memcache();

        $mem->connect("172.16.25.111",) or die("Could not connect");

        $mem->set($_SERVER['QUERY_STRING'],$data,,) or die("Failed to save data at the memcached server");

        header('Content-Length: '.filesize($fn)."\r\n");

        header('Content-Type: text/html'."\r\n");

        header('X-cache: MISS'."\r\n");

        print "$data";

    } else {

        header('Location: http://xxrenzhe.lnmmp.com'."\r\n");

        header('Content-Length: '.filesize($fn)."\r\n");

        header('X-cache: '.$fn."\r\n");

    }

?>
Apache配置
vi /etc/httpd/httpd.conf

# DocumentRoot "/usr/local/apache/htdocs" # 注释掉此行

Include /etc/httpd/extra/httpd-vhosts.conf # 取消此行注释

vi /etc/httpd/extra/httpd-vhosts.conf

<VirtualHost *:>

    DocumentRoot "/www/lnmmp.com"

    ServerName xxrenzhe.lnmmp.com

    ErrorLog "logs/lnmmp.com-error_log"

    CustomLog "logs/lnmmp.com-access_log"common

    <Directory "/www/lnmmp.com">

        Options Indexes FollowSymLinks

        AllowOverride None

        Require all granted

    </Directory>

</VirtualHost>
NFS目录挂载
mount -t nfs 172.16.25.111:/www/lnmmp.com /www/lnmmp.com
服务启动
service httpd start

service php-fpm start
数据库层:Ameoba+MariaDB
MariaDB的安装详见博客“MySQL初识-架构-安装-初始化-连接-管理工具-数据文件”;
MariaDB的主从复制架构配置见博客“Maria10实现主从复制架构及SSL复制”;
Ameoba安装见“http://docs.hexnova.com/amoeba/index.html”;
Ameoba实现读写分离见“http://docs.hexnova.com/amoeba/rw-splitting.html”
测试验证
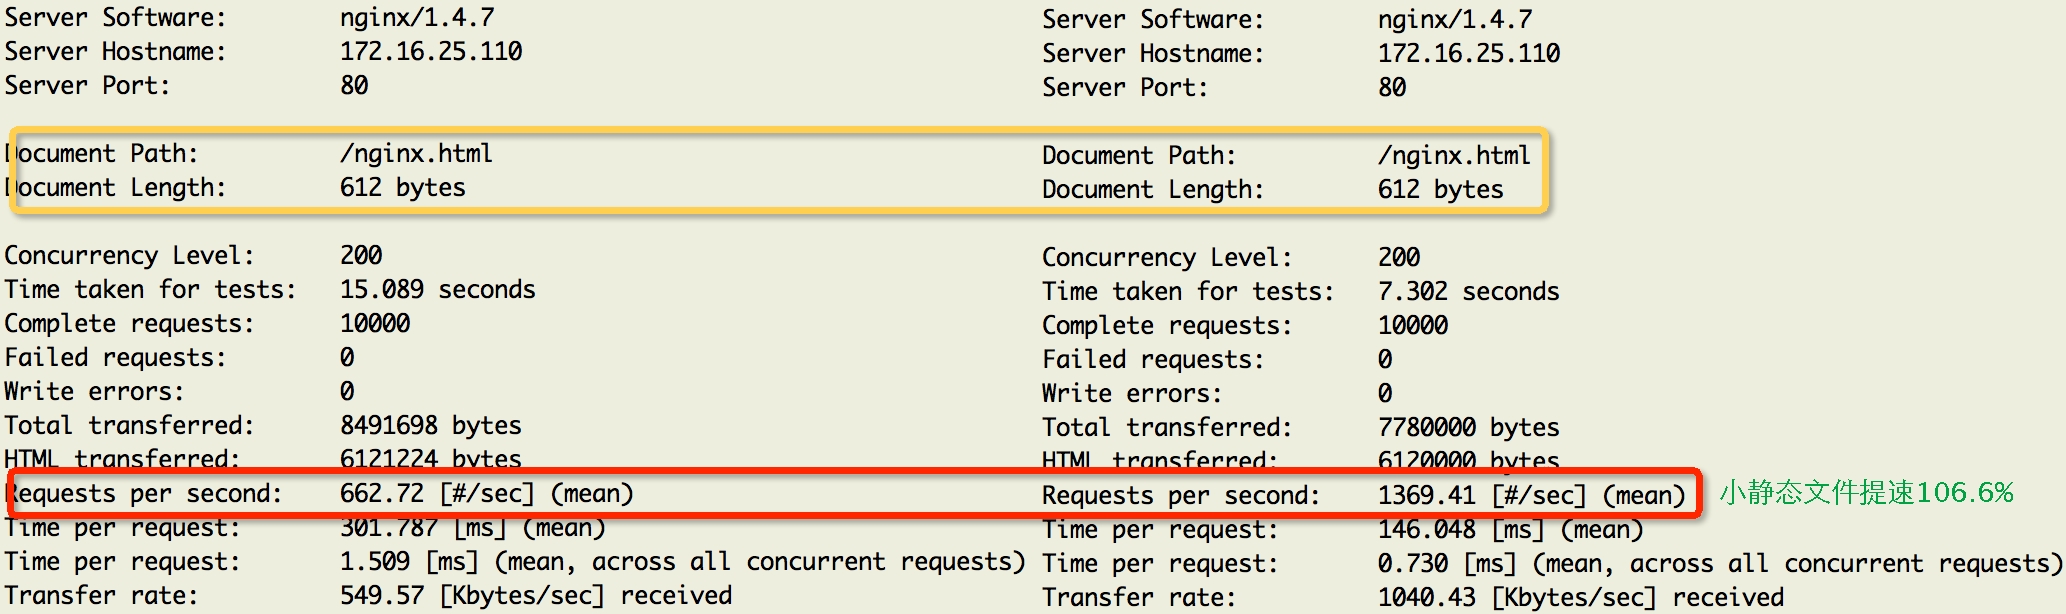
Nginx利用memcache缓存小静态文件测试效果
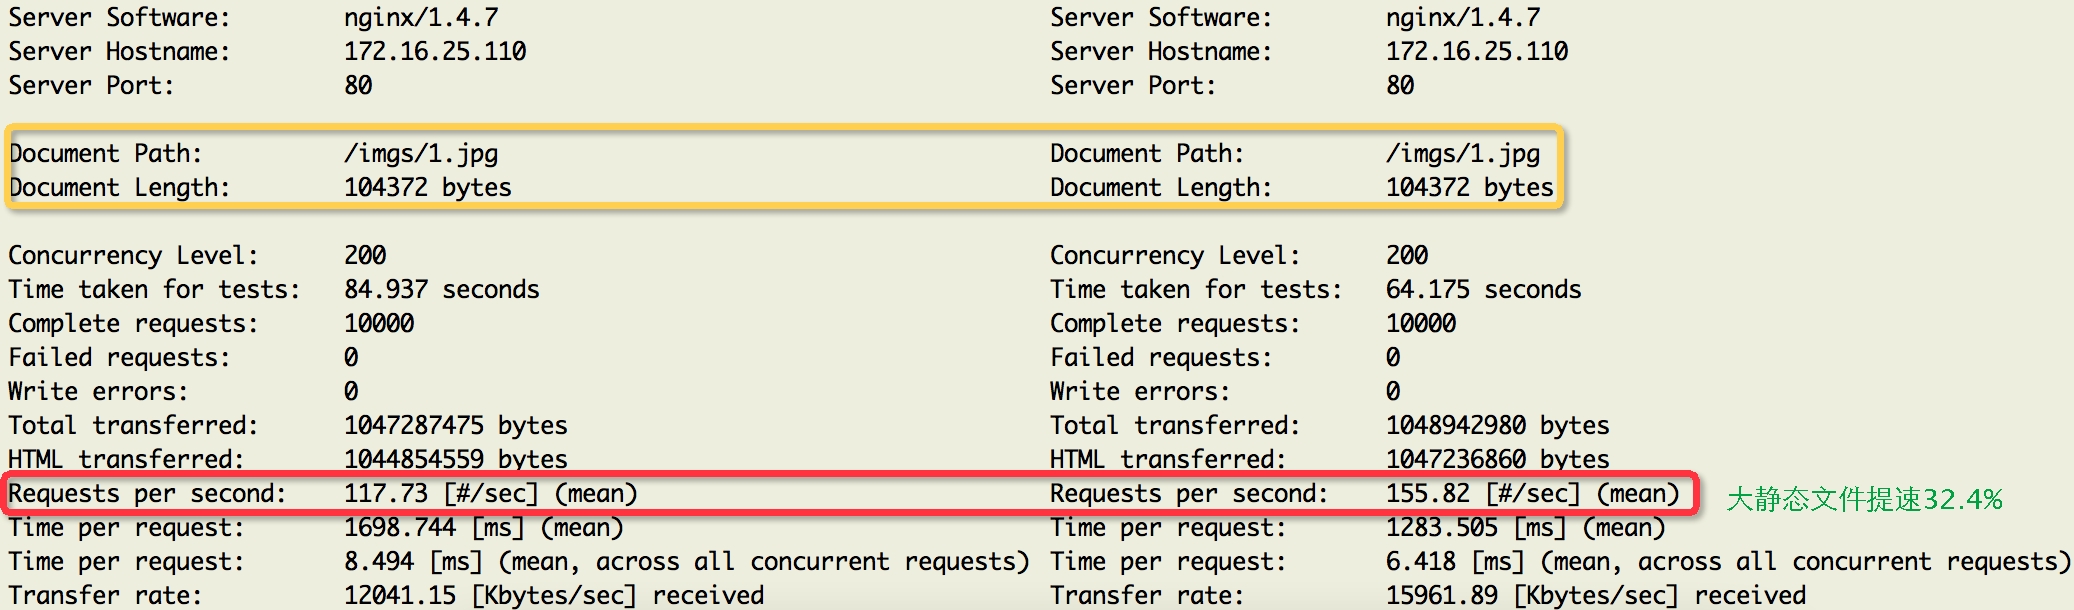
Nginx利用memcache缓存大静态文件测试效果
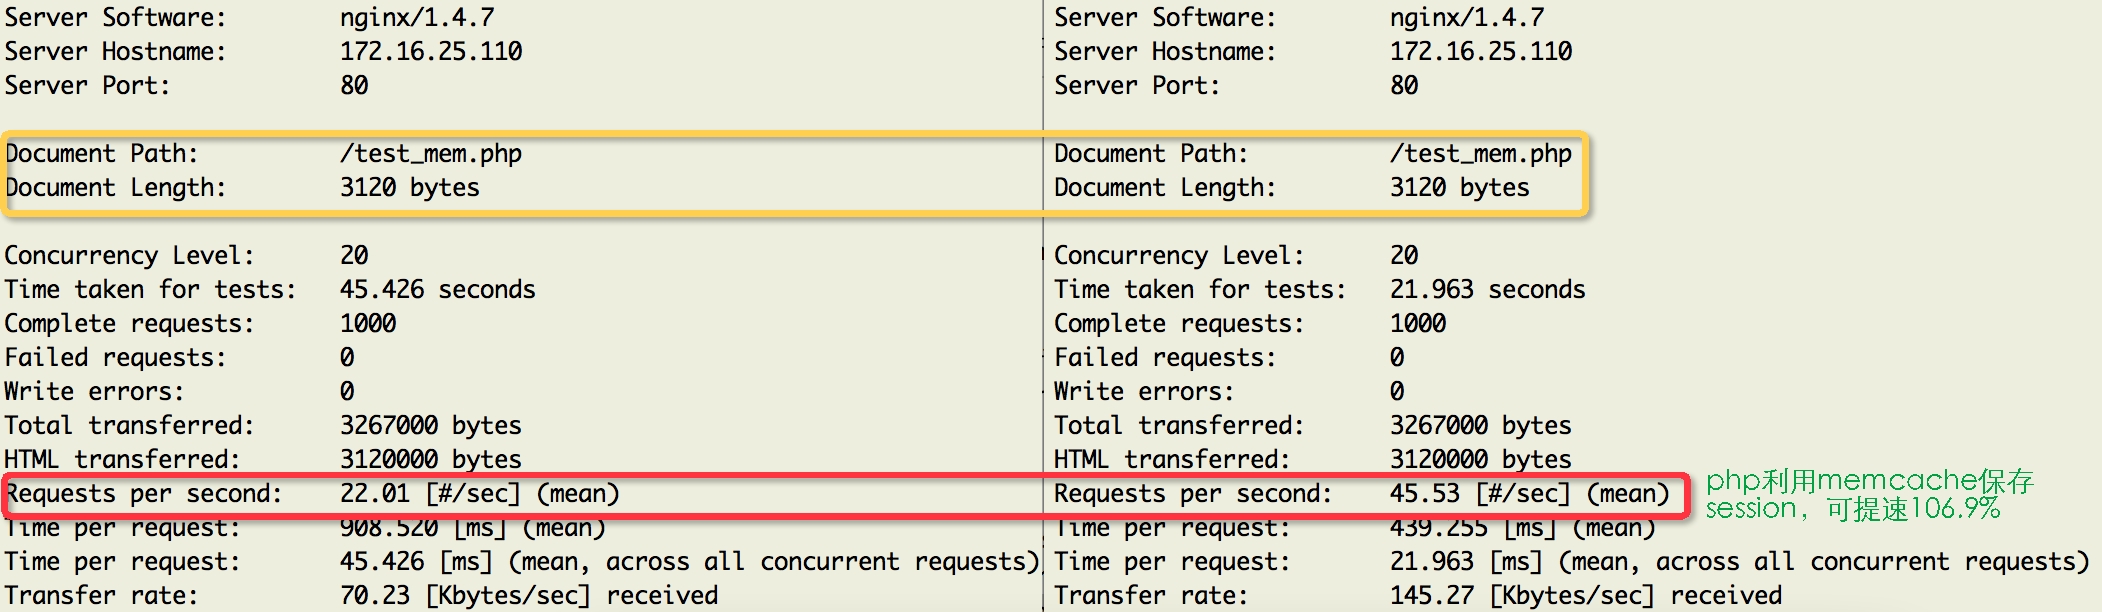
PHP利用memcache保存session数据测试效果
Lnmmp的更多相关文章
- Web服务之LNMMP架构及动静分离实现
原文链接:http://hoolee.blog.51cto.com/7934938/1413346 讲的非常详细,尽管我只看动静分离,可是看了一下其他的部署,也是非常不错,适合新手 一.LNMMP ...
- Varnish 4.0 实战(转)
简介 Varnish 是一款高性能且开源的反向代理服务器和 HTTP 加速器,其采用全新的软件体系机构,和现在的硬件体系紧密配合,与传统的 squid 相比,varnish 具有性能更高.速度更快.管 ...
- Varnish 4.0
Varnish 4.0 实战 简介 Varnish 是一款高性能且开源的反向代理服务器和 HTTP 加速器,其采用全新的软件体系机构,和现在的硬件体系紧密配合,与传统的 squid 相比,varn ...
- Varnish 4.0 实战
简介 Varnish 是一款高性能且开源的反向代理服务器和 HTTP 加速器,其采用全新的软件体系机构,和现在的硬件体系紧密配合,与传统的 squid 相比,varnish 具有性能更高.速度更快.管 ...
- 编译安装lamp (php)
用户账号及权限管理 用户账号:'user'@'host' user: 用户名 host: 此用户访问mysqld服务时允许通过哪些主机远程创建连接: host类型:IP.网络地址.主机名.通配符(%和 ...
- Apache 如何反向代理tomcat并且实现Session保持
简介 LAMT=Linux+Apache+MySQL+Tomcat: Tomcat 服务器是一个免费的开放源代码的Web 应用服务器,属于轻量级应用服务器: 在中小型系统和并发访问用户不是很多的场合下 ...
- NGINX如何反向代理Tomcat并且实现Session保持
简介 LNMT=Linux+Nginx+MySQL+Tomcat: Tomcat 服务器是一个免费的开放源代码的Web 应用服务器,属于轻量级应用服务器: 在中小型系统和并发访问用户不是很多的场合下被 ...
- 如何测试Nginx的高性能
简介 Nginx ("engine x") 是一个高性能的HTTP和反向代理服务器,也是一个IMAP/POP3/SMTP代理服务器: 作为一款轻量级的Web服务器,具有占有内存少, ...
- HAproxy + keepalived 实现双机热备
一.HAProxy简介: HAProxy提供高可用性.负载均衡以及基于TCP和HTTP应用的代理,支持虚拟主机,它是免费.快速并且可靠的一种解决方案.HAProxy特别适用于那些负载特大的web站点, ...
随机推荐
- PHP 快速建立一个对象
前言 PHP 中的数组(尤其关联数组)是经常使用的 —— 因为方便.在一些框架中也经常见到返回数组格式的配置参数.然而有些时候可能需要对象而非数组类型的配置参数,在查阅网络资料后找到了方法,作以记录. ...
- linux下的僵尸进程处理SIGCHLD信号【转】
转自:http://www.cnblogs.com/wuchanming/p/4020463.html 什么是僵尸进程? 首先内核会释放终止进程(调用了exit系统调用)所使用的所有存储区,关闭所有打 ...
- 64_n2
nodejs-from-0.1.3-4.fc26.noarch.rpm 11-Feb-2017 15:01 9982 nodejs-from2-2.1.0-6.fc26.noarch.rpm 11-F ...
- [转载]理解Tomcat的Classpath-常见问题以及如何解决
摘自: http://www.linuxidc.com/Linux/2011-08/41684.htm 在很多Apache Tomcat用户论坛,一个问题经常被提出,那就是如何配置Tomcat的cla ...
- spring中的任务调度Quartz
Spring 整合 Quartz 任务调度 主要有两种方式. Quartz的官网:http://www.quartz-scheduler.org/ 这两种只是一些配置文件简单配置就OK了,但是根本无法 ...
- tomcat已启动,使用maven的deploy发布后,根据路径打开浏览器访问时报错HTTP Status 500 - Error instantiating servlet class
web项目中请求出现错误,如下: HTTP Status 500 - Error instantiating servlet class XXXX类 type Exception report mes ...
- 自家人不认识自家人——考你一道有趣的Javascript小题目
今天的内容很简单,给大家分享一个有趣的Javascript小题目. 题目很简单,就是填空: var a = ______; var b = a; alert(a==b); // alert " ...
- go中操作json
package main import ( "encoding/json" "fmt" ) type Server struct { ServerName st ...
- java项目建立流程
spring mvc 书籍Spring in Action, 4th Edition java项目建立流程 1 使用maven来管理项目中的库.先用marven建立一个框架mvn archetype: ...
- eclipse 创建 maven 项目时如何修改 web 的版本和 jdk 的版本
eclipse 创建 maven 项目时如何修改 web 的版本和 jdk 的版本 在使用 eclipse 创建 maven 项目的时候,默认的 web.xml 的版本时 2.3,默认 jre 的版本 ...