使用spring + ActiveMQ 总结
使用spring + ActiveMQ 总结
目录[-]
- Spring 整合JMS 基于ActiveMQ 实现消息的发送接收
- 看了网上很多文件,最后总结出了自己需要的。
- 一、下载并安装ActiveMQ
- 首先我们到apache官网上下载activeMQ(http://activemq.apache.org/download.html),进行解压后运行其bin目录下面的activemq.bat文件启动activeMQ。
- 二、Spring中加入ActiveMQ的配置
- 首先将相关的jar拷贝到项目的lib文件下
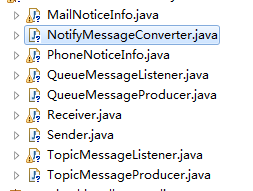
- 配置之前先看一下相关目录以便于理解
- 下面开始配置
- PhoneNoticeInfo
- QueueMessageProducer
- NotifyMessageConverter
- QueueMessageListener
Spring 整合JMS 基于ActiveMQ 实现消息的发送接收
看了网上很多文件,最后总结出了自己需要的。
一、下载并安装ActiveMQ
首先我们到apache官网上下载activeMQ(http://activemq.apache.org/download.html),进行解压后运行其bin目录下面的activemq.bat文件启动activeMQ。
二、Spring中加入ActiveMQ的配置
首先将相关的jar拷贝到项目的lib文件下
配置之前先看一下相关目录以便于理解
下面开始配置
<!-- ActiveMQ 连接工厂 -->
<!-- 真正可以产生Connection的ConnectionFactory,由对应的 JMS服务厂商提供-->
<bean id="connectinFactory" class="org.apache.activemq.ActiveMQConnectionFactory">
<!-- <property name="brokerURL" value="tcp://192.168.1.79:61616" /> -->
<property name="brokerURL" value="${mqUrl}" />
</bean>
<!-- Spring Caching连接工厂 -->
<!-- Spring用于管理真正的ConnectionFactory的ConnectionFactory -->
<bean id="cachingConnectionFactory"
class="org.springframework.jms.connection.CachingConnectionFactory">
<!-- 目标ConnectionFactory对应真实的可以产生JMS Connection的ConnectionFactory -->
<property name="targetConnectionFactory" ref="connectinFactory"></property>
<!-- Session缓存数量 -->
<property name="sessionCacheSize" value="10"></property>
</bean>
<!-- 配置消息发送目的地方式 -->
<!-- Queue队列:仅有一个订阅者会收到消息,消息一旦被处理就不会存在队列中 -->
<bean id="notifyQueue" class="org.apache.activemq.command.ActiveMQQueue">
<constructor-arg value="q.notify"></constructor-arg>
</bean>
<!-- 目的地:Topic主题 :放入一个消息,所有订阅者都会收到 -->
<!--这个是主题目的地,一对多的-->
<bean id="notifyTopic" class="org.apache.activemq.command.ActiveMQTopic">
<constructor-arg value="t.notify"></constructor-arg>
</bean>
<!-- Spring JMS Template 配置JMS模版 -->
<bean id="jmsTemplate" class="org.springframework.jms.core.JmsTemplate">
<property name="connectionFactory" ref="cachingConnectionFactory" />
</bean>
<!-- 使用Spring JmsTemplate 的消息生产者 -->
<bean id="queueMessageProducer" class="com.common.jms.QueueMessageProducer">
<property name="jmsTemplate" ref="jmsTemplate"></property>
<property name="notifyQueue" ref="notifyQueue"></property>
<property name="messageConverter" ref="messageConverter"></property>
</bean>
<bean id="topicMessageProducer" class="com.common.jms.TopicMessageProducer">
<property name="jmsTemplate" ref="jmsTemplate"></property>
<property name="notifyTopic" ref="notifyTopic"></property>
<property name="messageConverter" ref="messageConverter"></property>
</bean>
<!-- 消息消费者 一般使用spring的MDP异步接收Queue模式 -->
<!-- 消息监听容器 -->
<bean id="queueContainer"
class="org.springframework.jms.listener.DefaultMessageListenerContainer">
<property name="connectionFactory" ref="connectinFactory"></property>
<property name="destination" ref="notifyQueue"></property>
<property name="messageListener" ref="queueMessageListener"></property>
</bean>
<!-- 消息监听容器 -->
<bean id="topicContainer"
class="org.springframework.jms.listener.DefaultMessageListenerContainer">
<property name="connectionFactory" ref="connectinFactory"></property>
<property name="destination" ref="notifyTopic"></property>
<property name="messageListener" ref="topicMessageListener"></property>
<!-- 发布订阅模式 -->
<property name="pubSubDomain" value="true" />
</bean>
<!-- 异步接收消息处理类 -->
<bean id="queueMessageListener" class="com.common.jms.QueueMessageListener">
<property name="messageConverter" ref="messageConverter"></property>
</bean>
<bean id="topicMessageListener" class="com.common.jms.TopicMessageListener">
<property name="messageConverter" ref="messageConverter"></property>
</bean>
<bean id="messageConverter" class="com.common.jms.NotifyMessageConverter">
</bean>
下面展示一下Sender
public class Sender {
private static ServletContext servletContext;
private static WebApplicationContext ctx;
/**
* 发送点对点信息
* @param noticeInfo
*/
public static void setQueueSender(){
servletContext = ServletActionContext.getServletContext();
ctx = WebApplicationContextUtils.getWebApplicationContext(servletContext);
QueueMessageProducer notifyMessageProducer = ((QueueMessageProducer) ctx.getBean("queueMessageProducer"));
PhoneNoticeInfo noticeInfo = new PhoneNoticeInfo();
(下面先展示PhoneNoticeInfo 然后是 QueueMessageProducer )
noticeInfo.setNoticeContent("Hello Word");
noticeInfo.setNoticeTitle("hello Word");
noticeInfo.setReceiver("hello");
noticeInfo.setReceiverPhone("1111111");
notifyMessageProducer.sendQueue(noticeInfo);
}
public static ServletContext getServletContext() {
return servletContext;
}
public static void setServletContext(ServletContext servletContext) {
Sender.servletContext = servletContext;
}
public static WebApplicationContext getCtx() {
return ctx;
}
public static void setCtx(WebApplicationContext ctx) {
Sender.ctx = ctx;
}
}
PhoneNoticeInfo
public class PhoneNoticeInfo implements Serializable {
/** 消息标题 */
public String noticeTitle;
/** 消息内容 */
public String noticeContent;
/** 接收者 */
public String receiver;
/** 接收手机号 */
public String receiverPhone;
public String getNoticeTitle() {
return noticeTitle;
}
public void setNoticeTitle(String noticeTitle) {
this.noticeTitle = noticeTitle;
}
public String getNoticeContent() {
return noticeContent;
}
public void setNoticeContent(String noticeContent) {
this.noticeContent = noticeContent;
}
public String getReceiver() {
return receiver;
}
public void setReceiver(String receiver) {
this.receiver = receiver;
}
public String getReceiverPhone() {
return receiverPhone;
}
public void setReceiverPhone(String receiverPhone) {
this.receiverPhone = receiverPhone;
}
}
QueueMessageProducer
/**
* 消息生产者服务类
*/
public class QueueMessageProducer {
private JmsTemplate jmsTemplate;
private Destination notifyQueue;
private NotifyMessageConverter messageConverter;
public void sendQueue(PhoneNoticeInfo noticeInfo){
sendMessage(noticeInfo);
}
private void sendMessage(PhoneNoticeInfo noticeInfo) {
// TODO Auto-generated method stub
jmsTemplate.setMessageConverter(messageConverter);
jmsTemplate.setPubSubDomain(false);
jmsTemplate.convertAndSend(notifyQueue,noticeInfo);
}
public JmsTemplate getJmsTemplate() {
return jmsTemplate;
}
public void setJmsTemplate(JmsTemplate jmsTemplate) {
this.jmsTemplate = jmsTemplate;
}
public Destination getNotifyQueue() {
return notifyQueue;
}
public void setNotifyQueue(Destination notifyQueue) {
this.notifyQueue = notifyQueue;
}
public NotifyMessageConverter getMessageConverter() {
return messageConverter;
}
public void setMessageConverter(NotifyMessageConverter messageConverter) {
this.messageConverter = messageConverter;
}
}
NotifyMessageConverter
/**
* 消息转换
*/
public class NotifyMessageConverter implements MessageConverter {
private static Logger logger = LoggerFactory.getLogger(NotifyMessageConverter.class);
@Override
/**
* 转换接收到的消息为NoticeInfo对象
*/
public Object fromMessage(Message message) throws JMSException,
MessageConversionException {
// TODO Auto-generated method stub
if (logger.isDebugEnabled()) {
logger.debug("Receive JMS message :"+message);
}
if (message instanceof ObjectMessage) {
ObjectMessage oMsg = (ObjectMessage)message;
if (oMsg instanceof ActiveMQObjectMessage) {
ActiveMQObjectMessage aMsg = (ActiveMQObjectMessage)oMsg;
try {
PhoneNoticeInfo noticeInfo = (PhoneNoticeInfo)aMsg.getObject();
return noticeInfo;
} catch (Exception e) {
// TODO: handle exception
logger.error("Message:${} is not a instance of NoticeInfo."+message.toString());
throw new JMSException("Message:"+message.toString()+"is not a instance of NoticeInfo."+message.toString());
}
}else{
logger.error("Message:${} is not a instance of ActiveMQObjectMessage."+message.toString());
throw new JMSException("Message:"+message.toString()+"is not a instance of ActiveMQObjectMessage."+message.toString());
}
}else {
logger.error("Message:${} is not a instance of ObjectMessage."+message.toString());
throw new JMSException("Message:"+message.toString()+"is not a instance of ObjectMessage."+message.toString());
}
}
@Override
/**
* 转换NoticeInfo对象到消息
*/
public Message toMessage(Object obj, Session session) throws JMSException,
MessageConversionException {
// TODO Auto-generated method stub
if (logger.isDebugEnabled()) {
logger.debug("Convert Notify object to JMS message:${}"+obj.toString());
}
if (obj instanceof PhoneNoticeInfo) {
ActiveMQObjectMessage msg = (ActiveMQObjectMessage)session.createObjectMessage();
msg.setObject((PhoneNoticeInfo)obj);
return msg;
}else {
logger.debug("Convert Notify object to JMS message:${}"+obj.toString());
}
return null;
}
}
QueueMessageListener
public class QueueMessageListener implements MessageListener {
private static Logger logger = LoggerFactory.getLogger(QueueMessageListener.class);
private NotifyMessageConverter messageConverter;
/**
* 接收消息
*/
@Override
public void onMessage(Message message) {
// TODO Auto-generated method stub
try {
ObjectMessage objectMessage = (ObjectMessage)message;
PhoneNoticeInfo noticeInfo = (PhoneNoticeInfo)messageConverter.fromMessage(objectMessage);
System.out.println("queue收到消息"+noticeInfo.getNoticeContent());
System.out.println("model:"+objectMessage.getJMSDeliveryMode());
System.out.println("destination:"+objectMessage.getJMSDestination());
System.out.println("type:"+objectMessage.getJMSType());
System.out.println("messageId:"+objectMessage.getJMSMessageID());
System.out.println("time:"+objectMessage.getJMSTimestamp());
System.out.println("expiredTime:"+objectMessage.getJMSExpiration());
System.out.println("priority:"+objectMessage.getJMSPriority());
} catch (Exception e) {
// TODO: handle exception
logger.error("处理信息时发生异常",e);
}
}
public NotifyMessageConverter getMessageConverter() {
return messageConverter;
}
public void setMessageConverter(NotifyMessageConverter messageConverter) {
this.messageConverter = messageConverter;
}
}
使用spring + ActiveMQ 总结的更多相关文章
- spring +ActiveMQ 实战 topic selecter指定接收
spring +ActiveMQ 实战 topic selecter指定接收 queue:点对点模式,一个消息只能由一个消费者接受 topic:一对多,发布/订阅模式,需要消费者都在线(可能会导致信息 ...
- spring+activemq中多个consumer同时处理消息时遇到的性能问题
最近在做数据对接的工作,用到了activemq,我需要从activemq中接收消息并处理,但是我处理数据的步骤稍微复杂,渐渐的消息队列中堆的数据越来越多,就想到了我这边多开几个线程来处理消息. 可是会 ...
- Java ActiveMQ 讲解(二)Spring ActiveMQ整合+注解消息监听
对于ActiveMQ消息的发送,原声的api操作繁琐,而且如果不进行二次封装,打开关闭会话以及各种创建操作也是够够的了.那么,Spring提供了一个很方便的去收发消息的框架,spring jms.整合 ...
- spring activemq 整合
创建maven项目 项目目录结构为 首先配置相关maven依赖 <!-- 版本管理 --> <properties> <springframework>4.1.8. ...
- spring+activemq配置文件内容及实现原理
<?xml version="1.0" encoding="UTF-8"?> <beans xmlns="http://www.sp ...
- 基于Maven,Spring+ActiveMQ实现,贴近实际
本文只实现了Topic,queue改点配置就行了 一.pom依赖 Spring的太长了,具体可以看下面源码里面 <dependency> <groupId>org.apache ...
- spring+activemq实战之配置监听多队列实现不同队列消息消费
摘选:https://my.oschina.net/u/3613230/blog/1457227 摘要: 最近在项目开发中,需要用到activemq,用的时候,发现在同一个项目中point-to-po ...
- Spring ActiveMQ Caused By: javax.jms.IllegalStateException: Connection closed
根据 http://www.cnblogs.com/yshyee/p/7448808.html 进行JMS操作时,发送跟监听放到不同的项目中进行时,出现以下异常信息: org.springframew ...
- Spring ActiveMQ 整合(三): 确认机制ACK(收到消息后,应该有一个回应也就是确认答复)
https://blog.csdn.net/dly1580854879/article/details/68490197
随机推荐
- 娓娓道来c指针 (4)解析c的声明语句
(4)解析c的声明语句 在继续探索c指针之前.有必要来解析下c语言中复杂的声明语法. 仅仅须要记住两则:一个原则,一个规则. 原则:先看标示符. 规则:运算符优先级是规则. 举例说明 1.最简单的 i ...
- explain mysql性能优化
1 使用explain语句去查看分析结果,如 explain select * from test1 where id=1; 会出现: id selecttype table type po ...
- PHP安全细节(转)
一个常见的PHP安全细则 发布时间:2012-01-09 10:18:50 来源:51cto 评论:0 点击:9 次 [字号:大 中 小] PHP本身再老版本有一些问题,比如在 php4.3. ...
- POJ 3279 Fliptile (二进制+搜索)
[题目链接]click here~~ [题目大意]: 农夫约翰知道聪明的牛产奶多. 于是为了提高牛的智商他准备了例如以下游戏. 有一个M×N 的格子,每一个格子能够翻转正反面,它们一面是黑色,还有一面 ...
- android:hint属性对TextView的影响
近期看到同事写的一段代码,非常easy吧就是: <LinearLayout android:layout_width="wrap_content" android:layou ...
- express 设置header解决跨域问题
//设置跨域访问 app.all('*', function(req, res, next) { res.header("Access-Control-Allow-Origin", ...
- Spark in meituan http://tech.meituan.com/spark-in-meituan.html
Spark在美团的实践 忽略元数据末尾 回到原数据开始处 引言:Spark美团系列终于凑成三部曲了,Spark很强大应用很广泛, 文中Spark交互式开发平台和作业ETL模板的设计都很有启发借鉴意义. ...
- Sublime Text 使用指南 - 前端开发神器
Sublime Text 前端开发的神器 Sublime Text是一个前端开发者必备的编辑器,大量的插件,完善的功能,优越的性能,有非常多的特色,给前端开发提供了一个完善的开发条件. 本文主要介绍的 ...
- spring概念简介、bean扫描与注册实现方式
写在前面:本文作为整理,包含很多个人理解,有跳跃成份,初学者如果看晕了,可以先看其它同类文章,或者……多看几遍. 一.概念部分: 1.spring概念:网上有很多 2.spring核心:IOC(DI) ...
- ui-router详解(二)ngRoute工具区别
我们了解 angular.js 是一种富客户端单页面应用,所以要在一个页面呈现不同的视图,路由起到了至关重要的作用. angular.js 为我们封装好了一个路由工具 ngRoute ,它是一种靠ur ...


