微信小程序 主题皮肤切换(switch开关)
示例效果:

功能点分析:
1.点击switch开关,切换主题皮肤(包括标题栏、底部tabBar);
2.把皮肤设置保存到全局变量,在访问其它页面时也能有效果
3.把设置保存到本地,退出应用再进来时,依然加载上次设置的皮肤
步骤:
1、需要切换的皮肤:新建一个skin目录,下面写一个skin.wxss
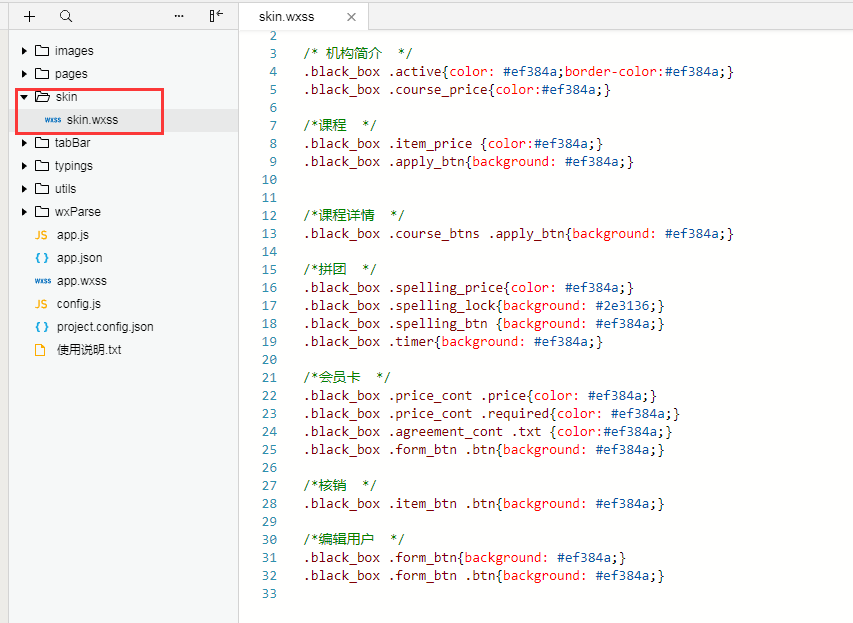
black_box就是最外面,也是最大的盒子(除了默认的page哈); black_box就是切换的皮肤;
还有关键一步,在app.wxss文件中把这个皮肤文件引入,因为换肤是所有页面都变化
@import "skin/skin.wxss";
通过控制skinStyle的值“black”来改变皮肤样式,我们还能写个blue_box的皮肤,然后设置变量为skinStyle为blue就行了
2、switch开关:
user.wxml:
user.js:根据皮肤开关设置皮肤模式(包括标题栏、tabBar等),并保存到本地; 最后,在每个页面,包括切换皮肤的页面的Page中的onLoad事件里,设置标题栏背景及SkinStyle的值;
const app = getApp()

Page({

  data: {

      skinStyle: '',

  },

  //皮肤开关

  switchChange: function (e) {

      var that = this;

      //开启

      if (e.detail.value == true) {

          app.globalData.skin = "black"

          app.setSkinBlackTitle(); //设置标题栏

          app.globalData.skinSwitch = true
          app.setBlackTabBar(); //设置tabBar
      } else {

          app.globalData.skin = 'normal'

          app.setSkinNormalTitle()

          app.globalData.skinSwitch = false
          app.setNormalTabBar();
      }

      that.setData({

          skinStyle: app.globalData.skin

      })

      //保存到本地

      wx.setStorage({

          key: "skin",

          data: app.globalData.skin

      })

      wx.setStorage({

          key: "skinSwitch",

          data: app.globalData.skinSwitch

      })

  },

  onLoad: function (options) {

      app.setNavBarBg();//设置标题栏背景色

      var that = this

      that.setData({

          skinStyle: app.globalData.skin,

          skinSwitch: app.globalData.skinSwitch

      })

  }

})
app.js:
在app.js的文件中,Page里的globalData中设置:skin:"normal",即默认为normal皮肤;tabBar数据配置;
我们要在程序打开时就获取皮肤设置,所以要在app.js去get与皮肤、标题、tabBar相关的信息:getSkin()
    //app.js

    App({

        onLaunch: function () {

            console.log('进入app');

            // 展示本地存储能力

            var logs = wx.getStorageSync('logs') || []

            logs.unshift(Date.now())

            wx.setStorageSync('logs', logs)

            this.login();


            this.getSkin();

        },

        globalData: {

            userInfo: null,

            skin: 'normal',

            skinSwitch: '',

        },

       //设置tabBar -- 默认模式

        setNormalTabBar(){

            wx.setTabBarItem({

                index: 0,

                text: '首页',

                iconPath: "images/icons/home_1.png",

                selectedIconPath: "images/icons/home_2.png",

            })

            wx.setTabBarItem({

                index: 1,

                text: '报名',

                iconPath: "images/icons/apply_1.png",

                selectedIconPath: "images/icons/apply_2.png",

            })

            wx.setTabBarItem({

                index: 2,

                text: '我的',

                iconPath: "images/icons/user_1.png",

                selectedIconPath: "images/icons/user_2.png",

            })

            wx.setTabBarStyle({

                color: '#7f8389',

                selectedColor: '#329fff',

                backgroundColor: '#f7f7fa',

                borderStyle: 'black'

            })

        },

       //设置tabBar -- 黑色模式

        setBlackTabBar(){

            wx.setTabBarItem({

                index: 0,

                text: '首页',

                iconPath: "images/icons/icon_home_1.png",

                selectedIconPath: "images/icons/icon_home_2.png",

            })

            wx.setTabBarItem({

                index: 1,

                text: '报名',

                iconPath: "images/icons/icon_apply_1.png",

                selectedIconPath: "images/icons/icon_apply_2.png",

            })

            wx.setTabBarItem({

                index:2,

                text: '我的',

                iconPath: "images/icons/icon_user_1.png",

                selectedIconPath: "images/icons/icon_user_2.png",

            })

            wx.setTabBarStyle({

                color: '#2e3136',

                selectedColor: '#ef384a',

                backgroundColor: '#ffffff',

                borderStyle: 'black'

            })

        },

        //皮肤

        getSkin: function () {

            var that = this

            wx.getStorage({

                key: 'skin',

                success: function (res) {

                    that.globalData.skin = res.data

                    if (that.globalData.skin == 'normal') {

                        that.globalData.skinSwitch = false

                        that.setSkinNormalTitle()

                        that.setNormalTabBar();

                    } else {

                        that.globalData.skinSwitch = true

                        that.setSkinBlackTitle()

                        that.setBlackTabBar()

                    }

                }

            })

        },

        //导航栏标题背景

        setNavBarBg: function () {

            var that = this

            if (that.globalData.skin == "normal") {

                that.setSkinNormalTitle()

            } else {

                that.setSkinBlackTitle()

            }

        },

        setSkinBlackTitle: function () {

            wx.setNavigationBarColor({

                frontColor: '#ffffff',

                backgroundColor: '#2e3136',

            })

        },

        setSkinNormalTitle: function () {

            wx.setNavigationBarColor({

                frontColor: '#000000',

                backgroundColor: '#ffffff',

            })

        },

    });
微信小程序 主题皮肤切换(switch开关)的更多相关文章
- 微信小程序换皮肤,动态切换菜单栏和导航栏的样式,动态修改TabBar和NavigationBar
在做微信小程序换皮肤的时候,需要动态修改菜单栏(TabBar)和导航栏(NavigationBar) 但是在小程序中它们的样式是写在app.json里面,而且app.json是静态编译,运行时哪怕你修 ...
- 微信小程序写tab切换
微信小程序之tab切换效果,如图: 最近在学习微信小程序并把之前的公司app搬到小程序上,挑一些实现效果记录一下(主要是官方文档里没说的,毕竟官方文档只是介绍功能) .wxml代码: <view ...
- 微信小程序Tab选项卡切换大集合
代码地址如下:http://www.demodashi.com/demo/14028.html 一.前期准备工作 软件环境:微信开发者工具 官方下载地址:https://mp.weixin.qq.co ...
- 微信小程序左右滑动切换页面示例代码--转载
微信小程序——左右滑动切换页面事件 微信小程序的左右滑动触屏事件,主要有三个事件:touchstart,touchmove,touchend. 这三个事件最重要的属性是pageX和pageY,表示X, ...
- 微信小程序开发--路由切换,页面重定向
这段时间开发了一个微信小程序,虽然小程序的导航API 官方文档写得很详细,但是在具体开发过程中还是会遇到很多不明白,或者一时转不过弯的地方. 1.页面切换传参,参数读取 1.1 wx.navigat ...
- 微信小程序左右滑动切换图片酷炫效果
开门见山,先上效果吧!感觉可以的用的上的再往下看. 心动吗?那就继续往下看! 先上页面结构吧,也就是wxml文件,其实可以理解成微信自己封装过的html,这个不多说了,不懂也没必要往下看了. < ...
- 微信小程序左右滑动切换图片酷炫效果(附效果)
开门见山,先上效果吧!感觉可以的用的上的再往下看. 心动吗?那就继续往下看! 先上页面结构吧,也就是wxml文件,其实可以理解成微信自己封装过的html,这个不多说了,不懂也没必要往下看了. < ...
- 微信小程序标签页切换
WXML中: <view class="swiper-tab"> <view class="swiper-tab-list {{currentTab== ...
- 微信小程序之 catalog 切换
组件名称:catalog 组件属性:catalogData,type:String 组件描述:这是一个子组件,数据从父组件中传递 效果图: catalog 目录为多个,使用 scroll-view 容 ...
随机推荐
- net core静态文件 访问除默认目录文件配置
在我们项目的实际应用中,不光是需要访问默认静态文件夹 wwwroot ,还有可能要要去访问除默认目录以外的文件夹,接下来我们进行配置 1.在根目录创建一个文件夹,继续创建它的子文件夹Images,在I ...
- Jmeter-【JSON Extractor】-响应结果中三级key取值
一.请求返回样式 二.取第三个option 三.查看结果
- NX二次开发-UFUN设置对象线型UF_OBJ_set_font
#include <uf.h> #include <uf_modl.h> #include <uf_obj.h> UF_initialize(); //创建块 UF ...
- Java-Class-C:org.springframework.http.ResponseEntity
ylbtech-Java-Class-C:org.springframework.http.ResponseEntity 1.返回顶部 1. org.springframework.http Clas ...
- hexo next主题深度优化(二),懒加载。
文章目录 tip:没有耐心的可以直接看:正式在hexo next中加入懒加载(最下面) 废话 背景 懒加载简单介绍 引入js 重点!敲黑板了!!! 完善懒加载函数 懒加载函数可配置的参数 正式在hex ...
- 可搭建SS服务上网的不限流量VPS推荐
https://itldc.com/en,7个机房,推荐指数:★★★★ 1995年运作至今,有多个机房,包括:新加坡.洛杉矶.新泽西.立陶宛.乌克兰.保加利亚.荷兰.VPS特征: KVM虚拟(支持BB ...
- KNN 实战
KNN算法很简单,大致的工作原理是:给定训练数据样本和标签,对于某测试的一个样本数据,选择距离其最近的k个训练样本,这k个训练样本中所属类别最多的类即为该测试样本的预测标签.简称kNN.通常k是不大于 ...
- Ubuntu环境下Postgres源码文件编译安装步骤
step1:官网下载postgres源码 URL:https://www.postgresql.org/ftp/source/ step2:解压源码文件 tar -zxvf postgresql-12 ...
- 调用第三方jar包_md5加密
vars.put是转换成jmeter格式
- hive sparksession查询只显示defalt库问题
1.spark环境记得拷贝进hive.xml 2.SparkSession.builder().enableHiveSupport()记得加上enableHiveSupport 3.window记得w ...