Asp.net MVC]Asp.net MVC5系列——Routing特性
目录
系列文章
[Asp.net MVC]Asp.net MVC5系列——第一个项目
[Asp.net MVC]Asp.net MVC5系列——添加视图
[Asp.net MVC]Asp.net MVC5系列——添加模型
[Asp.net MVC]Asp.net MVC5系列——从控制器访问模型中的数据
[Asp.net MVC]Asp.net MVC5系列——添加数据
[Asp.net MVC]Asp.net MVC5系列——在模型中添加验证规则
[Asp.net MVC]Asp.net MVC5系列——实现编辑、删除与明细信息视图
[Asp.net MVC]Asp.net MVC5系列——Razor语法
概述
ASP.NET MVC 5支持一种新的路由协议,称为路由特性。顾名思义,路由特性使用特性来定义路径。路由特性使你的Web应用程序URI有了更多的控制。当然,MVC5也支持以前定义路由的方式,你可以在一个项目中混合使用这两种方式来定义路由。
路由特性
例如,一个电子商务网站可能有以下的路由规则:
{productId:int}/{productTitle}

Mapped to ProductsController.Show(int id)

{username}

Mapped to ProfilesController.Show(string username)

{username}/catalogs/{catalogId:int}/{catalogTitle}

Mapped to CatalogsController.Show(string username, int catalogId)
以往的ASP.NET MVC版本,该规则将设置在routeconfig.cs文件中,并指出实际控制器的Action方法,如:
1 routes.MapRoute(

2     name: "ProductPage",

3     url: "{productId}/{productTitle}",

4     defaults: new { controller = "Products", action = "Show" },

5     constraints: new { productId = "\\d+" }

6 );
当路由的定义与Action方法,在同一个源文件中而不是在外部配置类中声明,它可以更容易的处理URI和行动之间的映射的。以前的路径定义将使用以下,简单的特性就可以达到目的:
1 [Route("{productId:int}/{productTitle}")]

2 public ActionResult Show(int productId) { ... }
使用路由特性
首先得启用Attribute路由,我们可以调用MapMvcAttributeRoutes方法来启用Attribute路由:

1 public class RouteConfig

2 {

3     public static void RegisterRoutes(RouteCollection routes)

4     {

5         routes.IgnoreRoute("{resource}.axd/{*pathInfo}");

6

7         routes.MapMvcAttributeRoutes();

8     }

9 }
也可以和常规的路由设置一起使用。
 1 public static void RegisterRoutes(RouteCollection routes)

 2 {

 3     routes.IgnoreRoute("{resource}.axd/{*pathInfo}");

 4

 5     routes.MapMvcAttributeRoutes();

 6

 7     routes.MapRoute(

 8         name: "Default",

 9         url: "{controller}/{action}/{id}",

10         defaults: new { controller = "Home", action = "Index", id = UrlParameter.Optional }

11     );

12 }
可选URI参数和参数的默认值
可以通过添加“?”标记一个参数为可选的参数,也可以为表单参数设置默认值(参数=value)。
 1 public class BooksController : Controller

 2 {

 3     // eg: /books

 4     // eg: /books/1430210079

 5     [Route("books/{isbn?}")]

 6     public ActionResult View(string isbn)

 7     {

 8         if (!String.IsNullOrEmpty(isbn))

 9         {

10             return View("OneBook", GetBook(isbn));

11         }

12         return View("AllBooks", GetBooks());

13     }

14

15     // eg: /books/lang

16     // eg: /books/lang/en

17     // eg: /books/lang/he

18     [Route("books/lang/{lang=en}")]

19     public ActionResult ViewByLanguage(string lang)

20     {

21         return View("OneBook", GetBooksByLanguage(lang));

22     }

23 }
在上面的例子中,/books和/books/1430210079将路由到View方法,前者将返回所有书的列表信息,后者将返回特定的书的信息。/books/lang和/books/lang/en将采用同样的方式。
路由前缀
在同一个控制器里面,路由以相同的前缀开始,例如:
 1 public class ReviewsController : Controller

 2 {

 3     // eg: /reviews

 4     [Route("reviews")]

 5     public ActionResult Index() { ... }

 6     // eg: /reviews/5

 7     [Route("reviews/{reviewId}")]

 8     public ActionResult Show(int reviewId) { ... }

 9     // eg: /reviews/5/edit

10     [Route("reviews/{reviewId}/edit")]

11     public ActionResult Edit(int reviewId) { ... }

12 }
你可以通过使用[routeprefix ]特性整个控制器设定一个共同的前缀:
 1 [RoutePrefix("reviews")]

 2 public class ReviewsController : Controller

 3 {

 4     // eg.: /reviews

 5     [Route]

 6     public ActionResult Index() { ... }

 7     // eg.: /reviews/5

 8     [Route("{reviewId}")]

 9     public ActionResult Show(int reviewId) { ... }

10     // eg.: /reviews/5/edit

11     [Route("{reviewId}/edit")]

12     public ActionResult Edit(int reviewId) { ... }

13 }
如果需要定义不同的路由前缀,可以在方法特性上使用波浪号~覆盖原来的前缀,例如:
1 [RoutePrefix("reviews")]

2 public class ReviewsController : Controller

3 {

4     // eg.: /spotlight-review

5     [Route("~/spotlight-review")]

6     public ActionResult ShowSpotlight() { ... }

7

8     ...

9 }
默认路由
你也可以运用在控制器级别的[路径]特性,将Action方法作为一个参数。该路由将被应用在控制器中的所有Action方法,除非Action方法使用了一个具体的[路由]特性,否则将使用控制器级别的默认路由。
 1 [RoutePrefix("promotions")]

 2 [Route("{action=index}")]

 3 public class ReviewsController : Controller

 4 {

 5     // eg.: /promotions

 6     public ActionResult Index() { ... }

 7

 8     // eg.: /promotions/archive

 9     public ActionResult Archive() { ... }

10

11     // eg.: /promotions/new

12     public ActionResult New() { ... }

13

14     // eg.: /promotions/edit/5

15     [Route("edit/{promoId:int}")]

16     public ActionResult Edit(int promoId) { ... }

17 }
由上可知,Action方法的路由特性的优先级大于控制器路由特性的优先级。
路由约束
路由约束,使你限制路由模版中的参数是如何匹配的,一般的语法为{parameter:constraint},例如:
1 // eg: /users/5

2 [Route("users/{id:int}"]

3 public ActionResult GetUserById(int id) { ... }

4

5 // eg: users/ken

6 [Route("users/{name}"]

7 public ActionResult GetUserByName(string name) { ... }
这里,如果id为int类型,将选择第一个路由,否则选择第二个路由。
下表列出了支持的约束:
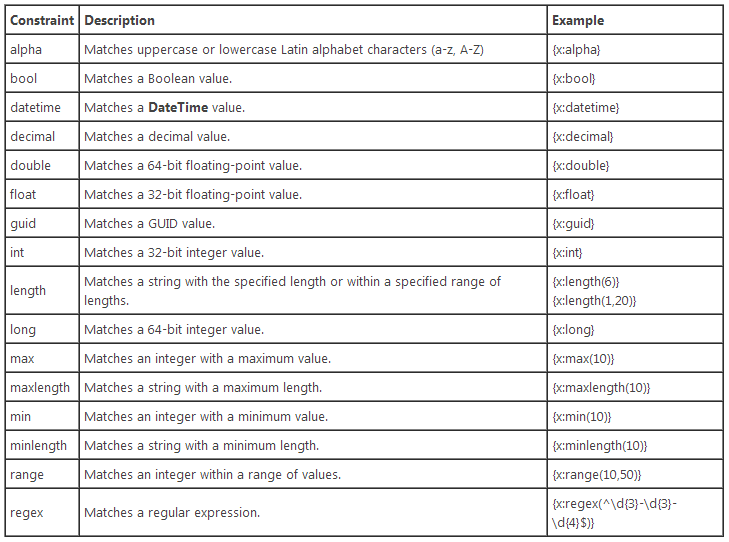
注意,其中一些带min的约束,可以带参数。
你也可以在一个参数上应用多个约束,多个约束以分号";"分割,例如:
1 // eg: /users/5

2 // but not /users/10000000000 because it is larger than int.MaxValue,

3 // and not /users/0 because of the min(1) constraint.

4 [Route("users/{id:int:min(1)}")]

5 public ActionResult GetUserById(int id) { ... }
通过问号"?"可以在内联约束中指定可选参数,例如:
1 // eg: /greetings/bye

2 // and /greetings because of the Optional modifier,

3 // but not /greetings/see-you-tomorrow because of the maxlength(3) constraint.

4 [Route("greetings/{message:maxlength(3)?}")]

5 public ActionResult Greet(string message) { ... }
自定义路由约束
可以通过实现接口IRouteConstraint 自定义路由约束,例如,定义一个参数有效性的约束:
 1 public class ValuesConstraint : IRouteConstraint

 2 {

 3     private readonly string[] validOptions;

 4     public ValuesConstraint(string options)

 5     {

 6         validOptions = options.Split('|');

 7     }

 8

 9     public bool Match(HttpContextBase httpContext, Route route, string parameterName, RouteValueDictionary values, RouteDirection routeDirection)

10     {

11         object value;

12         if (values.TryGetValue(parameterName, out value) && value != null)

13         {

14             return validOptions.Contains(value.ToString(), StringComparer.OrdinalIgnoreCase);

15         }

16         return false;

17     }

18 }
然后将自定义的约束进行注册:
 1 public class RouteConfig

 2 {

 3     public static void RegisterRoutes(RouteCollection routes)

 4     {

 5         routes.IgnoreRoute("{resource}.axd/{*pathInfo}");

 6

 7         var constraintsResolver = new DefaultInlineConstraintResolver();

 8

 9         constraintsResolver.ConstraintMap.Add("values", typeof(ValuesConstraint));

10

11         routes.MapMvcAttributeRoutes(constraintsResolver);

12     }

13 }
现在,你就可以在你的路由中使用该自定义的约束了
1 public class TemperatureController : Controller

2 {

3     // eg: temp/celsius and /temp/fahrenheit but not /temp/kelvin

4     [Route("temp/{scale:values(celsius|fahrenheit)}")]

5     public ActionResult Show(string scale)

6     {

7         return Content("scale is " + scale);

8     }

9 }
路由名
你可以为一个路由指定一个名称,以便生成相应的url。例如:
1 [Route("menu", Name = "mainmenu")]

2 public ActionResult MainMenu() { ... }
你可以使用 Url.RouteUrl 来生成相应的 URL
1 <a href="@Url.RouteUrl("mainmenu")">Main menu</a>
区域(Area)
你可以使用特性[RouteArea]指定一个控制器属于某个区域,当这样做时,你可以安全的移除该区域的AreaRegistration 类:
 1 [RouteArea("Admin")]

 2 [RoutePrefix("menu")]

 3 [Route("{action}")]

 4 public class MenuController : Controller

 5 {

 6     // eg: /admin/menu/login

 7     public ActionResult Login() { ... }

 8

 9     // eg: /admin/menu/show-options

10     [Route("show-options")]

11     public ActionResult Options() { ... }

12

13     // eg: /stats

14     [Route("~/stats")]

15     public ActionResult Stats() { ... }

16 }
使用该控制器,下面的链接将产生下面的url:"/Admin/menu/show-options"
Url.Action("Options", "Menu", new { Area = "Admin" })
你也可以使用AreaPrefix参数建立一个自定义的区域前缀,例如:
[RouteArea("BackOffice", AreaPrefix = "back-office")]
如果你同时使用带有路由特性的区域和带有(AreaRegistration 类创建的)传统路由的区域这两种方式 的话,你应该在配置MVC路由特性之后,默认传统路由之前注册区域,原因很简单,路由注册顺序必须是从最精确的匹配规则开始再到普通的匹配规则,最后才是模糊的匹配规则,这样就避免了在进行路由匹配时,过早的匹配了模糊规则,而相对精确的匹配起不到任何作用。下面的例子展示了这一点:
 1 public static void RegisterRoutes(RouteCollection routes)

 2 {

 3     routes.IgnoreRoute("{resource}.axd/{*pathInfo}");

 4

 5     routes.MapMvcAttributeRoutes();

 6

 7     AreaRegistration.RegisterAllAreas();

 8

 9     routes.MapRoute(

10         name: "Default",

11         url: "{controller}/{action}/{id}",

12         defaults: new { controller = "Home", action = "Index", id = UrlParameter.Optional }

13     );

14 }
总结
本文主要学习了asp.net mvc5路由的新特性,在查看mvc5的资料的时候,看到的一篇文章,觉得不错,就认真的看了一遍,试着用自己的语言翻译了原文,也许有翻译不到位的地方,望谅解,如果你英语不错,也可以参考原文。
原文地址:http://blogs.msdn.com/b/webdev/archive/2013/10/17/attribute-routing-in-asp-net-mvc-5.aspx
Asp.net MVC]Asp.net MVC5系列——Routing特性的更多相关文章
- [Asp.net MVC]Asp.net MVC5系列——布局视图
目录 系列文章 概述 布局视图 系列文章 [Asp.net MVC]Asp.net MVC5系列——第一个项目 [Asp.net MVC]Asp.net MVC5系列——添加视图 [Asp.net M ...
- [Asp.net MVC]Asp.net MVC5系列——在模型中添加验证规则
目录 概述 在模型中添加验证规则 自定义验证规则 伙伴类的使用 总结 系列文章 [Asp.net MVC]Asp.net MVC5系列——第一个项目 [Asp.net MVC]Asp.net MVC5 ...
- [Asp.net MVC]Asp.net MVC5系列——添加视图
目录 系列文章 概述 添加视图 总结 系列文章 [Asp.net MVC]Asp.net MVC5系列——第一个项目 概述 在这一部分我们添加一个新的控制器HelloWorldController类, ...
- [Asp.net MVC]Asp.net MVC5系列——添加模型
目录 概述 添加模型 总结 系列文章 [Asp.net MVC]Asp.net MVC5系列——第一个项目 [Asp.net MVC]Asp.net MVC5系列——添加视图 概述 在本节中我们将追加 ...
- [Asp.net MVC]Asp.net MVC5系列——从控制器访问模型中的数据
目录 概述 从控制器访问模型中的数据 强类型模型与@model关键字 总结 系列文章 [Asp.net MVC]Asp.net MVC5系列——第一个项目 [Asp.net MVC]Asp.net M ...
- [Asp.net MVC]Asp.net MVC5系列——添加数据
目录 概述 显示添加数据时所用表单 处理HTTP-POST 总结 系列文章 [Asp.net MVC]Asp.net MVC5系列——第一个项目 [Asp.net MVC]Asp.net MVC5系列 ...
- Asp.net MVC]Asp.net MVC5系列——实现编辑、删除与明细信息视图
目录 概述 实现信息的明细视图 实现信息的编辑视图 实现信息的删除视图 总结 系列文章 [Asp.net MVC]Asp.net MVC5系列——第一个项目 [Asp.net MVC]Asp.net ...
- Asp.net MVC]Asp.net MVC5系列——在模型中添加
目录 概述 在模型中添加验证规则 自定义验证规则 伙伴类的使用 总结 系列文章 [Asp.net MVC]Asp.net MVC5系列——第一个项目 [Asp.net MVC]Asp.net MVC5 ...
- Asp.net mvc项目架构分享系列之架构概览
Asp.net mvc项目架构分享系列之架构概览 Contents 系列一[架构概览] 0.项目简介 1.项目解决方案分层方案 2.所用到的技术 3.项目引用关系 系列二[架构搭建初步] 4.项目架构 ...
随机推荐
- 【转载】MongoDB集群和实战详解
1.概述 最近有同学和网友私信我,问我MongoDB方面的问题:这里我整理一篇博客来赘述下MongoDB供大家学习参考,博客的目录内容如下: 基本操作 CRUD MapReduce 本篇文章是基于Mo ...
- 【转】 Android定时器
转载自:http://www.android-study.com/pingtaikaifa/508.html 在Android开发中,定时器一般有以下3种实现方法: 一.采用Handler与线程的sl ...
- SpringBoot------注解把配置文件自动映射到属性和实体类
1.映射到属性 package top.ytheng.demo.controller; import org.springframework.beans.factory.annotation.Valu ...
- Eclipse------新建文件时没有JSP File解决方法
1.为没有web选项的eclipse添加web and JavaEE插件 .在Eclipse中菜单help选项中选择install new software选项 .在work with 栏中输入 Ju ...
- Oracle的动态SQL
例1:传递表名,和Where条件删除数据 CREATE OR REPLACE PROCEDURE raise_emp_salary (column_value NUMBER, emp_column V ...
- pycharm 激活
方法1: (1)更新**hosts**文件 [hosts文件百度云下载地址](https://pan.baidu.com/s/1o9ZujxS) **hosts**文件在windows中的地址为: C ...
- MD5加密与base64编码
转自:http://blog.csdn.net/sxzlc/article/details/74127268 import java.io.UnsupportedEncodingException; ...
- iOS - UICollectionView 瀑布流 添加表头视图的坑
UICollectionView 瀑布流 添加表头视图的坑 首先是,需求加了个头视图在顶部,在collectionView中的头视图跟TableView的不一样,TableView的表头只要设置tab ...
- 122、详解Glide图片加载库常用方法
转载:http://blog.csdn.net/android_xiong_st/article/details/53129256 Glide加载网络图片, 显示的还是以前的图片! (最全解决方案!) ...
- WP8.1学习系列(第十二章)——全景控件Panorama开发指南
2014/6/18 适用于:Windows Phone 8 和 Windows Phone Silverlight 8.1 | Windows Phone OS 7.1 全景体验是本机 Windows ...